VTS 模型設定

Once you have loaded a model, you will be able to access the model settings in the VTube Studio model config tab.
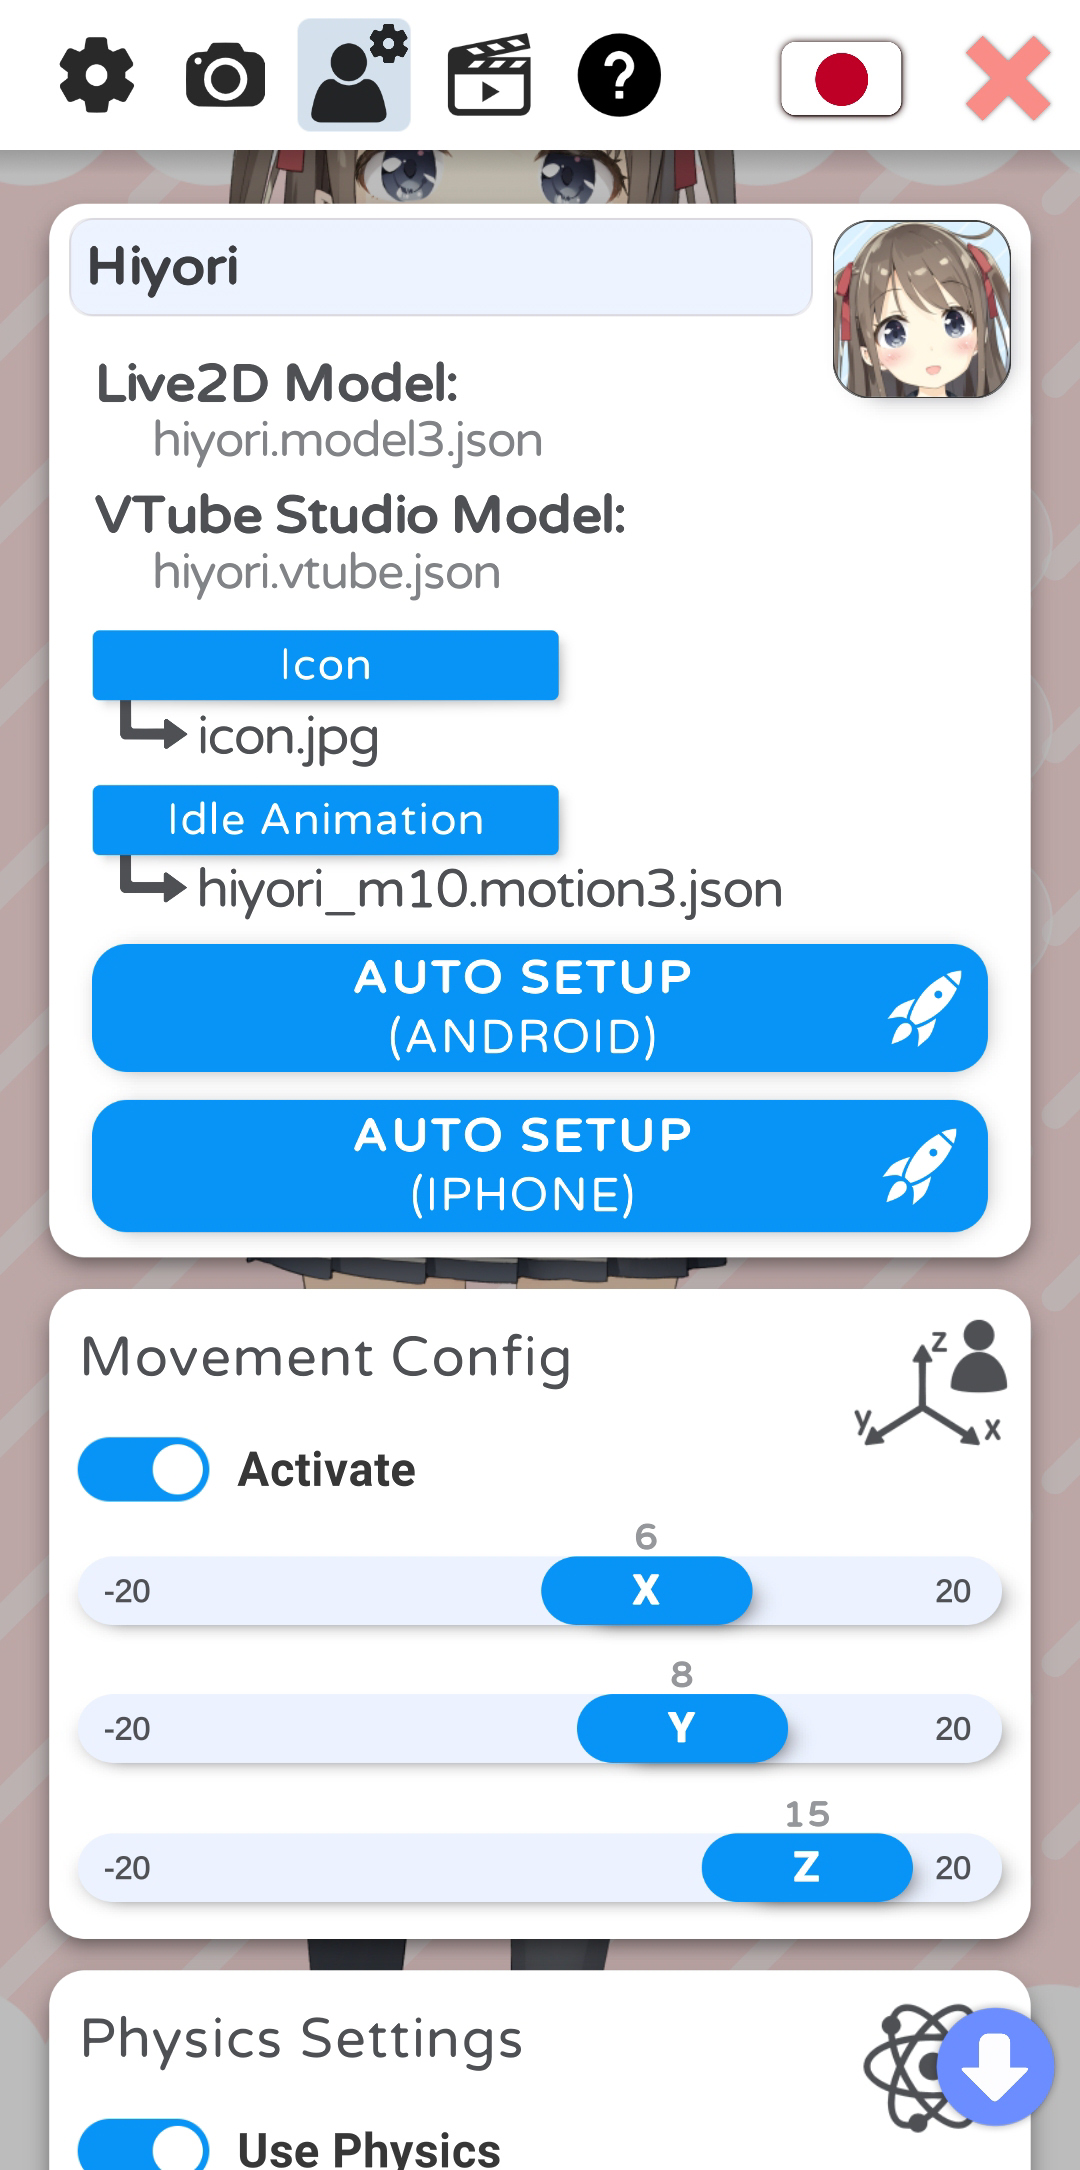
At the top, you can enter a name for your model. This name will be shown in the model selection bar. Below that, you can see the name of the Live2D model file and the automatically created VTube Studio model file (VTS model).
You can choose an icon (.jpg or .png, click icon at top right to open file selection) and default idle animation (.motion3.json) for your model. You can choose from any file inside your model folder.
You can also run the auto-setup for your VTube Studio model. This will set up your model based on standard Live2D parameter names and values. For more information about these parameters, please see: https://docs.live2d.com/cubism-editor-manual/standard-parametor-list/#
If you change the parameter IDs or ranges, auto-setup will not be able to set up your model and you'll have to do it manually. Even if you use auto-setup, you may have to fine-tune your VTS model to fit your Live2D model.
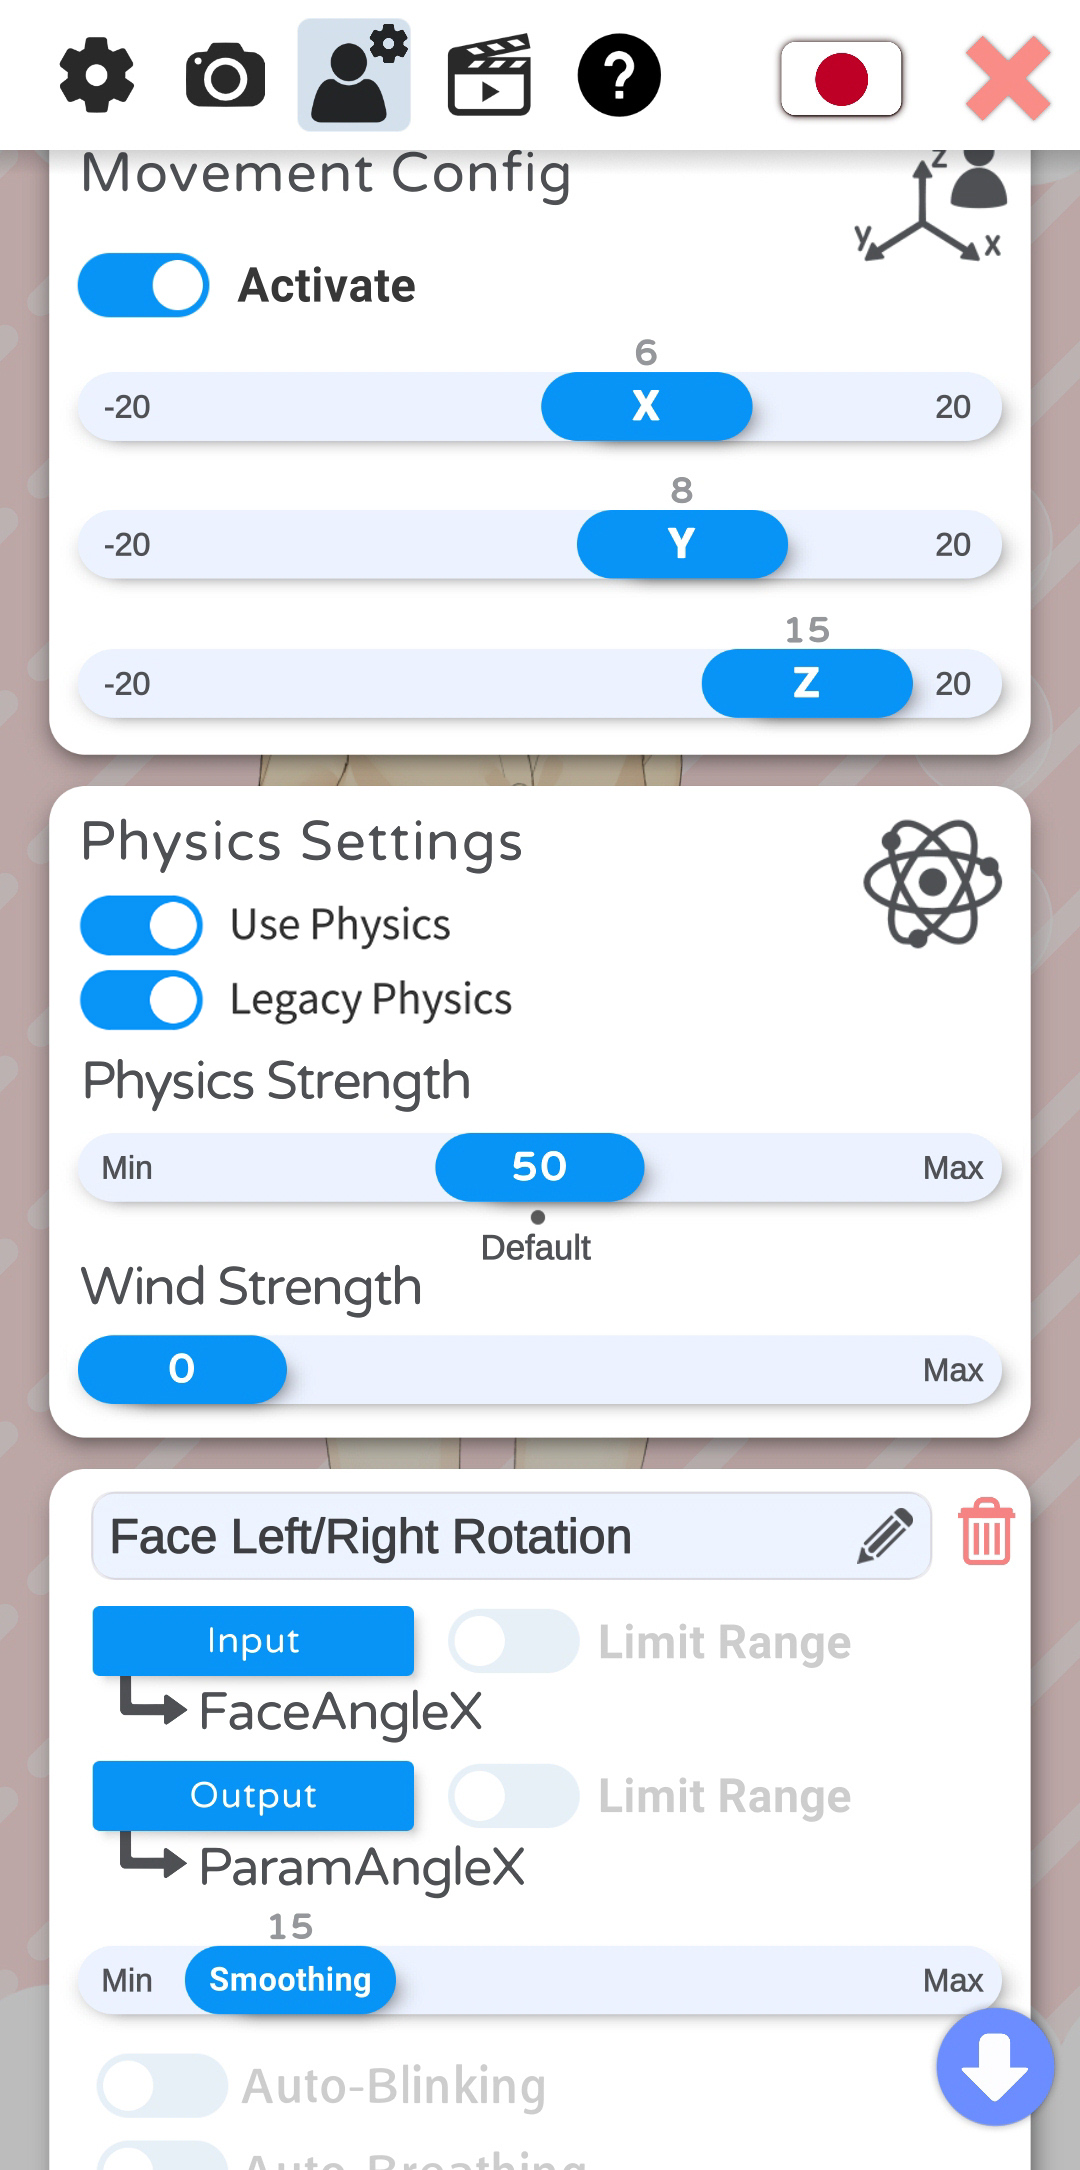
With the "Movement Config" settings, you can move the model left/right and closer/further away from the screen based on your head position. With the sliders, you can configure how much the model is moved.
Here, you can boost or reduce the effect of your Live2D physics setup. You can also activate “wind”, which will randomly apply a wind-like force to the physics system. This is experimental and may not look good depending on how your model is set up.
You can also set a multiplier between 0 and 2 (default is 1) for physics strength and wind strength per physics group in your Live2D model by clicking the small gear icon next to the "Physics Strength" and "Wind Strength" sliders.
VTube Studio used to ignore the Live2D physics setting "Effectiveness". This has been fixed in a recent update. To turn on "Effectiveness", make sure the "Legacy Physics toggle is off.
You can also set the physics framerate for the model here. This allows you to calculate the model physics at a fixed framerate instead of the normal app framerate, which might depend on the monitor refresh rate if you're using VSync. Live2D modellers typically use a certain framerate in the physics editor window when modeling the physics, so you might want to set that same framerate here.
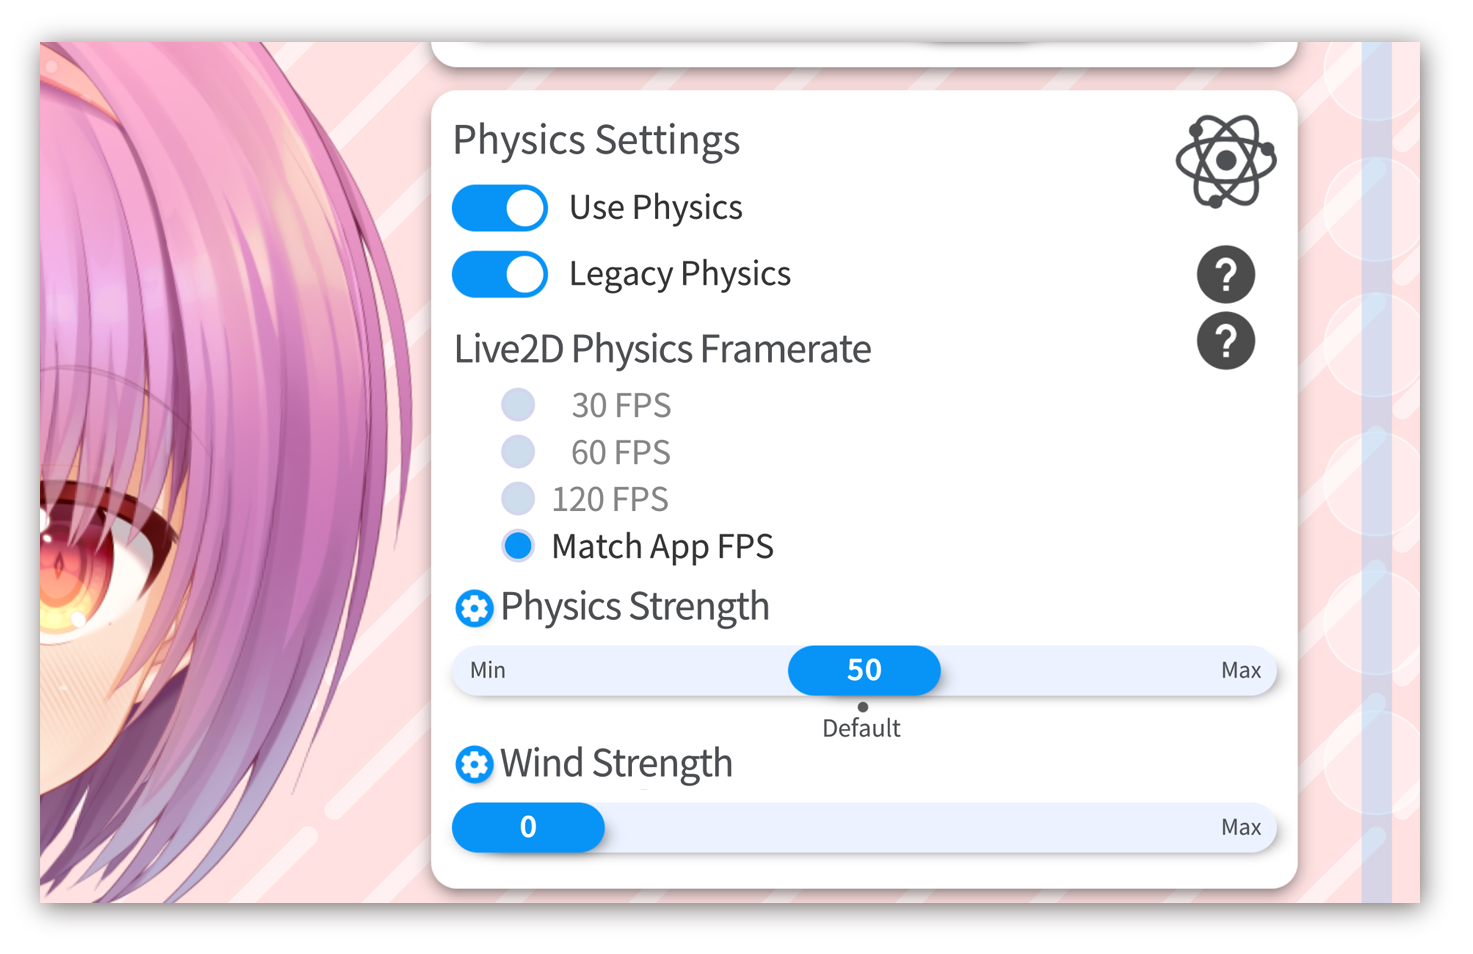
Please note that having this at anything other than "Match App FPS" uses multithreaded physics calculations, which is currently considered experimental. Use with caution and report any issues you have with this in the VTube Studio Discord.
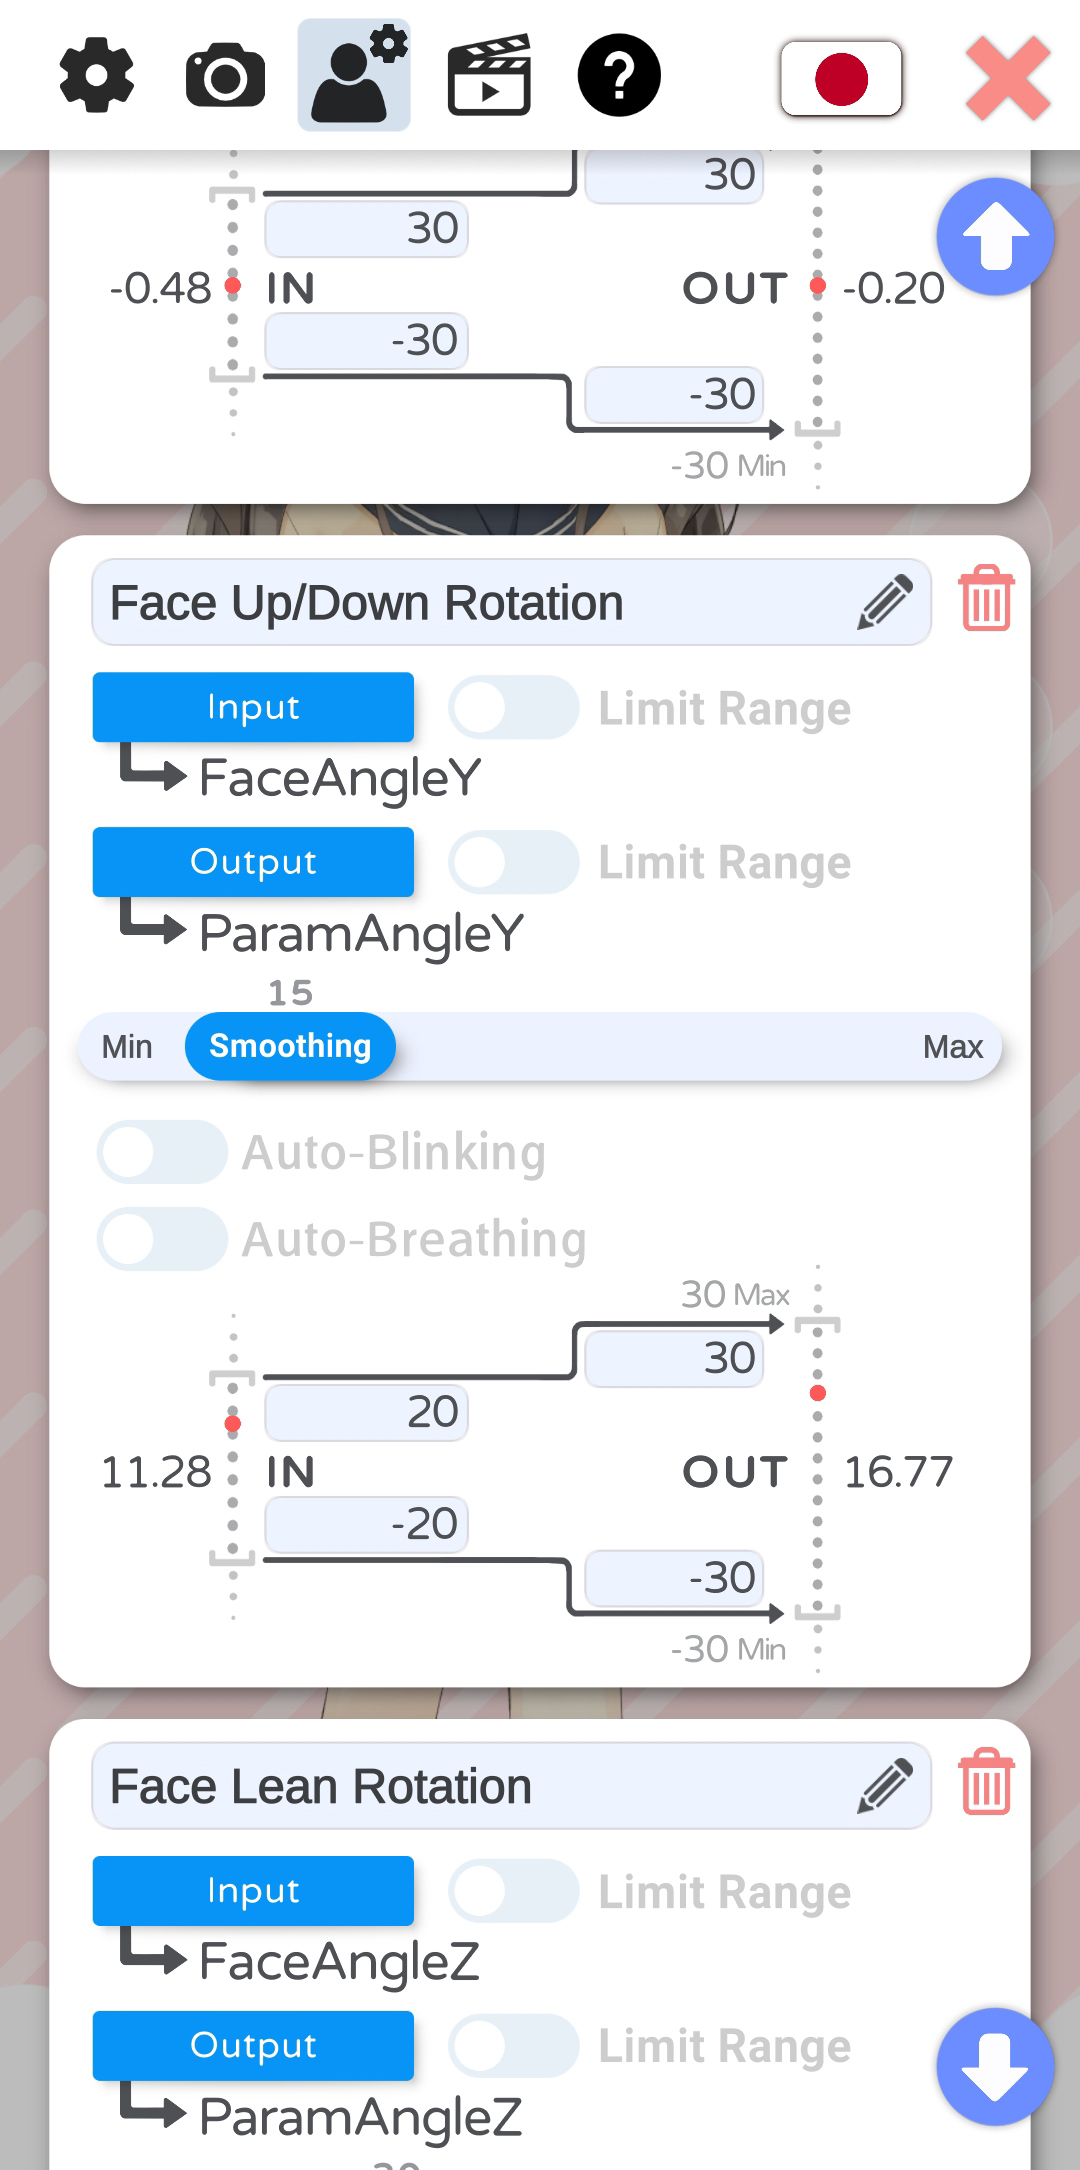
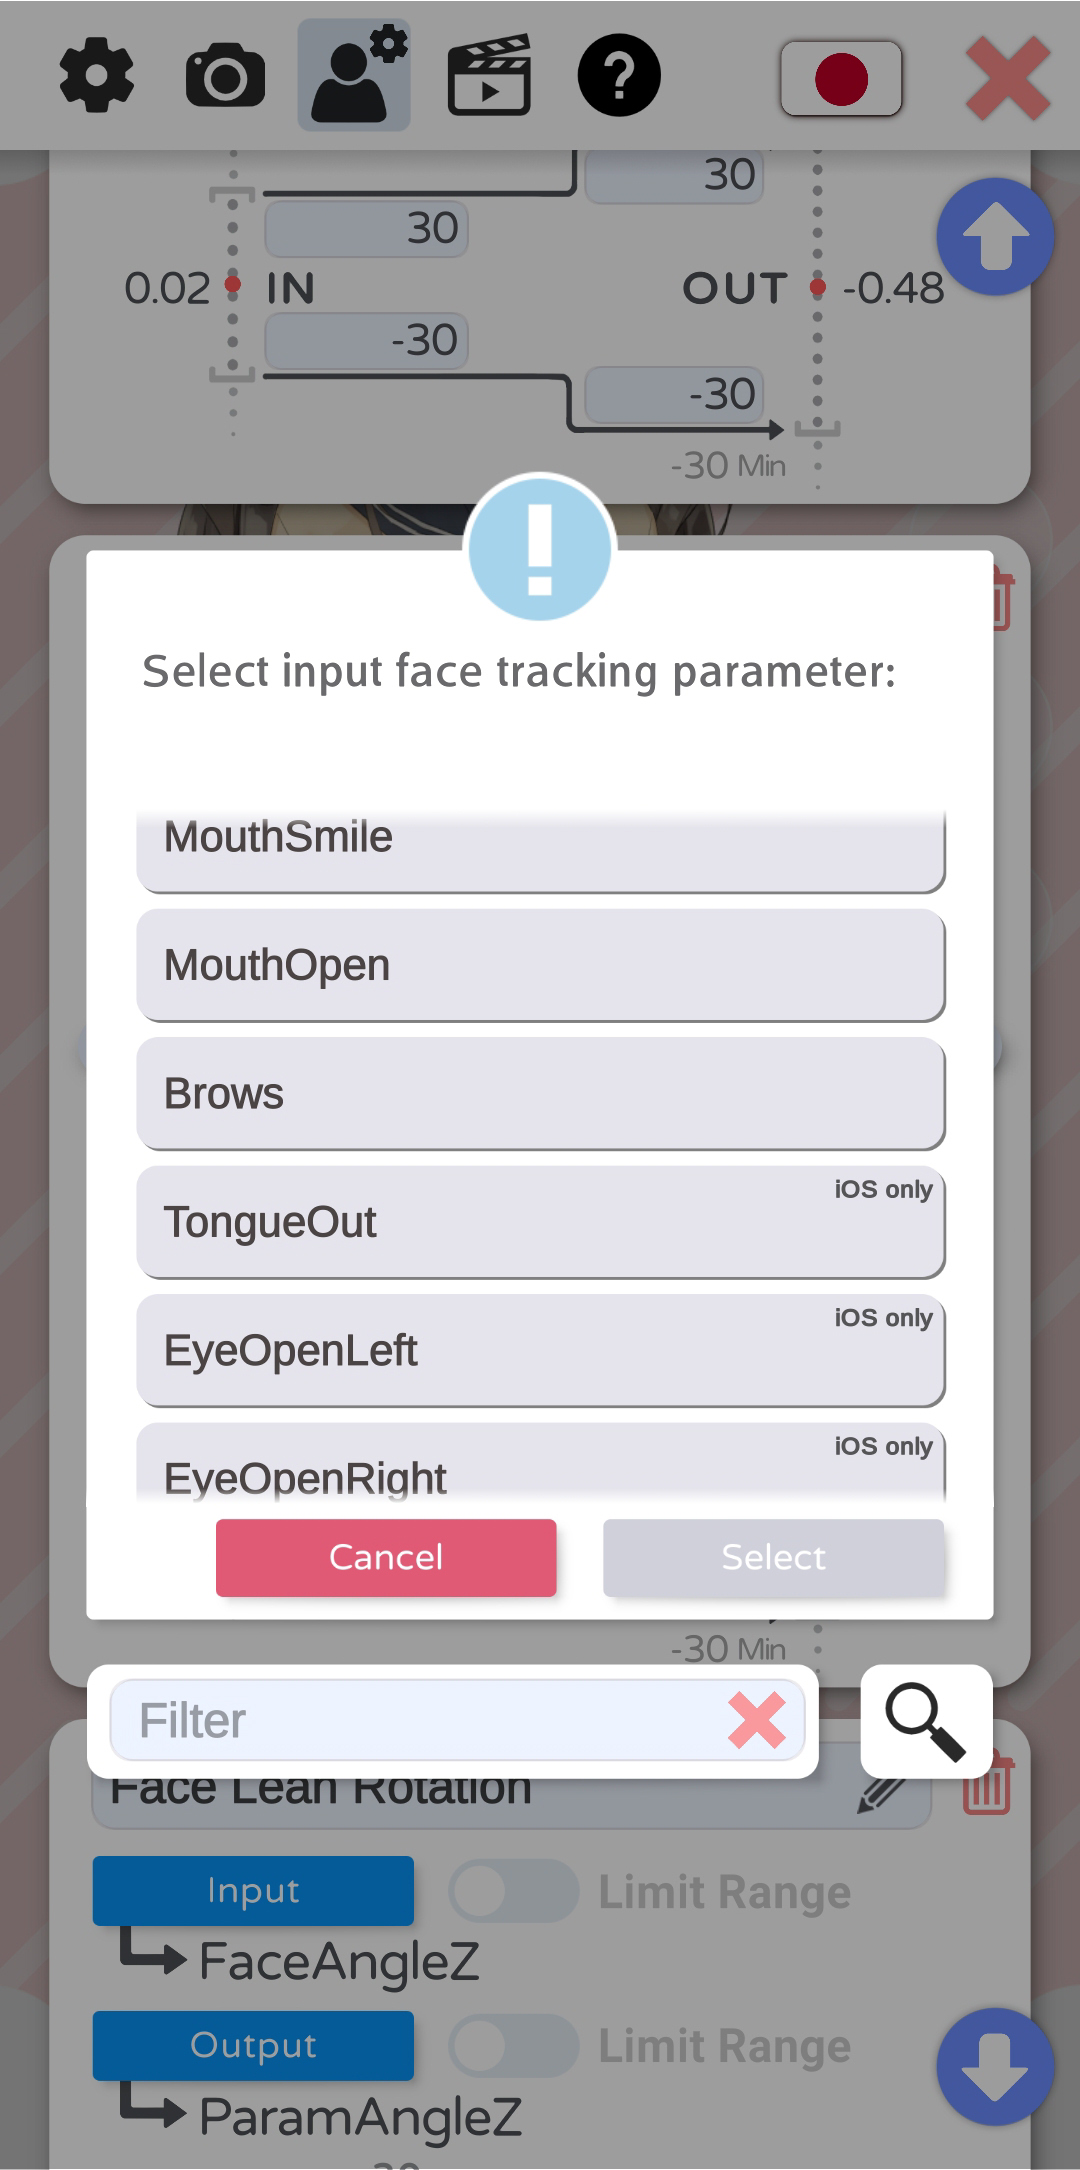
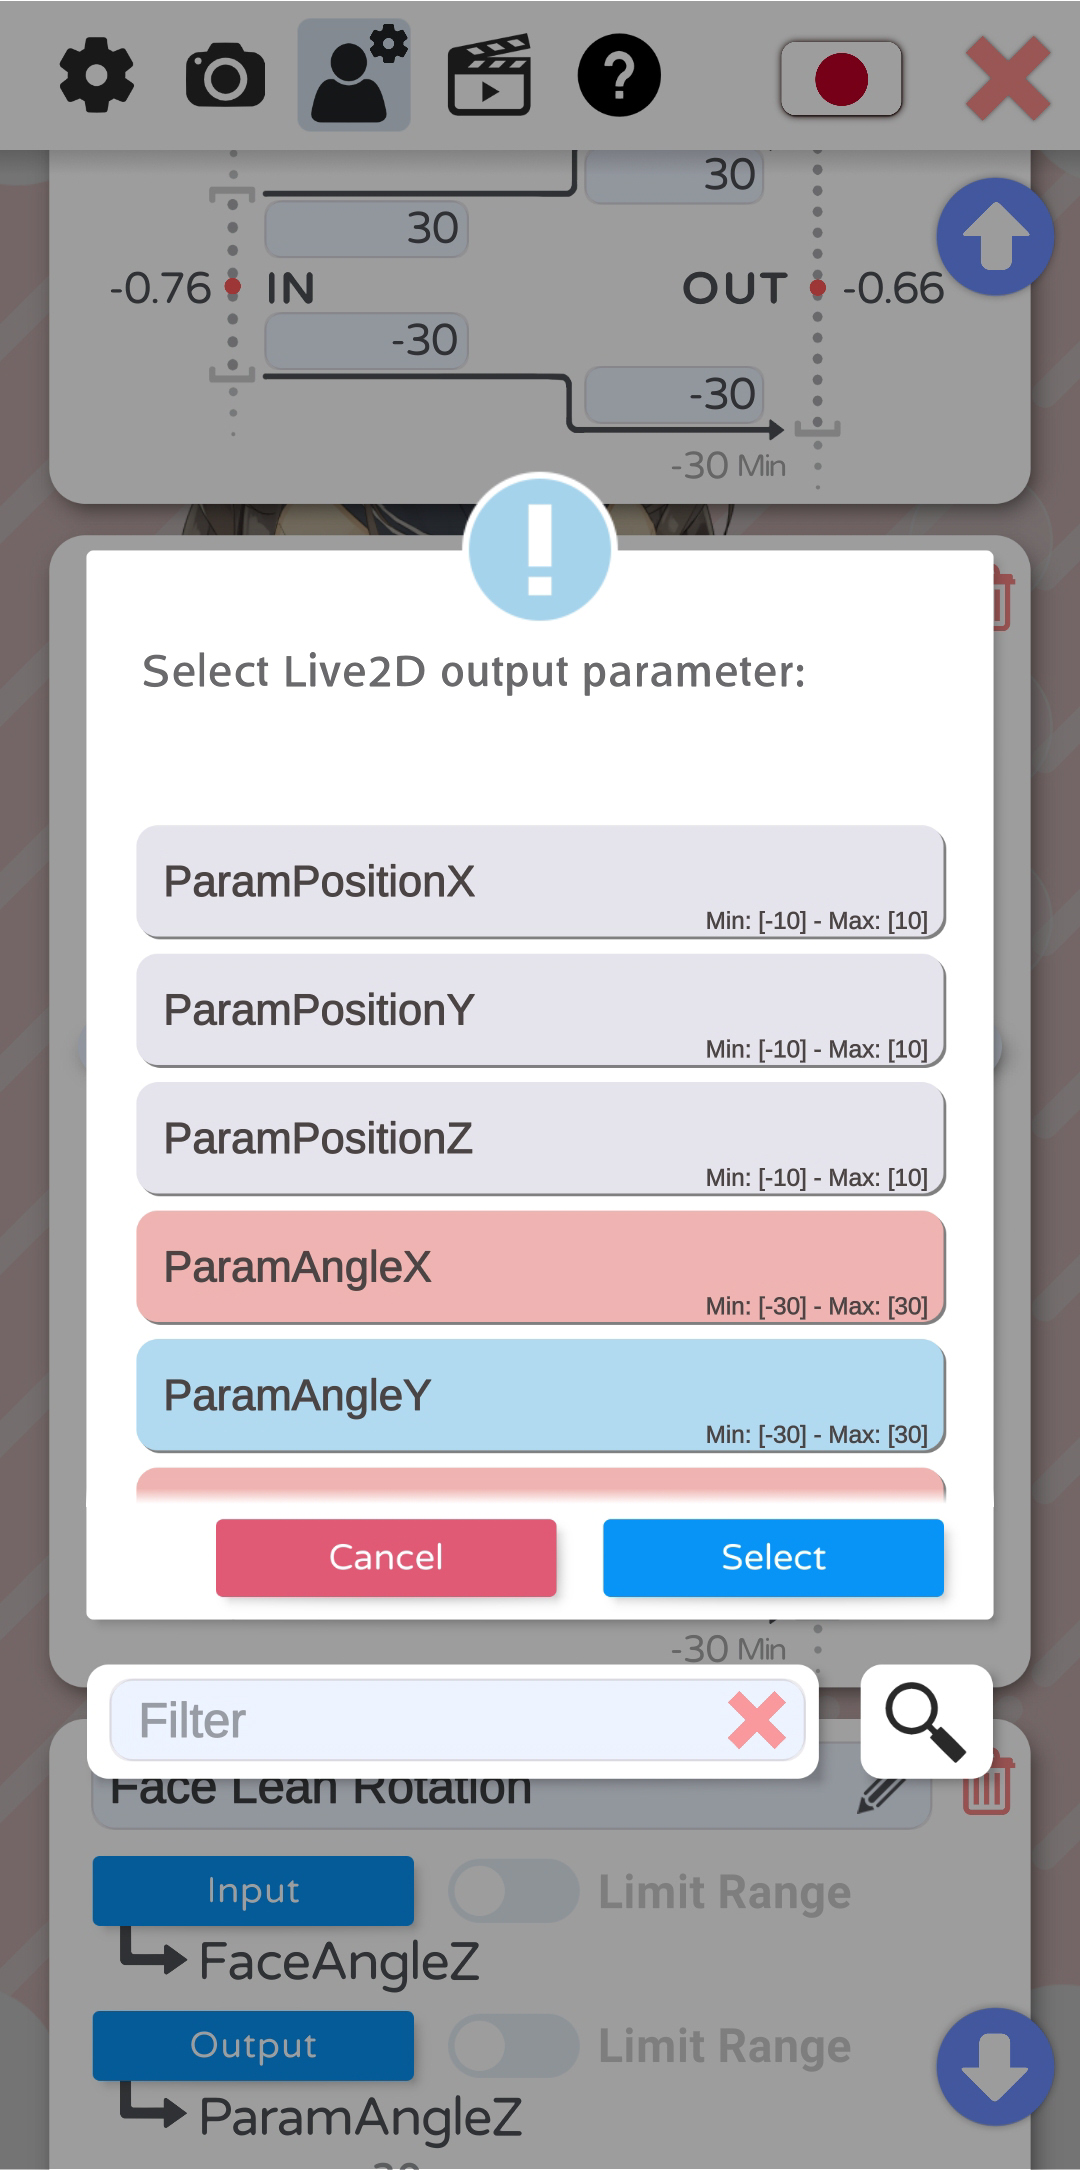
This is the most important part of your model settings. Here, you set up which face tracking parameters control which Live2D parameters.
The general idea is:
- You can freely map any INPUT parameter (face-tracking, mouse, etc.) to any OUTPUT parameter (Live2D parameter).
- How the values are mapped can be freely configured. For example, the input parameter MouthOpen is within the range [0, 1], with 0 being closed and 1 being all the way open. If your Live2D parameter (for example named ParamMouthOpen) has the range [-10, 10], you could map the ranges so (IN, 0) becomes (OUT, -10) and (IN, 1) becomes (OUT, 10). Or you map it any other way, there are no restrictions.
- The red dot will show where the current value is placed within the input and output range.
- By activating "Limit Range", you can make sure the the input or output values never exceed the range you set for the input or output. This will also cause the value to stop smoothly when approaching the limits.
- Generally, it is recommended to only change the output range and leave the input range as is.
- More smoothing will make the movements less shaky but will introduce lag. Experiment with the smoothing values until you find something that works for each parameter. On iOS, you will most likely need very little smoothing.
- Auto-breath will fade the output parameter up and down in a breath-like motion. No input parameter is required when using this option. Any input will be ignored.
- Auto-blink will randomly reduce the parameter to zero. This can be combined with an input parameter, but none is necessary.
- As input parameter, you can choose from a list of available parameters. iOS supports more face tracking parameters than Android (see below).
- As output parameter, you can choose any Live2D parameter. Each output parameter can only be chosen once, as otherwise you would have multiple input parameters writing to the same output parameter.


If your model doesn't move despite the Live2D parameter clearly moving in the VTS model config, the cause is most likely an expression, an animation or the physics system overwriting the value from the face tracking. This is explained in detail in the chapter:

VTube Studio currently supports the following input parameters that can be mapped to output Live2D parameters. The iOS-only parameters are also marked accordingly in the app.
| Parameter Name | Explanation | iOS | Android | Webcam | Webcam NVIDIA | Webcam Mediapipe |
|---|---|---|---|---|---|---|
| FacePositionX | horizontal position of face | ✔️ | ✔️ | ✔️ | ✔️ | ✔️ |
| FacePositionY | vertical position of face | ✔️ | ✔️ | ✔️ | ✔️ | ✔️ |
| FacePositionZ | distance from camera | ✔️ | ✔️ | ✔️ | ✔️ | ✔️ |
| FaceAngleX | face right/left rotation | ✔️ | ✔️ | ✔️ | ✔️ | ✔️ |
| FaceAngleY | face up/down rotation | ✔️ | ✔️ | ✔️ | ✔️ | ✔️ |
| FaceAngleZ | face lean rotation | ✔️ | ✔️ | ✔️ | ✔️ | ✔️ |
| MouthSmile | how much you're smiling | ✔️ | ✔️ | ✔️ | ✔️ | ✔️ |
| MouthOpen | how open your mouth is | ✔️ | ✔️ | ✔️ | ✔️ | ✔️ |
| Brows | up/down for both brows combined | ✔️ | ✔️ | ✔️ | ✔️ | ✔️ |
| MousePositionX | x-pos. of mouse or finger within set range | ✔️ | ✔️ | ✔️ | ✔️ | ✔️ |
| MousePositionY | y-pos. of mouse or finger within set range | ✔️ | ✔️ | ✔️ | ✔️ | ✔️ |
| TongueOut | stick out your tongue | ✔️ | ✔️ | ❌ | ❌ | ❌ |
| EyeOpenLeft | how open your left eye is | ✔️ | ✔️ | ✔️ | ✔️ | ✔️ |
| EyeOpenRight | how open your right eye is | ✔️ | ✔️ | ✔️ | ✔️ | ✔️ |
| EyeLeftX | eye-tracking | ✔️ | ✔️ | ✔️ | ✔️ | ✔️ |
| EyeLeftY | eye-tracking | ✔️ | ✔️ | ✔️ | ✔️ | ✔️ |
| EyeRightX | eye-tracking | ✔️ | ✔️ | ✔️ | ✔️ | ✔️ |
| EyeRightY | eye-tracking | ✔️ | ✔️ | ✔️ | ✔️ | ✔️ |
| CheekPuff | detects when you puff out your cheeks | ✔️ | ❌ | ❌ | ❌ | ❌ |
| BrowLeftY | up/down for left brow | ✔️ | ✔️ | ✔️ | ✔️ | ✔️ |
| BrowRightY | up/down for right brow | ✔️ | ✔️ | ✔️ | ✔️ | ✔️ |
| VoiceFrequency | depends on detected phonemes | ✔️ | ✔️ | ✔️ | ✔️ | ✔️ |
| VoiceVolume | how loud microphone volume is | ✔️ | ✔️ | ✔️ | ✔️ | ✔️ |
| VoiceVolume PlusMouthOpen |
MouthOpen + VoiceVolume | ✔️ | ✔️ | ✔️ | ✔️ | ✔️ |
| VoiceFrequency PlusMouthSmile |
MouthSmile + VoiceFrequency | ✔️ | ✔️ | ✔️ | ✔️ | ✔️ |
| VoiceA | detected phoneme: A | ✔️ | ✔️ | ✔️ | ✔️ | ✔️ |
| VoiceI | detected phoneme: I | ✔️ | ✔️ | ✔️ | ✔️ | ✔️ |
| VoiceU | detected phoneme: U | ✔️ | ✔️ | ✔️ | ✔️ | ✔️ |
| VoiceE | detected phoneme: E | ✔️ | ✔️ | ✔️ | ✔️ | ✔️ |
| VoiceO | detected phoneme: O | ✔️ | ✔️ | ✔️ | ✔️ | ✔️ |
| VoiceSilence | detected sound/phoneme: Silence | ✔️ | ✔️ | ✔️ | ✔️ | ✔️ |
| MouthX | Mouth X position (shift mouth left/right) | ✔️ | ✔️ | ❌ | ✔️ | ✔️ |
| FaceAngry | detects angry face (EXPERIMENTAL, not recommended) |
✔️ | ❌ | ❌ | ❌ | ❌ |
The webcam-version of VTube Studio also supports hand-tracking. The hand-tracking parameter list can be found here: https://github.com/rubujo/VTubeStudio/wiki/手部追蹤
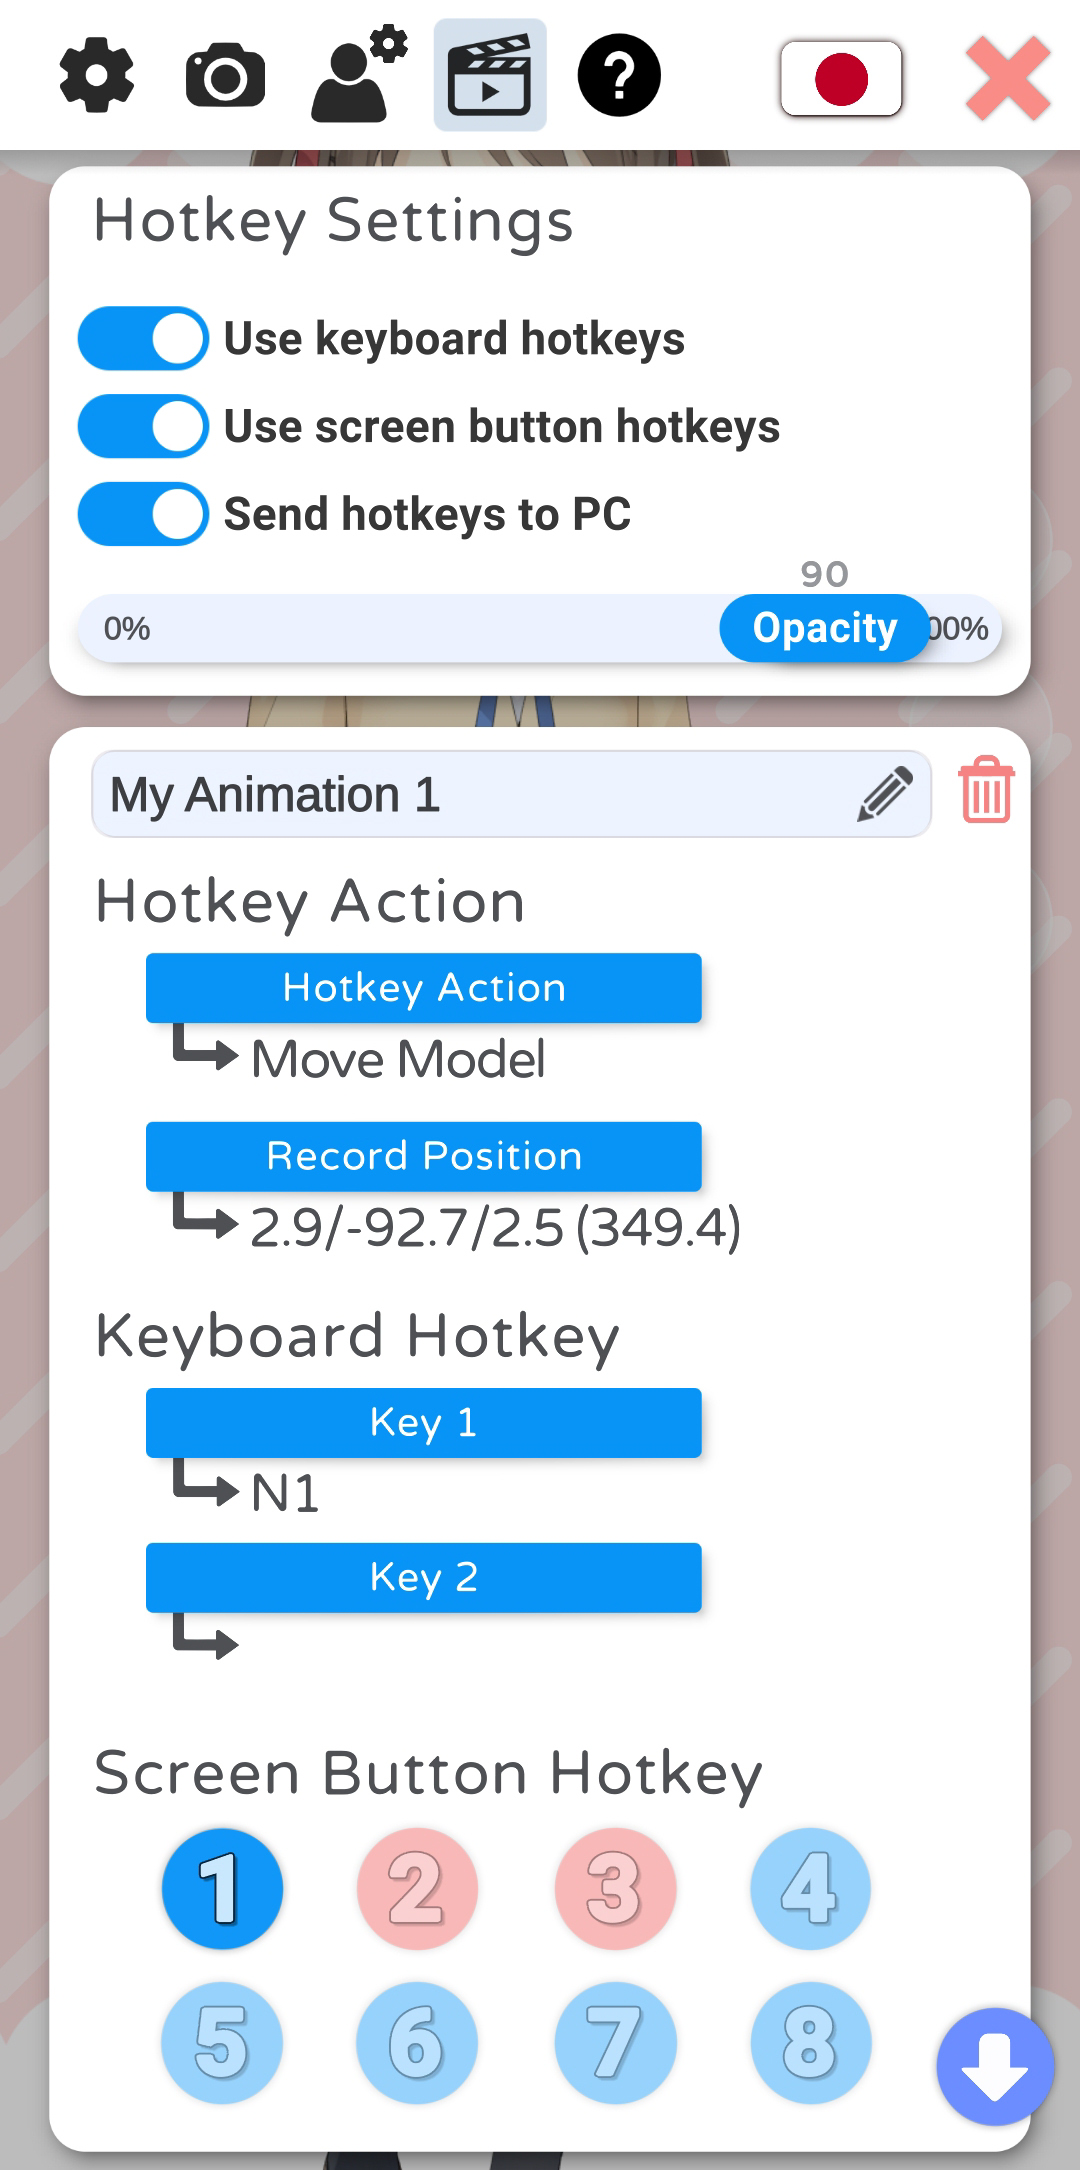
In VTube Studio, you can use hotkeys to trigger various actions. When creating a new hotkey, it is saved in the VTube Studio model configuration file. You can give hotkeys names that are also shown in the logs when the hotkey is activated.
There are two ways to trigger hotkeys:
-
Keyboard-Hotkeys (PC/Mac only)
- As the name implies, you can trigger hotkeys by pressing keys on your keyboard.
- You can set combinations of up to 2 keys.
- Keypresses are also read when the VTube Studio window is not in focus, for example when you're playing a game. However, this does not work on macOS.
- Also included: Mouse-Hotkeys (right/left/middle click).
-
On-Screen Button Hotkeys (PC/Mac and smartphones)
-
Up to 8 hotkeys can be set as on-screen buttons. They will be shown as semi-transparent white circles on the right of the main screen (see picture 3).
-
Opacity can be changed. They can also be made invisible.
-
You can customize the color for each on-screen button.
-
If you activate "Send hotkeys to PC", pressing an on-screen hotkey on your smartphone will send a signal to your PC (if connected) that the key with that ID has been pressed. When the model you have loaded on your PC also has on-screen button hotkeys set up, the corresponding key will be triggered.
-
You do not need to have a model loaded on your smartphone to send hotkey presses to your PC. If no model is loaded, all 8 on-screen buttons will be shown.
-
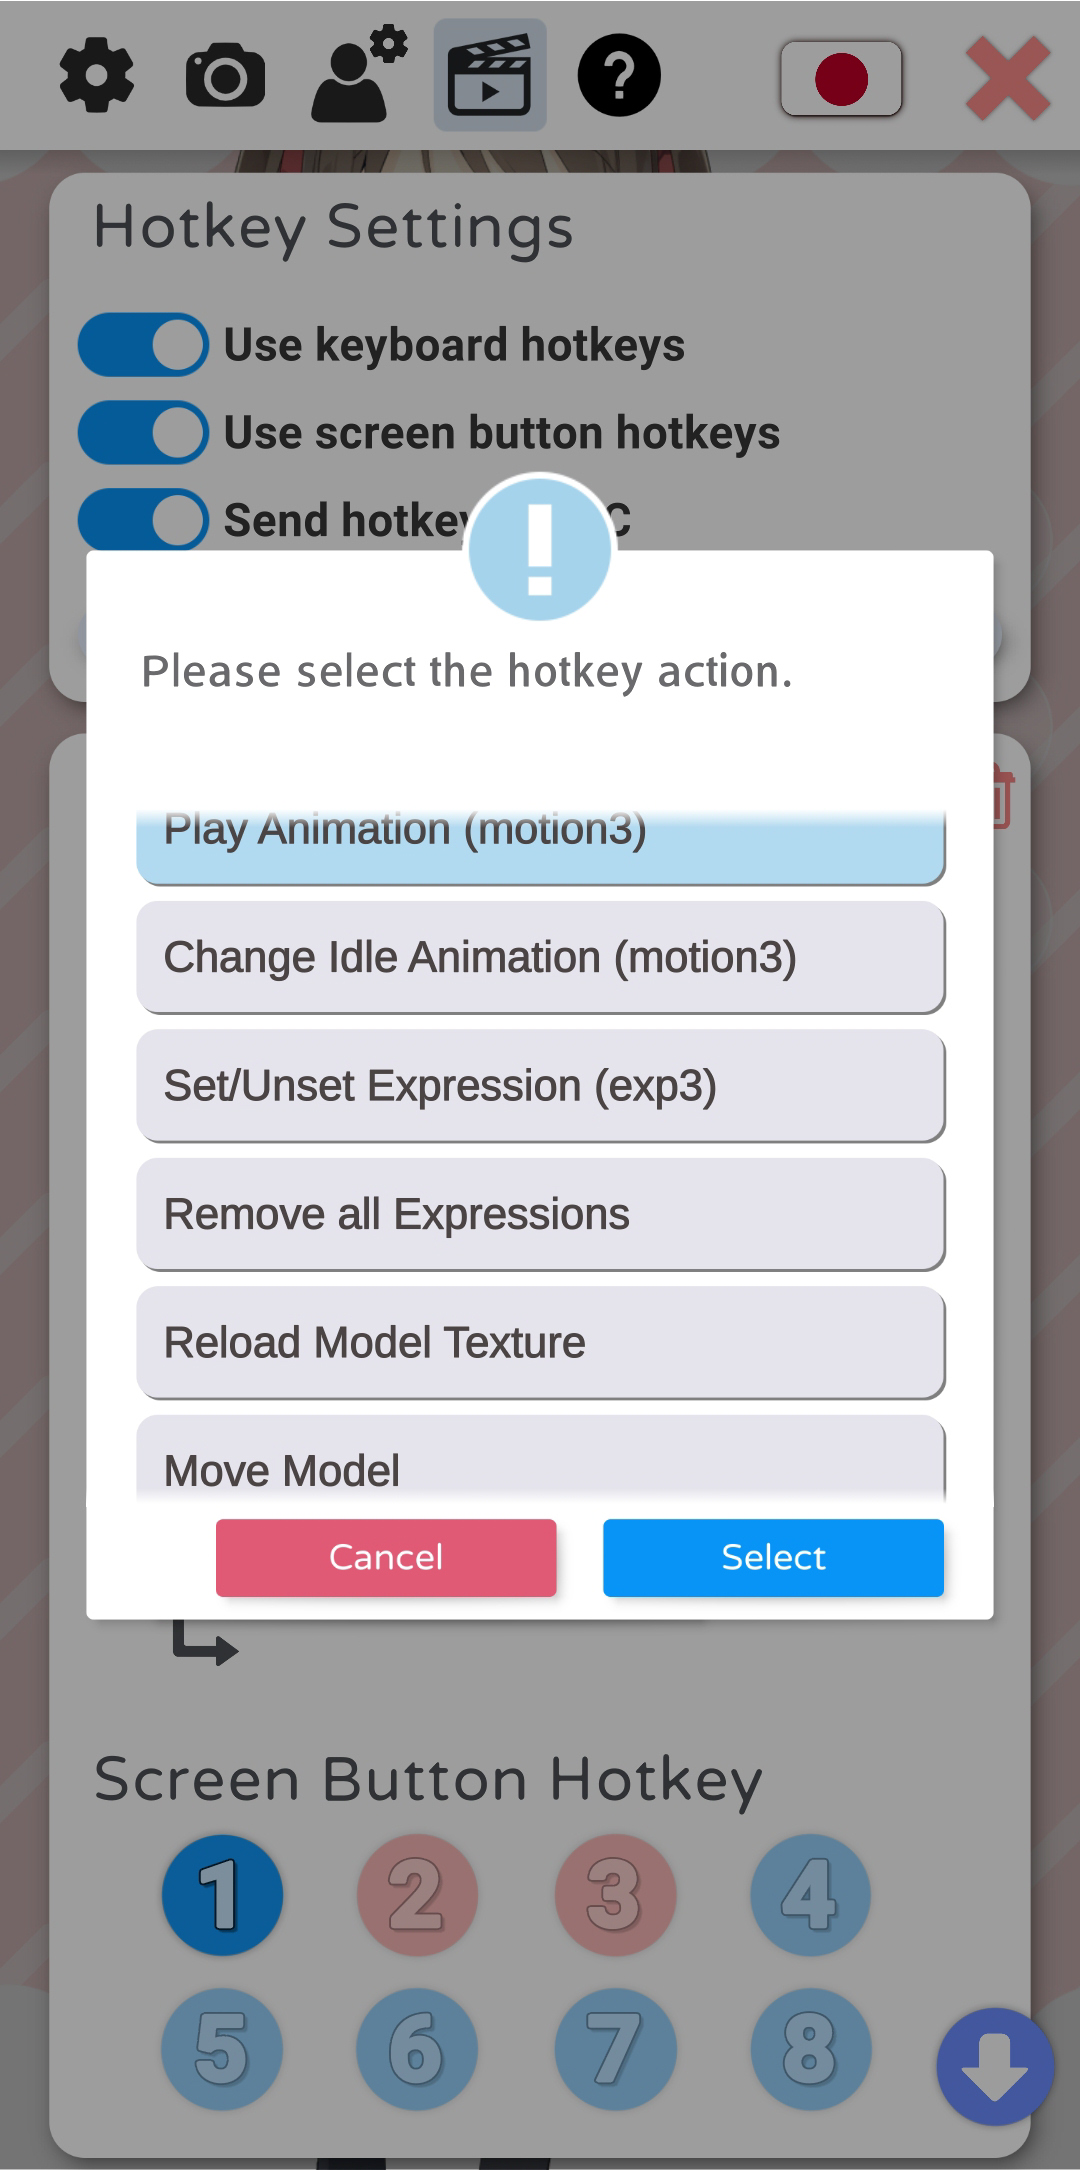
Various actions can be triggered by hotkeys:
-
Play Animation (.motion3.json)
- Will play the given animation once (overwrites face tracking)
-
Change Idle Animation (.motion3.json)
- Will change the currently looping idle animation. Will not be saved into the VTS model configuration.
-
Set/Unset Expression (.exp3.json)
- Toggles the given expression in the model (overwrites face tracking and animations)
- If multiple expressions set the same Live2D parameter to different values, the last expression will decide the value.
- More on this in the chapter “Expressions”
-
Remove all Expressions
- Removes all currently set expressions.
-
Reload Model Texture
- Reloads the model texture. This means you can modify your model .PNG-texture outside the app and reload it on the fly. Can be used for various cool effects during streams.
-
Move Model
- Moves the model to the given position/rotation/size.
- You can configure a time that the movement should take.
- The position for the hotkey can be set using the "Record Position" button, which will save the current model position, rotation and size. The numbers shown are:
- x-pos/y-pos/size rotation
-
Change Background
- Changes the background to the one you select for this hotkey.
-
Reload Microphone
- Reloads the currently active microphone used for voice lipsync.
- Alternatively, this hotkey can toggle the microphone on and off.
-
Calibrate Camera
- Triggers camera calibration.
-
Change VTS Model
- Changes the VTube Studio model to the one you select for this hotkey.
-
Take Screenshot
- Triggers screenshot with the previously set screenshot settings.
-
Screen Overlay
- Sets the Live2D model display overlay settings to the settings recorded in this hotkey. Will only work on Windows and macOS. For more info, see "Display Light Overlay".
-
Remove all items from scene
- Removes all items from the scene. You can also specify a "Item Scene Group" here so only that group gets deactivated. See also "Item Scenes & Item Hotkeys".
-
Toggle Item Scene
- Toggles the specified Item Scene (has to be set up before). See also "Item Scenes & Item Hotkeys".
-
Download random item from Steam Workshop into the scene
- Downloads a randomly selected item from the Steam Workshop into the scene. See also "Steam Workshop".
-
Live2D Item Action
- Triggers a Hotkey in a loaded Live2D Item. For more info, see "Live2D Items".
-
ArtMesh Color Preset
- Loads a screen/multiply color preset for the model. Also works with Live2D Items. For more info, see "Live2D Items".
-
Toggle Tracker On/Off
- Only available on Windows/MacOS. Toggles the selected tracker on/off. Tracker can be WiFi/USB (connected smartphone) or webcam.
-
Twitch Feature On/Off
- Only available on Windows/MacOS. Turns selected Twitch feature on/off.
-
Load Visual Effects Preset
- Only available on Windows/MacOS. Load a "Visual Effects / VFX" preset.
-
Live2D Editor API Parameter Sync On/Off
- Only available on Windows/MacOS. Turns the Live2D Editor API parameter sync on/off. For more info, see "Live2D Cubism Editor Communication".
For animations and expressions, there are a few extra settings you can use to customize fade times and animation playback behavior. For example, you can stop animations/expressions after a certain number of seconds or once the button is let go.
For animations specifically, you can set them to stop on the last frame. This will stop the animation on the last frame once playback has finished and hold all parameters there until you press the hotkey again. All Live2D parameters used in face-tracking for your model will not be affected by this and fade back automatically after the animation has finished playing regardless.
![]() 如果本使用手冊沒有回答到您的問題,請在 VTube Studio Discord
如果本使用手冊沒有回答到您的問題,請在 VTube Studio Discord ![]() 伺服器中詢問!
伺服器中詢問!
![]()
- 介紹&需求
- 已知問題
- 在哪裡可以取得模型?
- Android vs. iPhone vs. 網路攝影機
- 開始使用
- 載入您自己的模型
- 載入您自己的背景
- VTube Studio 設定
- 顯示器光源
- 視覺效果
- Spout2 背景
- VTS 模型設定
- 表情(貼圖/表情符號)
- 動畫
- 動畫、追蹤、物理等之間的互動
- 串流到 Mac/電腦
- 使用 OBS 錄製/串流
- 不使用 Steam 啟動
- 以系統管理員身分啟動
- 復原舊版本的 VTS
- NVIDIA Broadcast 人臉追蹤器
- Google Mediapipe 人臉追蹤器
- Tobii 眼動追蹤器
- 手部追蹤
- 唇音同步
- 使用單一網路攝影機或 iPhone/Android 裝置控制多個模型
- 連線問題&故障排除
- 拍攝/分享螢幕截圖
- 物品系統
- Live2D 物品
- 重新著色模型和物品
- 錄製動畫
- 多人遊戲
- VNet 安全性
- Twitch 互動
- 新增特殊圖形網格功能
- 物品場景&物品快速鍵
- 外掛程式(YouTube、Twitch 等等)
- VTube Studio 模型檔案
- 在模型間複製設定
- 傳送資料至 VSeeFace
- Steam 工作坊
- 如何解決延遲問題
- 如何解決網路攝影機問題
- Live2D Cubism Editor 溝通
- 常見問答
- 隱私權政策、授權條款和其它條款
