唇音同步
VTube Studio can use your microphone to analyze your speech and calculate Live2D model mouth forms based on it. Depending on your model setup, this can also be combined with camera/phone-based tracking.
You can select between two lipsync types:
-
Simple Lipsync
- Legacy option, Windows-only, based on Occulus VR Lipsync
- NOT RECOMMENDED, use Advanced Lipsync instead.
- Will not be discussed on this page because Advanced Lipsync supports the same (and more) parameters and is much more accurate.
- Advanced Lipsync:
Note: "Simple Lipsync" will not be discussed here. If you're still using it, please consider moving on to "Advanced Lipsync". It supports the same parameters and more, is more performant and works on all platforms.
To use Advanced Lipsync select it using the "Lipsync Type" button. Then select your microphone and make sure "Use microphone" is on.
There are three slider on the main config card:
-
Volume Gain: Boost volume from microphone. Will have an effect on the
VoiceVolumeandVoiceVolumePlusMouthOpenparameters as well as allVoiceA/I/U/E/Oparameters. - Volume Cutoff: Noise gate. Eliminates low-volume noise. It's probably best to keep this low or at 0 and have a noise-gate before audio is fed into VTube Studio instead.
-
Frequency Gain: Boost value for
VoiceFrequencyandVoiceFrequencyPlusMouthSmileas well as allVoiceA/I/U/E/Oparameters.
If your microphone lags behind, you can click the "Reload" button to restart the microphone. You can also set up a hotkey for that.
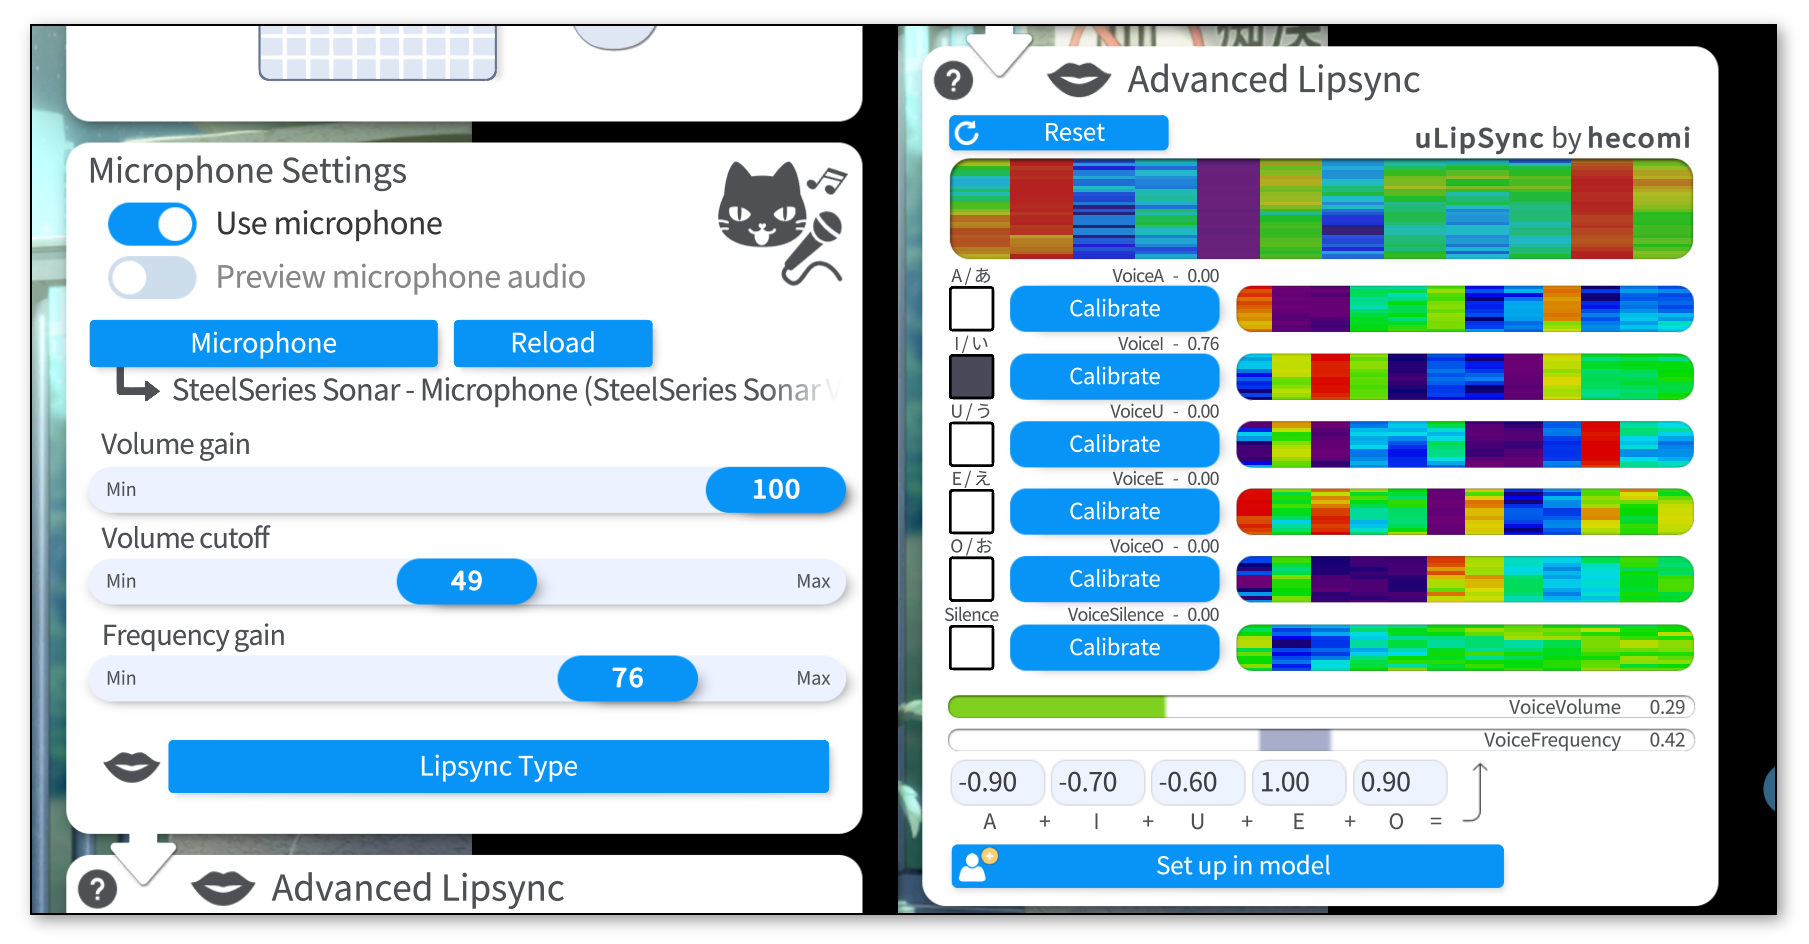
To calibrate the lipsync system, click each "Calibrate" button while saying the respecting vowel until the calibration is over. That way, the lipsync system will be calibrated to your voice. If you change your microphone or audio setup, you might want to redo the calibration.
Clicking "Reset" will reset the calibration to default values.
Make sure the calibration is good by saying all vowels again and checking if the respective vowel lights up on the UI.
The funny colorful visualizations shown next to the calibration buttons are related to the frequency spectrum recorded in your voice during calibration. If you'd like to learn more about the details, check the uLipSync repository.
The lipsync system outputs the following voice tracking parameters. You can use them as inputs for ANY Live2D parameter, not just the mouth parameters.
For example, you could use them to create "equalizer" effects or other cool audio visualizers and color effects by hooking up the vowel detection parameters to custom parameters in your model.
The following parameters are available:
-
VoiceA- Between 0 and 1
- How much the
Avowel is detected.
-
VoiceI- Between 0 and 1
- How much the
Ivowel is detected.
-
VoiceU- Between 0 and 1
- How much the
Uvowel is detected.
-
VoiceE- Between 0 and 1
- How much the
Evowel is detected.
-
VoiceO- Between 0 and 1
- How much the
Ovowel is detected.
-
VoiceSilence- Between 0 and 1
- 1 when "silence" is detected (based on your calibration) or when volume is very low (near 0).
-
VoiceVolume/VoiceVolumePlusMouthOpen- Between 0 and 1
- How loud the detected volume from microphone is.
-
VoiceFrequency/VoiceFrequencyPlusMouthSmile- Between 0 and 1
- You would NOT use these parameters if you're already using the
VoiceA,VoiceI, ... parameters. This is just an alternative for you if your model only has one mouth shape parameters so you can use this to combine the detected vowels into one single parameter. - Calculated based on the detected vowels. You can set up how the vowel detection values are multiplied to generate this parameter.


An example mouth model can be downloaded here: "aaa_BlendshapeMouthExample.zip"

The example model is simplified (and a bit scuffed) but it shows one possible setup that can be used for combining camera/phone-based lipsync with microphone lipsync.
There's a VOD where Brian Tsui and I went over this model setup, trying to figure out how to make things work. If you're interested, take a look here: https://www.youtube.com/watch?v=X2-nHPeF5Q0

The general idea is this:
- When significant sound is picked up from the microphone, fade mouth forms towards the forms generated by microphone lipsync, based on how loud the sound is.
- When very little or no sound is detected, just use the mouth forms based on camera tracking.
To achieve this, we could have the following parameter setup: (here pictured with regular MouthOpen/MouthForm setup, but could include VBridger mouth forms as well)
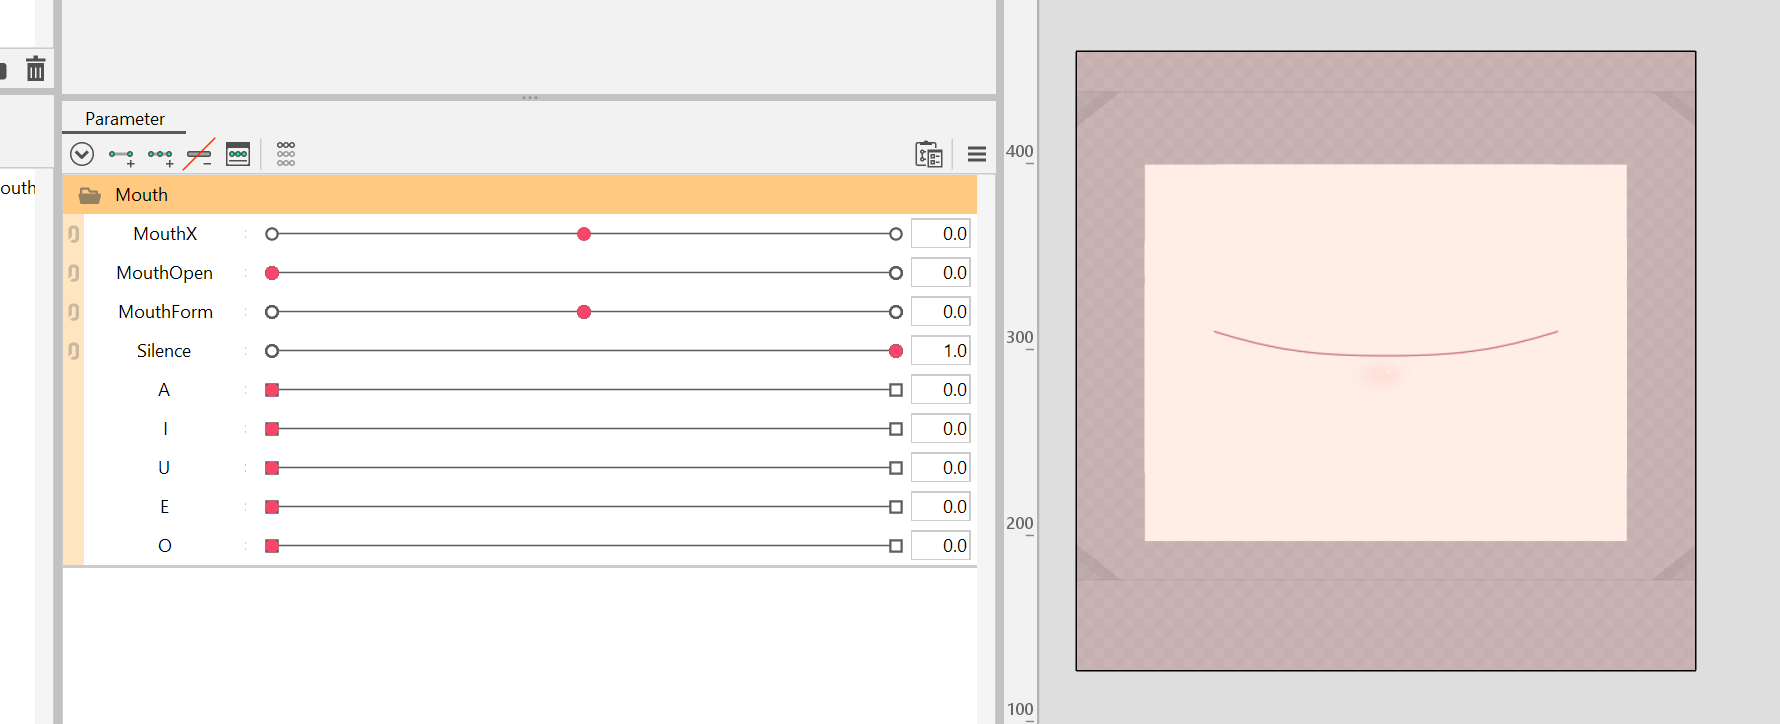
ParamMouthOpen and ParamMouthForm are set up just like usual. In addition, set up a ParamSilence. This parameter will later be hooked up to VoiceSilence, so it will be 1 when the microphone detects no or almost no sound.
Next, add keyforms for ParamSilence to make sure ParamMouthOpen and ParamMouthForm only affect the mouth forms when ParamSilence is at 1. When the parameter is at 0, moving ParamMouthOpen and ParamMouthForm should not deform the mouth at all.
Based on that default neutral mouth form, set up the blendshape parameters ParamA, ParamI, ParamU, ParamE and ParamO.
For those 5 blendshape parameters, just imagine what your model's mouth would look like when pronouncing the respective vowels. Just using the typical Japanese pronunciation as reference usually works fine, even for other languages.
Depending on what style your model is drawn in, mouth forms could look drastically different, but here's a reference I made for cute/girly mouth forms. In general, it might be better to make them look less happy and more neutral.
I would not recommend using this as a "template". It's only supposed to be a reference to get the idea across.
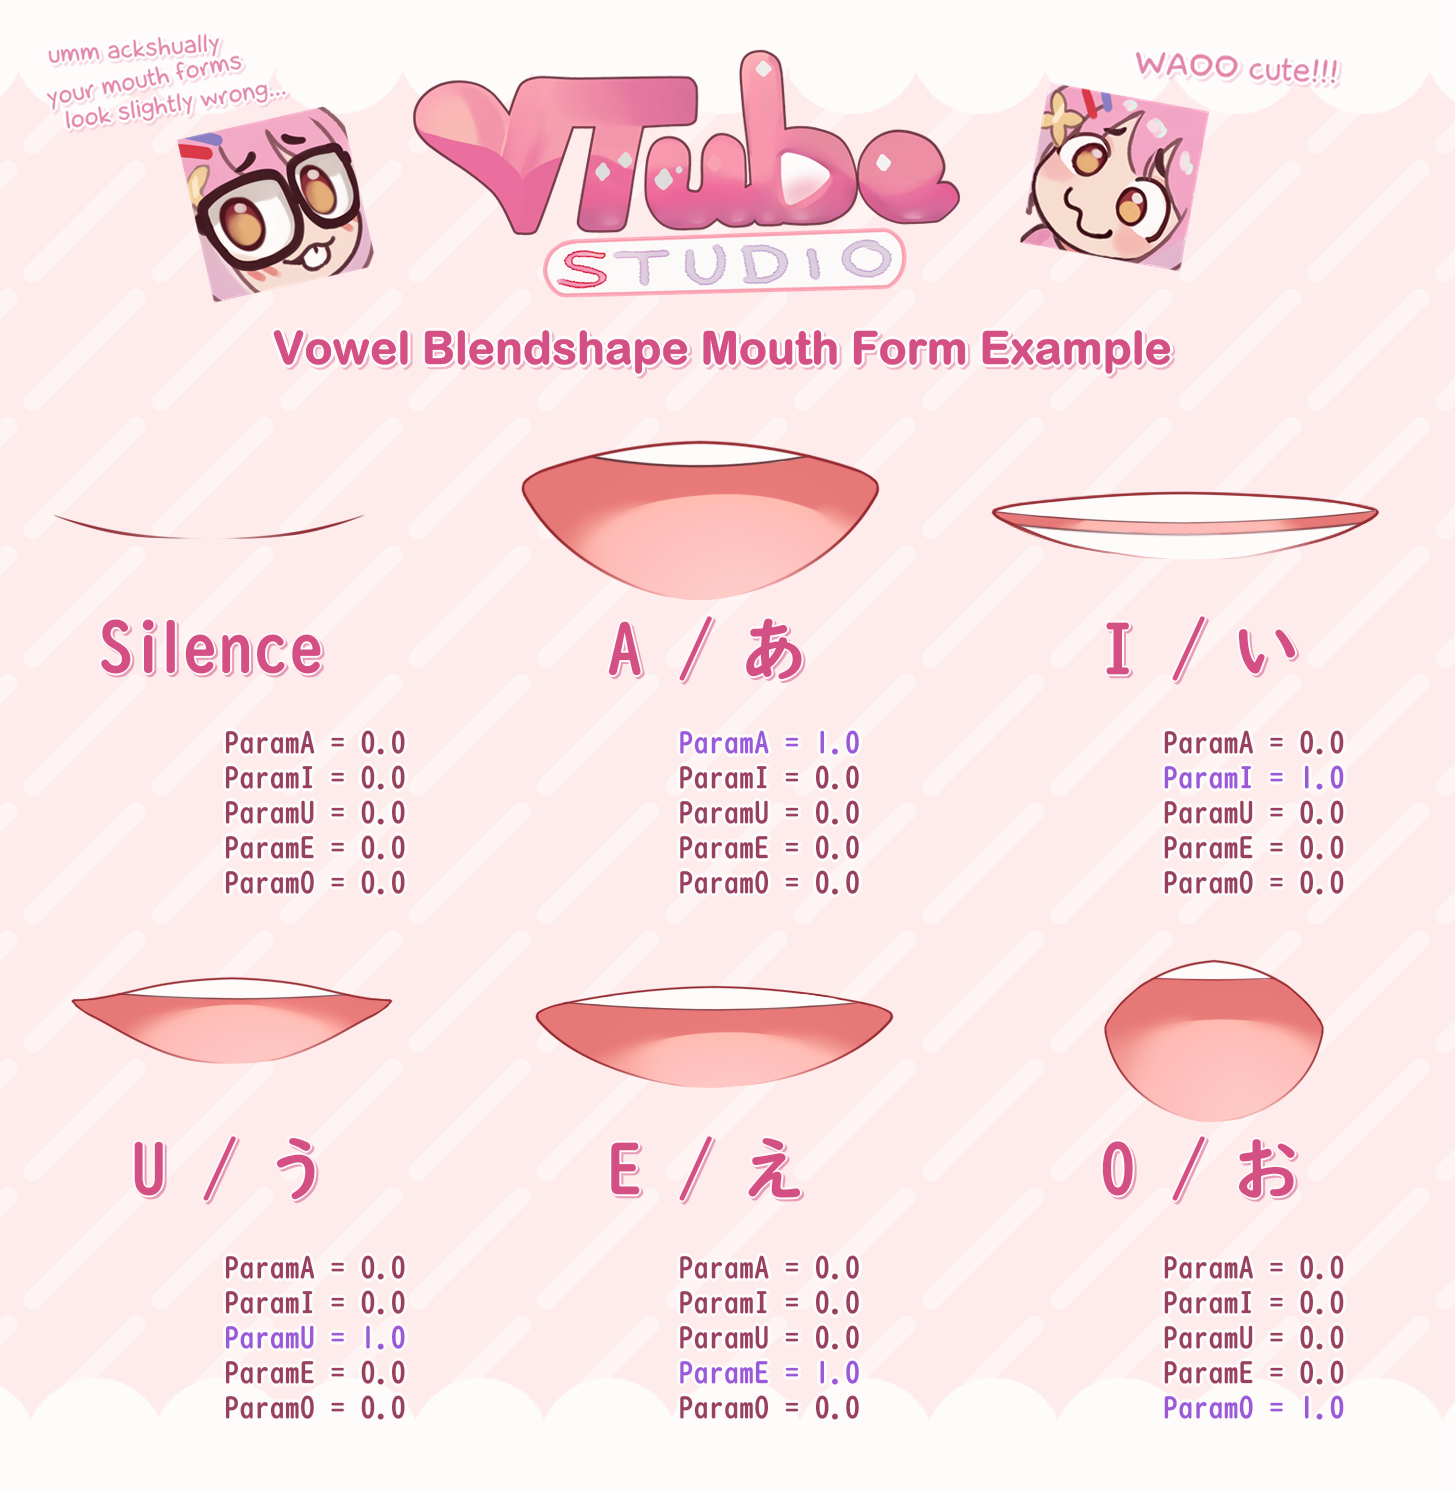
Keep in mind that the blendshapes won't look good (and don't have to look good) if multiple are at 1 at the same time. VTube Studio will make sure that the lipsync parameters that will control these Live2D blendshape parameters (VoiceA, VoiceI, VoiceU, VoiceE, VoiceO) are never 1 at the same time and they only mix at smaller parameter values.
This is all the setup you need. Now, import the model into VTube Studio and run the auto-setup for advanced lipsync (button at the bottom of the lipsync config). This will set up the following mappings (you can also set them up manually of course):
-
MouthOpen→ParamMouthOpen -
MouthSmile→ParamMouthForm -
VoiceSilence→ParamSilence -
VoiceA→ParamA -
VoiceI→ParamI -
VoiceU→ParamU -
VoiceE→ParamE -
VoiceO→ParamO
Again, the ParamSilence parameter will force your mouth form as set by MouthOpen and MouthSmile to neutral when the sound lipsync detects volume, at which point the blendshapes will take over, which are being driven by the VoiceA, VoiceI, ... tracking values.
If you want to lower the influence of the blendshapes on the mouth form, you can try decreasing the Volume Gain and Frequency Gain sliders.
Also note that you can turn off the microphone at any time. That will force ParamSilence to 1, which means your mouth is now 100% controlled by the webcam/phone-based tracking until you turn the microphone back on.
When sound is detected, the blendshapes take over, which means webcam/iPhone-based tracking is largely (or fully) ignored. That unfortunately also means there is no way to have "happy" or "unhappy" versions of the vowel blendshapes.
There are other parameter setups that could potentially get around this by not using blendshapes at all, but these setups may become very complex for little gain in perceived model quality.
When you just make a noise without opening your mouth (like a "mmmmmmm" kinda noise), the sound-based tracking will take over and open your mouth because it's probably detecting an A vowel sound. You could slightly improve that specific situation by calibrating the Silence detection using that "mmmm" sound.
If microphone audio lags behind the values shown on the UI, use the "Reload" button to reload the selected microphone. Alternatively, you can use a hotkey to reload the microphone.
The exact parameter and vowel mapping settings strongly depend on your model setup. Just try around a bit and see what works for you. It may take some trial and error, but if set up correctly, this can look really good especially when singing ♪ ♫ ♬

![]() 如果本使用手冊沒有回答到您的問題,請在 VTube Studio Discord
如果本使用手冊沒有回答到您的問題,請在 VTube Studio Discord ![]() 伺服器中詢問!
伺服器中詢問!
![]()
- 介紹&需求
- 已知問題
- 在哪裡可以取得模型?
- Android vs. iPhone vs. 網路攝影機
- 開始使用
- 載入您自己的模型
- 載入您自己的背景
- VTube Studio 設定
- 顯示器光源
- 視覺效果
- Spout2 背景
- VTS 模型設定
- 表情(貼圖/表情符號)
- 動畫
- 動畫、追蹤、物理等之間的互動
- 串流到 Mac/電腦
- 使用 OBS 錄製/串流
- 不使用 Steam 啟動
- 以系統管理員身分啟動
- 復原舊版本的 VTS
- NVIDIA Broadcast 人臉追蹤器
- Google Mediapipe 人臉追蹤器
- Tobii 眼動追蹤器
- 手部追蹤
- 唇音同步
- 使用單一網路攝影機或 iPhone/Android 裝置控制多個模型
- 連線問題&故障排除
- 拍攝/分享螢幕截圖
- 物品系統
- Live2D 物品
- 重新著色模型和物品
- 錄製動畫
- 多人遊戲
- VNet 安全性
- Twitch 互動
- 新增特殊圖形網格功能
- 物品場景&物品快速鍵
- 外掛程式(YouTube、Twitch 等等)
- VTube Studio 模型檔案
- 在模型間複製設定
- 傳送資料至 VSeeFace
- Steam 工作坊
- 如何解決延遲問題
- 如何解決網路攝影機問題
- Live2D Cubism Editor 溝通
- 常見問答
- 隱私權政策、授權條款和其它條款
