載入您自己的模型
VTube Studio comes with a few default models. Most of them belong to Live2D Inc., so please be sure to read the chapter "Privacy Policy and Licensing" if you want to use them in your streams.
This chapter covers how to load your own Live2D models into VTube Studio. It will be assumed that you already have your Live2D model finished and have a basic understanding what Live2D is and how it works (Live2D parameters, etc.)
If you're wondering how to get (or make) models for VTube Studio, please check this page: https://github.com/rubujo/VTubeStudio/wiki/Models
There isn’t really any specific special preparation you need to do with your Live2D model so it works with VTube Studio. As explained later in the chapter "VTube Studio Settings", you can map any face tracking parameter to any Live2D parameter, so you could theoretically choose parameter IDs and ranges however you want.
However, it is recommended to adhere to the default IDs and parameter ranges (min/max). Please also note that only the Live2D parameter IDs matter to VTube Studio, not the Live2D parameter names.
When you’re done with your model, export it via File → Export For Runtime → Export as .moc3 file.
Make sure to choose the following settings:
- "Export Version" set to "SDK 3.0" or "SDK 3.3" or "SDK 4.0" (recommended).
- "Export Physics settings file (physics3.json)". If you don’t to this, your model will not have physics. Always export your physics file like this and never independently from the model, as this is the only way to make sure the physics file is "registered" with the model (in the .model3.json file) so it’s usable by VTube Studio. If no physics file is registered, VTube Studio will use the first one it finds in the model folder.
- Export Types: SDK
This will create a folder with the following files (ignore the files marked red). If your model fails to load later in VTube Studio, make sure all files are there.
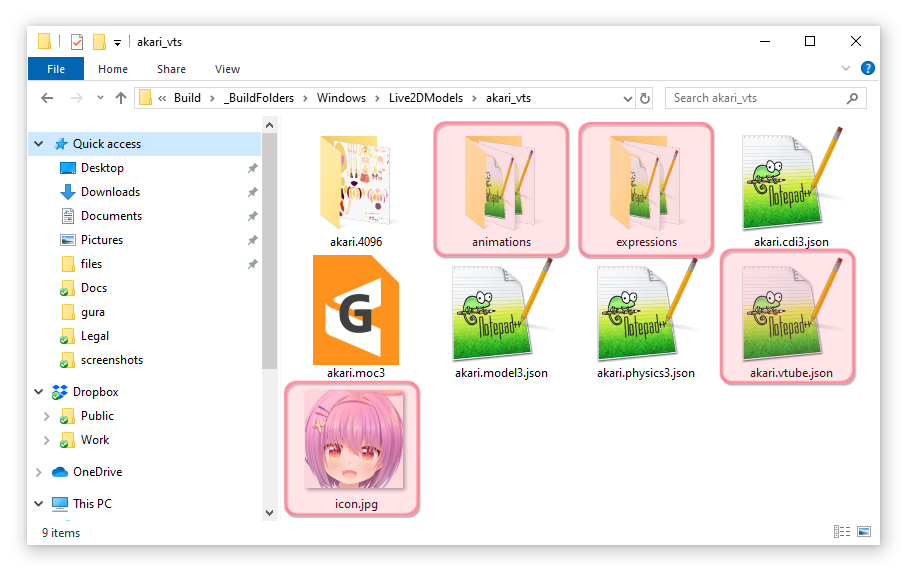
A short overview about what these files do:
-
<model>.model3.json
- Main Live2D model index file.
- Human-readable (can be opened/edited in text-editor)
- Has references to all other files. VTube Studio looks for this file.
-
<model>.moc3
- Model binary file. Has all model data, such as vertices, deformers, parameters, etc.
-
<model>.cdi3.json
- Model display information file. Not needed by VTube Studio.
- Human-readable.
-
<model>.physics3.json
- Has all the information about your physics setup.
- Human-readable.
-
<model>.<resolution> (here: akari.4096)
- Contains your texture(s). VTube Studio also supports models with multiple and/or large textures. Be advised that using large textures may lag or even crash the app on mobile.
Make sure you have all these files in a folder before you proceed. I usually call this folder <model>_vts, but you can choose any name.
If you want to use Live2D Animations and Live2D Expressions, put them in this folder as well or in a subfolder (see the two folders in the screenshot above). How expressions and animations work will be explained later. You should also add a model icon into that folder (any filename, .png or .jpg, recommended 512x512 pixels).
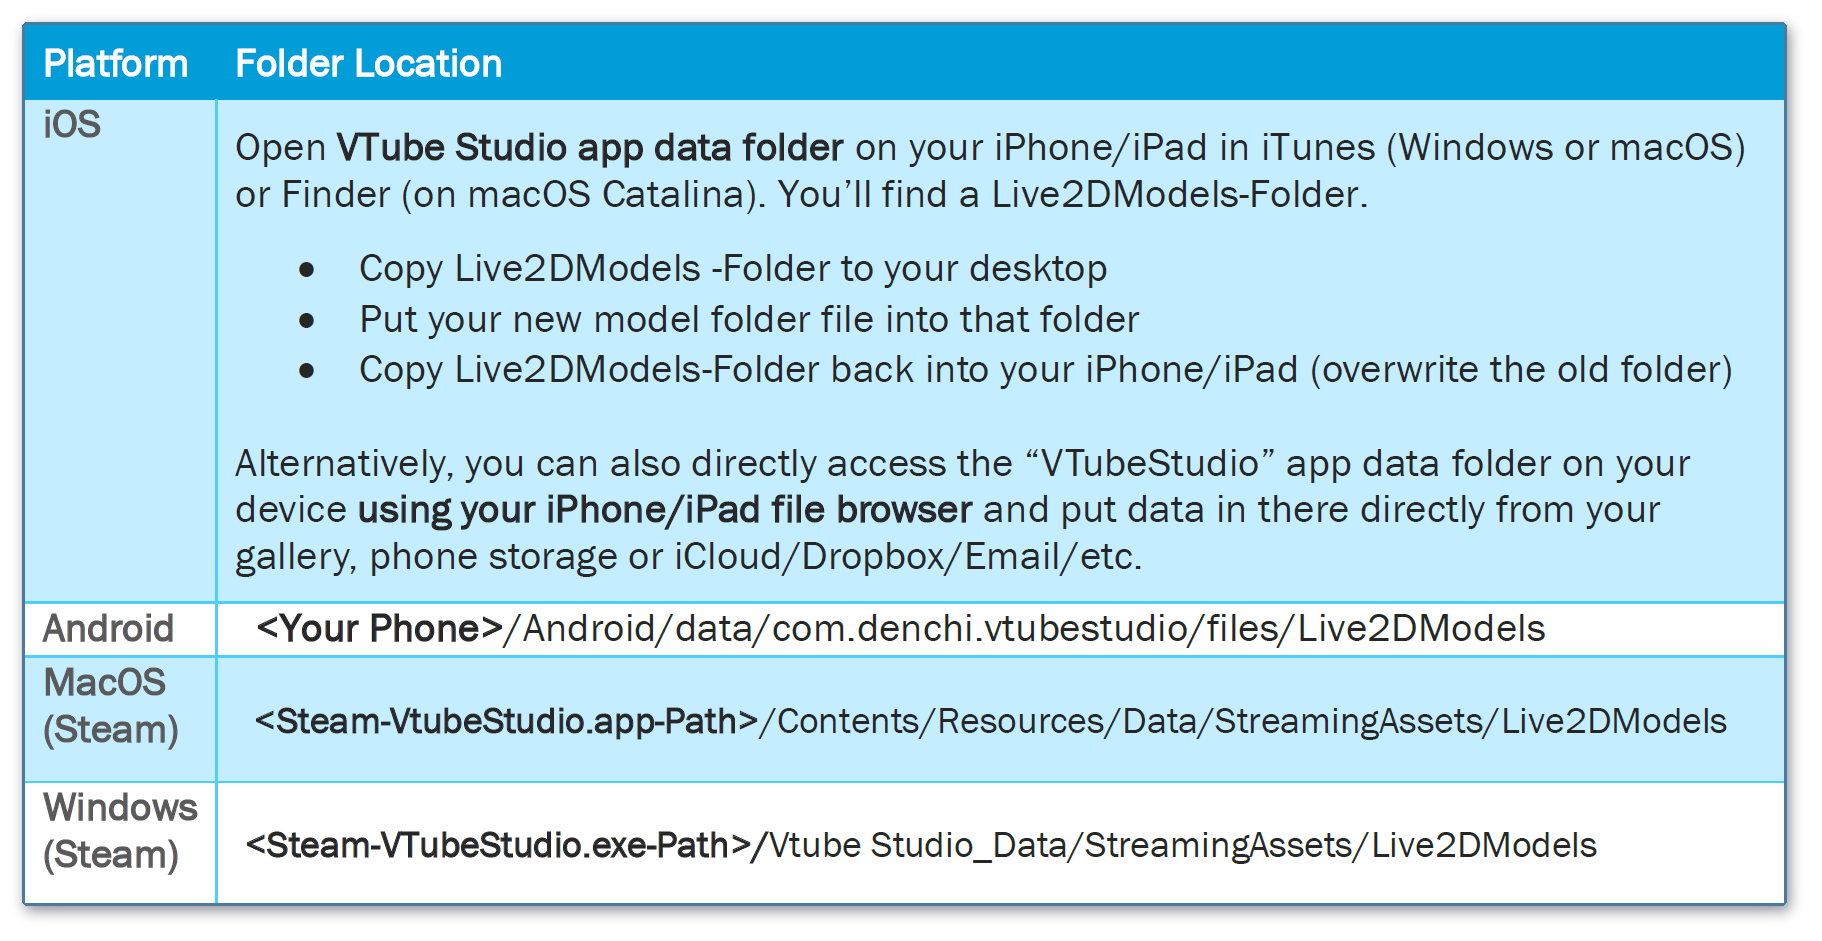
Take your model folder and put it in the "Live2DModels"-Folder in VTube Studio. Where this folder is located differs depending on the platform. In the Steam-version, you can use this button to open the folder:

Now start VTube Studio. When the app is started, it automatically looks for new Live2D models and creates a VTube Studio Model (VTS Model, <Live2D-Model-Name>.vtube.json) in the same folder. This file is human-readable and contains all information about your VTube Studio model setup.
You should now be able to see your model in the model selection bar. If not, make sure all files are present and there are no errors in the logs.
注意: You don't need to have the model on your smartphone if you just want to use the phone for tracking, but it can be nice for making short videos for Twitter/TikTok.
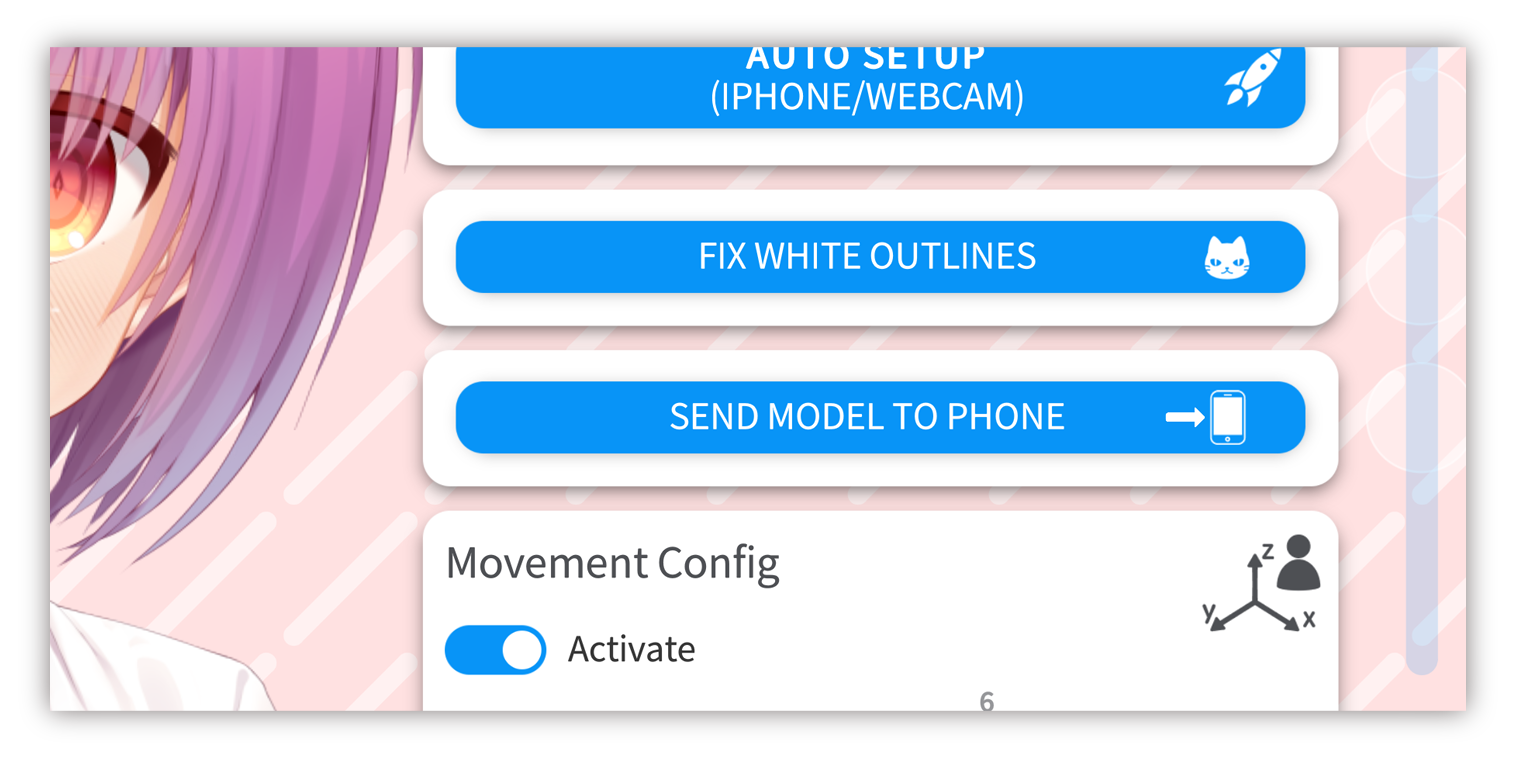
You can use the methods described above to load the model onto your phone manually. However, VTube Studio now also has functionality to directly send your model from your PC/Mac to your smartphone. Just open the model in the PC/Mac app, connect your smartphone via WiFi or USB and press this button.
If you already have the model on your smartphone, this will overwrite it.
When loading a new Live2D model, you will be asked to run the "Auto-Setup". The Auto-Setup can be triggered manually as well after the model is loaded (on the model tab in the settings).

When running the Auto-Setup, VTube Studio will automatically look for default Live2D parameters in your model. VTube Studio will assume that you have used default Live2D parameter IDs and parameter names and set up your VTube Studio accordingly. You can learn more about the default IDs here: https://docs.live2d.com/zh-CHS/cubism-editor-manual/standard-parameter-list/
If you do not use the default IDs, you will have to set your model up manually. This is explained in detail in the chapter "VTS Parameter Setup".
Alternatively, you can copy the setup from another model in this menu, including the parameter setup, expressions, animations and more. For more info about that, please take a look at the page "在模型間複製設定".
Your model should now be ready to use. Of course, you may need to finetune it, but it should move already. On iOS, you might have to open the camera review once after installing the app before the model will move.
The whole process is also explained in this video:
[VTube Studio] Loading your own Live2D Models - https://www.youtube.com/watch?v=AssUd6EtFXw
![]() 如果本使用手冊沒有回答到您的問題,請在 VTube Studio Discord
如果本使用手冊沒有回答到您的問題,請在 VTube Studio Discord ![]() 伺服器中詢問!
伺服器中詢問!
![]()
- 介紹&需求
- 已知問題
- 在哪裡可以取得模型?
- Android vs. iPhone vs. 網路攝影機
- 開始使用
- 載入您自己的模型
- 載入您自己的背景
- VTube Studio 設定
- 顯示器光源
- 視覺效果
- Spout2 背景
- VTS 模型設定
- 表情(貼圖/表情符號)
- 動畫
- 動畫、追蹤、物理等之間的互動
- 串流到 Mac/電腦
- 使用 OBS 錄製/串流
- 不使用 Steam 啟動
- 以系統管理員身分啟動
- 復原舊版本的 VTS
- NVIDIA Broadcast 人臉追蹤器
- Google Mediapipe 人臉追蹤器
- Tobii 眼動追蹤器
- 手部追蹤
- 唇音同步
- 使用單一網路攝影機或 iPhone/Android 裝置控制多個模型
- 連線問題&故障排除
- 拍攝/分享螢幕截圖
- 物品系統
- Live2D 物品
- 重新著色模型和物品
- 錄製動畫
- 多人遊戲
- VNet 安全性
- Twitch 互動
- 新增特殊圖形網格功能
- 物品場景&物品快速鍵
- 外掛程式(YouTube、Twitch 等等)
- VTube Studio 模型檔案
- 在模型間複製設定
- 傳送資料至 VSeeFace
- Steam 工作坊
- 如何解決延遲問題
- 如何解決網路攝影機問題
- Live2D Cubism Editor 溝通
- 常見問答
- 隱私權政策、授權條款和其它條款
