Documentation 2.1.3
- Getting Started
- How To Use
- How It Works
-
FAQ
- 1. Setup and first steps
- 2. Environment and software
-
3. User interface and reports
- 3.1 What browser should I use to browse AET reports?
- 3.2 I would like to compare pages between two environments/domains. How can I do that with the AET Tool?
- 3.3 How can I access pages that require authentication to enter?
- 3.4 How can I simulate another user agent?
- 3.5 What can I do with elements that render differently each time a page is opened and it occurs in changes detected each time?
- 3.6 I want to check how my page behaves on mobile devices, how can I do that?
- 3.7 How to get the latest report for the AET test suite?
- 4. Best practices
- AET Suite Migration to AET 2.1.0
![]()
AET is a testing tool which aids front end client side layout regression testing of websites and portfolios. It allows to ensure that a change in one part of the software did not introduce any defects in other parts of application. AET is a flexible application that can be adapted and tailored to the requirements of a given project.
The aim of AET is to ensure a better software quality. This goal is achieved by a couple of factors.
AET allows to create and maintain automated tests as well as to analyze their results easily and quickly. Test automation has a strong influence on test coverage because AET is able to cover a bigger part of software when compared to manual testing (it saves time needed for manual regression). Automation also helps to eliminate human errors. Finally, AET supports software continuous integration.
This is a quick guide showing how to setup the AET environment and run a sample test.
Before start make sure that you have enough memory on your machine (8 GB is minimum, 16 GB is recommended though).
You need to download and install the following software:
- VirtualBox 5.0.26
- Vagrant 1.8.4
- ChefDK 0.17.17
- Maven (at least version 3.0.4)
- JDK 7 or 8
- Chrome browser to view reports
Open a command prompt as the administrator and execute the following commands:
vagrant plugin install vagrant-omnibusvagrant plugin install vagrant-berkshelfvagrant plugin install vagrant-hostmanager
Navigate to the vagrant module directory. Run berks install and then vagrant up to start the virtual machine. This process may take a few minutes.
Create the file named suite.xml with the following content:
<?xml version="1.0" encoding="UTF-8" ?>
<suite name="test-suite" company="company" project="project">
    <test name="first-test" useProxy="rest">
        <collect>
            <open/>
            <resolution width="800" height="600" />
            <sleep duration="1500"/>
            <screen/>
            <source/>
            <status-codes/>
            <js-errors/>
        </collect>
        <compare xmlns="http://www.cognifide.com/aet/compare/">
            <screen comparator="layout"/>
            <source comparator="w3c-html5"/>
            <status-codes filterRange="400,600"/>
            <js-errors>
                <js-errors-filter source="http://w.iplsc.com/external/jquery/jquery-1.8.3.js" line="2" />
            </js-errors>
        </compare>
        <urls>
            <url href="https://en.wikipedia.org/wiki/Main_Page"/>
        </urls>
    </test>
</suite>
Then create another file named pom.xml with the following content:
<?xml version="1.0" encoding="UTF-8"?>
<project xmlns="http://maven.apache.org/POM/4.0.0"
        xmlns:xsi="http://www.w3.org/2001/XMLSchema-instance"
        xsi:schemaLocation="http://maven.apache.org/POM/4.0.0 http://maven.apache.org/xsd/maven-4.0.0.xsd">
    <modelVersion>4.0.0</modelVersion>

    <groupId>test-group</groupId>
    <artifactId>test-project</artifactId>
    <version>1.0.0</version>
    <packaging>pom</packaging>

    <name>Test project</name>
    <url>http://www.example.com</url>

    <properties>
        <aet.version>2.1.2</aet.version>
        <project.build.sourceEncoding>UTF-8</project.build.sourceEncoding>
    </properties>

    <build>
        <plugins>
            <plugin>
                <groupId>com.cognifide.aet</groupId>
                <artifactId>aet-maven-plugin</artifactId>
                <version>${aet.version}</version>
            </plugin>
        </plugins>
    </build>
</project>
It does not need to be in the same directory as the suite.xml file.
Once you have created both suite.xml and pom.xml files open a command prompt in the directory which contains the pom.xml file and execute the following command:
mvn aet:run -DtestSuite=full/path/to/suite.xml
Remember to provide the path to your suite.xml file.
Once the test run finishes there should be the target directory created inside the directory containing the pom.xml file. Inside the target directory you should find the redirect.html file. Open this file and the test report will show up in your web browser.
Congratulations! You have successfully created and run your first AET test.
You need JDK 8 and Maven 3.3.1 or newer to build the AET application. To build and upload the application use the following command in the application root:
mvn clean install -P upload
In order to be able to deploy bundles to the Karaf instance define the location of the vagrant vm in your setting.xml file ($USER_HOME/m2):
<server>
  <id>aet-vagrant-instance</id>
  <username>developer</username>
  <password>developer</password>
  <configuration>
    <sshExecutable>plink</sshExecutable>
    <scpExecutable>pscp</scpExecutable>
  </configuration>
</server>
Active MQ
a JMS (Java Message Service) Server which is a basic communication channel between AET System components.
AET
an open source testing tool developed by Cognifide.
AET Core
a set of system modules that are crucial for the whole system to work. The AET system will not work properly without all core modules configured and running properly.
AET Jobs
implementations of jobs that can perform a particular task (e.g. collect screenshots, compare sources, validate a page against W3C HTML5).
AET Maven Plugin
a default client application for the AET system that is used to trigger the execution of the Test Suite.
Amazon Web Services
cloud computing services where the AET environment can be deployed to.
Apache Karaf
see Karaf.
Artifact
usually used in the context of a small piece of data, the result of some operation (e.g. a collected screenshot or a list of W3C HTML5 validation errors).
AWS
see Amazon Web Services.
Baseline
a snapshot of the page, stored in a file, against which future versions will be compared. It is called also a Pattern.
Browsermob
a proxy server used by AET to collect some kinds of data from tested pages.
Cleaner
a module responsible for removing old and unused artifacts from the database.
Collector
a module responsible for gathering data necessary for its further processing (e.g. validation, comparison).
Collection
the first phase of the AET service during which all specified data is collected (e.g. screenshots, page source, js errors). Once they are collected successfully, all collection results are saved in the database.
Comparator
a module responsible for comparing data currently collected to its existing pattern or validating it against a set of defined rules.
Comparison
the second phase of the AET service that performs the operation on the data. In some cases the data collected during the first phase is compared to patterns, in others special validation is performed (e.g. W3C HTML5). The second phase starts before the collection finishes - just the moment when required artifacts are collected and become ready to be compared (e.g. to compare two screenshots system does not have to wait until the source of a page is collected).
Cookie Collector
a collector responsible for collecting cookies.
Cookie Comparator
a comparator responsible for processing collected cookies.
Cookie Modifier
a modifier that allows to modify cookies for a given page, i.e. to add or remove cookies.
Data Filter
a module responsible for filtering the collected data before performing comparison e.g. filtering uninteresting js errors before the js errors check takes place.
Data Storage
a database abstraction layer which contains versioned data (data grid).
Extract Element Modifier
a modifier that allows to extract an element from the html source (collected by the Screen Collector) by providing the id attribute or the class attribute.
Feature
a part of the AET system which covers a full testing case e.g. layout - this feature consists of the Screen Collector, the screen comparator and the layout reporter module.
Firefox
a browser the AET tool makes use of, currently the version that is used is 38.6.0 ESR (en-US).
Header Modifier
a modifier responsible for adding additional headers to a page.
Hide Modifiers
a modifier responsible for hiding an element on a page that is unnecessary for a given test.
Html-report
a basic report in a form of a HTML file.
Java
a programming language that is used to develop the AET tool.
Java Development Kit
see JDK.
Java Management Extensions
see JMX.
Java Message Service
see JMS.
JavaScript
see JS.
JDK
the Java Development Kit is a program development environment for developing Java applications.
Jenkins
a continuous Integration (CI) server which is used as the user interface wrapper for the AET Maven Plugin.
Jetty
a simple Http Server, used as a container for web applications.
JMS
an acronym for the Java Message Service, simple message standard that allows application components to communicate with one another.
JMX
Java Management Extensions (JMX) is a technology that is used to manage and monitor advanced interfaces of Java applications. In the AET tool it is used to manage ActiveMQ.
JS
a dynamic programming language.
JS Error
a JavaScript error that occurs in a script during its execution.
JS Errors Collector
a collector responsible for collecting JavaScript errors occurring on a given page.
JS Errors Comparator
a comparator responsible for processing the collected JavaScript error resource.
JS Errors Filter
a filter that filters the results returned by the JS Errors Collector. It removes matched JavaScript errors from reports.
JUnit
a simple framework allowing to develop repeatable tests. It is an instance of the xUnit architecture for unit testing frameworks. More information about it can be found at: http://junit.org/.
Karaf
in fact Apache Karaf is an OSGi container that provides a basic configuration for existing OSGi implementations (e.g. Apache Felix).
Layout Comparator
a comparator responsible for comparing a collected screenshot of page to its pattern.
Login Modifier
a modifier that allows to log in into the application and access secured sites.
Maven
a software project management and comprehension tool. It used as a base for the AET Maven Plugin.
Modifier
a module responsible for converting the target before the data collection process is performed e.g. modifying a requested header, adding a new cookie, hiding a visible element.
MongoDB
an open-source cross-platform document-oriented database that the AET tool makes use of for data storage and management. MongoDB is developed by MongoDB Inc.
Open
A module that is a special operand for the Collect Phase.
OSGi
a modular system and services platform for Java. It is used as an application environment for AET Java components.
Pattern
a sample model of data. Collection results are compared to their patterns to discover potential differences.
pom.xml
a Maven tool configuration file that contains information about the project and configuration details used by Maven to build the project.
Rebasing
an operation changing the existing pattern to the current result.
Regression testing
this is a type of software testing that seeks to uncover new software bugs, or regressions, in existing functional and non-functional areas of a system. It is especially useful after changes such as enhancements, patches or configuration changes, have been made.
Remove Lines Data Modifier
a modifier that allows to remove lines from the source (data or pattern) that a given page is compared to.
Remove Nodes Data Modifier
a modifier that allows to delete some node(s) from a html tree. Node(s) are defined by the xpath selector.
Report (Web application)
a web application for viewing / browsing AET test results. (At the moment the Google Chrome browser is supported).
Representational State Transfer API
see Rest API.
Resolution Modifier
a modifier responsible for changing the size of the browser screen.
Resource type
a unique name for the resource produced by the collector and consumed by the comparator.
Rest API
a Representational State Transfer API for the data stored in the AET Database. It enables the user to browse the data and artifacts stored after a run of the Test Suite was completed.
Runner
a unit responsible for the communication with the client and dispatching processing among workers.
SCM repository
a data structure storing metadata for a set of files that is managed by a source control management (SCM) system responsible for managing changes in files. The most popular examples of SCM systems are Git (http://git-scm.com/) and SVN (https://subversion.apache.org/).
Screen Collector
a collector responsible for collecting a screenshot of the page under a given URL.
Selenium
a portable software testing framework for web applications. At the moment AET makes use of Selenium 2.50.1.
Selenium Driver
a test tool that allows to perform specific actions in a browser environment (e.g. take a screenshot of a page).
Sleep Modifier
a modifier responsible for ceasing the execution of a given test temporarily. It causes a current thread to sleep.
Source Collector
a collector responsible for collecting the source of a page under a given URL. Unlike other collectors the Source Collector does not use Web Driver. It connects directly to a web server.
Source Comparator
a comparator responsible for comparing a collected page source to its pattern.
Status Code
a response code for the resource request. For a detailed list of codes please refer to the Hypertext Transfer Protocol documentation at: http://www.w3.org/Protocols/rfc2616/rfc2616-sec10.html.
Status Codes Collector
a collector responsible for collecting status codes for links to resources on a page under a given URL.
Status Codes Comparator
a comparator responsible for processing collected Status Codes.
Step
a single operation performed on the url defined in the <collect> phase of the suite.
Test
a definition of logical set of Test Cases performed on a set of URLs.
Test Suite
a set of Tests (at least one) finished with the Report.
Test Case
a single URL Test against a feature, e.g. a W3C HTML page test, a screenshot for the resolution 800x600 test.
Thresholds
a feature allowing to declare a Jenkins build as ‘success’, ‘unstable’ or ‘failed’ depending on the number of Tests that failed or were skipped.
Wait For Page Loaded Modifier
a modifier that waits until a page is loaded or a fixed amount of time is up.
Web Console
the OSGi console installed on Apache Karaf. By default it is accessible via a browser: http://localhost:8181/system/console/configMgr. The default user/password are: karaf/karaf.
Worker
a single processing unit that can perform a defined amount of tasks (e.g. collect a screenshot, compare a source).
W3C HTML5 Comparator
a comparator responsible for validating a collected page source against W3C HTML5 standards.
xunit-report
a Report that visualizes risks on the Jenkins job board and that contains information about the number of performed tests and the number of failures (potential threats).
AET comes with many useful Features. However, the tool doesn't solve all the challenges. And because of that AET are very easy to extend. You may create your own module, deploy it on your AET instance and start using it (no system restarts are required!). There are 4 types of modules in AET:
You may extend AET with any of those types. To do so, you need to implement several interfaces from
jobs-api module.
Below we present how to create a custom Modifier, which is the most common case and is the easiest type to extend.
Extending other types is similar and examples will be available in the future, however creating a new type of
Collector and corresponding Comparator involves also
extending Report Application to present the results.
Creating a new AET Modifier is really easy. You need basic Java and OSGi knowledge and installed JDK. We are also working on maven archetypes for each of those types that will help you to create extension structure.
In this example we will use Maven to build this project and create OSGi bundle, however you can use any other build tool that you find useful.
Now, we will create a sample Modifier that enables to change the background color of the tested page.
The idea here is to use a Modifier in the [[<collect>|TestProcessing#collection]]
phase and select the color of the background that will be applied to the page. Sample usage can look like this:
<change-background color="blue" />
And this will change the background of the page to blue.
Prepare project structure:
src
|- main
   |-java
pom.xml
Example pom.xml is presented below. It already contains all necessary dependencies that will be used
in this example Modifier. Remember, that we are working with OSGi so all the dependencies you need should
be available on the Karaf instance that AET are running at.
<?xml version="1.0" encoding="UTF-8"?>
<project xmlns="http://maven.apache.org/POM/4.0.0"
    xmlns:xsi="http://www.w3.org/2001/XMLSchema-instance"
    xsi:schemaLocation="http://maven.apache.org/POM/4.0.0 http://maven.apache.org/xsd/maven-4.0.0.xsd">
    <modelVersion>4.0.0</modelVersion>

    <groupId>com.example.aet.modifiers.pagebackground</groupId>
    <artifactId>page-background-modifier</artifactId>
    <version>1.0-SNAPSHOT</version>
    <packaging>bundle</packaging>

    <name>AET Background Modifier</name>
    <description>AET Modifier That Changes Page Background Color</description>

    <properties>
        <maven.compiler.compilerVersion>1.7</maven.compiler.compilerVersion>
        <maven.compiler.fork>true</maven.compiler.fork>
        <project.build.sourceEncoding>UTF-8</project.build.sourceEncoding>
        <!-- this should be versions of AET and libraries that you have deployed on Karaf -->
        <aet.api.version>2.1.2</aet.api.version>
        <slf4j.version>1.7.5</slf4j.version>
        <selenium.version>2.50.1</selenium.version>
        <felix.version>1.9.6</felix.version>
    </properties>

    <dependencies>
        <!-- AET API -->
        <dependency>
            <groupId>com.cognifide.aet</groupId>
            <artifactId>communication-api</artifactId>
            <version>${aet.api.version}</version>
        </dependency>
        <dependency>
            <groupId>com.cognifide.aet</groupId>
            <artifactId>jobs-api</artifactId>
            <version>${aet.api.version}</version>
        </dependency>
        <dependency>
            <groupId>com.cognifide.aet</groupId>
            <artifactId>datastorage-api</artifactId>
            <version>${aet.api.version}</version>
        </dependency>

        <dependency>
            <groupId>org.slf4j</groupId>
            <artifactId>slf4j-api</artifactId>
            <version>${slf4j.version}</version>
        </dependency>
        <dependency>
            <groupId>org.slf4j</groupId>
            <artifactId>slf4j-simple</artifactId>
            <version>${slf4j.version}</version>
        </dependency>

        <dependency>
            <groupId>org.apache.felix</groupId>
            <artifactId>org.apache.felix.scr.annotations</artifactId>
            <version>${felix.version}</version>
        </dependency>

        <dependency>
            <groupId>org.seleniumhq.selenium</groupId>
            <artifactId>selenium-api</artifactId>
            <version>${selenium.version}</version>
        </dependency>
    </dependencies>

    <build>
        <plugins>
            <plugin>
                <groupId>org.apache.felix</groupId>
                <artifactId>maven-bundle-plugin</artifactId>
            </plugin>
            <plugin>
                <!-- scr annotations - e.g. for generating OSGi component descriptors -->
                <groupId>org.apache.felix</groupId>
                <artifactId>maven-scr-plugin</artifactId>
            </plugin>
        </plugins>

        <pluginManagement>
            <plugins>
                <plugin>
                    <groupId>org.apache.maven.plugins</groupId>
                    <artifactId>maven-compiler-plugin</artifactId>
                    <version>3.3</version>
                    <configuration>
                        <source>1.7</source>
                        <target>1.7</target>
                    </configuration>
                </plugin>

                <plugin>
                    <groupId>org.apache.felix</groupId>
                    <artifactId>maven-bundle-plugin</artifactId>
                    <version>2.4.0</version>
                    <extensions>true</extensions>
                </plugin>

                <plugin>
                    <groupId>org.apache.felix</groupId>
                    <artifactId>maven-scr-plugin</artifactId>
                    <version>1.15.0</version>
                    <executions>
                        <execution>
                            <id>generate-scr-scrdescriptor</id>
                            <goals>
                                <goal>scr</goal>
                            </goals>
                        </execution>
                    </executions>
                </plugin>
            </plugins>
        </pluginManagement>
    </build>
</project>Start with creating PageBackgroundModifier class in the com.example.aet.modifiers.pagebackground package.
Now, implement a CollectorJob.
This is common interface for both Collectors and Modifiers.
You will have to implement two methods:
-
collectwhich is executed during the [[collection phase|TestProcessing#collection]], this method can throwProcessingExceptionwhen the modification fails. Throwing this exception from thecollectmethod won't terminate processing of all collectors/modifiers. The idea here is to continue processing other steps despite this error (and this is the expected behavior). If you want to terminate processing you should throw an exception that doesn't inherit fromAETException. -
setParametersthat setups all parameters necessary to perform modification (in our casecolorparameter), this method can throwParametersExceptionwhen some mandatory parameter is missing. Throwing this exception will terminate processing of all collectors/modifiers steps.
Implementation of PageBackgroundModifier can look like this:
package com.example.aet.modifiers.pagebackground;

import com.cognifide.aet.communication.api.metadata.CollectorStepResult;
import com.cognifide.aet.job.api.collector.CollectorJob;
import com.cognifide.aet.job.api.exceptions.ParametersException;
import com.cognifide.aet.job.api.exceptions.ProcessingException;
import java.util.Map;
import org.openqa.selenium.JavascriptExecutor;
import org.openqa.selenium.WebDriver;
import org.slf4j.Logger;
import org.slf4j.LoggerFactory;

public class PageBackgroundModifier implements CollectorJob {

  private static final Logger LOGGER = LoggerFactory.getLogger(PageBackgroundModifier.class);

  static final String NAME = "change-background";

  private static final String COLOR_PARAM = "color";
  private static final String EXAMPLE_CHANGE_BACKGROUND_MODIFICATION = "document.body.style.background = '%s';";

  private final WebDriver webDriver;
  private String color;

  PageBackgroundModifier(WebDriver webDriver) {
    this.webDriver = webDriver;
  }

  @Override
  public CollectorStepResult collect() throws ProcessingException {
    CollectorStepResult result;
    try {
      final String command = String.format(EXAMPLE_CHANGE_BACKGROUND_MODIFICATION, color);
      ((JavascriptExecutor) webDriver).executeScript(command);
      result = CollectorStepResult.newModifierResult();
    } catch (Exception e) {
      final String message = String
          .format("Can't execute JavaScript command. Error: %s ", e.getMessage());
      result = CollectorStepResult.newProcessingErrorResult(message);
      LOGGER.warn(message, e);
    }
    return result;
  }

  @Override
  public void setParameters(Map<String, String> params) throws ParametersException {
    if (!params.containsKey(COLOR_PARAM)) {
      throw new ParametersException(
          "'color' parameter must be provided for element modifier.");
    }
    color = params.get(COLOR_PARAM);
  }
}The next step is to register new Modifier in the AET system. To do so, you need to implement a
CollectorFactory
and make it an OSGi Service.
You will need to implement two methods:
-
getNamethat will return the name of registered Modifier (this is the name that will be used in suite XML to call the Modifier) in our case it is"change-background", -
createInstancethat will create a new instance of Modifier.
Implementation of PageBackgroundModifierCollectorFactory can look like this:
package com.example.aet.modifiers.pagebackground;

import com.cognifide.aet.job.api.collector.CollectorFactory;
import com.cognifide.aet.job.api.collector.CollectorJob;
import com.cognifide.aet.job.api.collector.CollectorProperties;
import com.cognifide.aet.job.api.collector.WebCommunicationWrapper;
import com.cognifide.aet.job.api.exceptions.ParametersException;
import java.util.Map;
import org.apache.felix.scr.annotations.Component;
import org.apache.felix.scr.annotations.Service;

@Component
@Service
public class PageBackgroundModifierCollectorFactory implements CollectorFactory {

  @Override
  public String getName() {
    return PageBackgroundModifier.NAME;
  }

  @Override
  public CollectorJob createInstance(CollectorProperties properties, Map<String, String> parameters,
      WebCommunicationWrapper webCommunicationWrapper) throws ParametersException {
    PageBackgroundModifier modifier = new PageBackgroundModifier(webCommunicationWrapper.getWebDriver());
    modifier.setParameters(parameters);
    return modifier;
  }
}Coding is finished now. You can build the Modifier into a bundle using Maven command:
mvn package
And you should have target directory created with page-background-modifier-1.0-SNAPSHOT.jar bundle.
Open OSGi console and install the bundle using Install/Update... button (remember to install it on
every worker if your environment contains more than one Karaf instance) like this:
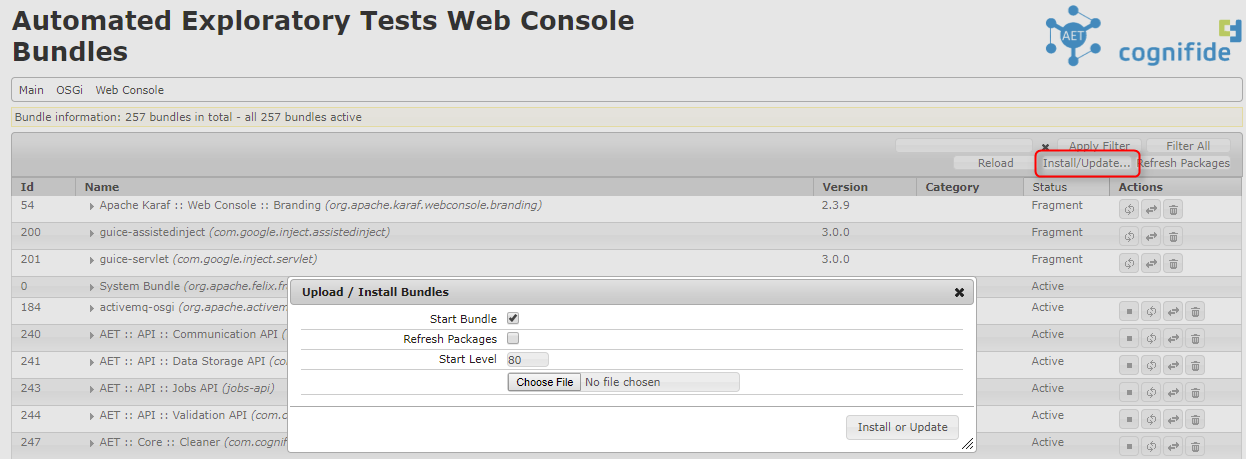
You should see now that your bundle is Active:

The only thing left now is to check how the new Modifier works! Create a Suite XML file and run it.
Sample suite could look like this:
<?xml version="1.0" encoding="UTF-8"?>
<suite name="example" company="example" project="example">
	<test name="changing-background">
		<collect>
			<open/>
			<wait-for-page-loaded />
			<sleep duration="1000"/>

			<change-background color="blue" />

			<resolution width="1280" height="1024"/>
			<sleep duration="2000"/>
			<screen  name="desktop"/>
		</collect>
		<compare>
			<screen comparator="layout"/>
		</compare>
		<urls>
			<url href="https://www.google.pl"/>
		</urls>
	</test>
</suite>
And the report you will see after the run is finished shows a page with changed background:
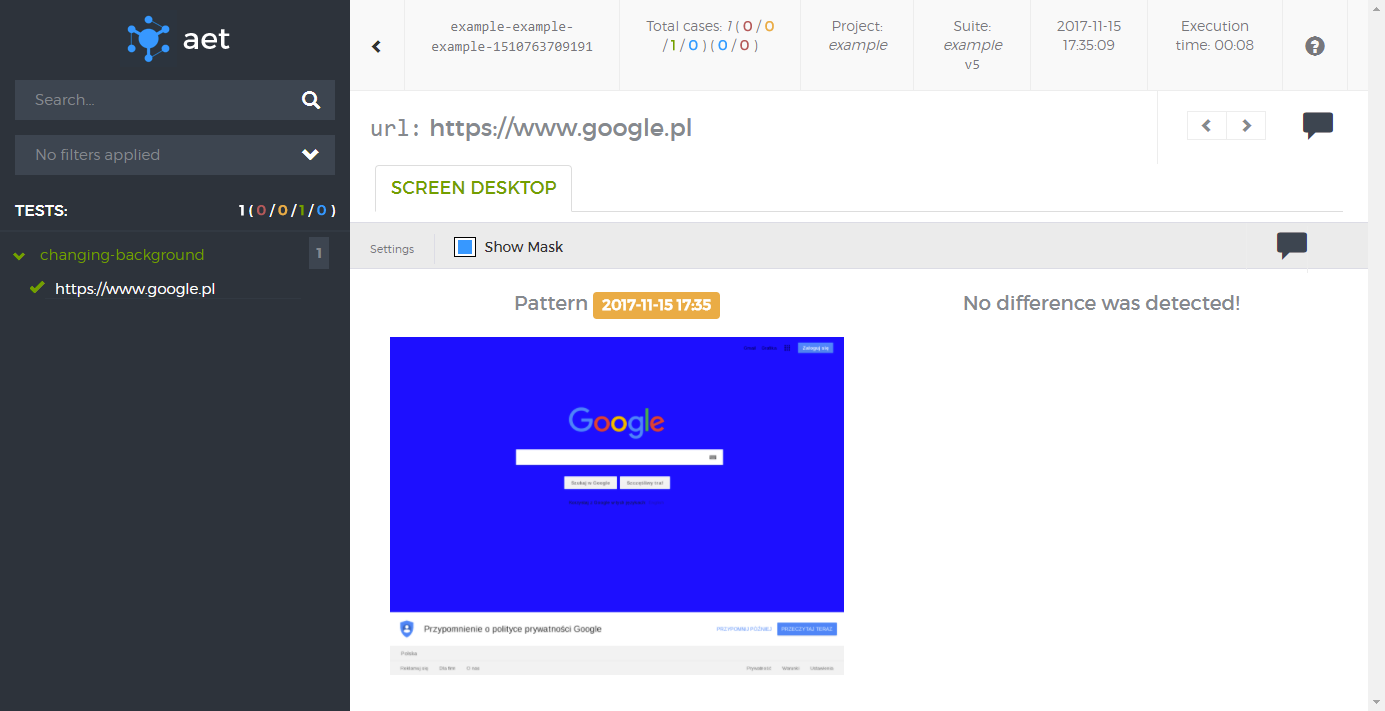
Job done!
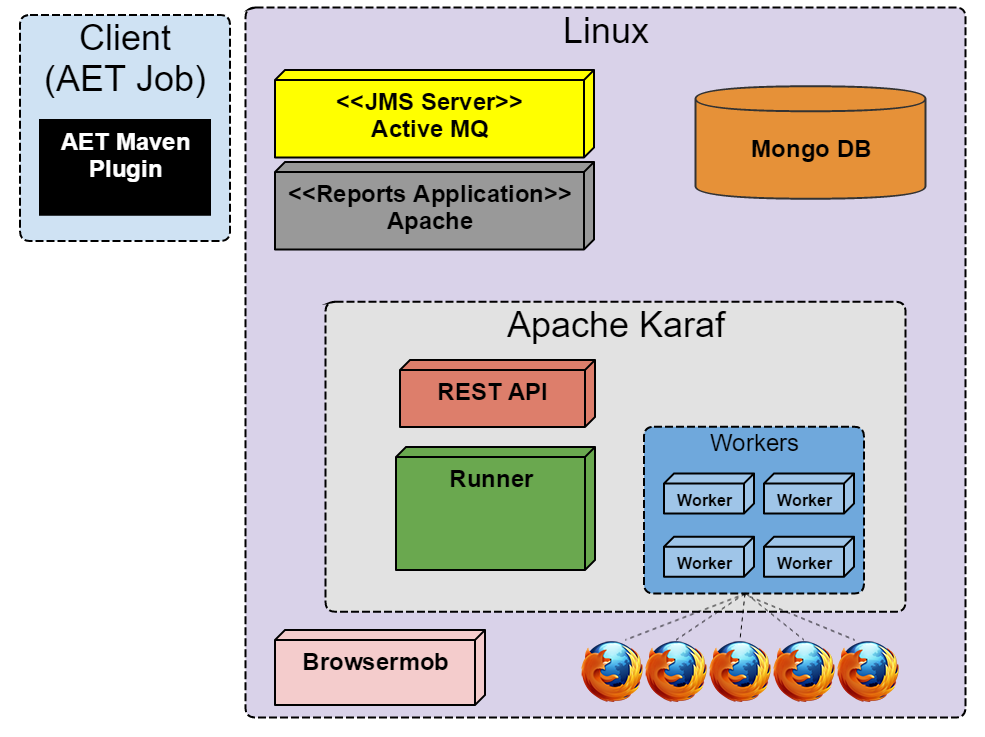
There are two ways to setup the AET environment: basic and advanced.
The basic setup makes use of Vagrant to create a single virtual machine running Linux OS (currently CentOS 6.7). This virtual machine contains all AET services as well as all the software required to run them. In this configuration, tests are using a Linux version of the Firefox web browser. Please note that there are differences in web page rendering between Linux and Windows versions of Firefox and if you want to use its Windows version then you must refer to the advanced setup.
See Basic Setup for more details.
The diagram below shows the basic AET setup.
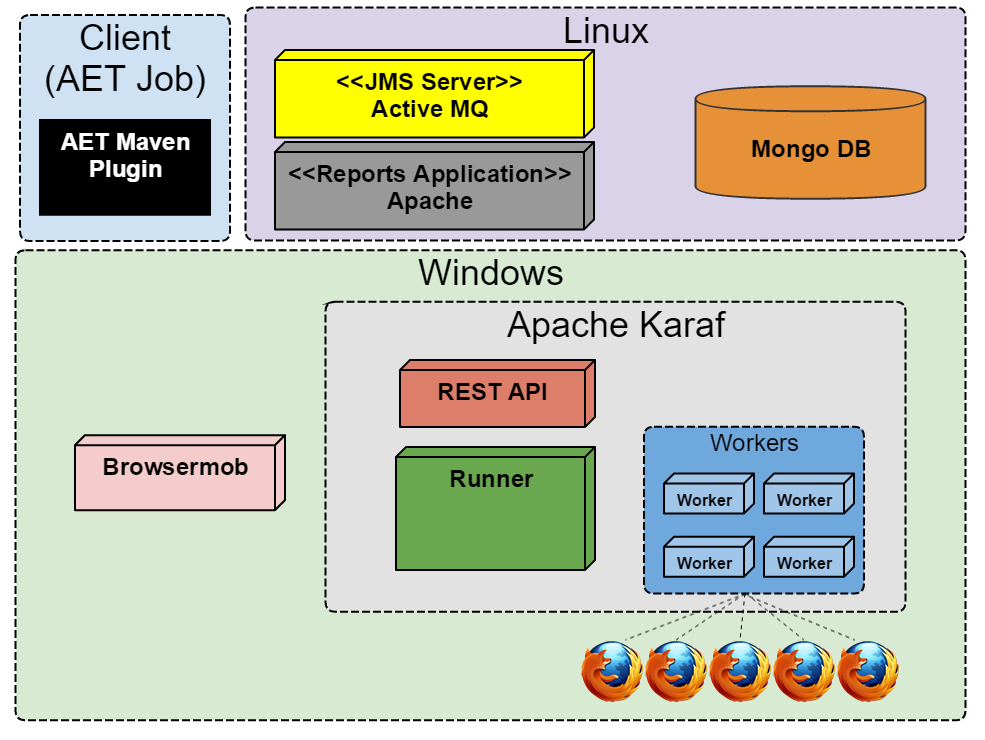
The advanced setup on the other hand makes use of two machines - one running a Linux OS and the other one running Windows, both complementary to each other. The linux machine hosts services such as MongoDB and ActiveMQ whereas the Windows machine hosts Karaf, the Browsermob proxy and Firefox. In this configuration tests run on a Windows version of the Firefox web browser.
See Linux and Windows Setup for more details.
The diagram below shows the advanced AET setup.
This setup makes use of the Vagrant module, a pseudo-cookbook which is responsible for local environment provisioning using Vagrant (powered by Chef + Berkshelf under the hood).
Currently a virtual machine with the following services is created:
- Karaf
- Apache
- Tomcat
- ActiveMQ
- MongoDb
- Brosermob
- Firefox
- X environment
All services run using default ports. For communication please use the following IP address:
192.168.123.100
By default the Vagrant virtual machine needs 3 GB of RAM and 2 vCPUs, so please make sure that you have enough memory on your machine (8 GB is minimum, 16 GB is recommended though).
- Download and install VirtualBox 5.1.14
- Download and install Vagrant 1.9.2
- Download and install ChefDK 1.1.16
As the administrator execute the following commands:
vagrant plugin install vagrant-omnibusvagrant plugin install vagrant-berkshelfvagrant plugin install vagrant-hostmanager
Whenever you'd like to keep all Vagrant related data and virtual machine disks in non-standard directories please:
- set the
VAGRANT_HOMEvariable for the location (by default it is set to$HOME/vagrant.d). - update VirtualBox settings (
File -> Preferences -> General) to move all disks to other directory.
Once you set all the thigs described above just execute:
berks update && vagrant destroy -f && vagrant up
All the commands need to be executed when you're inside a directory that contains Vagrantfile.
Next you will need to execute:
-
berks install- downloads Chef dependencies from external sources. It acts asmvn clean install, but for Chef cookbooks. -
vagrant up- creates a new virtual machine (the.boxfile will be downloaded during the first run), runs Chef inside it, sets domains and port forwarding up.
Whenever a new version is released please execute the following:
-
git pullto get the latest version ofVagrantfile. -
berks updateto update Chef dependencies. -
vagrant provisionto re-run Chef on the virtual machine.
To access the virtual machine via SSH please execute vagrant ssh from the same directory that contains Vagrantfile. After that please type sudo -i and press ENTER to switch to root.
If you prefer to use PuTTY, mRemote or any other connection manager, please log in as the user vagrant with the password vagrant on localhost with the port 2222. Keep in mind that the port may be different if you have more than one Vagrant machine running at the same time. You can check the current assignment by executing the vagrant ssh-config command from the directory that contains your Vagrantfile.
-
vagrant reloadrestarts the Vagrant machine and re-applies settings defined inVagrantfile. It's useful whenever you've changed the port forwarding or synced folder configuration. -
vagrant destroy -fdeletes the entire virtual machine. -
vagrant reload --provisionrestarts the virtual machine and re-runs Chef afterwards. -
vagrant suspendsuspends the virtual machine that is currently running. -
vagrant resumeresumes the suspended virtual machine. -
vagrant statusshows the status of the virtual machine described inVagrantfile. -
vagrant halthalts/turns off the virtual machine.
The local port is a port exposed on your machine. You can access services via localhost:<PORT>.
The VM port refers to the port assigned inside the Vagrant virtual machine.
Port forwarding rules can be easily changed in Vagrantfile.
| Local port | VM port | Description |
|---|---|---|
| 8181 | 8181 | Karaf |
- When getting the following error during application deployment to the local Vagrant:
run the
What went wrong: Execution failed for task ':deployDevClearCache'. > java.net.ConnectException: Connection timed out: connectifup eth1command on Vagrant using ssh.
This section describes advanced setup of AET using Linux and Windows. The main advantage of this approach is ability to run tests on Firefox on Windows, which is more reliable than Firefox on Linux.
Please note that full list of required tools and its versions can be found in System Components section.
- Turn off Firewall. This may be achieved differently on various linux distribution, for example on CentOS
selinuxandiptablesshould be disabled. - Install MongoDB in version 3.2.3
- Install JDK (1.7) from Oracle or OpenJDK
- Install ActiveMQ in version 5.13.1
- Enable JMX for ActiveMQ with connector under port
11199 - Switch Persistence for ActiveMQ
- Enable cleaning unused topic for ActiveMQ
- Enable JMX for ActiveMQ with connector under port
- Install Apache Server
- Configure site for the following path:
/opt/aet/apache/aet_reports/current
- Configure site for the following path:
Windows Setup.
- Follow to link and download all packages to your local instance.
- Turn off Windows Firewall (both, private and public network location settings).
- Install JDK 7 and set JAVA_HOME variable: C:\Program Files\Java\jdkYouVersion.
- Create dir under C:\ for karaf files. Preferebly C:\aet.
- Unpack Apache Karaf 2.3.9 to C:\aet\karaf.
- Create “4.2.1” dir under PATH C:\aet\karaf\system\org\apache\felix\org.apache.felix.framework
- Copy “org.apache.felix.framework-4.2.1.jar” to PATH C:\aet\karaf\system\org\apache\felix\org.apache.felix.framework\4.2.1
- Unpack “configs.zip” to PATH C:\aet\karaf\etc.
- Unpack “features.zip” to PATH C:\aet\karaf\deploy.
- Unpack “bundles.zip” to PATH C:\aet\karaf\deploy.
- Open CMD as Administrator and Run C:\aet\karaf\bin\shell.bat.
- Execute “wrapper:install” - it should generate new files under
/bindir
- Execute “wrapper:install” - it should generate new files under
- Edit C:\aet\karaf\etc\karaf-wrapper.conf.
- set set.default.KARAF_DATA to C:\aet\karaf\data
- modify and uncomment wrapper.java.initmemory= (set to 1024)
- modify wrapper.java.maxmemory (set to 4096)
- Unpack nssm-2.24 under C:.
- run C:\nssm-2.24\win64\nssm.exe install “Apache Karaf”
- NSSM prompt should display. Add “C:\aet\karaf\bin\karaf.bat” as Application Path. Startup dir should be filled up automaticly to “C:\aet\karaf\bin”
- Unpack “browsermob-proxy-2.0.0-bin” to PATH “C:\aet”.
- run C:\nssm-2.24\win64\nssm.exe install “BrowserMob Proxy”
- NSSM prompt should display. Add “C:\aet\browsermob-proxy-2.0.0\bin\browsermob-proxy.bat” as Application Path. Startup dir should be filled up automaticly to “C:\aet\browsermob-proxy-2.0.0\bin”
- Install Firefox Setup 38.6.0esr.
- Choose 'Custom Install' and do not install maintenance service - this is very important
- Open Firefox and navigate to Options => Advanced => Update => Select “Never check for updates”
- Reboot machine -> CMD -> shutdown –r /t 0.
- Configure your Karaf machine.
- Open Karaf connection. I.e localhost:8181/system/console/configMgr
- Edit " AET Default JMS Connection”
- Set connection to JMS
- failover:tcp:// <IP-of_ActiveMQ>:61616. Paste this to brokerURL and exchange localhost for proper IP address
- Set username and password, i.e. admin/admin
- Edit “AET Messages Manager”
- Set “ActiveMQ JMX”
- service:jmx:rmi:///jndi/rmi:// <IP-of_ActiveMQ>:11199/jmxrmi. Paste this to ActiveMQ JMX endpoint URL and exchange localhost for proper IP address
- Edit “AET MongoDB Client”.
- Set “MongoURI”
- mongodb:// <IP-of_MongoDB>. Paste this to MongoURI and exchange localhost for proper IP address where mongoDB was installed
- Set “MongoURI”
- Edit “AET Report Application Configuration”
- Set “Report application domain”
- Run example/test job.
Here's a description where to deploy all the artifacts.
| Artifact | Environment | Default folder |
|---|---|---|
| apache-karaf-2.3.9.zip | Windows - Karaf | C:\aet\karaf |
| browsermob-proxy-2.0.0-bin.zip | Windows - Karaf | C:\aet\browsermob-proxy-2.0.0 |
| bundles.zip | Windows - Karaf | C:\aet\karaf\deploy |
| configs.zip | Windows - Karaf | C:\aet\karaf\etc |
| features.zip | Windows - Karaf | C:\aet\karaf\deploy |
| Firefox Setup 38.6.0esr | Windows - Karaf | C:\Program Files (x86)\Mozilla Firefox |
| jdk-7u79-windows-x64 | Windows - Karaf | C:\Program Files\Java\jdk1.7.0_79 |
| nssm-2.24.zip | Windows - Karaf | C:\nssm-2.24 |
| org.apache.felix.framework-4.2.1.jar | Windows - Karaf | C:\aet\karaf\system\org\apache\felix\org.apache.felix.framework\4.2.1 |
| report.zip | Linux - Apache | /opt/aet/apache/aet_reports/current |
You can also install Baretail and Notepad++ for viewing logs and configuration files.
This section describes how to configure the AET OSGi services so that they could connect to the appropriate system components.
The services are configured through the Karaf Web Console which is hosted on Windows machine. Assuming that this machine's IP address is 192.168.0.2, the Karaf console is available under following address: http://192.168.0.2:8181/system/console/configMgr.
The example configuration assumes the following:
- The IP address of Linux machine is
192.168.0.1 - The IP address of Windows machine is
192.168.0.2 - The Apache HTTP server serves Reports application under domain
http:\\aet-report
The diagram below shows which AET OSGi service should connect to which system component on the appropriate machine. On the diagram the arrows point from the AET services to the system components. The notes on the arrows contain the properties of each service which should be set and example values according to assumptions stated above.
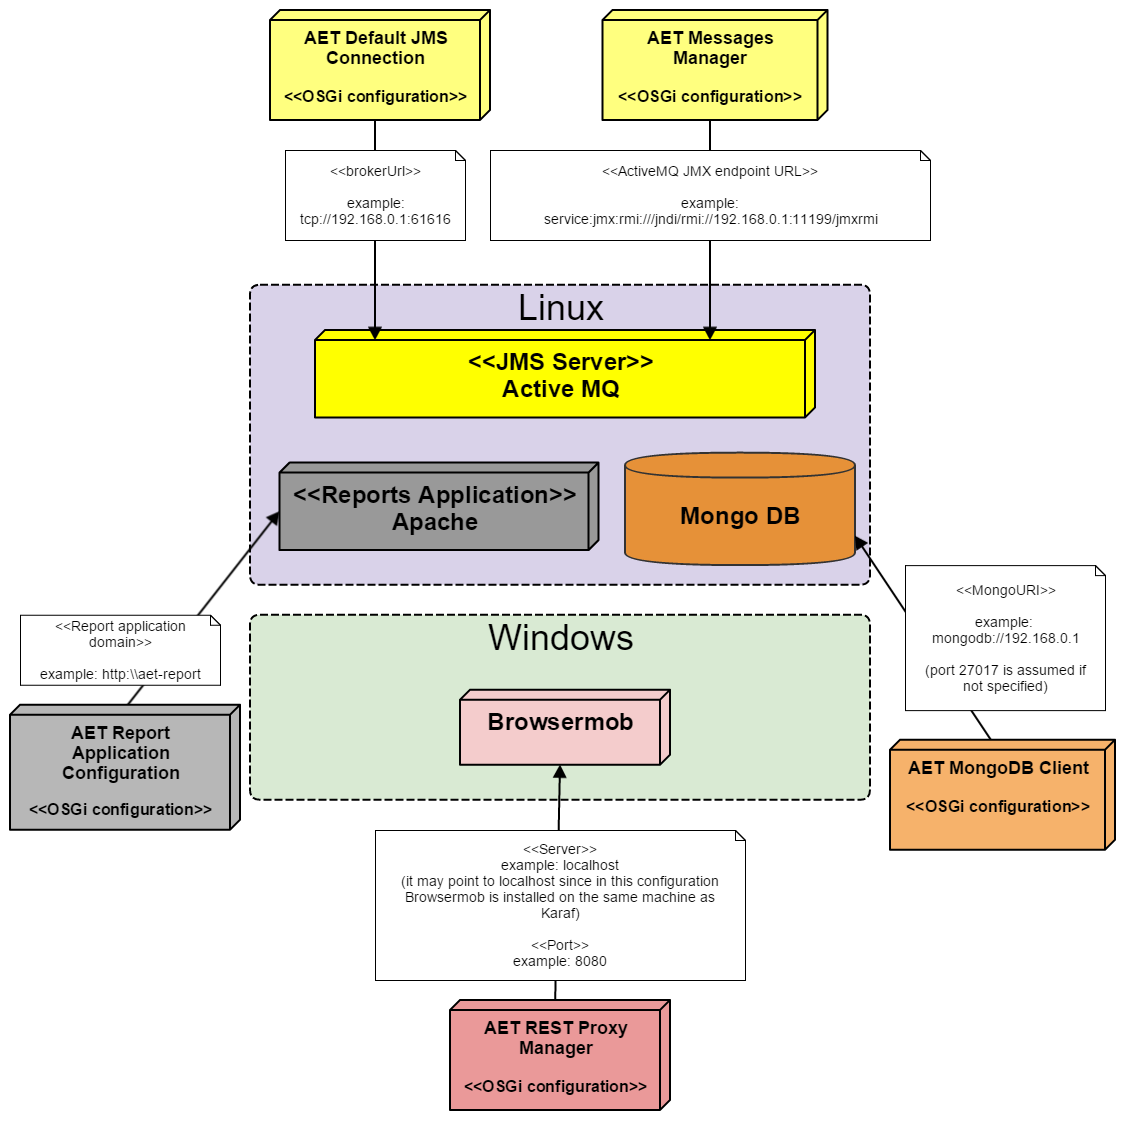
There are two more services that require configuration which are not present on the diagram above. The services are AET Collector Message Listener and AET Comparator Message Listener. There must be at least one of each of those services configured. Below there are listed the properties of each of above mentioned services with required values.
| Property name | Value |
|---|---|
| Collector name | Has to be unique within Collector Message Listeners. |
| Consumer queue name | Fixed value AET.collectorJobs
|
| Producer queue name | Fixed value AET.collectorResults
|
| Embedded Proxy Server Port | Has to be unique within Collector Message Listeners. |
| Property name | Value |
|---|---|
| Comparator name | Has to be unique within Comparator Message Listeners. |
| Consumer queue name | Fixed value AET.comparatorJobs
|
| Producer queue name | Fixed value AET.comparatorResults
|
In general the test suite is an XML document that defines tests conducted on a collection of web pages. This chapter covers the test suite API, with a description of its each element.
<?xml version="1.0" encoding="UTF-8" ?>
<!-- Each test suite consists of one suite -->
<suite name="test-suite" company="cognifide" project="project">
    <!-- The First test of Test Suite -->
    <!-- The flow is [collect] [compare] [urls] -->
    <test name="first-test" useProxy="rest">
        <!-- Description of the collect phase -->
        <collect>
            <open/>
            <resolution width="800" height="600" />
            <!-- sleep 1500 ms before next steps - used on every url defined in urls -->
            <sleep duration="1500"/>
            <screen/>
            <source/>
            <status-codes/>
            <js-errors/>
        </collect>
        <!-- Description of compare phase, says what collected data should be compared to the patterns, can also define the exact comparator. If none chosen, the default one is taken. -->
        <compare xmlns="http://www.cognifide.com/aet/compare/">
            <screen comparator="layout"/>
            <source comparator="w3c-html5"/>
            <status-codes filterRange="400,600"/>
            <js-errors>
                <js-errors-filter source="http://w.iplsc.com/external/jquery/jquery-1.8.3.js" line="2" />
            </js-errors>
        </compare>
        <!-- List of urls which will be taken into tests -->
        <urls>
            <url href="http://www.cognifide.com"/>
        </urls>
    </test>
</suite>
The root element of the test suite definition is the suite element.
| ! Important |
|---|
When defining the suite the user should think of the following three mandatory parameters properly: name, company, project. These parameters are used by the AET System to identify the suite. Any change in one of these parameter values in the future will occur in treating the suite as a completely new one which will in effect gather all patterns from scratch. |
The Root element for the xml definition, each test suite definition consists of exactly one suite tag.
| Attribute name | Description | Mandatory |
|---|---|---|
name |
Name of the test suite. It should contain lowercase letters, digits and/or characters: -, _ only. |
yes |
company |
Name of the company. It should contain lowercase letters, digits and/or characters: - only. |
yes |
project |
Name of the project. It should contain lowercase letters, digits and/or characters: - only. |
yes |
domain |
General domain name consistent for all urls considered. Every url link is built as a concatenation of the domain name and the href attribute of it. If the domain property is not set, then the href value in the url definition should contain a full valid url. See more in the [[Urls |
Urls]] section. |
The suite element contains one or more test elements.
This tag is definition of the single test in test suite. Test suite can contain many tests.
| Attribute name | Description | Mandatory |
|---|---|---|
name |
Name of the test. Should consists only of letters, digits and/or characters: -, _. This value is also presented on report (more details in [[Suite Report |
SuiteReport]] section). |
useProxy |
Defines which (if any) Proxy should be used during collection phase. If not provided, empty or set with "false", proxy won't be used. If set to "true", default Proxy Manager will be used. Otherwise Proxy Manager with provided name will be used (see Proxy). Proxy is needed by Status Codes Collector and Header Modifier. |
no |
zIndex |
Specifies order of tests on HTML Report. A test with greater zIndex is always before test with lower value. Default value is 0. This attribute accepts integers in range <-2147483648; 2147483647>. |
no |
Each test element contains:
- one collect and one compare element - test execution phases,
- one urls element - list of urls to process.
Web proxy is required for some of the AET features:
AET proxy is currently provided by BrowserMob Proxy .
Rest proxy requires standalone Browsermob server.
See Linux and Windows Setup for more details.
This proxy is used as default when useProxy is set to "true" (which is equivalent to setting useProxy="rest").
Example usage
<?xml version="1.0" encoding="UTF-8" ?>
<suite name="test-suite" company="cognifide" project="project">
    <test name="header-modify-test" useProxy="rest">
      ...
    </test>
    ...
</suite>This tag contain list of collectors and modifiers which will be run. It specifies what pages' data should be collected and it allows for some data modification before collection step. All collect steps are processed in defined order.
Each collector provides some specific result of gathering current data (i.e. png, html files) and a common metadata file - result.json.
Following elements are available in collect element:
This tag contain list of Comparators. Each comparator takes collected resource of defined type and runs it against comparator. It provides some specific result files illustrating found differences (i.e png, html files) and a common metadata file - result.json.
Each resource type has default comparator, user can use other comparators for each type by providing attribute comparator with comparator name, e.g.:
<source comparator="my_source_comparator"/>runs my_source_comparator against each source collected during collection phase. Each comparator can contain list of Data Filters which will be performed before each compare phase.
Data filters are used to modify gathered data before these data are passed to comparator. For example you may remove some node from html tree. Data filters are defined in test suite xml as subnodes of comparator node.
Each Data Filter has predefined type of data on which it operates.
See Urls.
Currently, running an AET suite requires using aet-maven-plugin which is an AET client application.
- Maven installed (recommended version - 3.0.4).
- Proper version of AET Maven plugin installed.
- Well-formed and valid xml test suite file available (described with details in Defining Suite chapter),
-
pom.xmlfile with defined aet-maven-plugin configuration (described below).
This file (pom.xml) is a Maven tool configuration file that contains information about the project and configuration details used by Maven to build the project.
Running AET suite requires creating and configuring such a file. The File presented below might be used as a template for setup AET suite runs:
<?xml version="1.0" encoding="UTF-8"?>
<project xmlns="http://maven.apache.org/POM/4.0.0"
        xmlns:xsi="http://www.w3.org/2001/XMLSchema-instance"
        xsi:schemaLocation="http://maven.apache.org/POM/4.0.0 http://maven.apache.org/xsd/maven-4.0.0.xsd">
    <modelVersion>4.0.0</modelVersion>

    <groupId>{PROJECT-GROUP}</groupId>
    <artifactId>{PROJECT-NAME}</artifactId>
    <version>1.0.0</version>
    <packaging>pom</packaging>

    <name>Tests</name>
    <url>http://www.example.com</url>

    <properties>
        <aet.version>{PLUGIN-VERSION}</aet.version>
        <project.build.sourceEncoding>UTF-8</project.build.sourceEncoding>
    </properties>

    <build>
        <plugins>
            <plugin>
                <groupId>com.cognifide.aet</groupId>
                <artifactId>aet-maven-plugin</artifactId>
                <version>${aet.version}</version>
            </plugin>
        </plugins>
    </build>
</project>
User should configure three variables before proceeding to the next steps:
-
{PROJECT-GROUP}which is a group the project belongs to. It should follow the package name rules, i.e. it is reversed domain name controlled by project owner and consists of lowercase letters and dots,- example:
com.example.test
- example:
-
{PROJECT-NAME}which is this build identifier for Maven tool. It should consist only of lowercase letters and-characters,- example:
aet-sanity-test
- example:
-
{PLUGIN-VERSION}which should be set to the aet-maven-plugin version currently used- example:
1.0.0
- example:
Having the version as the maven property (${aet.version}) enables defining this parameter from the command line later, e.g. -Daet.version=1.1.0.
Running the AET suite with AET Maven plugin from the command line can be done by invoking a maven command in the directory where the pom.xml file has been defined:
mvn aet:run -DtestSuite=FULL_PATH_TO_TEST_SUITE
The testSuite parameter is the path to the xml suite configuration file.
During test suite processing there will be information on its progress displayed in the console. It reflects how many artifacts were currently collected, compared and reported. When processing is finished the information about the processing status - BUILD SUCCESS or BUILD FAILURE - is displayed in the console.
When the test run completes, the resulting report files can be found in the maven run target folder.
Check Client Application for more details about aet-maven-plugin.
Generally it is a good idea to create a separate SCM repository (e.g. GIT or SVN) for AET suites. This will enable running AET suites using Jenkins easily.
AET execution progress is updated on real time basis and can be viewed in the console. This progress information is accessible in two different ways:
as a command line and with the use of a Jenkins job. To see the progress:
- log in to Jenkins
- choose proper build execution from the Build history panel and
- click the Console Output.
For every test suite started the execution details are provided in the progress log:
[INFO] ********************************************************************************
[INFO] ********************** Job Setup finished at 10:14:43.249.**********************
[INFO] *** Suite is now processed by the system, progress will be available below. ****
[INFO] ********************************************************************************
During test processing detailed information about the actual progress is displayed as in the following example:
...
[INFO] [06:34:20.680]: COLLECTED: [success: 0, total: 72] ::: COMPARED: [success: 0, total: 0]
[INFO] [06:34:31.686]: COLLECTED: [success: 1, total: 72] ::: COMPARED: [success: 1, total: 1]
[INFO] [06:34:35.689]: COLLECTED: [success: 2, total: 72] ::: COMPARED: [success: 1, total: 2]
[INFO] [06:34:36.691]: COLLECTED: [success: 2, total: 72] ::: COMPARED: [success: 2, total: 2]
[INFO] [06:34:43.695]: COLLECTED: [success: 3, total: 72] ::: COMPARED: [success: 2, total: 3]
[INFO] [06:34:44.698]: COLLECTED: [success: 3, total: 72] ::: COMPARED: [success: 3, total: 3]
...
where:
collected - shows results of collectors' work - how many artifacts have been successfully collected and what is the total number of all artifacts to be collected,
compared - shows results of comparators' work - how many artifacts have been successfully compared and what is the total number of all artifacts to be compared. The total number of artifacts to be compared depends on collectors' work progress - increases when the number of successfully collected artifacts increases.
If there are problems during processing, warning information with some description of processing step and its parameters is displayed:
[WARN] CollectionStep: source named source with parameters: {} thrown exception. TestName: comparator-Source-Long-Response-FAILED UrlName: comparators/source/failed_long_response.jsp Url: http://192.168.123.100:9090/sample-site/sanity/comparators/source/failed_long_response.jsp
In this example the source collector failed to collect necessary artifacts. This information is subsequently reflected in the progress log:
...
[INFO] [06:36:44.832]: COLLECTED: [success: 46, failed: 1, total: 72] ::: COMPARED: [success: 46, total: 46]
[INFO] [06:36:50.837]: COLLECTED: [success: 47, failed: 1, total: 72] ::: COMPARED: [success: 47, total: 47]
[INFO] [06:36:52.840]: COLLECTED: [success: 48, failed: 1, total: 72] ::: COMPARED: [success: 47, total: 48]
...
In the example above one artifact has failed during the collection phase.
When the AET test processing completes the information about received reports and processing status - BUILD SUCCESS or BUILD FAILURE is shown in the console - as shown below:
[INFO] Received report message: ReportMessage{company=aet-demo-sanity, project=demo-sanity-test, testSuiteName=main, status=OK, environment=win7-ff16, domain=http://192.168.123.100:9090/sample-site/sanity/, correlationId=aet-demo-sanity-demo-sanity-test-main-1426570459612}
[INFO] [06:38:03.549]: COLLECTED: [success: 71, failed: 1, total: 72] ::: COMPARED: [success: 71, total: 71]
[INFO] Received report message: ReportMessage{company=aet-demo-sanity, project=demo-sanity-test, testSuiteName=main, status=OK, environment=win7-ff16, domain=http://192.168.123.100:9090/sample-site/sanity/, correlationId=aet-demo-sanity-demo-sanity-test-main-1426570459612}
[INFO] Total: 2 of 2 reports received.
[INFO] ------------------------------------------------------------------------
[INFO] BUILD SUCCESS
[INFO] ------------------------------------------------------------------------
[INFO] Total time: 3:45.645s
[INFO] Finished at: Tue Mar 17 06:38:03 CET 2015
[INFO] Final Memory: 14M/246M
[INFO] ------------------------------------------------------------------------
BUILD SUCCESS - the status means that test processing has been successfully finished and reports have been generated in the target folder.
BUILD FAILURE - the status means that there was some technical problem during processing, for example the database did not respond and it was not possible to receive reports.
The Jenkins console output presents the same information as described above, but if the test suite is defined to generate xunit-report additional information such as Junit processing is logged in the console:
[xUnit] [INFO] - Starting to record.
[xUnit] [INFO] - Processing JUnit
[xUnit] [INFO] - [JUnit] - 1 test report file(s) were found with the pattern 'test-suite/target/xunit-report.xml' relative to '/var/lib/jenkins/jobs/aet-sanity-test-integration/workspace' for the testing framework 'JUnit'.
[xUnit] [INFO] - Converting '/var/lib/jenkins/jobs/aet-sanity-test-integration/workspace/test-suite/target/xunit-report.xml' .
[xUnit] [INFO] - Check 'Failed Tests' threshold.
[xUnit] [INFO] - The new number of tests for this category exceeds the specified 'new unstable' threshold value.
[xUnit] [INFO] - Setting the build status to UNSTABLE
[xUnit] [INFO] - Stopping recording.
Build step 'Publish xUnit test result report' changed build result to UNSTABLE
Finished: UNSTABLE
The meaning of the 'Successful' and 'Failed' build is quite different here, because the final build status depends mainly on the test results and thresholds configuration. The build can result in the BUILD SUCCESS status (which means that all workers - collectors, comparators, reporters finished their work and proper reports were generated), but the final Jenkins build status can be for example UNSTABLE because there were some new test failures.
The Jenkins build is considered UNSTABLE (yellow) or FAILURE (red) if the current (tests that failed now, but did not fail in the previous run) or total number of failed tests exceeds the thresholds specified. For example: when the "yellow total" threshold is set to 0 and one or more test cases failed, the build is marked as UNSTABLE.
AET tests can use a number of useful features which check different elements of a given page. You can find out more information about them on the subpages of this page.
Below you can find a few most common cases which demonstrate how to use these features.
This is a case when you want to test a layout of some page by making a screenshot of this page in a specified resolution. Your page has some dynamic content e.g. carousel or advertisement and you don't want it to influence the result of your test. The following code snippet shows the test suite for such a case:
<?xml version="1.0" encoding="UTF-8" ?>
<suite name="test-suite" company="company" project="project">
    <test name="first-test" useProxy="rest">
        <collect>
            <open/>
            <hide xpath="//div[@id='mw-panel']" />
            <resolution width="800" height="600" />
            <sleep duration="1500"/>
            <screen/>
        </collect>
        <compare>
            <screen comparator="layout"/>
        </compare>
        <urls>
            <url href="https://en.wikipedia.org/wiki/Main_Page"/>
        </urls>
    </test>
</suite>
This test checks the layout of Wikipedia main page. After opening the page Hide Modifier is used to hide the navigation bar on the left side of the page. Then Resolution Modifier is used to set the screenshot resolution to 800x600 and Screen Collector takes a screenshot. Finally Layout Comparator compares the page layout to the one collected during the previous test run.
This is a case when you want to check the status codes of requests generated by the page and you are only interested in a specific range of codes e.g. client errors (codes 400-499). The following code snippet shows the test suite for such a case:
<?xml version="1.0" encoding="UTF-8" ?>
<suite name="test-suite" company="company" project="project">
    <test name="first-test" useProxy="rest">
        <collect>
            <open/>
            <status-codes />
        </collect>
        <compare>
            <status-codes filterRange="400,499" />
        </compare>
        <urls>
            <url href="https://en.wikipedia.org/wiki/Main_Pagee"/>
        </urls>
    </test>
</suite>
This test uses Status Codes Collector to gather status codes for a given url (which in this case points to a non-existent resource). Then Status Codes Comparator is used to display status codes that fit the range starting from 400 up to 499.
This is a case when you want to dismiss a dialog asking for consent for storing cookies which has to be displayed if the page needs to be compliant with the EU legislation. Some pages make use of cookies to determine if a dialog should be displayed. The following code snippet shows the test suite for such a case:
<suite name="test-suite" company="company" project="project">
    <test name="first-test" useProxy="rest">
        <collect>
            <modify-cookie action="add" cookie-name="eu_cn" cookie-value="1" />
            <open/>
            <sleep duration="1500"/>
            <screen/>
        </collect>
        <compare>
            <screen comparator="layout"/>
        </compare>
        <urls>
            <url href="http://example.com/"/>
        </urls>
    </test>
</suite>
This test makes use of Cookie Modifier to add the eu_cn cookie with the value 1 which in this example indicates that the user already gave her/his consent to store cookies. After that screenshots are collected and the layout of the page is compared to the previous test run.
This is a case when you want to check if there are any JavaScript errors on the page. You know that, for example, some third party library used contains an error but you don't want it to affect your test. The following code snippet shows the test suite for such a case:
<suite name="test-suite" company="company" project="project">
    <test name="first-test" useProxy="rest">
        <collect>
            <open/>
            <js-errors/>
        </collect>
        <compare>
            <js-errors>
                <js-errors-filter error="Uncaught ReferenceError: variable is not defined"/>
            </js-errors>
        </compare>
        <urls>
            <url href="http://example.com/"/>
        </urls>
    </test>
</suite>
This test makes use of JS Errors Collector to collect JavaScript errors. Then JS Errors Comparator is used do display the issues. Within the comparator JS Errors Data Filter ignoring a specified error is defined.
This is a case, when you want to check the source of the page but you want to exclude some code from comparison. It could be, for instance, an embedded analytics script. The following code snippet shows the test suite for such a case:
<suite name="test-suite" company="company" project="project">
    <test name="first-test" useProxy="rest">
        <collect>
            <source />
        </collect>
        <compare>
            <source comparator="source" compareType="allFormatted">
                <remove-nodes xpath="//script" />
            </source>
        </compare>
        <urls>
            <url href="https://en.wikipedia.org/wiki/Main_Page"/>
        </urls>
    </test>
</suite>
This test makes use of Source Collector to gather source code. Then Source Comparator compares the source of the page with the previous test. The applied Remove Nodes Data Filter removes all <script> nodes from the source before comparison takes place.
Open module is special operand for collect phase. It is responsible for opening web page for given url and preparing browser environment to perform chain of collections and modifications.
Second usage of this module is to allow user easily perform actions before page is being opened, such as modify headers, cookies etc.
| ! Open module |
|---|
| Each collect phase must contain open module. |
| ! Note |
|---|
| In some cases it is recommended to use **[[Sleep Modifier |
Module name: open
No parameters
<?xml version="1.0" encoding="UTF-8" ?>
<suite name="test-suite" company="cognifide" project="project">
    <test name="open-test">
      <collect>
        ...
        <!-- example action before page is opened -->
        <open/>
        <!-- collect page data -->
        ...
      </collect>
      <compare>
        ...
      </compare>
      <urls>
        ...
      </urls>
    </test>
    ...
    <reports>
      ...
    </reports>
</suite>The collector is a module which is responsible for collecting data from tested pages.
Each collector presented in the section below consists of the following two elements:
- module name (produced resource type),
- parameters.
This name is a unique identifier of a system functionality. Each collector has its unique name which should also be unique for all the modules in the collect phase. This is always a name of the tag definition for the collector.
The AET System does not know what work will be performed by the collector when it reads the suite definition. The only thing that is known is the module name. The system will recognize which collector should be called by matching the definition from the collect phase with the name registered in the system. When no collector with a defined name is found in the system, a system exception will occur and the test will be not performed. This solution enables to add new features to the system with no system downtime (just by installing a new feature bundle).
Each collector produces a resource of a defined type. This type can be later recognized by comparators and data filters. Two collectors can't produce data with the same resource type. A produced resource type is always equal to the collector module name.
This is a set of key-value pairs with the use of which the user can pass some configuration and information to the collector. Parameters for collectors are usually not mandatory - passing this parameter is not obligatory. Usually this is the extension of some collector functionality. However, there is one special property: name. The collector with the name set can be treated in a special way by comparators (some comparators may look only for collection results from collectors with a specific name) e.g.:
...
<collect>
  <open/>
  <sleep duration="1000"/>
  <resolution width="1280" height="1024" name="desktop"/>
  <screen name="desktop"/>
  <resolution width="768" height="1024" name="tablet"/>
  <screen name="tablet"/
  <resolution width="320" height="480" name="mobile"/>
  <screen name="mobile"/>

</collect>
<compare>
  <screen collectorName="mobile"/>
</compare>
...
During the collect phase, three screenshot with different resolutions will be taken and saved in the database. However, only one of them (mobile) will be compared to the pattern during the comparison phase and presented in the report (under the "Layout For Mobile" section).
The following picture depicts the elements described before:
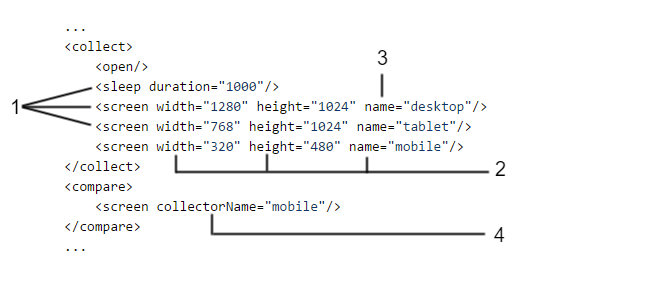
where:
- Module name (produced resource type),
- Parameters,
- Special collector property: name,
- Special comparator property: collectorName.
| ! Beta Version |
|---|
| This AET Plugin is currently in a BETA version. |
Accessibility Collector is responsible for collecting validation results containing violations of the defined coding standard found on the page. It makes use of the HTML_CodeSniffer tool to find violations.
Module name: accessibility
| Parameter | Value | Description | Mandatory |
|---|---|---|---|
standard |
WCAG2A WCAG2AA (default) WCAG2AAA |
The parameter specifies the standard which the page is validated against. More information on the standards is available at: WCAG2 | no |
<?xml version="1.0" encoding="UTF-8" ?>
<suite name="test-suite" company="cognifide" project="project">
    <test name="source-test">
        <collect>
            ...
            <accessibility standard="WCAG2AAA" />
            ...
        </collect>
        <compare>
            ...
        </compare>
        <urls>
            ...
        </urls>
    </test>
    ...
    <reports>
        ...
    </reports>
</suite>| ! Beta Version |
|---|
| This AET Plugin is currently in a BETA version. |
Client Side Performance Collector is responsible for collecting performance analysis results. The collector makes use of the YSlow tool to perform analysis.
Module name: client-side-performance
| ! Important information |
|---|
| In order to use this collector *[[proxy |
No parameters.
<?xml version="1.0" encoding="UTF-8" ?>
<suite name="test-suite" company="cognifide" project="project" environment="win7-ff16">
    <test name="source-test" useProxy="rest">
        <collect>
            ...
            <client-side-performance />
            ...
        </collect>
        <compare>
            ...
        </compare>
        <urls>
            ...
        </urls>
    </test>
    ...
    <reports>
        ...
    </reports>
</suite>
Cookie collector is responsible for collecting cookies.
Module name: cookie
No parameters.
<?xml version="1.0" encoding="UTF-8" ?>
<suite name="test-suite" company="cognifide" project="project">
    <test name="cookie-test">
        <collect>
            ...
            <cookie/>
            ...
        </collect>
        <compare>
            ...
        </compare>
        <urls>
            ...
        </urls>
    </test>
    ...
    <reports>
        ...
    </reports>
</suite>
JS Errors Collector is responsible for collecting javascript errors occuring on given page.
Module name: js-errors
No parameters.
<?xml version="1.0" encoding="UTF-8" ?>
<suite name="test-suite" company="cognifide" project="project">
    <test name="js-errors-test">
        <collect>
            ...
            <js-errors/>
            ...
        </collect>
        <compare>
            ...
        </compare>
        <urls>
            ...
        </urls>
    </test>
    ...
    <reports>
        ...
    </reports>
</suite>| ! Compare collected screenshot |
|---|
| Please remember that defining collector and not using it during comparison phase is configuration error. From now on suites that define screen collection and does not use it during comparison phase will be rejected during suite validation phase. |
| ! Notice |
|---|
Screen Collector is responsible for collecting screenshot of the page or just part of it by specifying element locator (xpatc or css) under given URL.
Module name: screen
Note that you cannot maximize the window and specify the dimension at the same time. If no parameters provided, default browser size is set before taking screenshot.
| Parameter | Value | Description | Mandatory |
|---|---|---|---|
xpath |
xpath_to_element | Xpath to element(s) | optional (either xpath or css) |
css |
css_selector_to_element | css selector to element(s) | optional (either xpath or css) |
timeout |
1000ms | The timeout for the element to appear, in milliseconds. The max value of this parameter is 15000 milliseconds (15 seconds). | no (default will be used) this parameter applies only in conjunction with xpath or css param |
<?xml version="1.0" encoding="UTF-8" ?>
<suite name="test-suite" company="cognifide" project="project">
    <test name="screen-test">
        <collect>
            ...
            <screen name="desktop" />
            <screen name="carouselComponent" css=".carousel"/>
            ...
        </collect>
        <compare>
            ...
        </compare>
        <urls>
            ...
        </urls>
    </test>
    ...
    <reports>
        ...
    </reports>
</suite>
Instead of
<screen width="1280" height="1024" name="desktop" />please use:
<resolution width="1280" height="1024"/>
<sleep duration="1000" />
<screen name="desktop" />| ! Note |
|---|
| Before taking screenshot [[Hide modifier |
Source Collector is responsible for collecting source of the page under given URL. Unlike others collectors source collector doesn't use web driver, it connects directly to web server.
Module name: source
| ! Note |
|---|
System is waiting up to 20 seconds before request is timed out. This parameter is configurable via OSGi configuration (AET Source Collector Factory). |
No parameters.
<?xml version="1.0" encoding="UTF-8" ?>
<suite name="test-suite" company="cognifide" project="project">
    <test name="source-test">
        <collect>
            ...
            <source />
            ...
        </collect>
        <compare>
            ...
        </compare>
        <urls>
            ...
        </urls>
    </test>
    ...
    <reports>
        ...
    </reports>
</suite>
Status Codes Collector is responsible for collecting status codes returned by resources on the processed page.
Module name: status-codes
Important information
In order to use this modifier it must be declared before the open module in the definition of the test suite XML and proxy must be used.
No parameters.
<?xml version="1.0" encoding="UTF-8" ?>
<suite name="test-suite" company="cognifide" project="project">
    <test name="status-codes-test" useProxy="rest">
        <collect>
            ...
            <status-codes />
            ...
        </collect>
        <compare>
            ...
        </compare>
        <urls>
            ...
        </urls>
    </test>
    ...
    <reports>
        ...
    </reports>
</suite>Modifier is module which performs particular modification on data before collection happens.
Each modifier consists of two elements:
- module name,
- parameters.
This name is unique identifier for each modifier (and each module in collect phase).
This is set of key-value pairs using which user can pass some configuration and information to modifier. Parameters for modifiers can be divided into two groups:
- mandatory - parameters without which modification will not be possible,
- optional - passing this parameter is not obligatory, usually they trigger some functionality extensions.
Click Modifier allows to perform a click action on some element on the page. When the element has not been found (e.g. because of an improper xpath value) a warning message will be logged but the test will be passed to next steps.
Module name: click
| ! Important information |
|---|
| In order to use this modifier it must be declared after the open module in the definition of the XML test suite. Remember that the element that will be clicked must be visible at the moment of performing the click action. |
| Parameter | Default value | Description | Mandatory |
|---|---|---|---|
xpath |
xpath of the element to be clicked | xpath or css | |
css |
css selector of the element to be clicked | xpath or css | |
timeout |
1000ms | The timeout for the element to appear, in milliseconds. The max value of this parameter is 15000 milliseconds (15 seconds). | no (default will be used) |
<?xml version="1.0" encoding="UTF-8" ?>
<suite name="test-suite" company="cognifide" project="project">
    <test name="click-test">
        <collect>
            <open />
            <resolution width="200" height="300"/>
            ...
            <click xpath="//*[@id='header_0_container1_0_pRow']/div[1]/div/div/a/img" timeout="3000" />
            <click css="#logo > a"/>
            <sleep duration="2000" />
            ...
            <screen />
            ...
        </collect>
        <compare>
            ...
            <screen comparator="layout" />
            ...
        </compare>
        <urls>
        ...
        </urls>
    </test>
    ...
    <reports>
        ...
    </reports>
</suite>
Cookie Modifier allows to modify cookies for a given page, i.e. add or remove some cookies.
Module name: modify-cookie
| ! Important information |
|---|
| In order to use this modifier it must be declared before the open module in the definition of the test suite XML. When declared after the open module (but before Cookie Collector) it can be used as a filter for Cookie Collector. |
| Parameter | Value | Description | Mandatory |
|---|---|---|---|
action |
add remove |
Specifies what action should be taken with a given cookie | yes |
cookie-name |
Cookie name | yes | |
cookie-value |
Cookie value | Yes, if the add action is chosen |
|
cookie-domain |
Cookie domain attribute value | No, used only if the add action is chosen |
|
cookie-path |
Cookie path attribute value | No, used only if the add action is chosen |
| ! Note |
|---|
If cookie-domain is provided WebDriver will reject cookies unless the Domain attribute specifies a scope for the cookie that includes the origin server. For example, the user agent will accept a cookie with the Domain attribute example.com or foo.example.com from foo.example.com, but the user agent will not accept a cookie with a Domain attribute of bar.example.com or of baz.foo.example.com. For more information read here. |
| ! Note |
|---|
If cookie-path is provided WebDriver will reject cookie unless the path portion of the url matches (or is a subdirectory of) the cookie's Path attribute, where the %x2F (/) character is interpreted as a directory separator. |
<?xml version="1.0" encoding="UTF-8" ?>
<suite name="test-suite" company="cognifide" project="project">
    <test name="cookie-modify-test">
        <collect>
            ...
            <modify-cookie action="add" cookie-name="sample-cookie" cookie-value="sample-cookie-value"/>
            <modify-cookie action="remove" cookie-name="another-cookie"/>
            ...
            <open />
            ...
        </collect>
        <compare>
            ...
        </compare>
        <urls>
        ...
        </urls>
    </test>
    ...
    <reports>
        ...
    </reports>
</suite>
Header Modifier is responsible for injecting additional headers to the page before it is opened to test.
Module name: header
Important information
In order to use this modifier it must be declared before the open module in the definition of the test suite XML and proxy must be used.
| Parameter | Value | Description | Mandatory |
|---|---|---|---|
key |
x | Key for the header | yes |
value |
y | Value for the header | yes |
<?xml version="1.0" encoding="UTF-8" ?>
<suite name="test-suite" company="cognifide" project="project">
    <test name="header-modify-test" useProxy="rest">
        <collect>
            ...
            <header key="Authorization" value="Basic emVuT2FyZXVuOnozbkdAckQZbiE=" />
            ...
            <open />
            ...
        </collect>
        <compare>
            ...
        </compare>
        <urls>
        ...
        </urls>
    </test>
    ...
    <reports>
        ...
    </reports>
</suite>
Hide Modifier is responsible for hiding an element on the page that is redundant for testing and/or can make the page look different each time a screenshot is taken. It affects Screen Collector results. Hiding is performed by setting the css visibility property to hidden. It works with webDriver only. You can hide many elements by defining many <hide> nodes. If the xpath covers more than one element then all the elements matching the xpath will be hidden.
Module name: hide
| ! Important information |
|---|
| In order to use this modifier it must be declared after the open module in the definition of the test suite XML. |
| Parameter | Value | Description | Mandatory |
|---|---|---|---|
xpath |
xpath_to_element | Xpath to element(s) to hide | xpath or css |
css |
css_selector_to_element | css selector to element(s) to hide | xpath or css |
timeout |
1000ms | The timeout for the element to appear, in milliseconds. The max value of this parameter is 15000 milliseconds (15 seconds). | no (default will be used) |
leaveBlankSpace |
boolean | Defines if element(s) should be invisible (effect as using display=none) or should be not displayed (effect as using visibility=hidden). When set to true, blank and transparent space is left in place of the hidden element, otherwise, element is completely removed from the view. When not defined, hide modifier behaves as if leaveBlankSpace property was set to true. |
no |
<?xml version="1.0" encoding="UTF-8" ?>
<suite name="test-suite" company="cognifide" project="project">
    <test name="hide-test">
        <collect>
            <open />
            ...
            <hide xpath="//*[@id='logo']" />
            <hide css="#ad-section > a" />
            ...
            <resolution width="1200" height="760" />
            <screen />
            ...
        </collect>
        <compare>
            ...
        </compare>
        <urls>
        ...
        </urls>
    </test>
    ...
    <reports>
        ...
    </reports>
</suite>
Execute Java Script Modifier is responsible for executing specified js command.
Module name: executejavascript
| Parameter | Value | Description | Mandatory |
|---|---|---|---|
cmd |
js script | Javascript command that will be executed |
cmd or snippetUrl
|
snippetUrl |
url | The url to external js snippet that will be executed |
cmd or snippetUrl
|
basicAuthUsername |
Basic Auth username | For Basic HTTP Authentication header | only if basicAuthPassword present |
basicAuthPassword |
Basic Auth password | For Basic HTTP Authentication header | only if basicAuthUsername present |
Please remember, that only one parameter cmd or snippetUrl should be defined in single <executejavascript> usage.
In case, when both parameters are defined, snippetUrl parameter will be ignored.
<?xml version="1.0" encoding="UTF-8" ?>
<suite name="test-suite" company="cognifide" project="project">
    <test name="hide-test">
        <collect>
            <open />
            ...
            <executejavascript cmd="document.body.style.background = 'green';" />
            <executejavascript snippetUrl="http://example.com/snippets/my-aet-snippet.js" />
            <executejavascript snippetUrl="http://secured.com/snippets/other-aet-snippet.js"
                               basicAuthUsername="john"
                               basicAuthPassword="s3cre7"/>
            ...
            <resolution width="1200" height="760" />
            <screen />
            ...
        </collect>
        <compare>
            ...
        </compare>
        <urls>
        ...
        </urls>
    </test>
    ...
    <reports>
        ...
    </reports>
</suite>
Login Modifier allows to login into pages that have access secured with login form. If input element isn't available (for example it's not loaded yet) then Login Modifier will wait up to 10s for login input, then for password input and at the end for submit button to appear. If the login form isn't ready or logging in fails for any other reason, we will try again 3 times by default.
Login modifier checks if login-token-key cookie is present to decide if authentication was successful. If cookie with specified name is present, it assumes that credentials were valid.
Module name: login
| ! Important information |
|---|
| In order to use this modifier it must be declared before open module in test suite XML definition. |
| Parameter | Value | Mandatory | Default value |
|---|---|---|---|
login |
User's login | no | admin |
password |
Password | no | admin |
login-page |
Url to login page | no | http://localhost:4502/libs/granite/core/content/login.html |
login-input-selector |
Xpath expression for login input | no | //input[@name='j_username'] |
password-input-selector |
Xpath expression for password input | no | //input[@name='j_password'] |
submit-button-selector |
Xpath expression for submit button | no | //*[@type='submit'] |
login-token-key |
Name for cookie we get after successfull login | no | login-token |
timeout |
Number of milliseconds (between 0 and 10000) that modifier will wait to login page response after submiting credentials. It is also used between reattempts to log in. | no | 5000 |
force-login |
Enforces login even when login cookie is present. | no | false |
retrial-number |
Number of reattempts to log in. It's a way to deal with unpredictable problem with logging in. | no | 3 |
<?xml version="1.0" encoding="UTF-8" ?>
<suite name="test-suite" company="cognifide" project="project">
    <test name="login-test">
        <collect>
            <login login="user"
                password="password"
                login-page="http://192.168.180.19:5503/libs/cq/core/content/login.html"
                login-input-selector="//input[@name='j_username']"
                password-input-selector="//input[@name='j_password']"
                submit-button-selector="//*[@type='submit']" />
            <open />
            ...
        </collect>
        <compare>
            ...
        </compare>
        <urls>
        ...
        </urls>
    </test>
    ...
    <reports>
        ...
    </reports>
</suite>
Resolution Modifier is responsible for changing browser screen size. Affects Screen Collector results.
| ! Note |
|---|
| Please note that final resoulution of screenshots may be different when scrollbar is dispayed. Default width of Firefox's Scrollbar is equal to 33px. (so when you want to grab viewport of size 1024, then set width parameter to 1057px) |
Module name: resolution
| Parameter | Value | Description | Mandatory |
|---|---|---|---|
width |
int (1 to 100000) | Window width | no |
height |
int (1 to 100000) | Window height | no |
| ! Important information |
|---|
| You cannot maximize the window and specify the dimension at the same time. If you specify height param you have to also specify width param and vice versa. |
<?xml version="1.0" encoding="UTF-8" ?>
<suite name="test-suite" company="cognifide" project="project">
    <test name="resolution-modify-test">
        <collect>
            ...
            <resolution width="200" height="300"/>
            <sleep duration="1000"/>
            <screen />
            ...
        </collect>
        <compare>
            ...
        </compare>
        <urls>
        ...
        </urls>
    </test>
    ...
    <reports>
        ...
    </reports>
</suite>
Sleep Modifier is responsible for temporarily ceasing execution, causes current thread to sleep. It is useful in situations when page resources have a long loading time - it suspends next collectors for some time.
Module name: sleep
| Parameter | Value | Description | Mandatory |
|---|---|---|---|
duration |
int (1 to 30000) | Sleep time, in milliseconds | yes |
| ! Important information |
|---|
| One sleep duration cannot be longer than 30000 milliseconds (30 seconds). Two consecutive sleep modifiers are not allowed. Total sleep duration (sum of all sleeps) in test collection phase cannot be longer than 120000 milliseconds (2 minutes). |
<?xml version="1.0" encoding="UTF-8" ?>
<suite name="test-suite" company="cognifide" project="project">
    <test name="sleep-test">
        <collect>
            ...
            <open />
            ...
            <sleep duration="3000" />
            ...
        </collect>
        <compare>
            ...
        </compare>
        <urls>
        ...
        </urls>
    </test>
    ...
    <reports>
        ...
    </reports>
</suite>
Wait For Page Loaded Modifier waits until the page is loaded (all DOM elements are loaded) or a fixed amount of time is up. The idea of waiting for the page is to count the amount of elements [by findElements(By.xpath("//*"))] on the current page state in the loop. If the number of elements has increased since the last checkout, continue the loop (or break if the timeout is reached). Else if the number of elements is still, assume the page has been loaded and finish waiting.
Module name: wait-for-page-loaded
No parameters.
| ! Important information |
|---|
| Timeout for waiting is 10000 milliseconds. The Page is checked every 1000 milliseconds. |
<?xml version="1.0" encoding="UTF-8" ?>
<suite name="test-suite" company="cognifide" project="project">
    <test name="wait-for-page-loaded-test">
        <collect>
            ...
            <open />
            ...
            <wait-for-page-loaded />
            ...
        </collect>
        <compare>
            ...
        </compare>
        <urls>
        ...
        </urls>
    </test>
    ...
    <reports>
        ...
    </reports>
</suite>
Wait For Element To Be Visible Modifier allows to wait for an element to appear on the page. When the element has not been found (e.g. because of an improper xpath value or timeout) a warning message will be logged but the test will be passed to next steps.
Module name: wait-for-element-to-be-visible
| ! Important information |
|---|
| In order to use this modifier it must be declared after the open module in the definition of the XML test suite. |
| Parameter | Default value | Description | Mandatory |
|---|---|---|---|
xpath |
xpath of the element to be found | xpath or css | |
css |
css selector of the element to be found | xpath or css | |
timeout |
1000ms | The timeout for the element to appear, in milliseconds. The max value of this parameter is 15000 milliseconds (15 seconds). | no (default will be used) |
<?xml version="1.0" encoding="UTF-8" ?>
<suite name="test-suite" company="cognifide" project="project">
    <test name="wait-for-element-to-be-visible-test">
        <collect>
            <open />
            <resolution width="200" height="300"/>
            ...
            <wait-for-element-to-be-visible css="#search" timeout="3000"/>
            <wait-for-element-to-be-visible xpath="//div/div/a"/>
            <sleep duration="2000" />
            ...
            <screen />
            ...
        </collect>
        <compare>
            ...
            <screen comparator="layout" />
            ...
        </compare>
        <urls>
        ...
        </urls>
    </test>
    ...
    <reports>
        ...
    </reports>
</suite>
Wait For Image Completion Modifier allows to wait for an image to appear and load on the page. When the element has not been found or fails to finish loading (e.g. because of an improper xpath value or timeout) a warning message will be logged but the test will be passed to next steps.
Module name: wait-for-element-to-be-visible
| ! Important information |
|---|
| In order to use this modifier it must be declared after the open module in the definition of the XML test suite. The modifier checks if the img html element's "complete" attribute is true, so placeholders might cause the modifier to not work as expected. |
| Parameter | Default value | Description | Mandatory |
|---|---|---|---|
xpath |
xpath of the image to be found and loaded | xpath or css | |
css |
css selector of the image to be found and loaded | xpath or css | |
timeout |
1000ms | The timeout for the image to load, in milliseconds. The max value of this parameter is 15000 milliseconds (15 seconds). | no (default will be used) |
<?xml version="1.0" encoding="UTF-8" ?>
<suite name="test-suite" company="cognifide" project="project">
    <test name="wait-for-image-completion-test">
        <collect>
            <open />
            <resolution width="200" height="300"/>
            ...
            <wait-for-image-completion css="img#important" timeout="3000"/>
            <wait-for-image-completion xpath="//div/div/img"/>
            <sleep duration="2000" />
            ...
            <screen />
            ...
        </collect>
        <compare>
            ...
            <screen comparator="layout" />
            ...
        </compare>
        <urls>
        ...
        </urls>
    </test>
    ...
    <reports>
        ...
    </reports>
</suite>
Execute Java Script Modifier is responsible for executing specified js command.
Module name: executejavascript
| Parameter | Value | Description | Mandatory |
|---|---|---|---|
cmd |
js script | Javascript command that will be executed |
cmd or snippetUrl
|
snippetUrl |
url | The url to external js snippet that will be executed |
cmd or snippetUrl
|
basicAuthUsername |
Basic Auth username | For Basic HTTP Authentication header | only if basicAuthPassword present |
basicAuthPassword |
Basic Auth password | For Basic HTTP Authentication header | only if basicAuthUsername present |
Please remember, that only one parameter cmd or snippetUrl should be defined in single <executejavascript> usage.
In case, when both parameters are defined, snippetUrl parameter will be ignored.
<?xml version="1.0" encoding="UTF-8" ?>
<suite name="test-suite" company="cognifide" project="project">
    <test name="hide-test">
        <collect>
            <open />
            ...
            <executejavascript cmd="document.body.style.background = 'green';" />
            <executejavascript snippetUrl="http://example.com/snippets/my-aet-snippet.js" />
            <executejavascript snippetUrl="http://secured.com/snippets/other-aet-snippet.js"
                               basicAuthUsername="john"
                               basicAuthPassword="s3cre7"/>
            ...
            <resolution width="1200" height="760" />
            <screen />
            ...
        </collect>
        <compare>
            ...
        </compare>
        <urls>
        ...
        </urls>
    </test>
    ...
    <reports>
        ...
    </reports>
</suite>The comparator is a module which is responsible for consuming data and comparing it to the pattern or against a defined set of rules.
Each comparator presented in the section below consists of the following three elements:
- consumed resource type,
- module name (comparator),
- parameters.
This is a name of the resource type consumed by the defined comparator. This is always a name of the tag definition for the comparator.
This name tells the system which resource type should be consumed by the defined comparator. When no comparator in the system can consume the defined resource type, a system exception will occur and the test will not be performed. This solution enables to add new features to the system with no system downtime (just by installing a new feature bundle).
Each comparator can consume only one resource type.
This is a special parameter, a unique name for the comparator type treated as the interpretation of a given resource type. The system will recognize which implementation of the comparator should be called by this name. This parameter is required for each comparator but the system will assume a default comparator for each resource type when no comparator property is defined.
- cookie -> CookieComparator,
- js errors -> JSErrorsComparator,
- screen -> LayoutComparator,
- source -> SourceComparator,
- status-codes -> StatusCodesComparator.
Sample usage can be found in the system for the source comparison where two comparators exist: W3C HTML5 Comparator and Source Comparator. The example below shows its sample usage:
...
<collect>
    <open/>
    <source/>
</collect>
<compare>
    <source comparator="source"/>
    <source comparator="w3c-html5"/>
</compare>
...
When the test defined as shown above is executed, collection of a page source is performed only once but the result of this collection is used twice during the comparison phase. First by Source Comparator and then by W3C HTML5 Comparator.
This is a set of key-value pairs allowing the user to pass some configuration and information to the comparator. Parameters for comparators can be divided into the following two groups:
- mandatory - parameters which comparison will be not possible without,
- optional - passing this parameter is not obligatory, usually this is the extension of some comparator functionality.
There exists the special comparator property collectorName which is connected to the collector name property. By using the collectorName property combined with the collector name property the user can control which comparator instance compares results collected by a particular collector. See examples below:
...
<collect>
    <open/>
    <sleep duration="1000"/>
    <resolution width="1280" height="1024" name="desktop"/>
    <screen name="desktop"/>
    <resolution width="768" height="1024" name="tablet"/>
    <screen name="tablet"/>
    <resolution width="320" height="480" name="mobile"/>
    <screen name="mobile"/>
</collect>
<compare>
    <screen collectorName="desktop"/>
    <screen collectorName="mobile"/>
    <screen collectorName="tablet"/>
</compare>
...
The configuration above will trigger three screens collections (desktop, tablet and mobile) and two comparisons (mobile and tablet). The screenshot taken for desktop will not be compared.
...
<collect>
    <open/>
    <sleep duration="1000"/>
     <resolution width="1280" height="1024" name="desktop"/>
     <screen name="desktop"/>
     <resolution width="768" height="1024" name="tablet"/>
     <screen name="tablet"/>
     <resolution width="320" height="480" name="mobile"/>
     <screen name="mobile"/>
</collect>
<compare>
    <screen/>
</compare>
...
The configuration above will trigger three screens collections (desktop, tablet and mobile) and three comparisons (desktop, table, mobile).
...
<collect>
    <open/>
    <sleep duration="1000"/>
    <resolution width="1280" height="1024" name="desktop"/>
    <screen name="desktop"/>
    <resolution width="768" height="1024" name="tablet"/>
    <screen name="tablet"/>
    <resolution width="320" height="480" name="mobile"/>
    <screen name="mobile"/>
</collect>
<compare>
    <screen/>
    <screen collectorName="tablet"/>
</compare>
...
The configuration above will trigger three screens collections (desktop, tablet and mobile) and four comparisons (desktop, tablet, mobile and one additional for the tablet).
The following picture depicts definitions described earlier:

where:
- Consumed resource type,
- Special property: collectorName,
- Special property: comparator,
- Module name (comparator).
| ! Beta Version |
|---|
| This AET Plugin is currently in a BETA version. |
Accessibility Comparator is responsible for processing collected accessibility validation results. It makes use of the html CodeSniffer library.
Module name: accessibility
Resource name: accessibility
| Parameter | Value | Description | Mandatory |
|---|---|---|---|
report-level |
ERROR (default) WARN NOTICE |
Violations of the ERROR type are only displayed in the report. Violations of WARN and ERROR types are displayed in the report. All violation types are displayed in the report. |
no |
| ignore-notice | boolean (default: true) |
If the ignore-notice=true test status does not depend on the number of notices.If ignore-notice=false notices are treated as warnings in calculating the test status. Enforces the report-level = NOTICE. |
no |
showExcluded |
boolean (default: true) |
The flag that indicates if excluded issues (see [[Accessibility Data Filter | AccessibilityDataFilter]]) should be displayed in the report. By default set to true. |
<?xml version="1.0" encoding="UTF-8" ?>
<suite name="test-suite" company="cognifide" project="project">
    <test name="accessibility-test">
        <collect>
            ...
            <accessibility />
            ...
        </collect>
        <compare>
            ...
            <accessibility report-level="WARN" />
            ...
        </compare>
        <urls>
        ...
        </urls>
    </test>
    ...
    <reports>
        ...
    </reports>
</suite>| ! Beta Version |
|---|
| This AET Plugin is currently in a BETA version. |
Client Side Performance Comparator is responsible for processing collected client side performance analysis results. The comparator makes use of the YSlow tool in order to perform the comparison phase on collected results.
Module name: client-side-performance
Resource name: client-side-performance
No parameters
<?xml version="1.0" encoding="UTF-8" ?>
<suite name="test-suite" company="cognifide" project="project">
    <test name="client-side-performance-test">
        <collect>
            ...
            <client-side-performance />
            ...
        </collect>
        <compare>
            ...
            <client-side-performance />
            ...
        </compare>
        <urls>
        ...
        </urls>
    </test>
    ...
    <reports>
        ...
    </reports>
</suite>
Cookie Comparator is responsible for processing collected cookies. This can be simply listing of collected cookies, verifying if a cookie exists or comparing a collected cookie to the pattern.
The cookie feature allows to collect patterns and can be rebased from the report only in the compare action mode.
Module name: cookie
Resource name: cookie
| Parameter | Value | Description | Mandatory |
|---|---|---|---|
action |
list test compare |
Displays a list of cookies Tests if a cookie with a given name and value exists Compares the current data to the pattern (compares only cookie names, values are ignored) |
no If the action parameter is not provided, the default list action is performed |
cookie-name |
The name of the cookie to test, applicable only for the test action | yes, if action set to test
|
|
cookie-value |
The value of a cookie to test, applicable only for the test action | no | |
showMatched |
boolean (default: true) |
Works only in the compare mode. The flag that says if matched cookies should be displayed in the report or not. By default set to true. |
no |
<?xml version="1.0" encoding="UTF-8" ?>
<suite name="test-suite" company="cognifide" project="project">
    <test name="cookie-test">
        <collect>
            ...
            <cookie />
            ...
        </collect>
        <compare>
            ...
            <cookie />
            ...
        </compare>
        <urls>
        ...
        </urls>
    </test>
    ...
    <reports>
        ...
    </reports>
</suite>
JS Errors Comparator is responsible for processing of collected javascript errors resource. In this case it is simply displaying list of javascript errors.
JS Errors feature do not allow to collect patterns, so it does not compare results with any patterns - rebase action is also not avaliable.
Module name: js-errors
Resource name: js-errors
No parameters
<?xml version="1.0" encoding="UTF-8" ?>
<suite name="test-suite" company="cognifide" project="project">
    <test name="js-errors-test">
        <collect>
            ...
            <js-errors />
            ...
        </collect>
        <compare>
            ...
            <js-errors />
            ...
        </compare>
        <urls>
        ...
        </urls>
    </test>
    ...
    <reports>
        ...
    </reports>
</suite>| ! Important information |
|---|
| [[JS Errors Data Filter |
Layout Comparator is responsible for comparing collected screenshot of page with pattern. This is default comparator for screen resource.
Can be rebased from report.
Module name: layout
Resource name: screen
No parameters
<?xml version="1.0" encoding="UTF-8" ?>
<suite name="test-suite" company="cognifide" project="project">
    <test name="layout-compare-test">
        <collect>
            ...
            <screen />
            ...
        </collect>
        <compare>
            ...
            <screen comparator="layout" />
            ...
        </compare>
        <urls>
        ...
        </urls>
    </test>
    ...
    <reports>
        ...
    </reports>
</suite>Since AET 1.3 fast comparison of screenshots will be implemented. Taken screenshot MD5 will be matched against current pattern. If hashes will be the same, screenshot will be treated as one without differences and no further comparison will be performed.
Source Comparator is responsible for comparing collected page source with pattern.
Can be rebased from report.
Module name: source
Resource name: source
| Parameter | Value | Description | Mandatory |
|---|---|---|---|
compareType |
content | Compare only text inside HTML nodes. Ignore formatting, tag names and attributes. | no If compareType is not provided default all value is taken. |
| markup | Compare only HTML markup and attributes. Ignore text inside HTML tags, formatting and white-spaces. Remove empty lines. | ||
| allFormatted | Compare full source with formatting and white-spaces ignored. Remove empty lines. | ||
| all | Compare all source (default). |
<?xml version="1.0" encoding="UTF-8" ?>
<suite name="test-suite" company="cognifide" project="project">
    <test name="source-compare-test">
        <collect>
            ...
            <source />
            ...
        </collect>
        <compare>
            ...
            <source comparator="source" compareType="markup" />
            ...
        </compare>
        <urls>
        ...
        </urls>
    </test>
    ...
    <reports>
        ...
    </reports>
</suite>| ! Important information |
|---|
| [[Extract Element Data Filter |
Status Codes Comparator is responsible for processing collected status codes. In this case it is simply displaying the list of collected status codes from given page.
Status Codes feature do not allow to collect patterns, so it does not compare results with any patterns - rebase action is also not available.
Module name: status-codes
Resource name: status-codes
| Parameter | Value | Example | Description | Mandatory |
|---|---|---|---|---|
filterRange |
x,y | 400,500 | Defines range of status codes that should be processed | yes, if filterCodes is not present |
filterCodes |
x,y,z | 400,401,404 | List of status codes that should be processed | yes, if filterRange is not present |
showExcluded |
boolean (default: true) |
true | Flag that says if excluded codes (see [[Status Codes Data Filters | StatusCodesDataFilters]]) should be displayed in report. By default set to true. |
<?xml version="1.0" encoding="UTF-8" ?>
<suite name="test-suite" company="cognifide" project="project">
    <test name="status-codes-test" useProxy="rest">
        <collect>
            ...
            <open />
            ...
            <status-codes />
            ...
        </collect>
        <compare>
            ...
            <status-codes filterRange="400,404" />
            ...
        </compare>
        <urls>
        ...
        </urls>
    </test>
    ...
    <reports>
        ...
    </reports>
</suite>
W3C HTML5 Comparator is responsible for validating the collected page source against w3c standards using validator.nu. HTML5 is supported by this library.
The W3C HTML5 feature does not allow to collect patterns, so it does not compare results with any patterns either - the rebase action is also not available.
Module name: w3c-html5
Resource name: source
| Parameter | Value | Description | Mandatory |
|---|---|---|---|
ignore-warnings |
boolean (default: true) | If ignore-warnings="true" the test status does not depend on the warnings amount. Otherwise warnings count as w3c errors when computing the testcase status. |
no |
errors-only |
boolean(default: true) |
This parameter will be removed from the 1.5 AET Version! It has the same result as the ignore-warnings parameter. |
no |
| ! Mandatory parameter |
|---|
Please remember, that using the parameter comparator="w3c-html5" is mandatory while defining this comparator. More information about this parameter can be found in the Comparators section. |
<?xml version="1.0" encoding="UTF-8" ?>
<suite name="test-suite" company="cognifide" project="project">
    <test name="w3c-html5-test">
        <collect>
            ...
            <open />
            ...
            <source />
            ...
        </collect>
        <compare>
            ...
            <source comparator="w3c-html5" />
            ...
        </compare>
        <urls>
        ...
        </urls>
    </test>
    ...
    <reports>
        ...
    </reports>
</suite>
Data filters are modules which narrow down the area which the comparison will be performed on.
They are nested in Comparators and apply only to the instance of the comparator which they are defined in.
Each data filter consists of two elements:
- module name,
- parameters.
This name is a unique identifier for each data filter (and each module in the compare phase).
This is a set of key-value pairs the user can make use of to pass some configuration and information to the data filter. Parameters can be divided into two groups:
- mandatory - parameters which filtering will be not possible without,
- optional - passing this parameter is not obligatory, usually it triggers some functionality extension.
Accessibility Data Filter filters out Accessibility issues - it removes the matched accessibility issues from reports.
This filter can be only applied to the accessibility comparator tag in the test case.
When more than one parameter is provided then only issues fully matched are filtered out.
Module name: accessibility-filter
Resource name: accessibility
| Parameter | Value | Description | Mandatory |
|---|---|---|---|
error |
string error | The exact error message | At least one parameter is required, ignored if 'errorPattern' parameter is provided |
errorPattern |
regexp | Regular expression that matches message text of issue to be filter out | At least one parameter is required, |
principle |
string principle | The exact accessibility issue principle | |
line |
integer line number | The line number in the file which the issue occurred in | |
column |
integer column number | The column number in the file which the issue occurred is |
Note:
-
errorwill be overridden byerrorPatternif set. - If there are some If some XML-specific charactes (e.g.
&) are in parameter's value, then they have to be escaped. Suite should be valid XML document.
In this example the exact match of the accessibility issue breaking principle "WCAG2A.Principle4.Guideline4_1.4_1_2.H91.Button.Name", at the line 21, the column 5 with the message "This button element does not have a name available to the accessibility API. Valid names are: title attribute, element content." will be totally ignored.
<?xml version="1.0" encoding="UTF-8" ?>
<suite name="test-suite" company="cognifide" project="project">
    <test name="accessibility-filter-test">
        <collect>
            ...
            <open/>
            ...
            <accessibility/>
            ...
        </collect>
        <compare>
            ...
            <accessibility>
                <accessibility-filter
                    error="This button element does not have a name available to the accessibility API. Valid names are: title attribute, element content."
                    principle="WCAG2A.Principle4.Guideline4_1.4_1_2.H91.Button.Name"
                    line="21"
                    column="5" />
                <accessibility-filter errorPattern="[\w]* button element does not have a name available .*" />
                <accessibility-filter error="This select element does not have a name available to an accessibility API. Valid names are: label element, title attribute." />
                <accessibility-filter principle="WCAG2A.Principle1.Guideline1_3.1_3_1.F68" />
                <accessibility-filter line="252" />
                <accessibility-filter column="6" />
                <accessibility-filter line="317" column="50" />
            </accessibility>
            ...
        </compare>
        <urls>
            ...
        </urls>
    </test>
    ...
    <reports>
        ...
    </reports>
</suite>
There can be more than one accessibility-filter tag in the accessibility comparator e.g.:
<accessibility>
    <accessibility-filter principle="WCAG2A.Principle1.Guideline1_3.1_3_1.F68" />
    <accessibility-filter error="This select element does not have a name available to an accessibility API. Valid names are: label element, title attribute." />
    <accessibility-filter line="270" />
    <accessibility-filter line="314" />
    <accessibility-filter column="5" />
    <accessibility-filter errorPattern="^This button .* element content.$" />
</accessibility>
Extract Element Data Filter allows to extract an element from the html source (collected by Screen Collector) by providing an id attribute or a class attribute. The found source of the element is processed by the comparator.
Module name: extract-element
Resource name: source
| Parameter | Value | Description | Mandatory |
|---|---|---|---|
elementId |
HTML id | Id for the element to extract | See the note below |
class |
HTML class | Class name for the element to extract | See the note below |
| ! Note |
|---|
One of these parameters is required. Only one parameter (either the elementId attribute or the class attribute) can be provided. |
<?xml version="1.0" encoding="UTF-8" ?>
<suite name="test-suite" company="cognifide" project="project">
    <test name="extract-element-test">
        <collect>
            ...
            <open/>
            ...
            <source/>
            ...
        </collect>
        <compare>
            ...
            <source comparator="source">
                <extract-element elementId="login_form"/>
            <!-- OR -->
                <extract-element class="class_form"/>
            </source>
            ...
        </compare>
        <urls>
            ...
        </urls>
    </test>
    ...
    <reports>
        ...
    </reports>
</suite>Js Errors Data Filter filters JS Errors Collector result - it removes matched javascript errors from reports.
This filter can be only applied to js-errors comparator tag in test case.
When more than one parameter is provided then only fully matched errors are filtered.
If some XML-specific charactes (e.g. &) are in parameter's value, then they must be escaped.
Module name: js-errors-filter
Resource name: js-errors
| Parameter | Value | Description | Mandatory |
|---|---|---|---|
error |
string error | Exact error message | At least one of parameter is required |
source |
JavaScript filename suffix (see notes) below | Source file name in which error occurred | At least one of parameter is required |
errorPattern |
pattern error text | Regular expression that matches message text of issue to be filter out | At least one parameter is required |
line integer line number |
Line number in file in which error occurred | At least one of parameter is required |
Note:
- filter will check if value of
sourceparam is a suffix of JS error source. So we can use"/jquery-1.8.3.js"to filter errors from all JQuery files regardless of path or even filter errors from all JavaScript files with".js". -
errorparam will be overridden byerrorPatternif set - If there are some If some XML-specific charactes (e.g.
&) are in parameter's value, then they have to be escaped. Suite should be valid XML document.
In this sample exact match of js error from file "http://w.iplsc.com/external/jquery/jquery-1.8.3.js", line 2 with message "Error: Syntax error, unrecognized expression: .iwa_block=pasek-ding" will be totally ignored (not included in report)
<?xml version="1.0" encoding="UTF-8" ?>
<suite name="test-suite" company="cognifide" project="project">
    <test name="js-errors-filter-test">
        <collect>
            ...
            <open/>
            ...
            <js-errors/>
            ...
        </collect>
        <compare>
            ...
            <js-errors>
                <js-errors-filter
                    error="Error: Syntax error, unrecognized expression: .iwa_block=pasek-ding"
                    line="2"
                    source="http://w.iplsc.com/external/jquery/jquery-1.8.3.js" />
                <js-errors-filter
                    source="/some/path/to/custom.js" />
                <js-errors-filter
                    errorPattern="^.*Syntax error, unrecognized expression.*$" />
            </js-errors>
            ...
        </compare>
        <urls>
            ...
        </urls>
    </test>
    ...
    <reports>
        ...
    </reports>
</suite>
There can be more than one js-errors-filter tag in js-errors comparator eg:
<js-errors>
    <js-errors-filter error="Error: Syntax error, unrecognized expression: .iwa_block=pasek-ding" />
    <js-errors-filter source="http://w.iplsc.com/external/jquery/jquery-1.8.3.js"
                      line="2" />
</js-errors>
Remove Lines Data Filter allows to remove lines from compared source (data or pattern). This may be helpful when we need to compare page sources with dynamic content. We can then remove these dynamic content markup.
Line number in reports represents lines state after modification, so have in mind that marked lines have different lines number in real source.
Module name: remove-lines
Resource name: source
| Parameter | Value | Description | Mandatory |
|---|---|---|---|
dataRanges |
ranges of lines to remove from data | Ranges should be provided in form a,b, this will be interpreted as closed interval of integers [a,b].Particular ranges should be separated by semicolons: a,b;c,d;e,f a>0, b>0 | At least one of parameters is required. |
patternRanges |
ranges of lines to remove from pattern | Ranges should be provided in form a,b, this will be interpreted as closed interval of integers [a,b].Particular ranges should be separated by semicolons: a,b;c,d;e,f a>0, b>0 |
Examples:
Suppose we want to remove line 10: 10,10
Suppose we want to remove lines from 10 to 15: 10,15
Suppose we want to remove lines from 10 to 15, line 27 and lines from 30 to 38: 10,15;27,27;30,38
<?xml version="1.0" encoding="UTF-8" ?>
<suite name="my-test-suite" company="cognifide" project="project">
    <test name="remove-lines-test">
        <collect>
            ...
            <source/>
            ...
        </collect>
        <compare>
            ...
            <source comparator="source">
                <remove-lines dataRanges="10,15;27,27" patternRanges="10,14;27,28"/>
            </source>
            ...
        </compare>
        <urls>
            ...
        </urls>
    </test>
    ...
    <reports>
        ...
    </reports>
</suite>
Remove Nodes Data Filter allows to delete some node(s) from html tree. Node(s) are defined by xpath selector.
| ! Important information |
|---|
| Html source has to be valid xml document |
Name: remove-nodes
Resource name: source
| Parameter | Value | Description | Mandatory |
|---|---|---|---|
xpath |
xpath_to_node | Xpath selector for nodes to remove | yes |
<?xml version="1.0" encoding="UTF-8"?>
<suite name="test-suite" company="Cognifide" project="project">
    <test name="remove-nodes-test">
        <collect>
            ...
            <open/>
            ...
            <source/>
            ...
        </collect>
        <compare>
            ...
            <source comparator="source">
                <remove-nodes xpath="//*[@id='blueBarNAXAnchor']/div/div/div/a/i"/>
            </source>
            ...
        </compare>
        <urls>
            ...
        </urls>
    </test>
    <reports>
        ...
    </reports>
</suite>
Remove Regex Data Filter allows to remove parts of source based on regex expressions from compared source (data and/or pattern).
This may be helpful when we need to compare page sources with dynamic content. We can then remove these dynamic content markup.
See also Remove Lines and Remove Nodes data Filters.
Module name: remove-regexp
Resource name: source
| Parameter | Value | Mandatory |
|---|---|---|
dataRegExp |
RegExp that will replace matched parts of data sources | At least one of parameter is required. |
patternRegExp |
RegExp that will replace matched parts of pattern sources | |
regExp |
RegExp that will replace matched parts of pattern and data sources |
| ! Note |
|---|
regExp value overrides dataRegExp and patternRegExp
|
Tip:
Use http://www.regexplanet.com/advanced/java/index.html to create check your Regular Expression and when ready use 'as a Java string' value in your testsuite.
<?xml version="1.0" encoding="UTF-8" ?>
<suite name="my-test-suite" company="cognifide" project="project">
    <test name="remove-regex-test">
        <collect>
            ...
            <source/>
            ...
        </collect>
        <compare>
            ...
            <source comparator="source">
                 <remove-regexp regExp='\"correlationId\": \".*\"'/>
            </source>
            ...
        </compare>
        <urls>
            ...
        </urls>
    </test>
    ...
</suite>Exclude Filter removes from reports Status Codes results that match specified parameters.
Name: exclude
Resource name: status-codes
| Parameter | Value | Description | Mandatory |
|---|---|---|---|
url |
String url | Exact url to be removed from results. | At least one of parameter is required. |
pattern |
String regex pattern | Regex pattern that urls should match to be removed from results. |
If both parameters are provided then result is removed when it matches at least one of the parameters.
In this sample match results with url http://www.cognifide.com/_cog_opt_js_f359581ea4bd3379b4c25591838a5dd8.js or url that matches pattern ^.*js$ will be ignored (not included in report).
<?xml version="1.0" encoding="UTF-8"?>
<suite name="test-suite" company="Cognifide" project="project">
    <test name="exclude-test" useProxy="rest">
        <collect>
            ...
            <open/>
            ...
            <status-codes/>
            ...
        </collect>
        <compare>
            ...
            <status-codes filterRange="200,999">
                <exclude url="http://www.cognifide.com/_cog_opt_js_f359581ea4bd3379b4c25591838a5dd8.js" pattern="^.*js$"/>
            </status-codes>
            ...
        </compare>
        <urls>
            ...
        </urls>
    </test>
    <reports>
        ...
    </reports>
</suite>
There can be more than one exclude tags in status-codes comparator. They are processed in turns. Example below is equivalent to defined above:
<status-codes>
    <exclude url="http://www.cognifide.com/_cog_opt_js_f359581ea4bd3379b4c25591838a5dd8.js"/>
    <exclude pattern="^.*js$"/>
</status-codes>
In this case both results with url http://www.cognifide.com/_cog_opt_js_f359581ea4bd3379b4c25591838a5dd8.js and urls that match pattern ^.*js$ (ending with js) will not be displayed on reports.
Exclude and include modifiers can be both applied to status-codes comparator. They are processed in turns. Example:
<status-codes>
    <include pattern="^.*js$"/>
    <exclude url="http://www.cognifide.com/_cog_opt_js_f359581ea4bd3379b4c25591838a5dd8.js"/>
</status-codes>
In this case, at first all urls that do not match ^.*js$ pattern are removed. Then url http://www.cognifide.com/_cog_opt_js_f359581ea4bd3379b4c25591838a5dd8.js is removed. Therefore only urls ending with js except http://www.cognifide.com/_cog_opt_js_f359581ea4bd3379b4c25591838a5dd8.js will be included in reports.
Include Filter removes from reports Status Codes results that do not match specified parameters.
Name: include
Resource name: status-codes
| Parameter | Value | Description | Mandatory |
|---|---|---|---|
url |
String url | Exact url to be included in reports. Results that do not match will be removed. | At least one of parameter is required. |
pattern |
String regex pattern | Regex pattern that urls should match to be included in reports. Results that do not match will be removed. |
If both parameters are provided then result is only included in the report when it matches both of the parameters.
In example below only result with url http://www.cognifide.com/_cog_opt_js_f359581ea4bd3379b4c25591838a5dd8.js will be included in report.
<?xml version="1.0" encoding="UTF-8"?>
<suite name="test-suite" company="Cognifide" project="project" environment="win7-ff16">
    <test name="include-test" useProxy="rest">
        <collect>
            ...
            <open/>
            ...
            <status-codes/>
            ...
        </collect>
        <compare>
            ...
            <status-codes filterRange="200,999">
                <include url="http://www.cognifide.com/_cog_opt_js_f359581ea4bd3379b4c25591838a5dd8.js"/>
            </status-codes>
            ...
        </compare>
        <urls>
            ...
        </urls>
    </test>
    <reports>
        ...
    </reports>
</suite>
There can be more than one include tags in status-codes comparator. They are processed in turns. Example:
<status-codes>
    <include pattern="^.*js$"/>
    <include url="http://www.cognifide.com/_cog_opt_js_f359581ea4bd3379b4c25591838a5dd8.js"/>
</status-codes>
In this case only http://www.cognifide.com/_cog_opt_js_f359581ea4bd3379b4c25591838a5dd8.js url will be included on reports: first all results that do not match ^.*js$ pattern (ending with js) are removed. Then within that result all urls different that "http://www.cognifide.com/_cog_opt_js_f359581ea4bd3379b4c25591838a5dd8.js" are removed.
In example above, first <include> can be omitted and result will be the same.
Include and exclude modifiers can be both applied to status-codes comparator. They are processed in turns. Example:
<status-codes>
    <include pattern="^.*js$"/>
    <exclude url="http://www.cognifide.com/_cog_opt_js_f359581ea4bd3379b4c25591838a5dd8.js"/>
</status-codes>
In this case only first all urls that do not match ^.*js$ pattern are removed. Then url http://www.cognifide.com/_cog_opt_js_f359581ea4bd3379b4c25591838a5dd8.js is removed. Therefore only urls ending with js except http://www.cognifide.com/_cog_opt_js_f359581ea4bd3379b4c25591838a5dd8.js will be included in reports.
W3C HTML5 Issues Filter allows to exclude some W3C HTML5 issues from the result. The issues excluded will appear at the bottom of a table with issues and won't be taken into account when calculating the status.
Name: w3c-filter
Resource name: source
Comparators: w3c-html5
| Parameter | Value | Description | Mandatory |
|---|---|---|---|
message |
string | Exact message text of the issue to be filtered out. *see notes below | At least one of params should be used and all the params used should be not empty. |
messagePattern |
regexp | A regular expression that matches message text of the issue to be filtered out. *see notes below | At least one of params should be used and all of the params used should be not empty. |
line |
integer | A line in the source file where the issue appears. | |
column |
integer | A column in the source file where the issue appears. |
Note:
-
messagewill be overridden bymessagePatternif set. - If there are some XML-specific characters (e.g.
&) in the parameter value, they have to be escaped. The suite should be a valid XML document.
<?xml version="1.0" encoding="UTF-8"?>
<suite name="test-suite" company="Cognifide" project="project" environment="win7-ff16">
<test name="remove-nodes-test">
<collect>
...
<open/>
...
<source/>
...
</collect>
<compare>
...
<source comparator="w3c-html5" errors-only="false">
<w3c-filter messagePattern = "The first occurrence of.*" />
<w3c-filter message="A slash was not immediately followed by “>”."/>
<w3c-filter message="Element “img” is missing required attribute “src”."/>
<w3c-filter line="1" column="119"/>
<w3c-filter line="390" message="End tag for “html” seen, but there were unclosed elements."/>
</source>
...
</compare>
<urls>
...
</urls>
</test>
<reports>
...
</reports>
</suite><urls> element lists all urls which will be processed within the current test. It contains one or more url elements.
A single url which will be processed by a particular test.
| Attribute name | Description | Mandatory |
|---|---|---|
href |
A page address (also see note under the name attribute) | yes |
name |
An identifier for the url. It is used to identify the data for the url. If provided it should be unique for each test in the test suite. If not provided it is set to the encoded href value. It should consists of letters, digits and/or characters: -, _ only. Note that if href="" with the provided url name attribute and the suite domain attribute is also valid. |
no |
description |
no longer supported |
<?xml version="1.0" encoding="UTF-8" ?>
<suite name="test-suite" company="cognifide" project="project">
    <test name="urls-test">
        <collect>
            ...
        </collect>
        <compare>
            ...
        </compare>
        <urls>
            <url href="http://www.example.com"/>
            ...
        </urls>
    </test>
    ...
    <reports>
        ...
    </reports>
</suite>
Suite Report is testing results' presentation. It's composed of single tests. Each of them contains one or more URLs, on which tests were run.
| ! Important information |
|---|
| AET reports are tested and written for Google Chrome web browser. |
Each test's result will be presented in one of three colors:
- green - if all group result passed and no risks was detected,
- yellow - if there is small risk detected,
- red - if there were some risks detected and result requires inspection
There is also 4th colour, which is not correlated with test's results. It is blue, which appears when user accepts certain pattern.
Report is made up of 3 main parts (see also screenshot below):
- toolbar,
- sidepanel (which contains two sub-parts):
- filtering,
- navigation-tree,
- main.
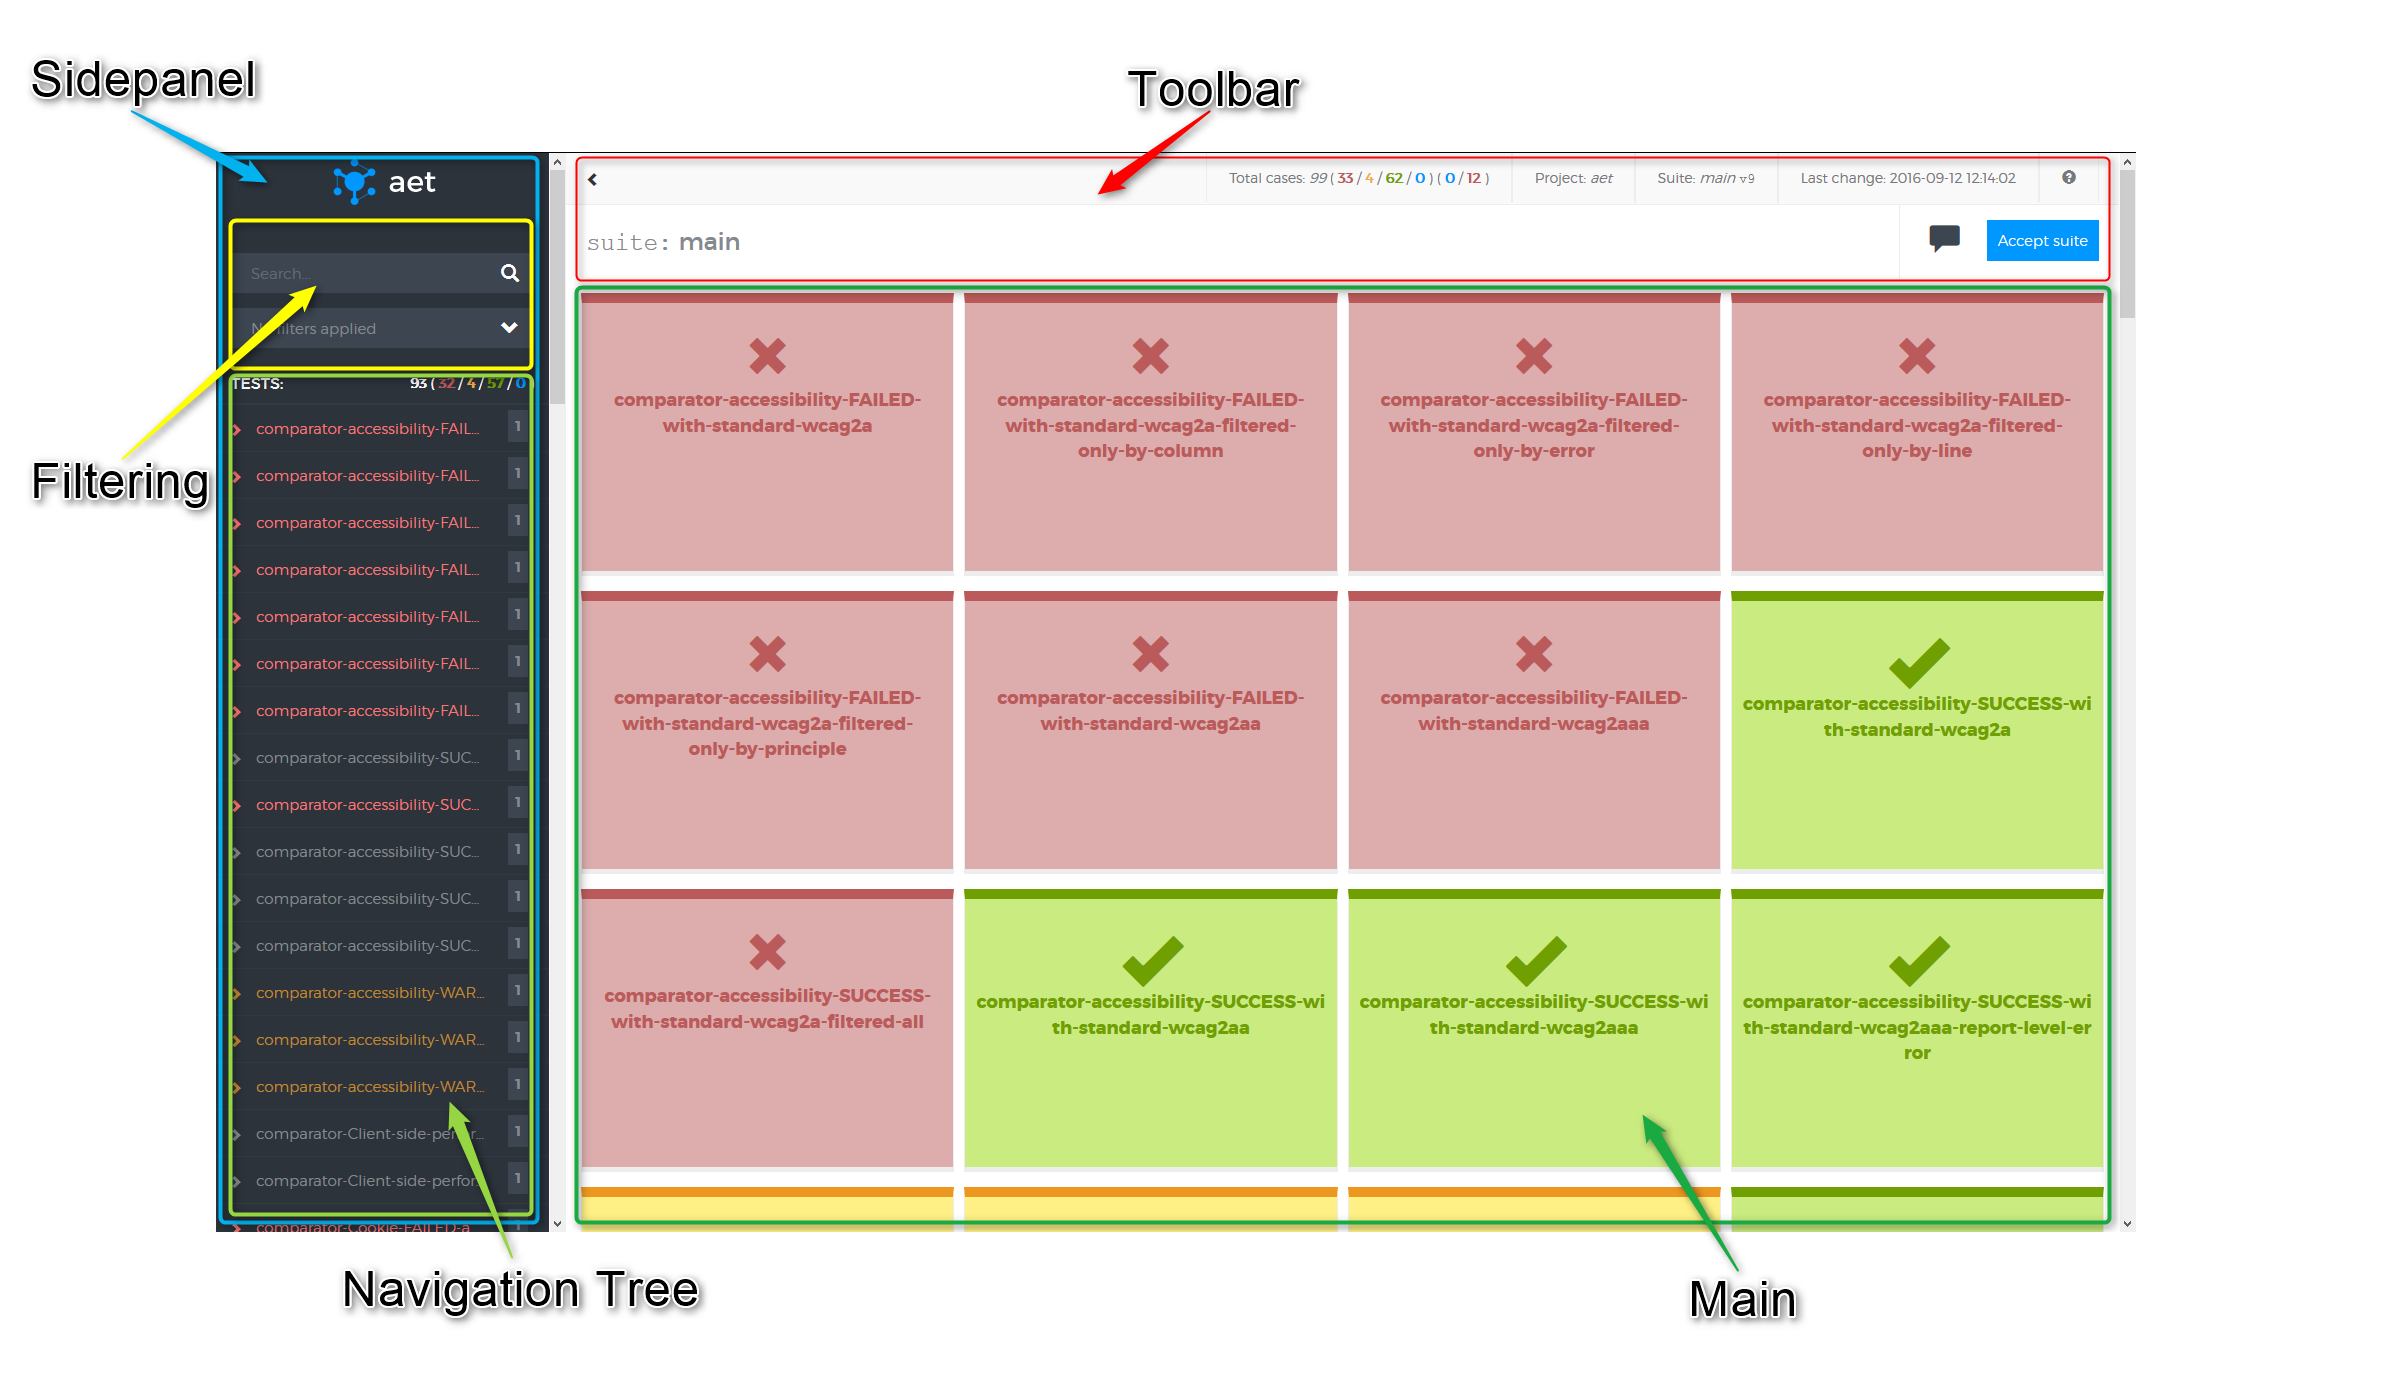
With given suite report you can:
- accept or revert patterns,
- create notes,
- filter results,
- search for specific test/URL,
- navigate on report with keyboard shortcuts.
For more information about AET reports' features see AET Report Features.
The highest report's level is suite. Every suite contains tests and the certain test contains one or more URLs on which tests are run.
On this level you can see such information as:
- all tests which was launched via certain suite,
- project name,
- test cases' status,
- date and time of running the test suite.
If you go to the certain test level, you can obtain information about:
- test case's name,
- status' representation of tested URLs,
- URLs included in the test.
On URL level you can learn about:
- cases on which certain site was tested (represented as tabs on upper part of report),
- test case's details for given URL.
Cookie test results can be presented in three diffrent forms which depend on the action parameter defined in test definition. The forms are:
- list,
- test,
- compare.
Lists all cookies found on the tested page. This result will always have success status.
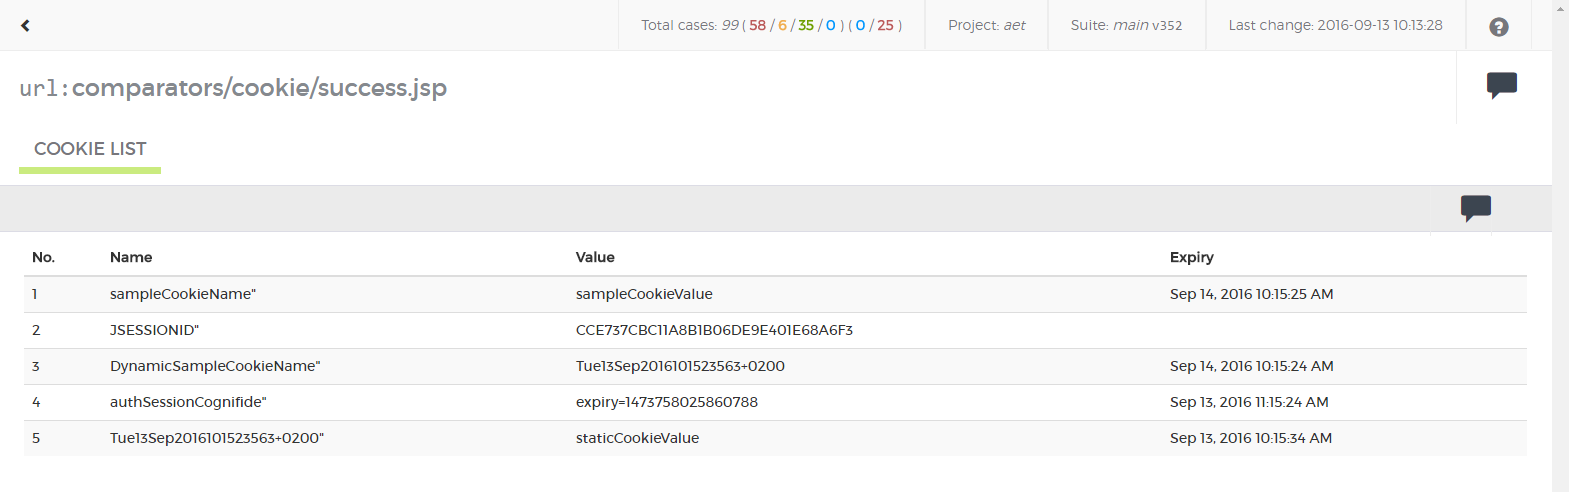
You can check all of site's cookies in order to find the invalid one. However, this mode is not intended to discover website issues. This list should be empty when tested page does not intend to use cookies and The EU Cookie Law is respected.
It shows result of checking presence of cookie with defined parameters on the tested page.

In case of cookie being not found on the page or having an unexpected value the result is marked as risk (red).

There are a few things you should pay attention to:
- lack of a cookie that occurred before might be caused by some website error (e.g. bug in system functionality),
- lack of a cookie might result in further system erros (e.g. losing some user specific data),
- lack of an important cookie (e.g. cookie with user localization data) may cause a page to be dispalyed improperly.
Cookies found on the tested page are compared to the others, which were saved in the pattern (if there is no pattern, then cookies collected during the first page entry are set as the pattern). Differences are searched only for cookies' names. Result will be successful if all found cookies' names are identical to those in the pattern.

Otherwise the result in the report will be marked as at risk (red). Differences will be presented in the form (see "1" on screenshot below) and there will be "accept test case" action available (see "2" on screenshot below).
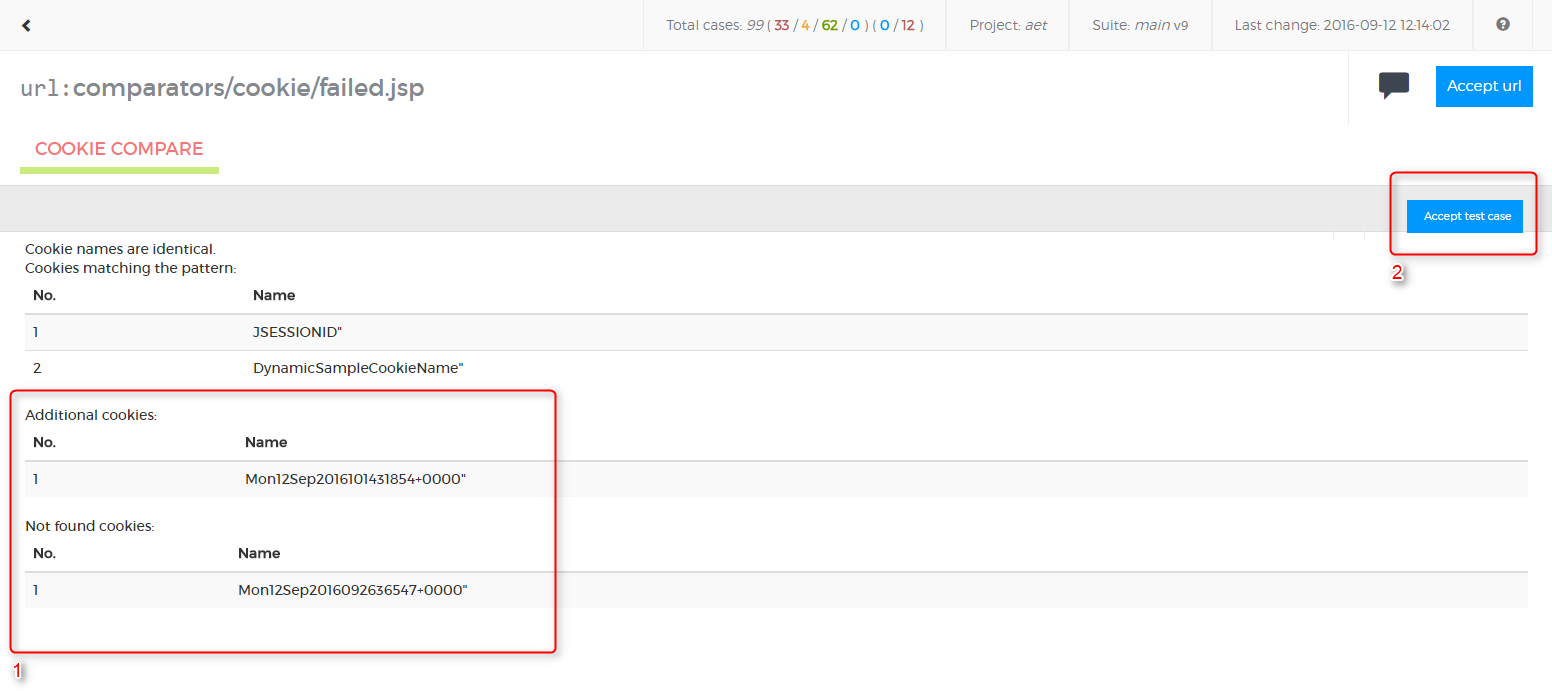
- lack of a cookie that occurred before might be caused by some website error (e.g. bug in system functionality),
- lack of a cookie might result in further system erros (e.g. losing some user specific data),
- an additional cookie may be generated by some unwanted content on a page (e.g. some 3rd party software add own cookies),
- when a page does not intend to use cookies and The EU Cookie Law is respected, lists of additional and detected cookies should always be empty.
This case displays success status when there were no JS errors found.
| ! Important information |
|---|
| All errors filtered with [[JS Errors Data Filter |
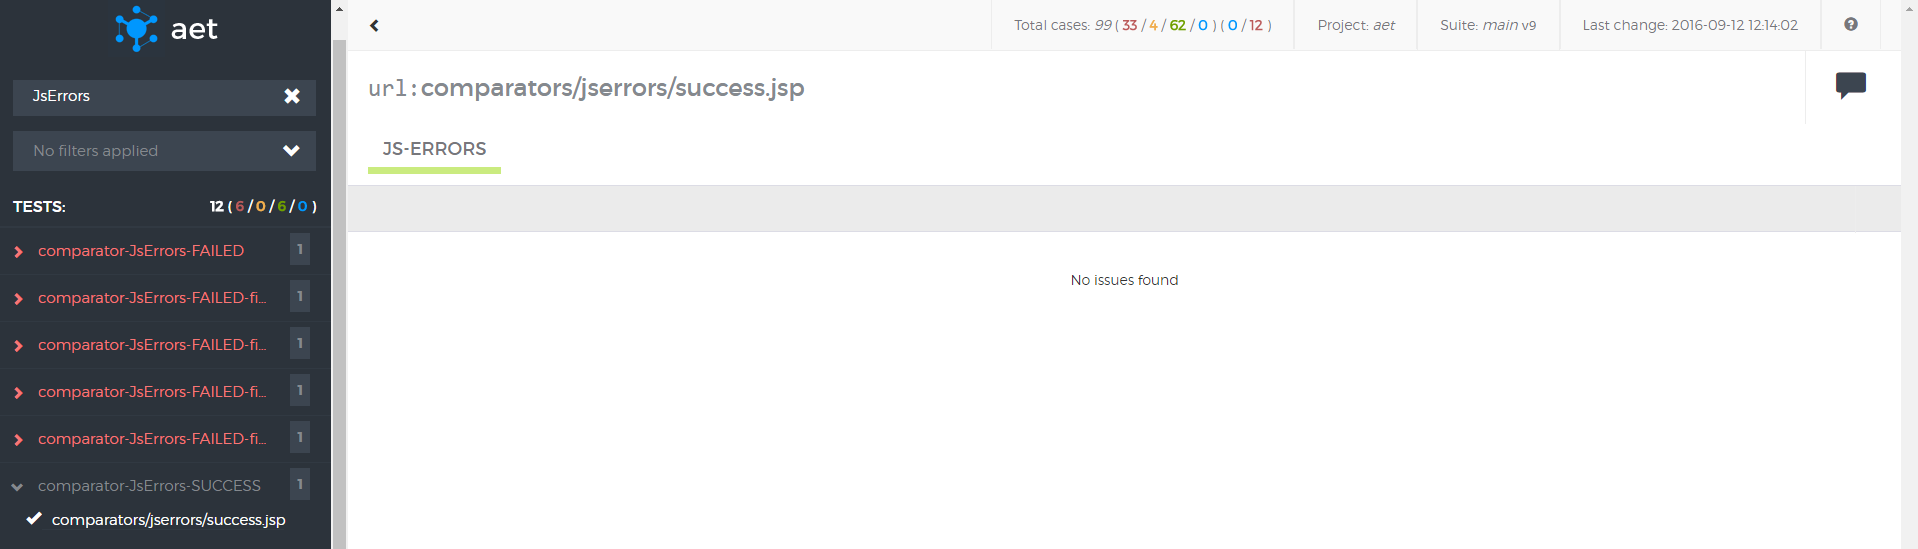
Otherwise the report is marked as risk (red) when at least one error has been found.
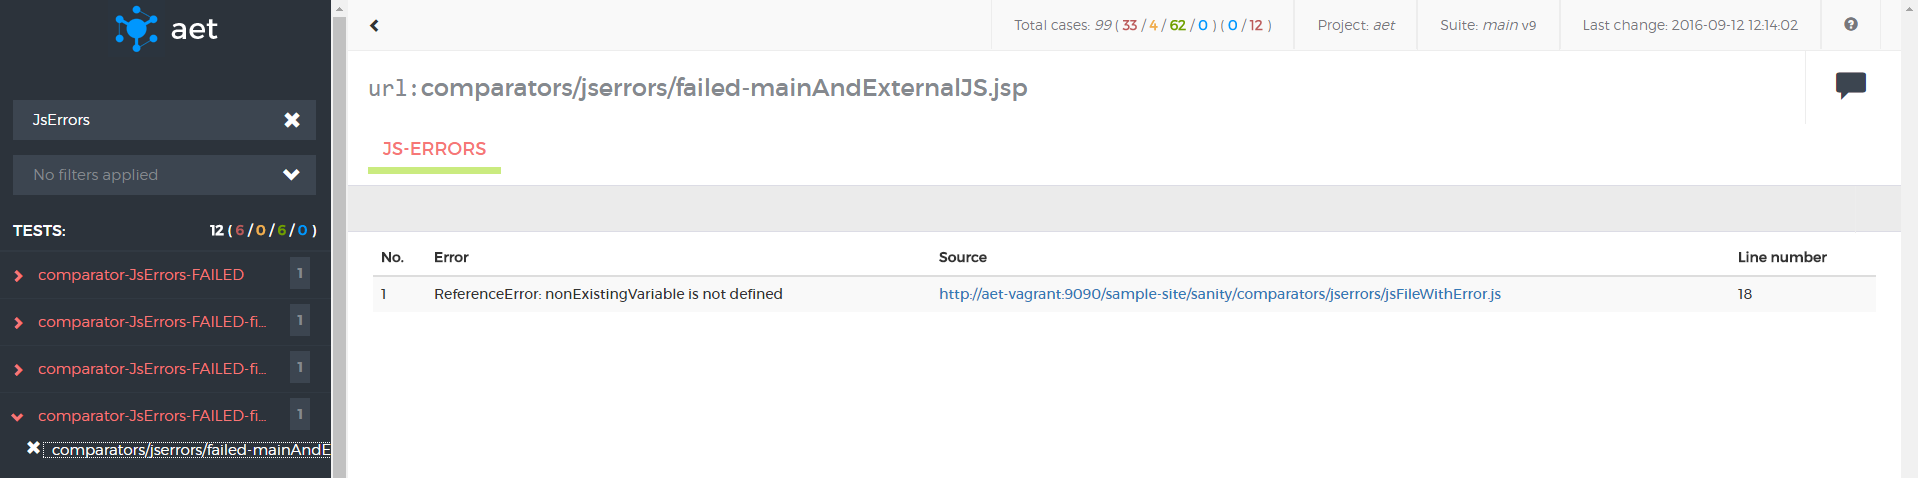
- JS Errors can cause improper behaviour of a page (e.g. dynamic components may not work properly in some (or even all) browsers,
- JS Error can also occur when good practices are not followed in the javascript code.
For layout tests the results are presented as compared screenshots
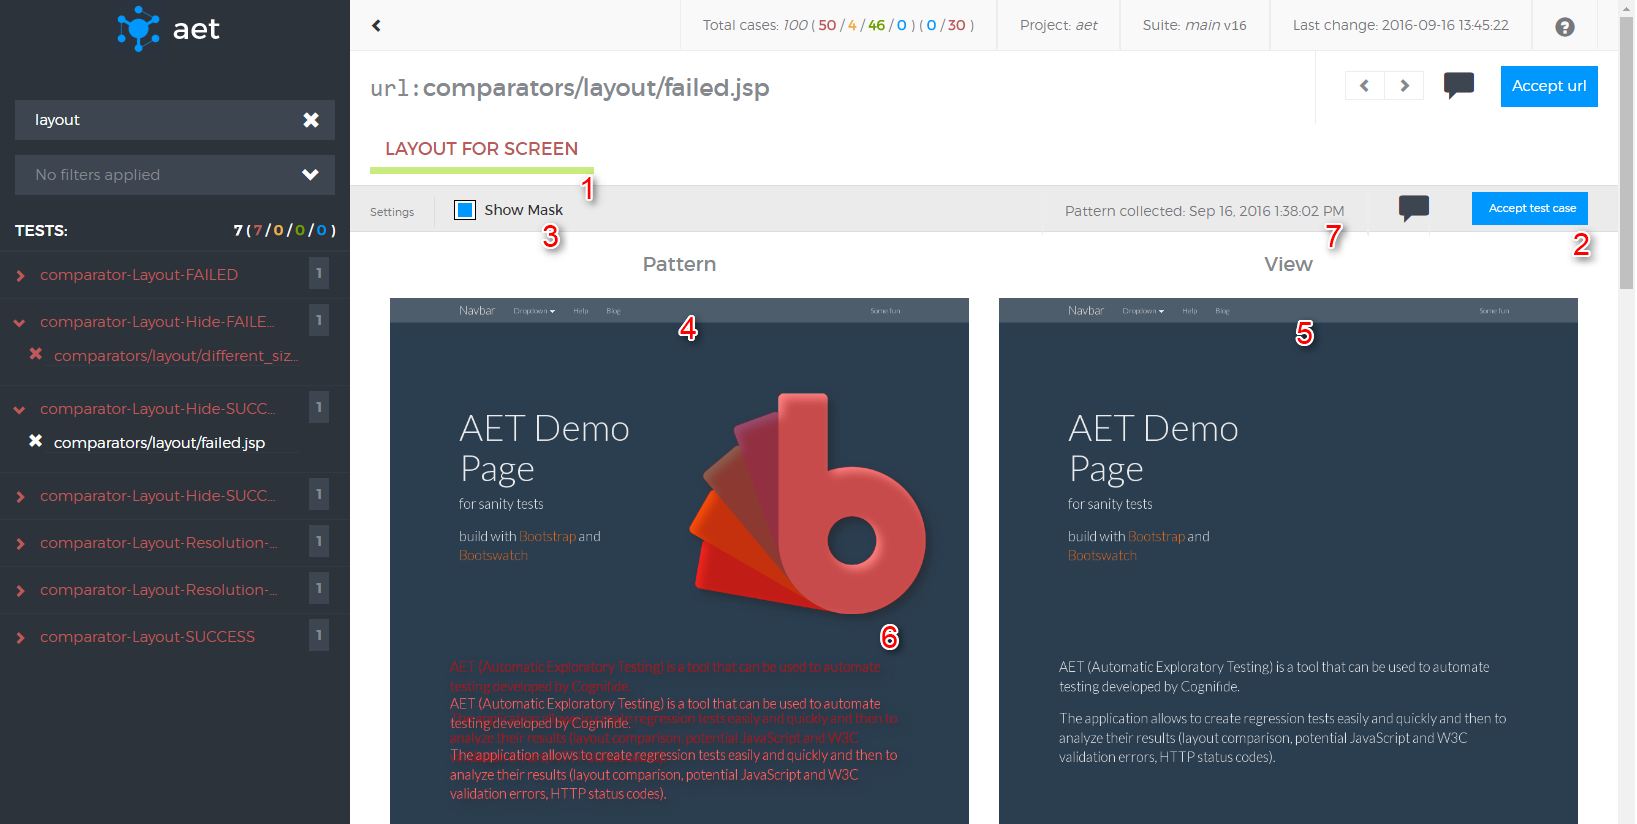
- Test case's name (red font means failure).
- "Accept test case" button (available only when differences have been detected).
- "Show mask" switch - when the mask is on, differences are marked in a red colour over the collected screenshot, otherwise a raw screenshot is presented.
- Pattern - a screen which the "view" is compared to (if there is no pattern, the first collected screenshot is saved as the pattern).
- View - a screen that was taken during the test and it is compared to the pattern.
- Example of difference area.
- Date of obtaining current pattern.
Yellow color in mask is introduced when there is a change in test definition. The yellow color shows that we have different resolutions for pattern and collected view.
In this example pattern has resolution 800x600, but then test definition for view has been increased using resolution modifier:
<resolution width="1024" height="768" />
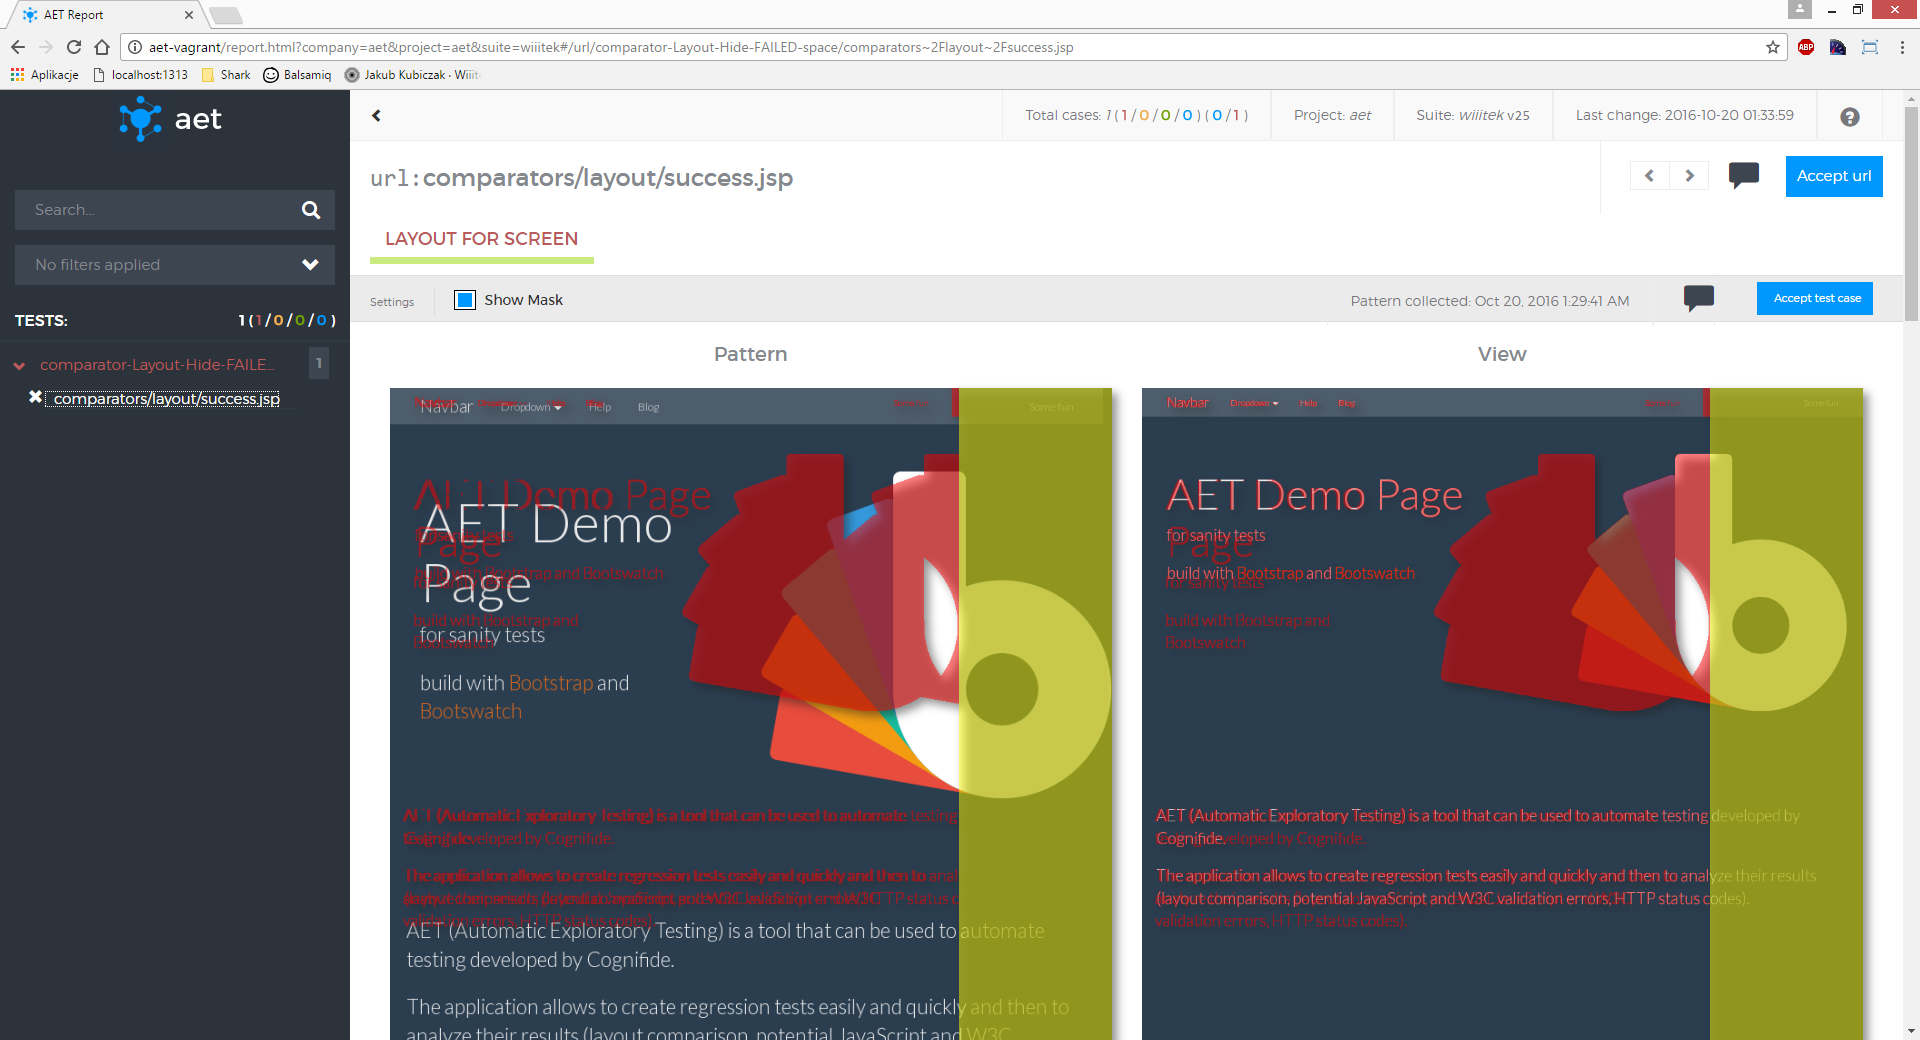
Test case's result is marked as successful when there is no difference between view and pattern (see screenshot below).
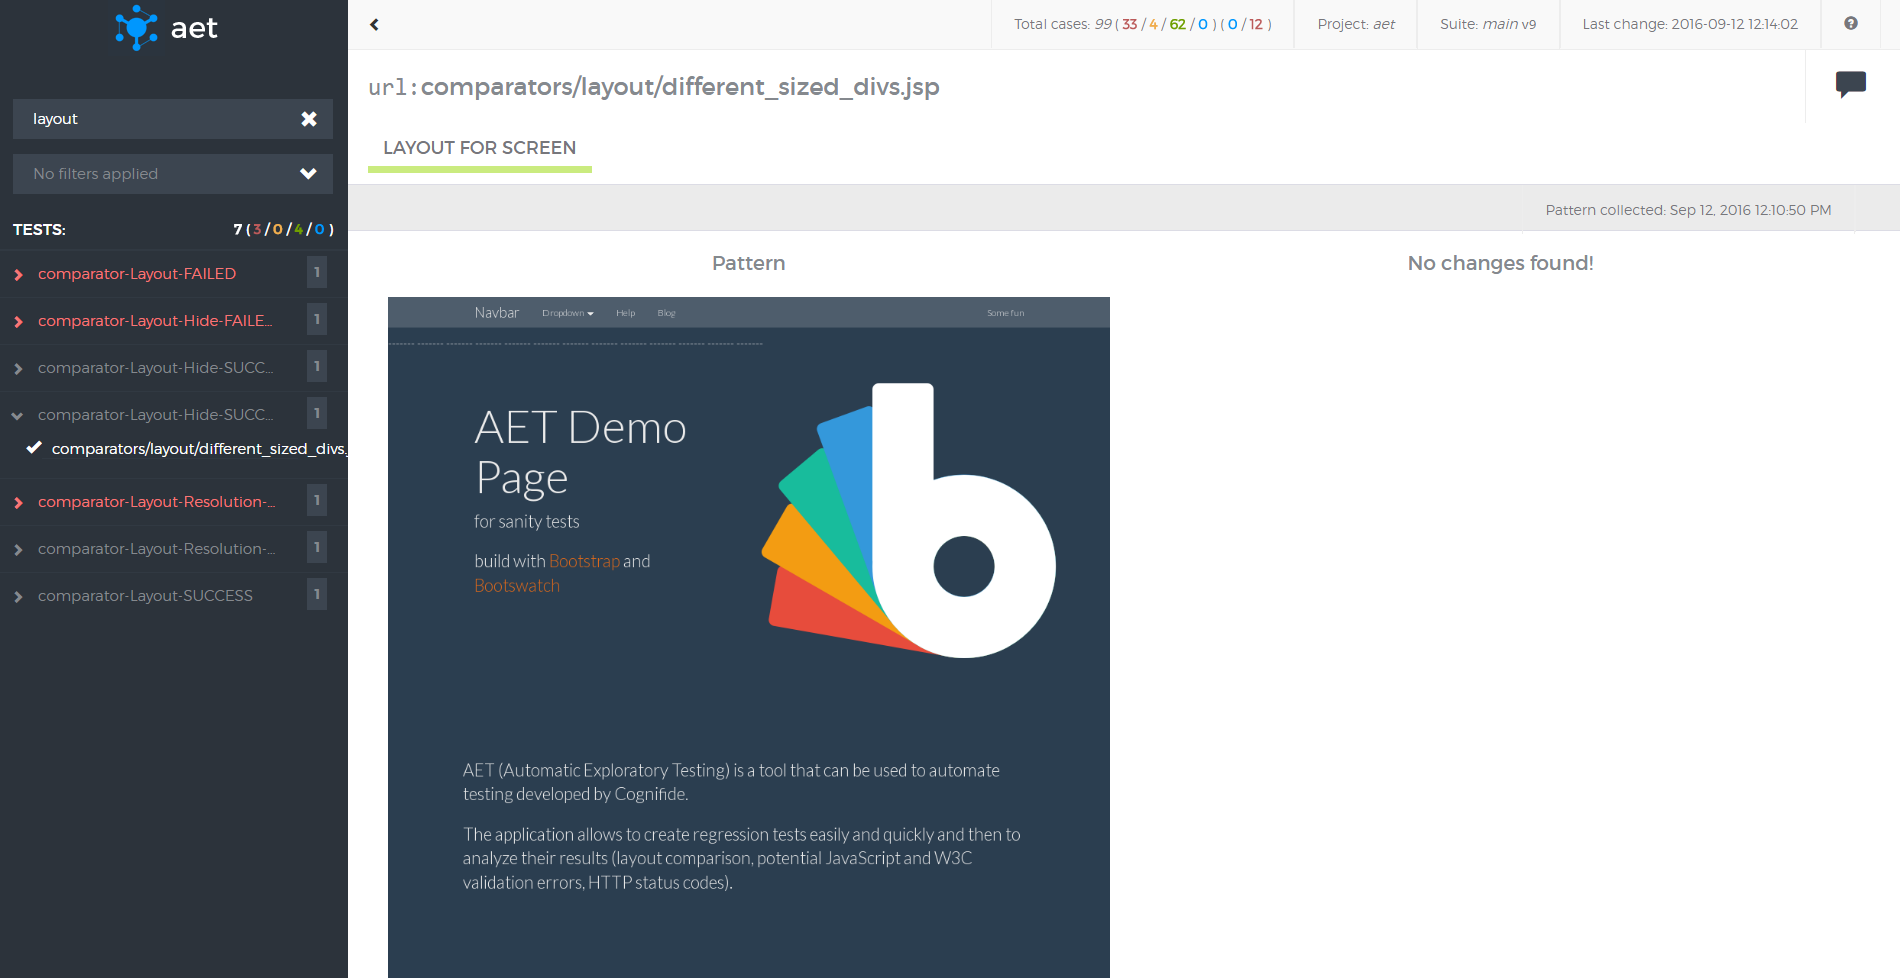
- Differences found in page screenshots may indicate undesired changes in the page layout (css, html structure) e.g. when a new functionality was implemented in a system it may have an impact on another system component(s). This may show itself as a changed page layout.
- Content changes can be divided into two groups: wanted (are intended) and unwanted (a result of a mistake or an error). An example of a change that is not a defect (wanted) is: the carousel component with the latest news items displayed or the twitter component displaying latest tweets. In order to avoid detecting these sorts of changes in these dynamic components, the user can use the Hide Modifier feature in the suite definition. Another example of the ‘wanted’ dynamic content is a cookies policy popup that may be hidden using the Cookie Modifier.
Source test cases' results display compared sources. (see screenshot below).
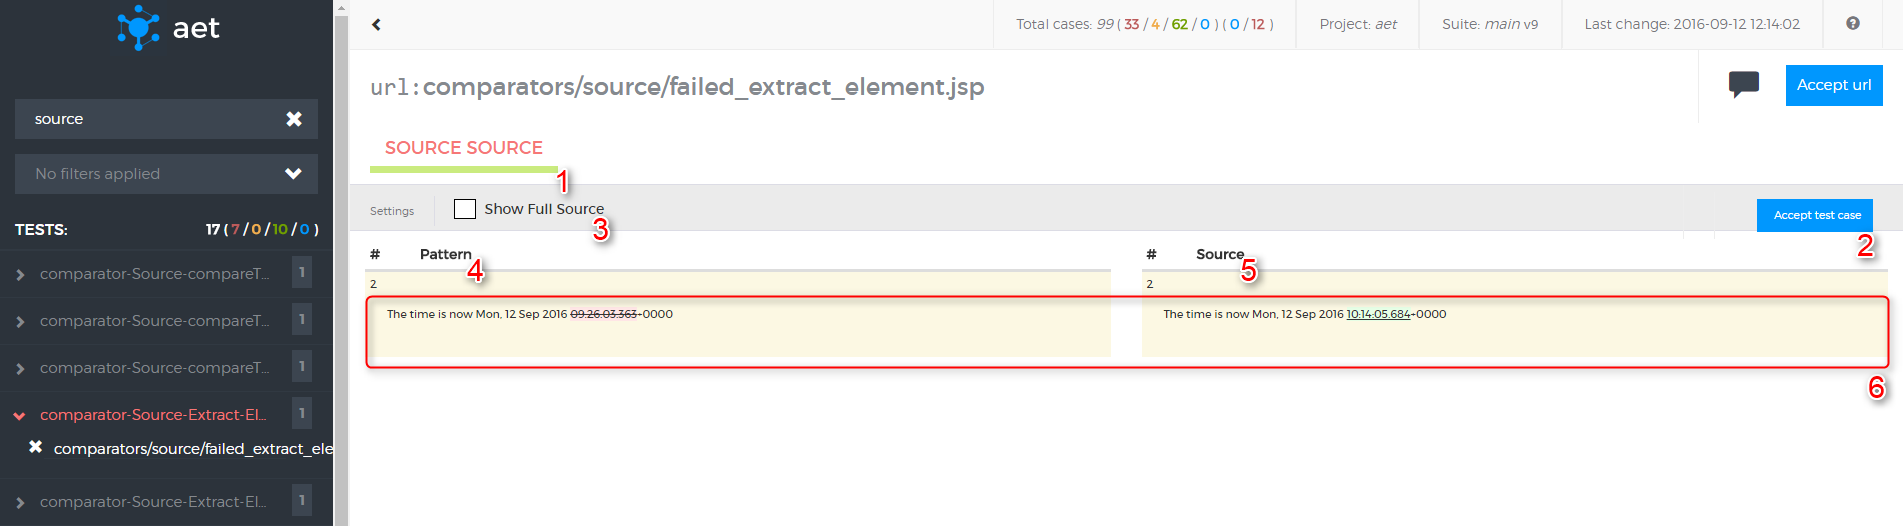
- Test case's name (red font means failure),
- "Accept test case" button (available only when differences have been detected),
- "Show full source" switch - when the switch is off only differences are shown on the screen, otherwise full source is shown,
- Pattern - source file to which collected source is compared. When there is no pattern, first collected source is saved as pattern automatically,
- Source - source file which is compared with pattern,
- Sample block with visible differences (e.g. changed characters).
Test case's result is marked as successful when there is no difference between source and pattern (see screenshot below).
- Differences found by source comparison may indicate undesired changes in a page layout (html structure) and content, e.g. when a new functionality is implemented in a system it might have an impact on other system component(s). This may occur as a changed page source.
- Content changes can be divided into two groups: wanted (intended) and unwanted (result of a mistake or an error).
In order to filter out wanted changes and detect changes that are a result of a mistake or an error, the user can use one of following filters in the suite definition:
- The Extract Element Data Modifier (e.g. to find changes only in the main menu that has the parameter id='main-menu' set),
- The Remove Lines Data Filter (to remove lines that changes every time - e.g. a current timestamp),
- The Remove Nodes Data Filter (e.g. to remove content displayed by the dynamic news carousel component).
In this test case you can check response codes from certain URLs. There is possibility of excluding individual codes, URLs and patterns (they are ignored by that test) as well as including them (only them will be tested by that test). For more information about excluding/including see Status Codes Data Filters.
If any code is filtered by certain test, the result is failure (see screenshot below).
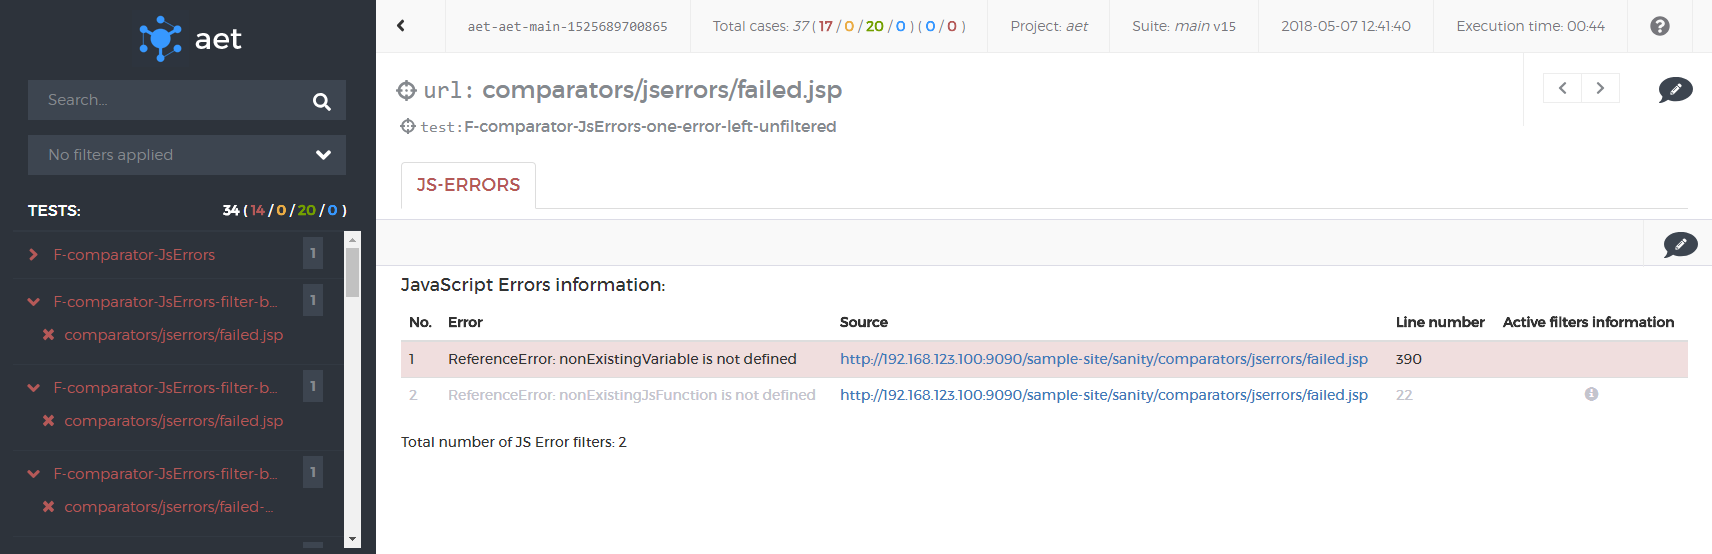
Otherwise test's result is successful (like on the screenshot below).
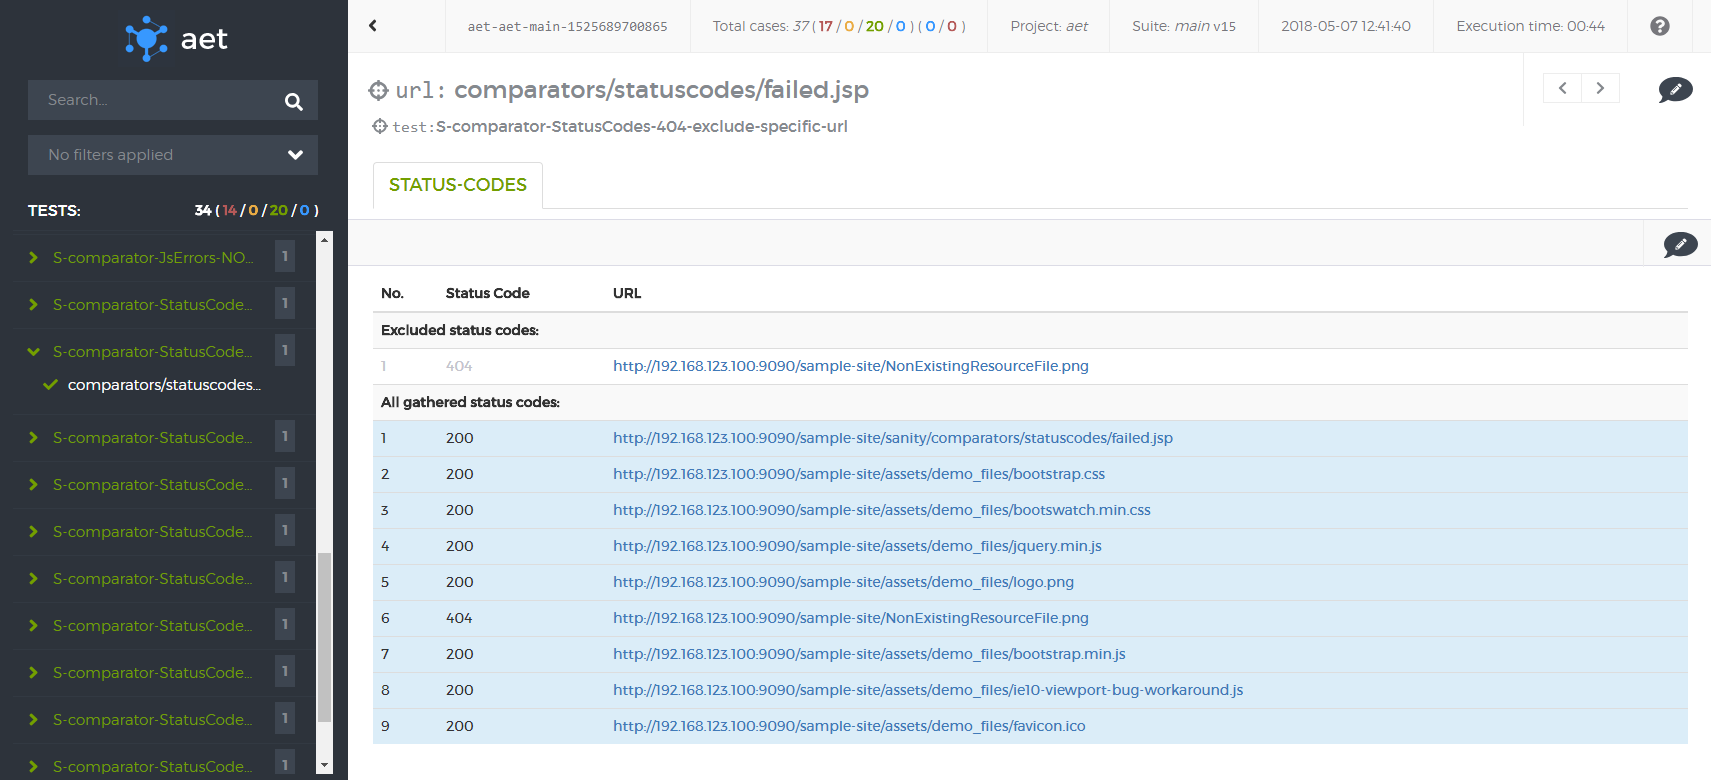
Additionally, if excluding filter is used, excluded codes are presented in additional section.
- All status codes with a number higher than 400 are potential errors and indicate that the resource that is used by a page is unreachable (e.g. a page logo image, a page layout css file)
- Status code errors affect SEO (e.g. google page ranking is lowered for pages with 404 status codes).
| ! Important information |
|---|
| W3C validator is compatible with HTML5 standard. |
| W3C report results display page source W3C validation output. If no W3C errors were found, result is marked as success - green (see screenshot bellow). |
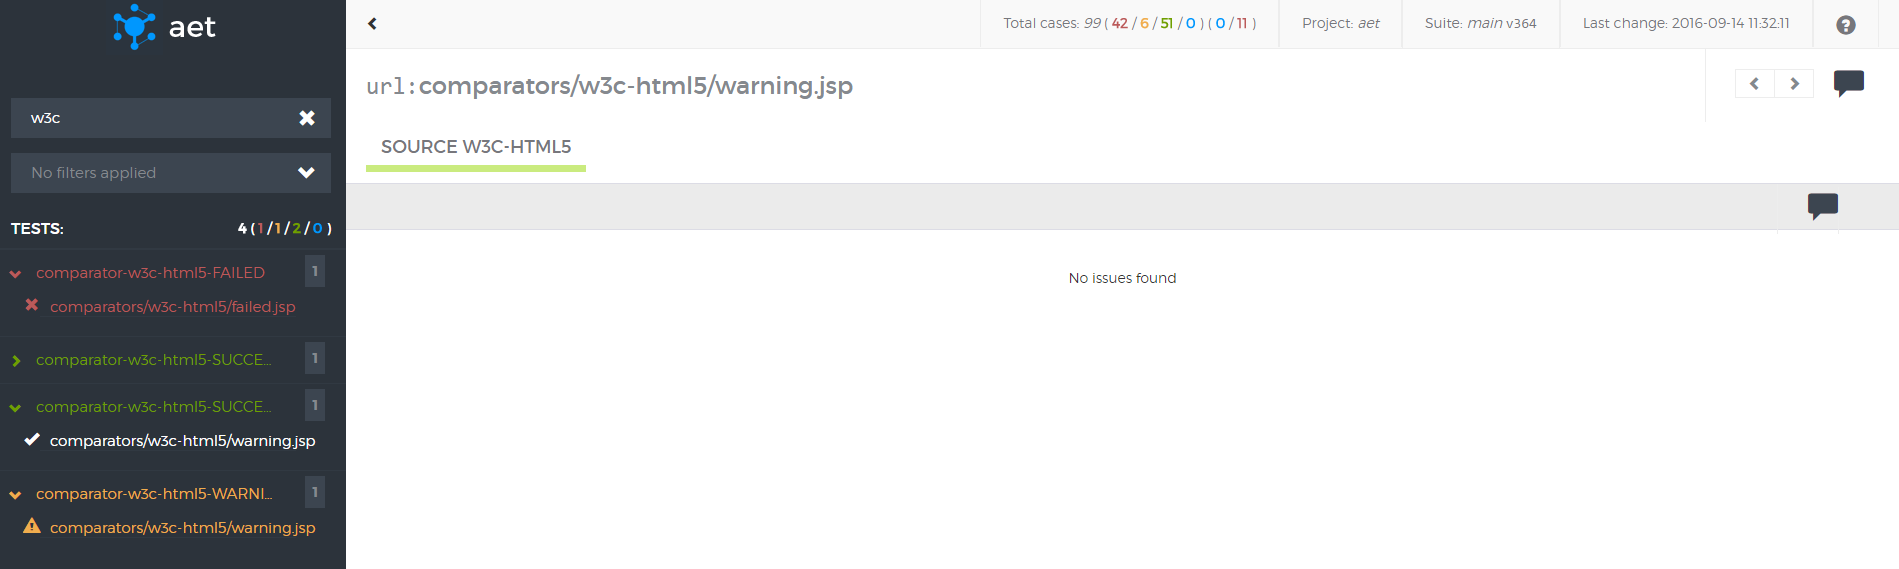
There is possibility to see warning (yellow), if W3C warnings were present and parameter ignore-warnings was set to false (as on screenshot bellow).
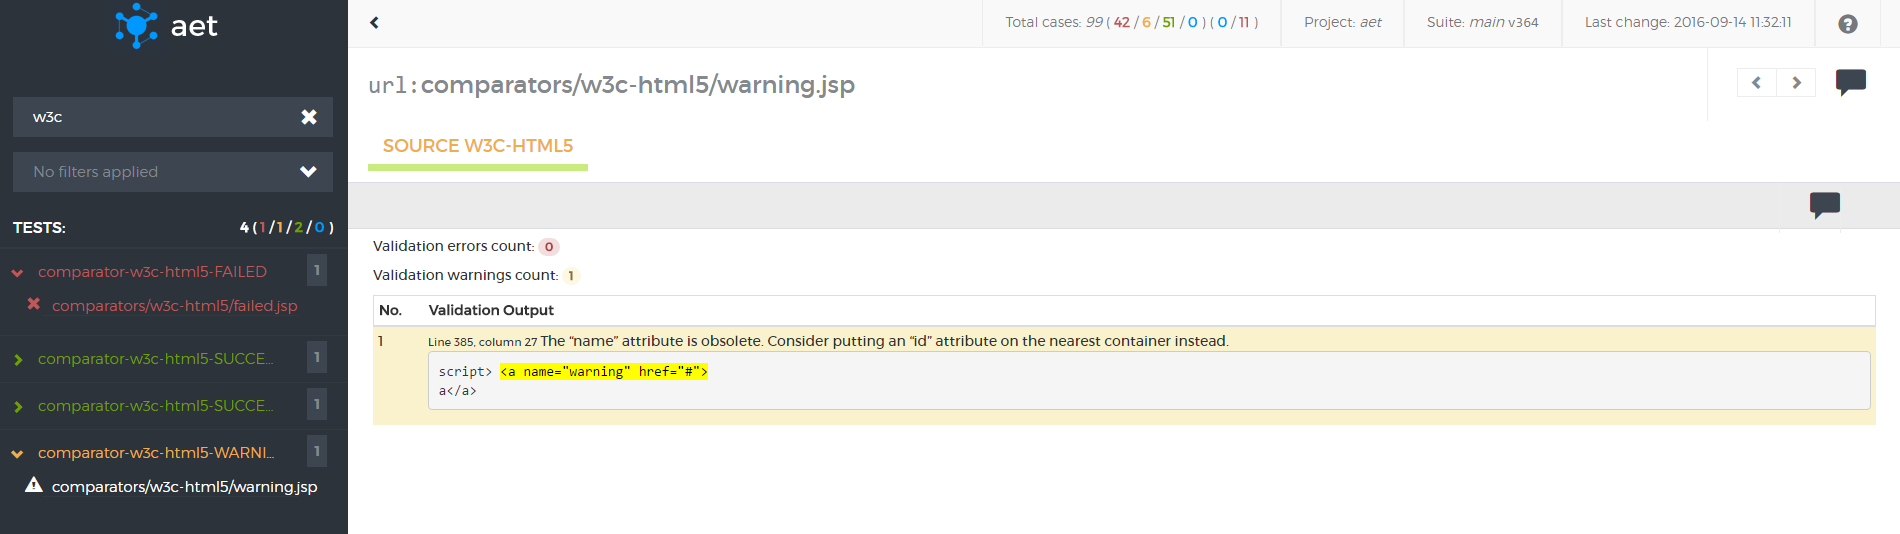
If at least one W3C validation error was found, report is marked as risk - red (see screenshot bellow).
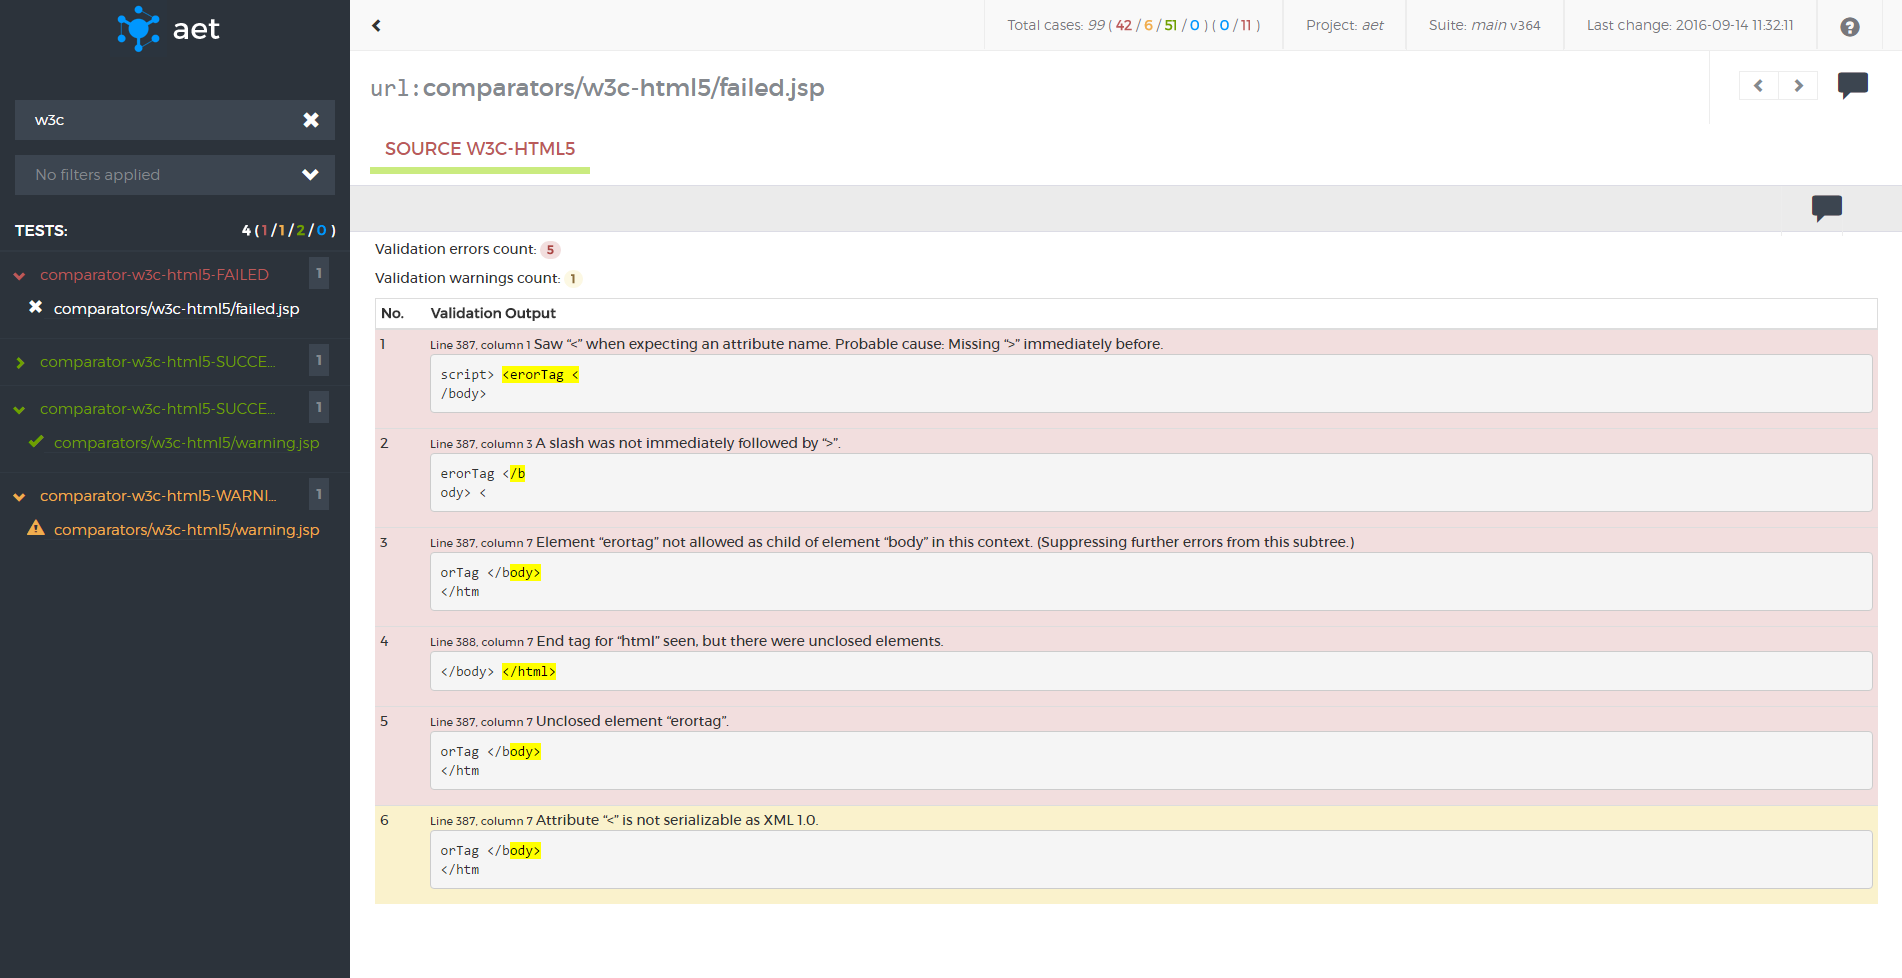
Result shows total count of validation errors and validation warnings.
- The W3C validation is important from the SEO point of view. Pages that do not comply to W3C standards are ranked low in Google PageRank and other rankings.
- Detected W3C errors may indicate serious html structure bugs (e.g. tags that haven't been closed) or content issues (e.g. invalid tags parameters:
<a>without href). - Maintenance of pages that follow W3C standards is much easier to carry out because pages that keep these standards are much less prone to be displayed differently in different browsers or devices.
- The W3C validation can also reveal page encoding and special characters displaying issues.
| ! Important information |
|---|
| This feature is currently in BETA version. |
This test case's result displays validation output of page accessibility analysis. Result shows total count of errors, warnings and notices about possible violations. Output presented on this report comes from html CodeSniffer library.
Result is successful if there are no errors, warnings or notices (see screenshot below).
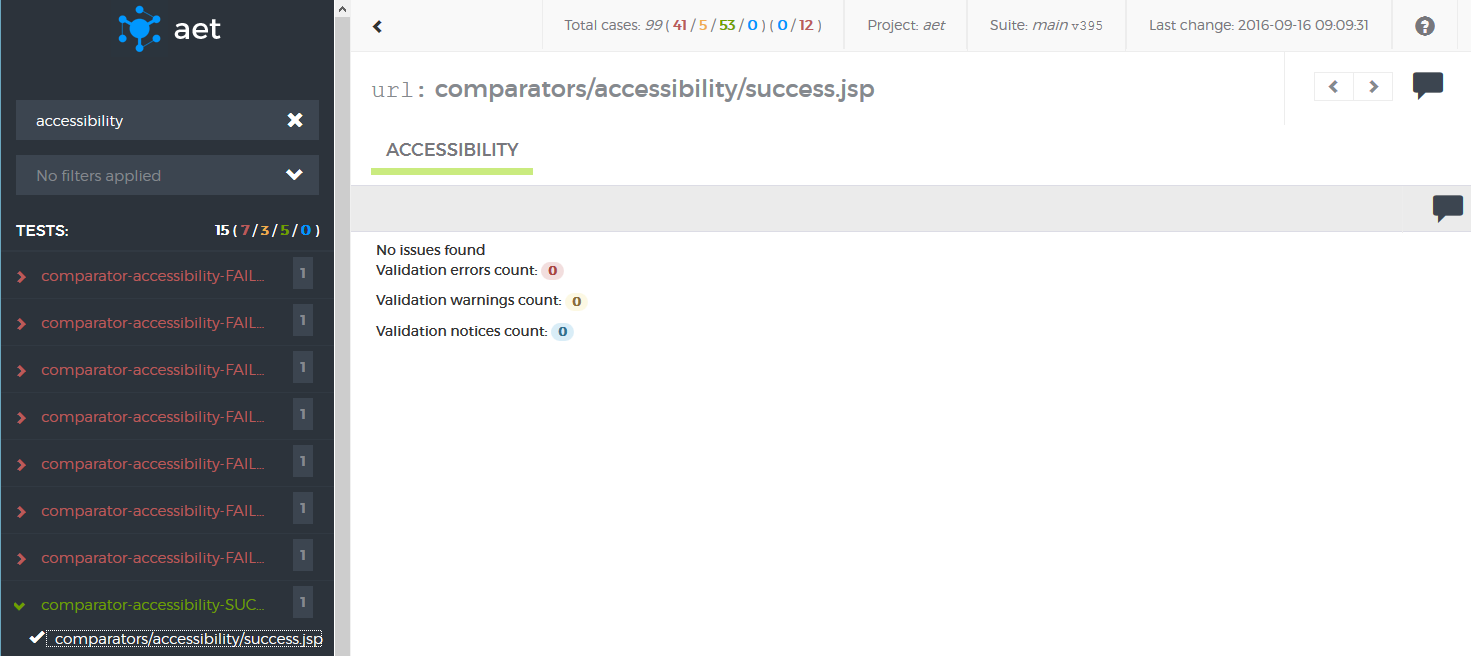
If there is no error, but several warnings or notices appear, the result is marked as warning (see screenshot below).
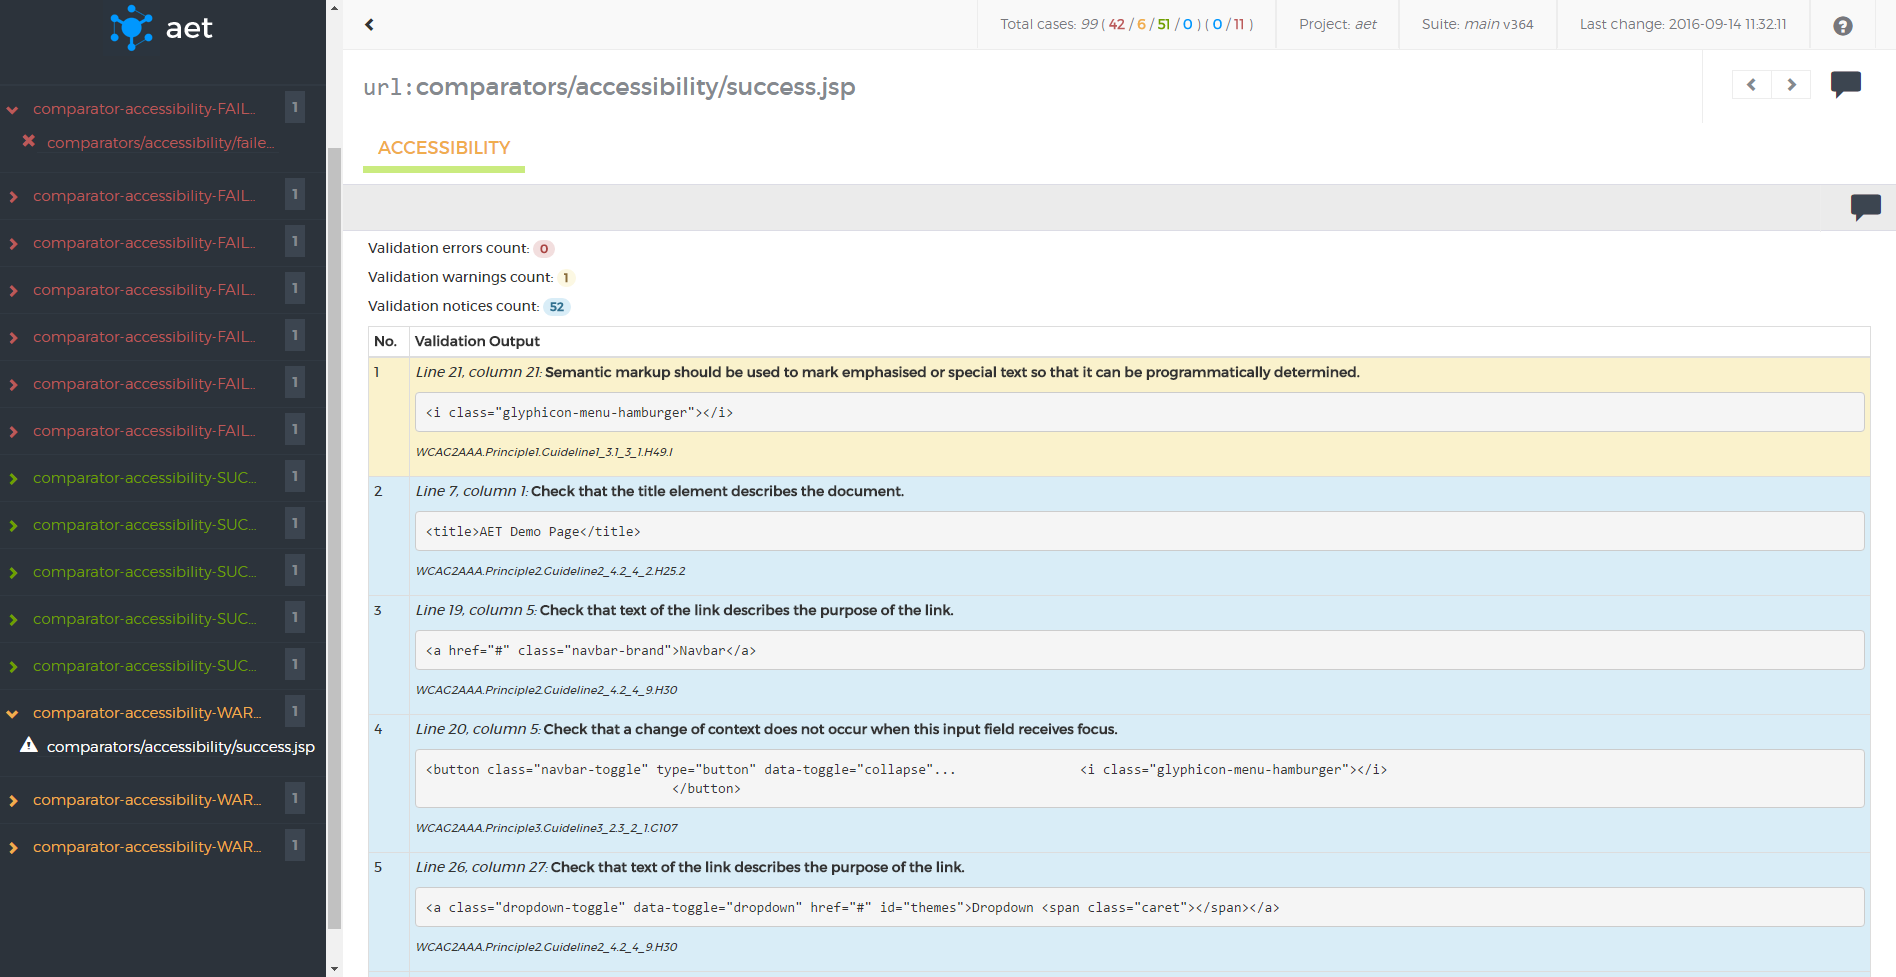
If any error occurs, the result is marked as risk (see screenshot below).
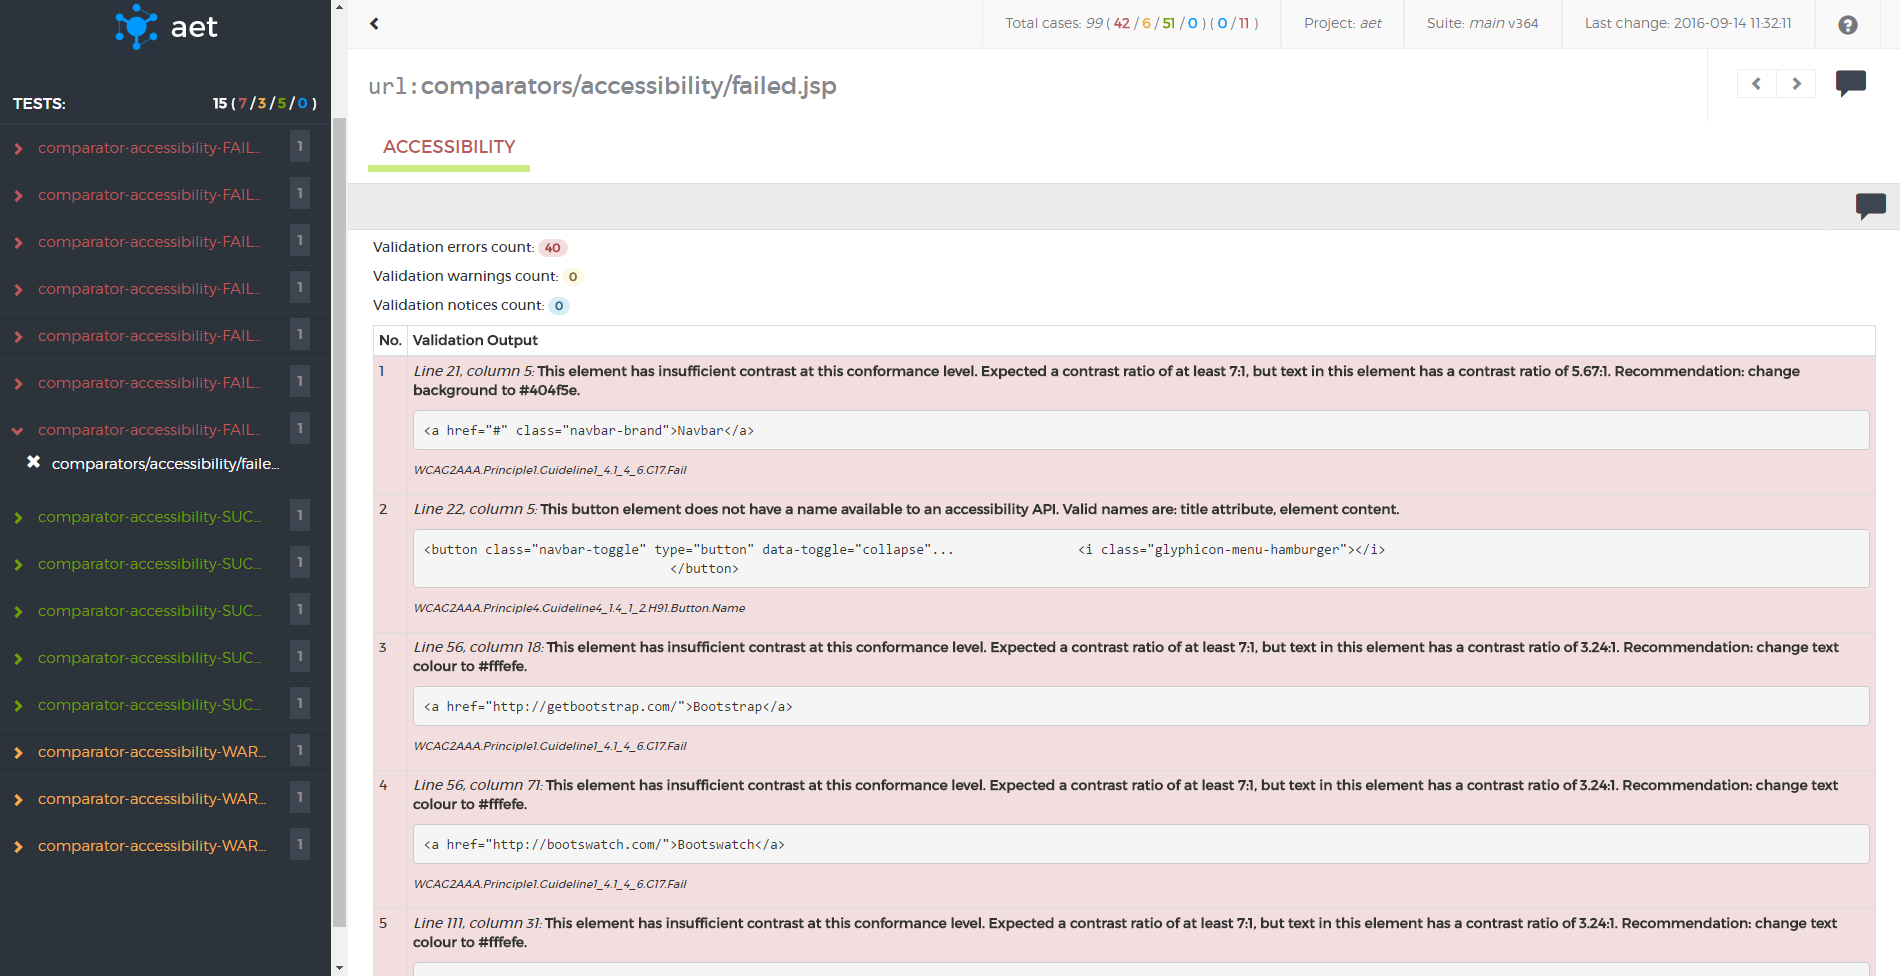
- When page fails accessibility tests it could mean that it couldn't access information, e.g. there are images on page without description or alt attribute, anchors elements don't have link content, page styling and design is not clear enough for people with disabilities.
- Lack of accessibility could be against the law in some countries.
| ! Important information |
|---|
| This feature is currently in BETA version. |
Client side performance report results display validation output of performance analysis. Result shows overall score and the list of rules, which are graded individually. Each rule contains a description and optionally the list of components associated with the rule. Results presented on this report come from YSlow tool.

- Test case name with status color.
- Overall performance score (computed from subscores).
- List of subscores (Each subscore is assigned a letter grade A through F, with A being the highest grade).
- Description of subscore (only for score with grade worse than A).
If overall score is A, the report is marked as success.
If overall score is B to E, the report is marked as warning.
If overall score is F, the report is marked as risk.
- Poor client side performance has negative impact on user experience.
- Pages with grade F are slow and probably user will not want to use them. They are especially difficult to load on mobile devices.
- Client side performance is taken into account by most of search engines. Good performance means better ranking.
There is possibility to accept failed test on each level (suite, test and URL) for the test cases in which the pattern is used (for now acceptable cases are: cookie compare, layout for screen and source "Source"). It is possible to revert certain acceptation, but for now only if changes are not saved. Accepting on suite level makes all acceptable test accepted, on test level it provides acceptation of each URL in certain test case. The lowest level is accepting certain URLs.
Accepting pattern example:

Reverting pattern example:
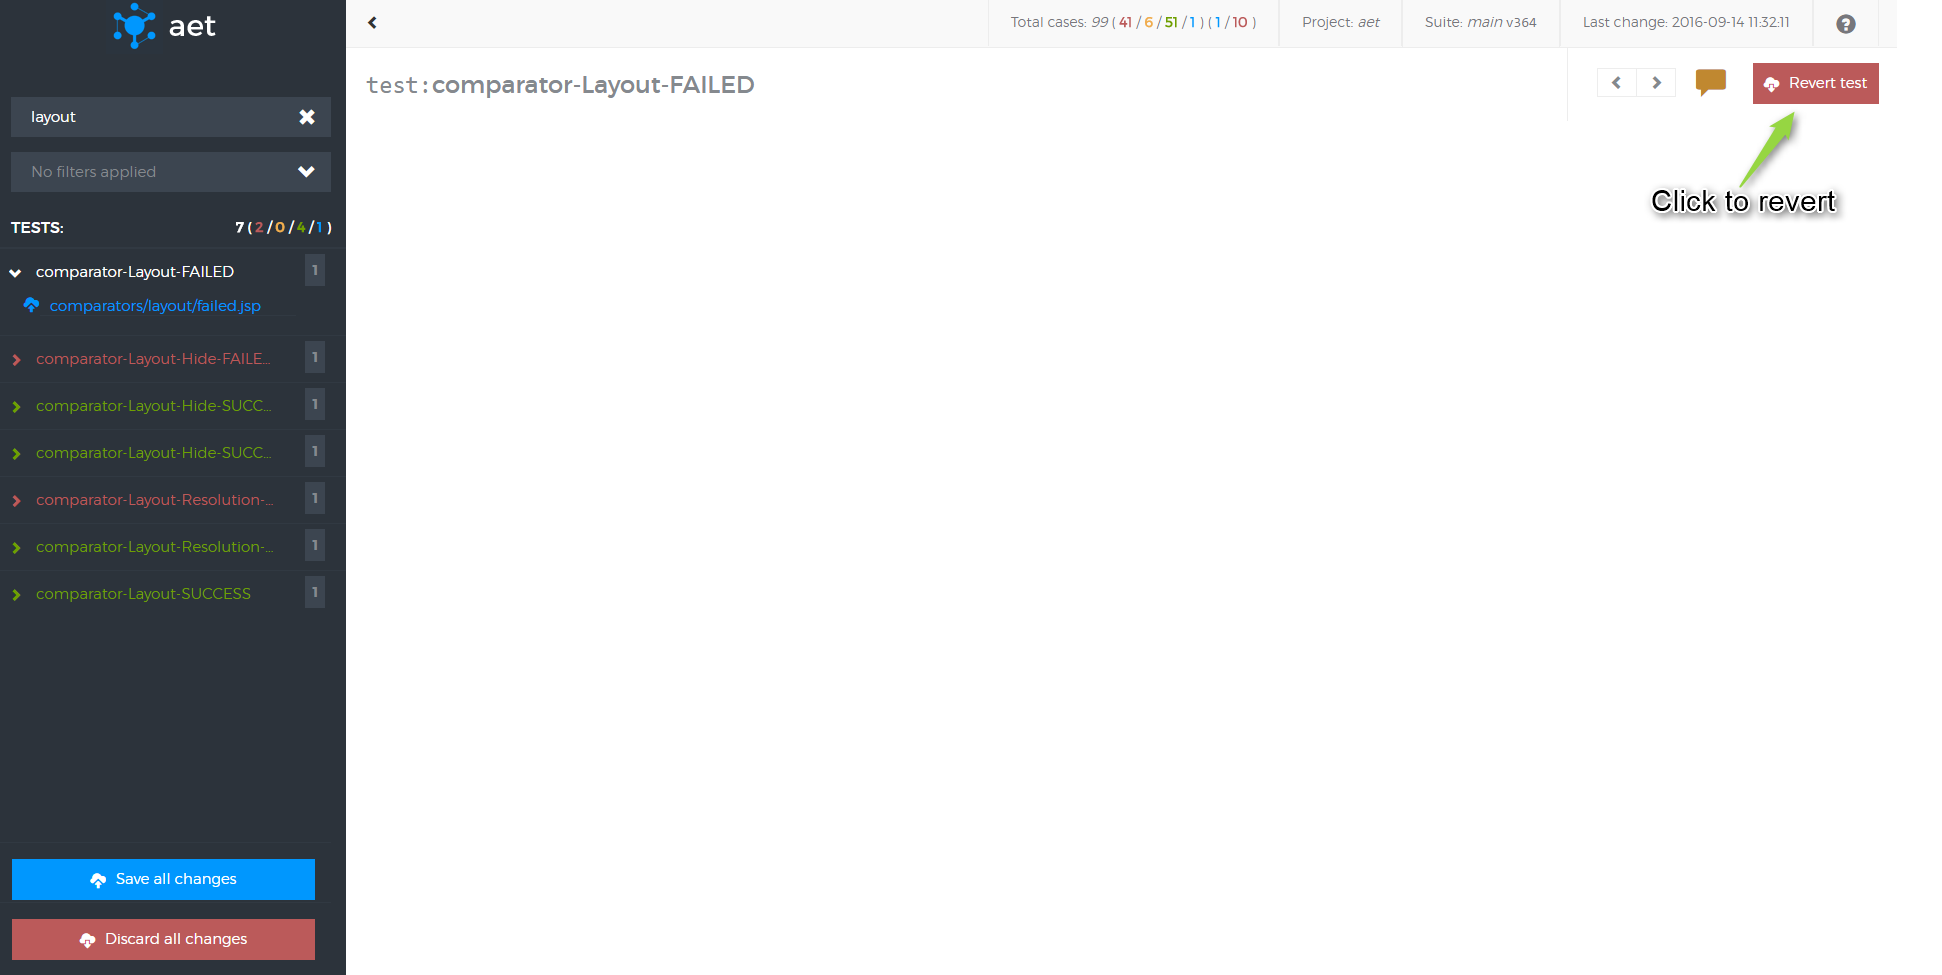
There is possibility to add notes to each level of the report. Notes are useful to give some information about test case e.g. why failed test was accepted.
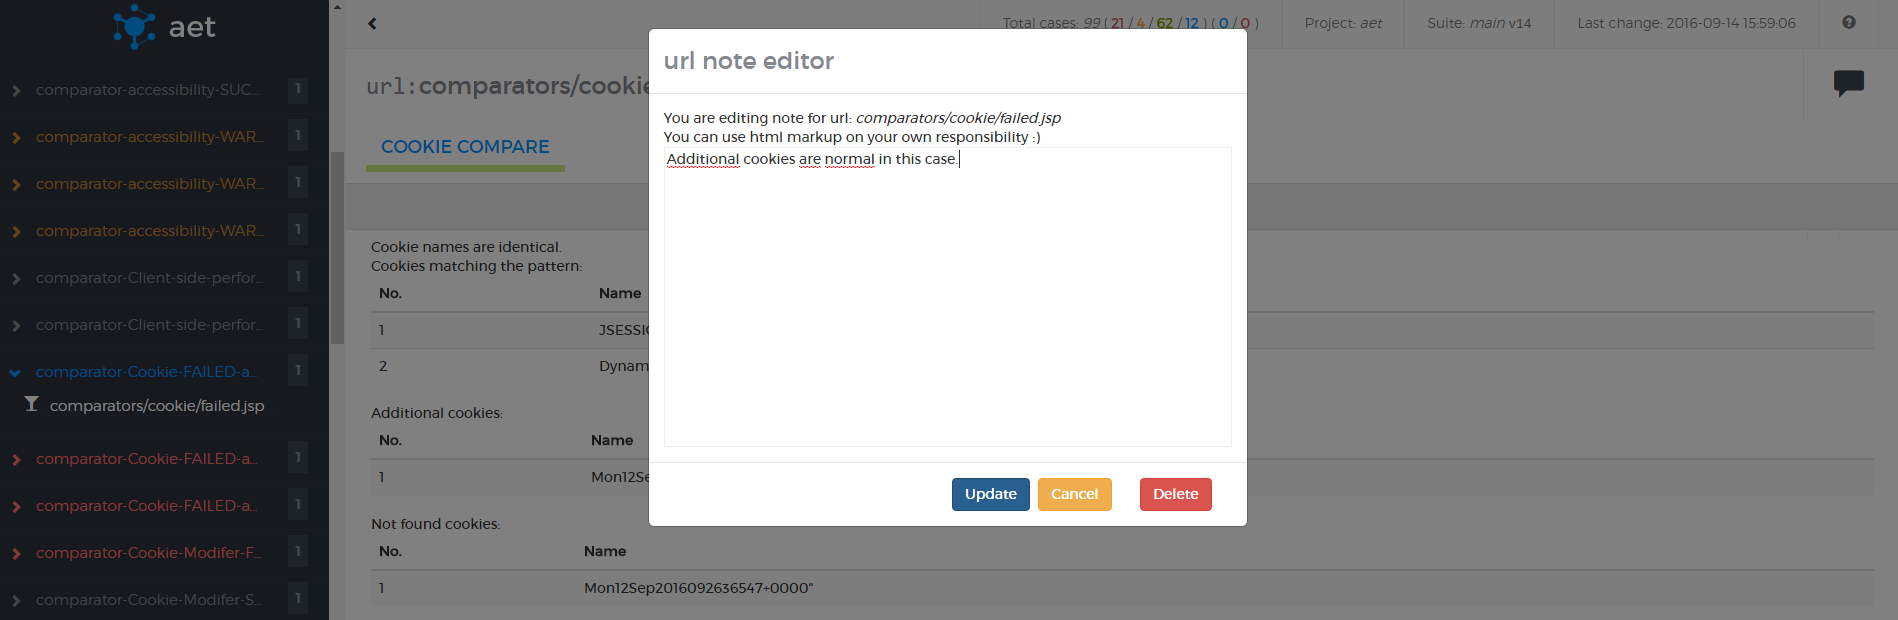
Every test case has one of the following states:
- passed — if the comparator doesn't find any change, i.e. validation passes,
- passed with warnings — if there are some warnings, but they are not very important,
- failed — if the comparator detects some changes or some validation rules are broken,
- accepted — if failed test was accepted. The state of the test case is propagated to the URL then to the test and to the test suite. It is possible to accept all test cases for a given URL or in a current test suite.
Tests and URLs may be filtered by:
- text included in the test name or URL,
- test status.
Filtering by status works as an alternative: if one selects passed and failed tests both should be visible.
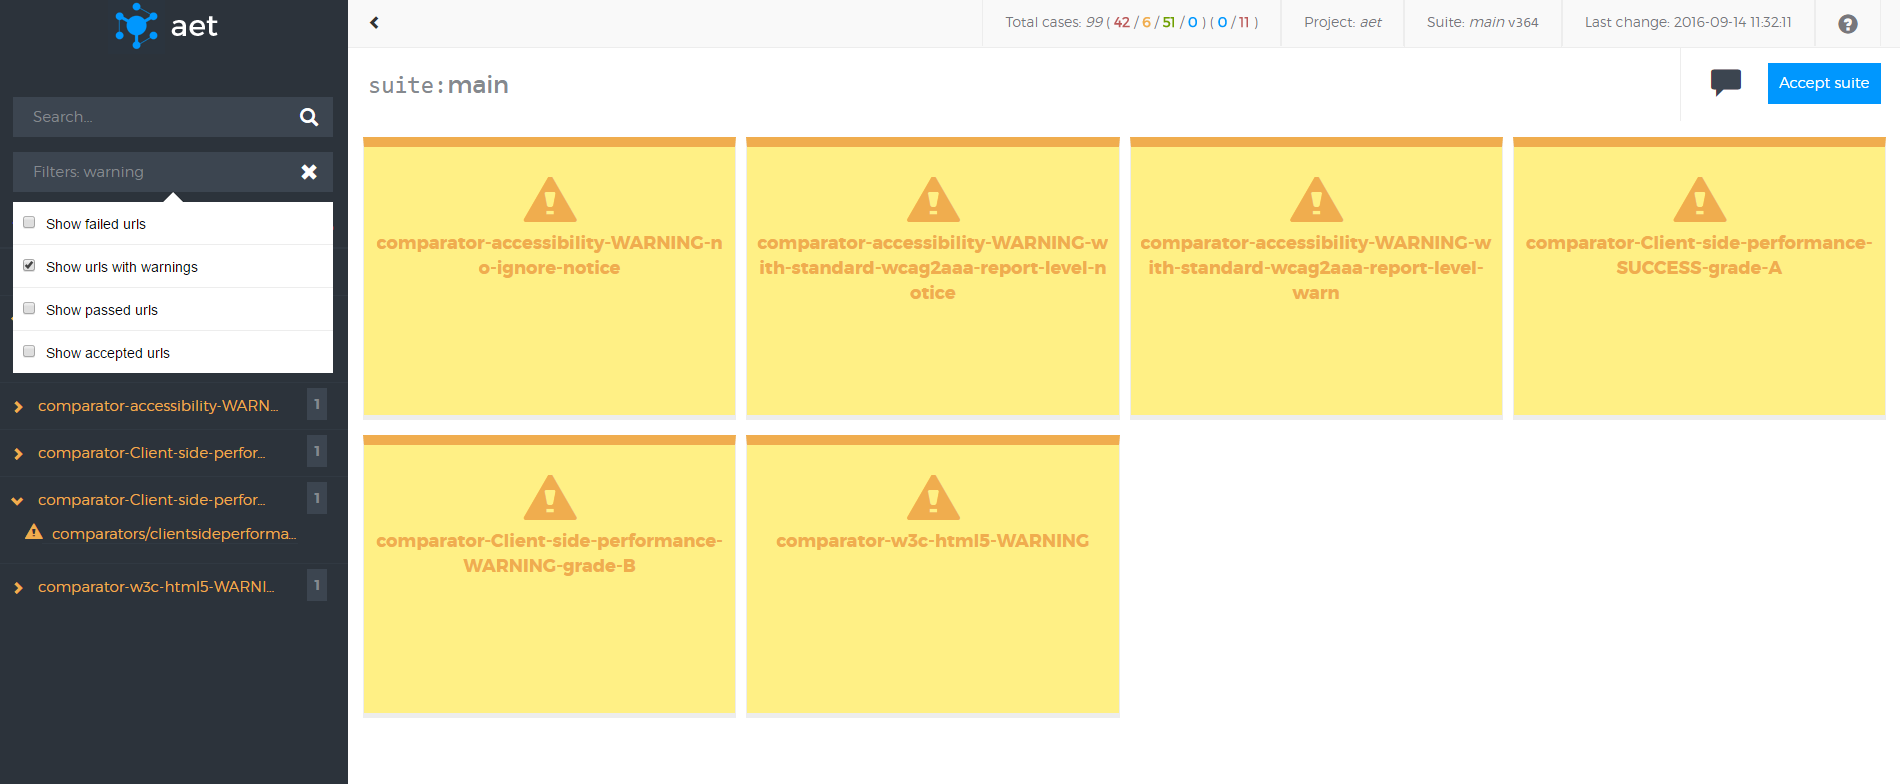
It is possible to search tests and URLs by the query. Searched fields are the URL and test name.
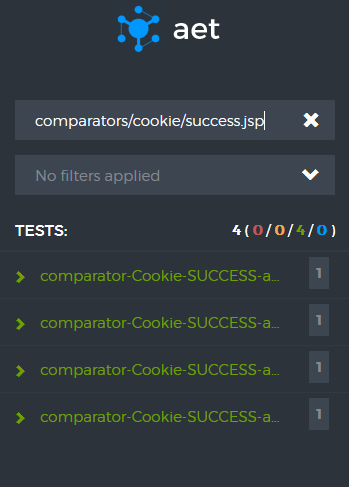
- press q to expand/collapse all items
- press e to expand/collapse all error items
- use [ / ] to navigate between test's urls
- press m to show/hide layout mask (when available)
- press ← / → to navigate between url's tabs
AET is a distributed system that consists of a set of modules deployed on Apache Karaf which communicate with one another using JMS Server - Active MQ. The data collected and results of test processing are saved into the Datastorage (its current implementation is MongoDB). Additionally, AET makes use of Browsermob as a requests proxy server and Apache Server as a host server for Reports Web Application.
The diagram below depicts the AET system and communication between AET system components:
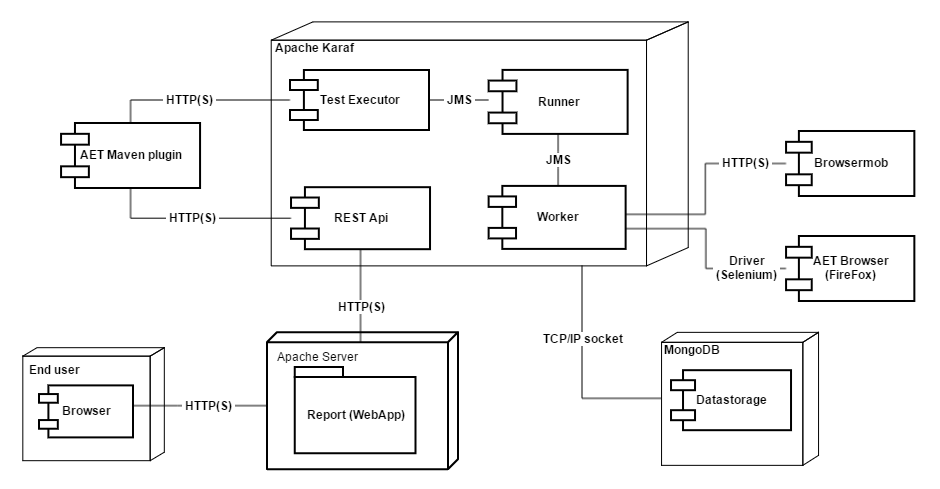
AET makes use of the following third party software as parts of the system:
| Software | Used version | Function |
|---|---|---|
| Apache ActiveMQ | 5.13.1 | JMS Sever used for communication between system components |
| Apache Karaf | 2.3.9 with 4.2.1 Apache Felix Framework. | OSGi container for AET bundles and REST API |
| Apache Server | 2.2.15 | Http server used to host [[Reports Web Application |
| Browsermob | 2.0.0 | Proxy server |
| Firefox | 38.6.0 ESR (en-US) | Browser with Selenium (2.50.1) |
| MongoDB | 3.2.3 | System database |
The AET System consists of 7 core units:
- The Client (AET Maven Plugin)
- The Runner cluster
- The Worker cluster
- The JMS Server
- The Database
- The REST API
- Reports web application
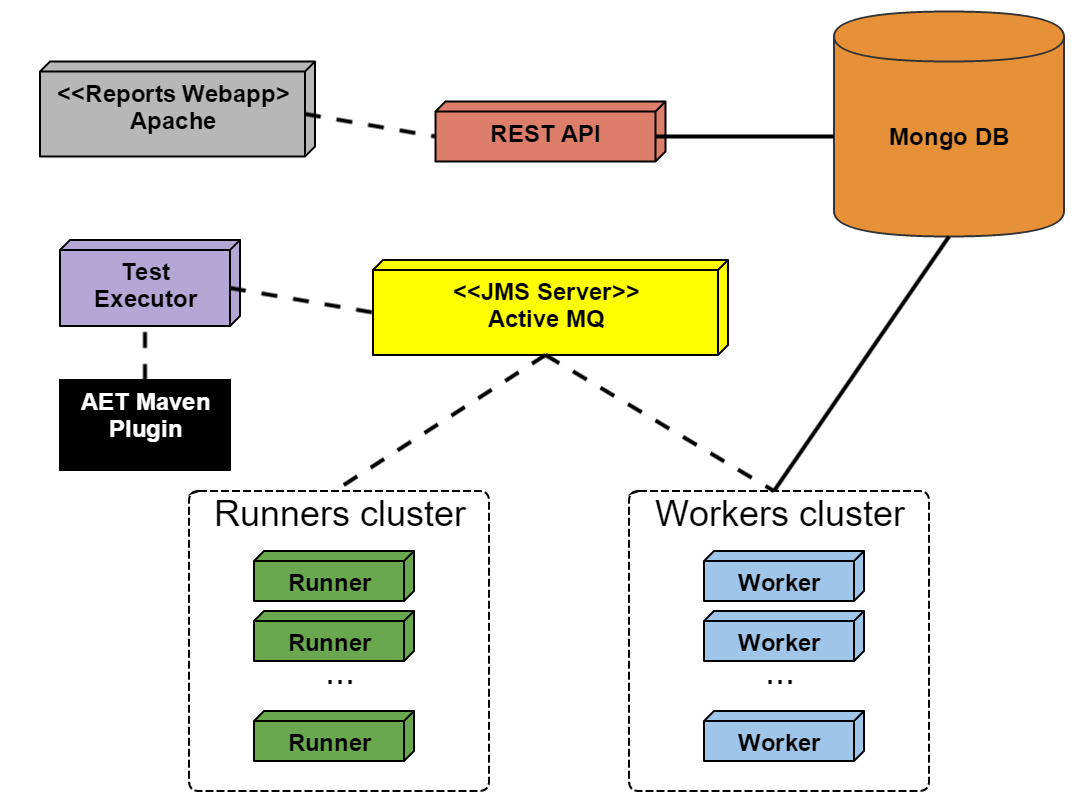
The Client component has the following functions
- sending request to the AET System.
- checking the suite processing status.
- downloading the Report after the Test Suite run is finished.
The Test Executor is an entry point of the test suite processing. It exposes endpoints which client applications can use to run the test suite and check the processing status by sending the simple HTTP requests.
The Runner is the heart of the system. It is responsible for consuming Client's request and dispatching it to Workers. It works similar to the Map-Reduce algorithm. During the execution of the suite, the Runner checks if the next phase can begin and when all the phases are finished the Runner informs the client about it.
The Worker is a single processing unit that can perform a specific task e.g. collect a screenshot using the Firefox browser in the Windows 7 environment, collect a page source, compare two screenshots, check if the source of a page is W3C-complaint and many others.
The JMS Server is a communication hub for the whole system. Workers, runners and the client communicate with one another using JMS messages.
The Database serves as the system storage. It stores all the results, reports and patterns.
The REST API for the stored data; the user can download the Report, collected sources, view screenshots and comparison results via the REST API.
AET uses the following third party software as parts of the system:
| Software | Used version | Function |
|---|---|---|
| Apache Karaf | 2.3.9 with 4.2.1 Apache Felix Framework. | OSGi container for AET bundles and REST API. |
| Apache ActiveMQ | 5.13.1 | JMS Sever used for communication between system components. |
| MongoDB | 3.2.3 | System database. |
| Browsermob | 2.0.0 | Proxy server. |
| Firefox | 38.6.0 ESR (en-US) | Browser with Selenium (2.50.1). |
The AET client application comes with a sort of a plugin to the Maven build automation tool -- aet-maven-plugin. This plugin connects to the AET application in order to run the specified test suite.
In order to run tests you must create a Maven project and include aet-maven-plugin in the pom.xml file in the following way:
<plugin>
    <groupId>com.cognifide.aet</groupId>
    <artifactId>aet-maven-plugin</artifactId>
    <version>${aet.version}</version>
</plugin>
The plugin version is here specified as the Maven property aet.version. This allows to define the AET plugin version from the command line using the -Daet.version=x.y.z option, where x.y.z is the version number.
aet-maven-plugin defines the aet:run Maven goal which needs to be executed in order to run the test suite.
So if you want to run AET tests you must execute the following command in the directory where the pom.xml file has been defined:
mvn aet:run -DtestSuite=FULL_PATH_TO_TEST_SUITE
aet-maven-plugin has a few parameters that configure its behaviour. The testSuite parameter already mentioned defines the path to the xml suite configuration file. All the parameters are described below:
| Parameter | Description | Default Value | Mandatory |
|---|---|---|---|
testSuite |
The full path to the suite definition file (at least a file name with an extension, e.g. testSuite.xml). |
suite.xml | no |
endpointDomain |
the URL to the main AET domain | http://localhost:8181 | no |
domain |
Overrides the domain parameter value from the test suite definition. | - | no |
timeout |
Milliseconds to detect the timeout since the last status received from AET. This is useful to abort the test run if there is no activity for a long time. | 300000 (5 minutes) | no |
pattern |
Id of suite that will be used as patterns source. Identical structure of pattern and current suites is assumed. | - | no |
xUnit |
The flag that indicates whether the xUnit report should be generated and downloaded or not. | false | no |
The result of successful command line execution of the AET test suite is the redirect.html file and, if the xUnit parameter is set to true (the suite is executed with the -DxUnit=true flag), also the xunit-report.xml file. Both files are generated in the target folder in the directory where the pom.xml file has been defined.
There are a few sample commands with a different parameter set below.
By default, aet-maven-plugin connects to the AET application using the port 8181 of localhost. If your AET application has been deployed to some other machine e.g. under the URL http://aet.example.com, you can tell the plugin to connect to that machine in the following way:
mvn aet:run -DtestSuite=suite.xml -DendpointDomain=http://aet.example.com
If all URLs in your test suite point to a single domain, you can specify it so it is no longer needed to do it again in the suite file. Let's assume you'd like to test some subpages of the English version of Wikipedia. Then you can specify the target domain in the following way:
mvn aet:run -DtestSuite=suite.xml -Ddomain=https://en.wikipedia.org
If you want the test run to fail if its run takes too much time, you can specify the timeout (in milliseconds) in the following way:
mvn aet:run -DtestSuite=suite.xml -Dtimeout=2000
If you want to generate the xUnit report to have test results displayed in Jenkins, you can set it in the following way:
mvn aet:run -DtestSuite=suite.xml -DxUnit=true
Next to client application in form of a maven plugin, AET offers a shell script to execute tests. In order to trigger test execution, provided shell script utilizes exposed Test Executor API.
AET Test executor

Usage:

	./aet.sh <endpoint> [<suite_file_name>] [-i | --interval <POLL_INTERVAL>]

Options:
	-i --interval <POLL_INTERVAL>  - Set interval in seconds for polling suite status. Default interval : 1 sec
Shell script needs one parameter to trigger test execution. Set endpoint parameter to point script to domain which exposes Test Executor API.
Shell script can be run with parameters which are described below:
| Parameter | Description | Default Value | Mandatory |
|---|---|---|---|
endpointDomain |
AET domain which exposes Test Executor API | - | yes |
suite_file_name |
The full path to the suite definition file (at least a file name with an extension, e.g. testSuite.xml). |
suite.xml | no |
-i | --interval <POLL_INTERVAL> |
Interval of polling the status of currently executed test. (Unit: seconds) | 1 | no |
After test is completed the script downloads xUnit report to extract the test failures number. The number of failures is then set as an exit status.
During test execution script creates two files:
-
xUnit.xml- this file is downloaded after test is processed, to extract information on any failures. -
redirect.html- this file is created to help reach the test result by redirecting to test results URL after opening it.
In order to run properly, following commands need to be available on PATH of the environment the script is executed on:
-
curl- used to make actual request against Test Executor API and also to downloadxUnit.xmlfile after test completion. Comes preinstalled on most Unix systems. Download link -
jq- used to parse JSON responses from Test Executor API. Download link -
xmllint- used to retirieve failure information from downloadedxUnit.xml. Comes preinstalled on most Unix systems. For Windows installation instructions, refer to Jo Jordan's post.
Execute test on AET instance that exposes Test Executor API on http://localhost:8181.
./aet.sh http://localhost:8181
Execute test as above, suite configuration is available in my-suite.xml file.
./aet.sh http://localhost:8181 my-suite.xml
Execute test as above, poll status of running test every 5 seconds.
./aet.sh http://localhost:8181 my-suite.xml 5
The Test Executor module is an entry point of the test suite processing. It exposes endpoints which client applications can use to run the test suite and check the processing status by sending the simple HTTP requests.
The heart of this module is the SuiteExecutor OSGi service. This service is responsible for starting the test suite execution and storing the processing status. It communicates directly with the AET Runner via ActiveMQ.
The Test Executor module exposes two endpoints. First is responsible for running provided test suite and the second provides the suite processing status.
Base path for both endpoints:
http://<Domain_or_IP_Address>:<PORT>
-
URL:
/suite - HTTP Method: POST
-
Parameters:
-
suite- xml file containing the suite definition, -
domain- overrides domain specified in the suite xml file.
-
-
Description: Executes test suite provided as a parameter. The request's content type has to be
multipart/form-data.
This endpoint returns JSON object with following fields:
| Field | Description |
|---|---|
correlationId |
Correlation ID of the suite run, used to check the processing status. |
statusUrl |
URL under which the processing status is available. |
htmlReportUrl |
Link to HTML report generated by the suite run. |
xunitReportUrl |
Link to xUnit report generated by the suite run. |
errorMessage |
Contains an error message. Only this field will be present if suite start fails. |
-
URL:
/suitestatus/<correlationId> - HTTP Method: GET
-
Parameters:
-
correlationId- correlation ID of the suite run, which is returned in response to the suite run request.
-
-
Description: Returns processing status of the suite run identified by
correlationId. Please note that theRun suiterequest returns full URL from which the processing status can be obtained.
This endpoint returns JSON object with following fields:
| Field | Description |
|---|---|
status |
Processing status. Available values: PROGRESS, ERROR, FATAL_ERROR, FINISHED, UNKNOWN
|
message |
Detailed message associated with status (might be empty). |
This service processes the requests sent to endpoints. It parses provided suite file, locks the test suite and sends it to the Runner. It starts the threads that receive progress messages from Runner and stores the statuses in cache.
The service returns processing status when requested. It returns one status at a time and removes it from cache, so the status message can be obtained only once. When there are no status requests made for a specified amount of time, then the statuses for the specific suite run are removed from the cache permanently.
The ActiveMQ message receive timeout can be configured in the OSGi Console, under the AET Suite Executor entry. It is specified in milliseconds.
Runner is the heart of the system. It is responsible for consuming client's request and dispatching it to Workers. It works similar to the Map-Reduce algorithm. During the execution of the suite, the Runner checks if the next phase can begin and when all the phases are finished the Runner informs the client about it.
Runner starts whole suite processing and is responsible for merging all results. See following diagram that shows sequence of suite processing:
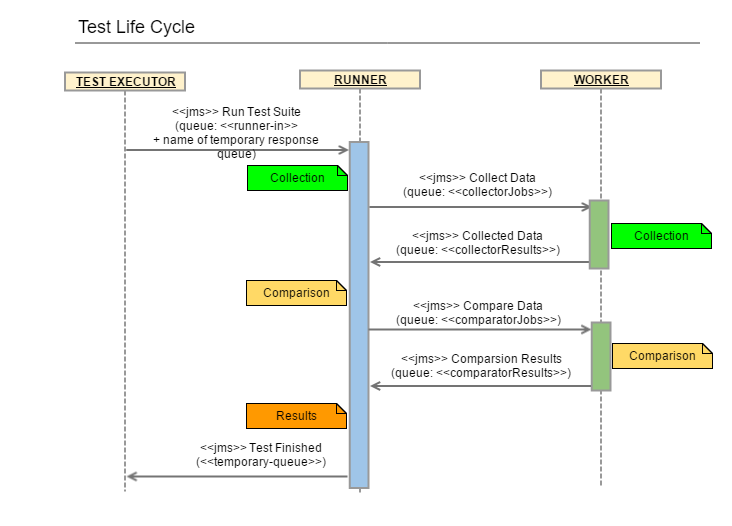
The Worker is a single processing unit that can perform a specific task e.g. collect a screenshot using the Firefox browser,
collect a page source, compare two screenshots, check if the source of a page is W3C-compliant and many others.
Worker uses jobs to perform the tests. This module communicates with the browser (Firefox).
The Worker is responsible for executing a single piece of work and returning it to the Runner. See the following diagram that shows the sequence of suite processing:
Representational State Transfer API for accessing and modifying data stored in AET Database. REST API is part of AET System and is the interface between system database, user and application.
Its methods are used by AET Maven Plugin to download reports, HTML Report uses it to load images and to perform rebase action.
Rebase (switching artifacts id of pattern(s)) and adding comments should be done on client side. REST API only consumes whole json representation of suite.
Base api path:
http://<Domain_or_IP_Address>:<PORT>/api
-
URL:
/api/artifact - HTTP Method: GET
-
Parameters:
company,project,id - Example: http://aet.example.com/api/artifact?company=cognifide&project=example&id=56fa80c1ab21c61f14bfef45
-
Description: Returns file from DB as
application/octet-stream(even for json files), if not found or error occurred json message withapplication/jsoncontent type is returned.
-
URL:
/api/metadata - HTTP Method: GET
-
Parameters:
company,project,correlationId - Example: http://aet.example.com/api/metadata?company=cognifide&project=example&correlationId=cognifide-example-1459257500567
- Description: Returns newest version of metadata identified by provided correlationId.\
-
URL:
/api/metadata - HTTP Method: GET
-
Parameters:
company,project,suite - Example: http://aet.example.com/api/metadata?company=cognifide&project=example&suite=mysimplesuite
- Description: Returns newest version of latest run (identified by latest correlationId) of metadata by with provided suite name.
-
URL:
/api/metadata - HTTP Method: POST
- Parameters: raw JSON in POST body
-
Example: http://aet.example.com/api/metadata
[raw json in post body] - Description: This method increments version number before saving to DB and returns updated suite object in json format. Returns status 409 if given suite is locked.
-
URL:
/lock - HTTP Method: GET
-
Parameters:
company-project-nameas last part of path - Example: http://aet.example.com/lock/cognifide-example-mysimplesuite
- Description: Returns lock status for given suite (true if it's locked or false in json)
-
URL:
/lock - HTTP Method: POST
-
Parameters:
value- additional info for lock (currently it's correlationId only) "company-project-name" as last part of path -
Example: http://aet.example.com/lock/cognifide-example-mysimplesuite
[value=cognifide-example-mysimplesuite-12312454] - Description: This methods sets lock only if there is no lock already set for given suite. Returns status 409 if given suite is already locked.
-
URL:
/lock - HTTP Method: PUT
-
Parameters:
value- additional info for lock (currently it's correlationId only) "company-project-name" as last part of path -
Example: http://aet.example.com/lock/cognifide-example-mysimplesuite
[value=cognifide-example-mysimplesuite-12312454] - Description: This method extends the duration of a lock for given suite.
-
URL:
/config/list - HTTP Method: GET
- Example: http://aet.example.com/config/list
- Description: Returns all suites for all projects in all companies as html list of links to reports and metadata (this method will change or will be removed in near future- for now it stays only for devs and testing purposes).
-
URL:
/config/locks - HTTP Method: GET
- Example: http://aet.example.com/config/locks
- Description: Returns list of current locks.
-
URL:
/config/communicationSettings - HTTP Method: GET
- Example: http://aet.example.com/config/communicationSettings
- Description: Returns current JMS broker settings and report app domain. This method is used by maven client.
The Cleaner is a mechanism that removes obsolete data from the AET Database.
The Cleaner is a scheduled task (using the Quartz Scheduler library with a Cron expression). There may be multiple Cleaner instances running in the system, however it is recommended that they should not run over the same span of time (scheduled hours should be carefully picked).
There are two parameters that define if the Suite in the AET Database is obsolete:
- version,
- creation timestamp.
The Version of the suite is incremented each time the suite changes (e.g. during the next run of all suite tests or simply during suite rebasing/commenting). In case when the suite is run with all tests, correlationId of the suite changes. During rebasing/commenting, only the version is incremented, correlationId remains unchanged.
The Creation timestamp is the time when the suite was run or when it was changed last time.
Those parameters can be set in the Cleaner configuration:
- Last N versions to keep - defines the number of artifact versions that will be left after the cleaning operation. If left empty, only one version will be kept after the cleaning operation.
- Remove artifacts older than X days - defines how old files should be removed (older than X days). Works as a conjunction with last versions to be kept.
The Cleaner makes use of Apache Camel as an execution processor. The following diagram shows a sample Cleaner execution:
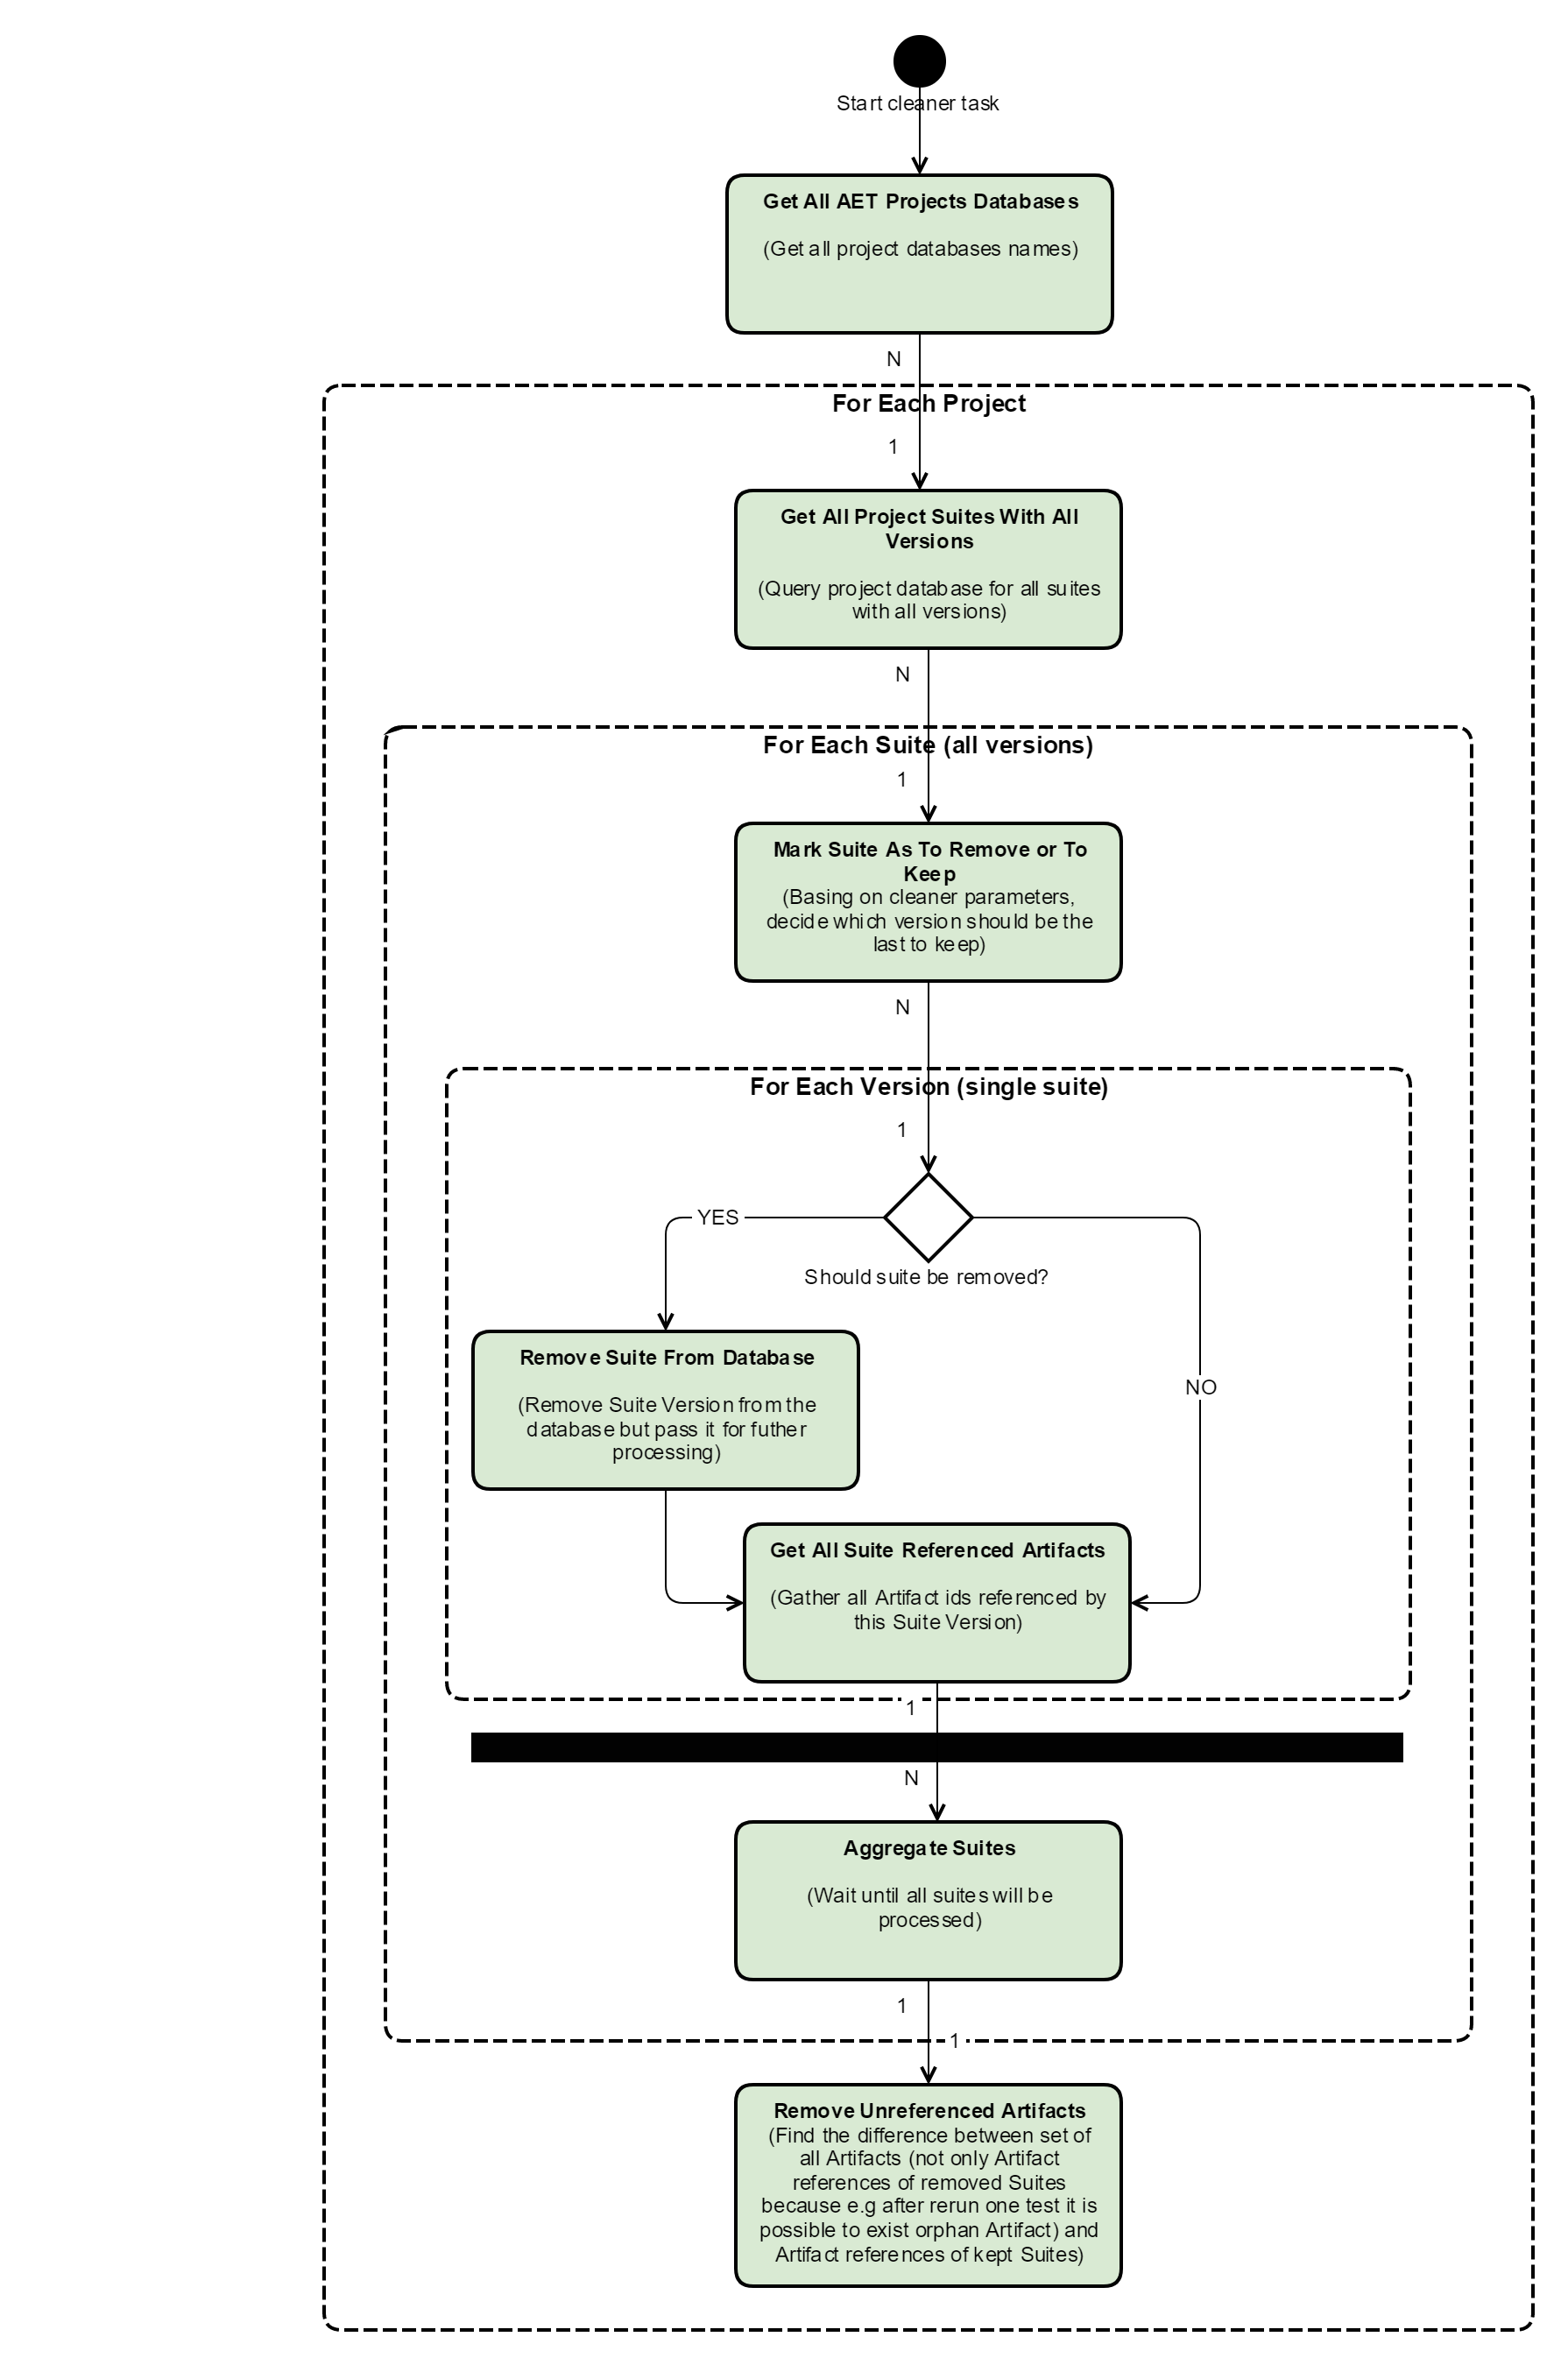
Let's assume we have the following suite versions in the database before running the Cleaner.
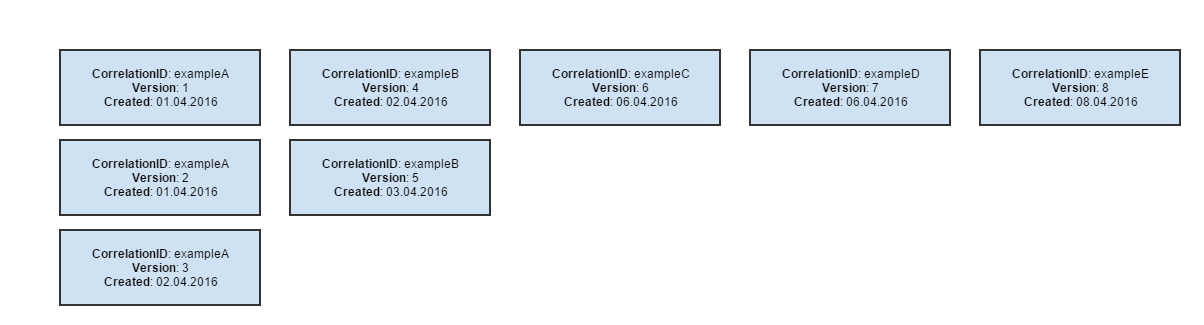
After running the Cleaner with the following parameters:
- remove all suites but for the last 3 versions,
- remove all suites created before 5 days since now (assume now is 08.04.2016, so 5 days since now is 03.04.2016).
The following suites will be removed (marked red).
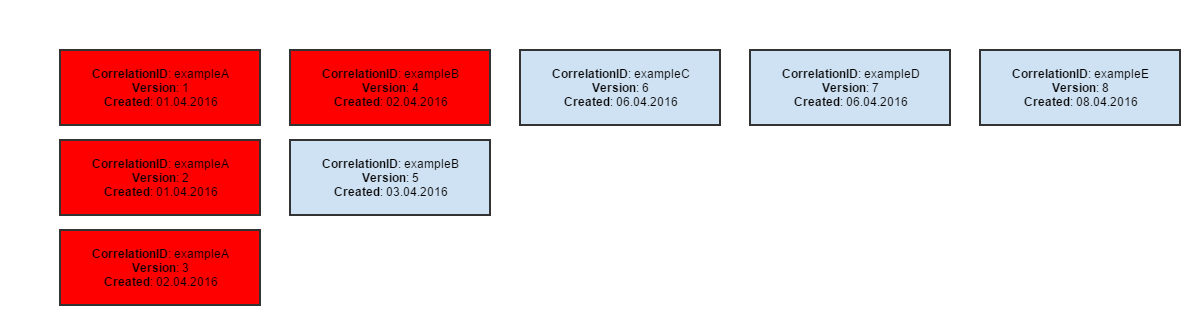
After running the Cleaner with the following parameters:
- remove all suites but for the last 2 versions,
- remove all suites older than 6 days (since 08.04.2016, which is 02.04.2016).
the following suites will be removed (marked red).
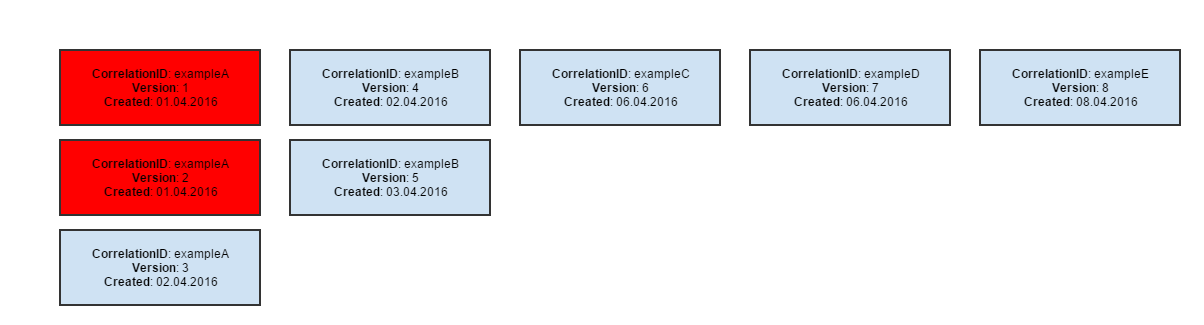
After running the Cleaner with the following parameters:
- remove all suites but for the last 2 versions,
- no date specified.
The following suites will be removed (marked red).
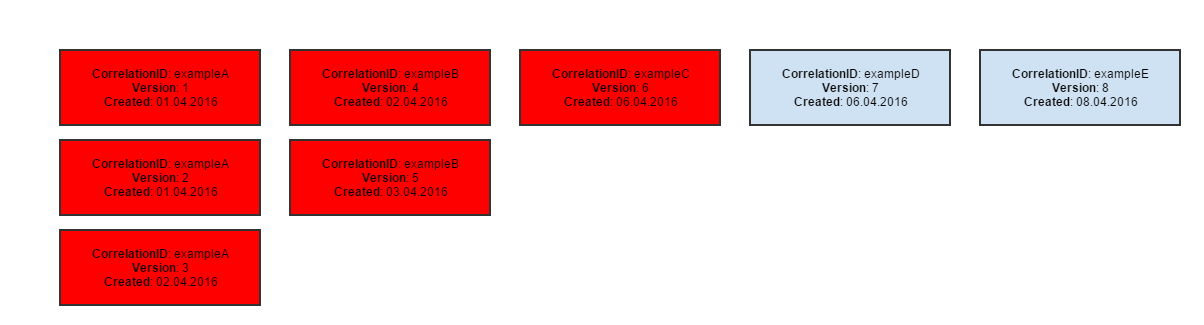
Each AET test processing consists of two phases:
- collection,
- comparison,
After report is generated, client is notified about the finished test run.
The following diagram shows the life cycle of single test:
This is the first phase during which all specified data will be collected (e.g. screenshots, page source, js errors). All collection results are saved in database after successful collection.
The second phase is operation on collected data. In some cases collected data is compared to patterns, in other special validation is performed (e.g. w3c). The second phase starts before collection finishes - just at the moment when required artefacts are collected and ready to compare (e.g. to compare two screenshots, system does not have to wait until source of page is collected).
The following diagram shows the life cycle of test suite:
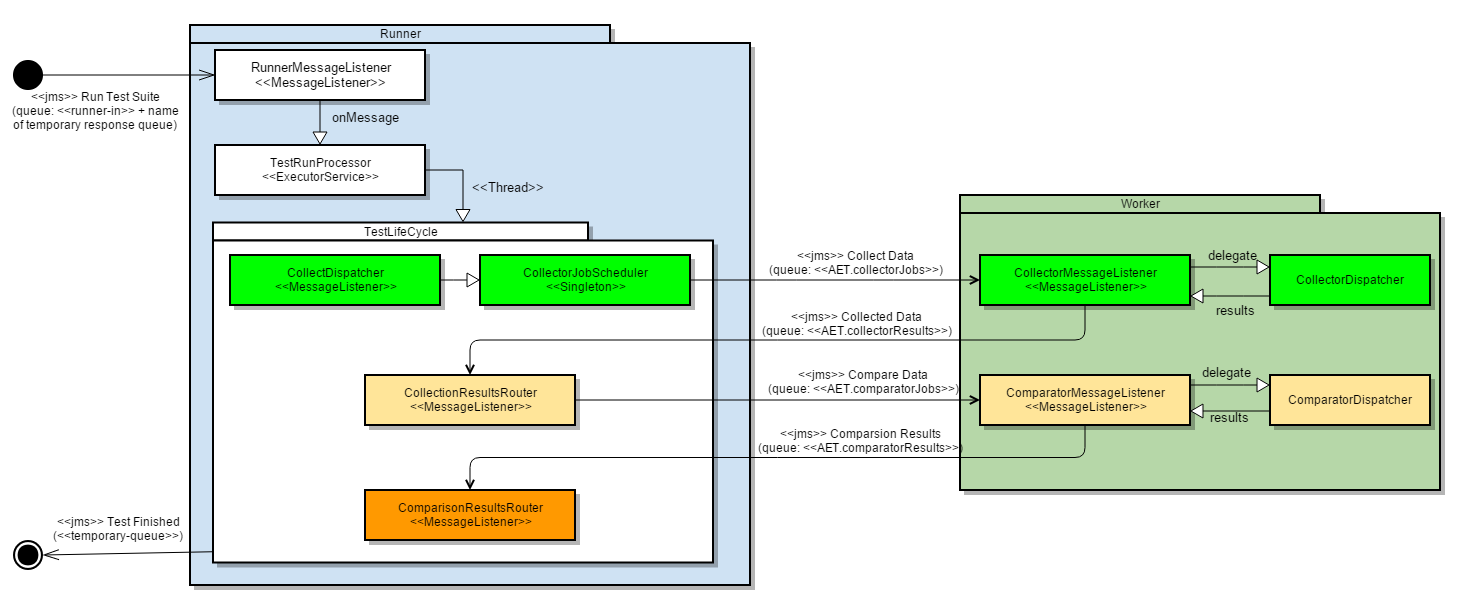
Lock feature was implemented to block concurent modification of suite. This prevents overriding user changes (eg rebase, comments) by test suite run.
When suite is locked there is no way to update it by any operation in REST API.
When client (e.g. aet-maven-plugin) starts test suite then it tries to set lock by sending request to REST API.
- If given suite is already in locked state, REST API returns status 409 and then client is throwing exception and finishes execution (test suite doesn't get into runner in Queue).
- If suite isn't locked, lock is set and 'lock-heart-beat' is started. On each heartbeat lock duration is extended. Heartbeat is working until client finishes its execution.
Each AET project has its own database. The project database consists of 3 collections:
- Metadata,
- Artifacts (files + chunks GridFS collections).
The metadata collection holds the whole suite run with all necessary metadata e.g.:
{
"suite": {
"correlationId": "cognifide-example-1234567890",
"project": "example",
"name": "integration",
"version": 2,
"tests": [
{
"name": "example-desktop",
"comment": "Some test-level comment",
"urls": [
{
"name": "unique-url-name",
"caseUrl": "/authors.html",
"canonicalUrl": "https://cognifide.com/authors.html",
"domain": "https://cognifide.com",
"comment": "Some url-level comment",
"useProxy": "rest",
"steps": [
{
"header": {
"parameters": {
"key": "Authorization",
"value": "Basic emVuT2FyZXVuOnozbkdAckQZbiE="
}
}
},
{
"open": { }
},
{
"screen": {
"name": "desktop",
"parameters": {
"width": 1280,
"height": 1024
},
"pattern": "568b54a4e63e740bfc2210e5",
"result": {
"artifact": "bb8b54a4e63e740bfc2210e8",
"status": "OK"
},
"comparators": [
"layout:" {
"result": {
"artifact": "bb8b54a4e63e740bfc2210x5",
"status": {
"status": "SUCCESS",
currentCreateDate: "Mar 2, 2016 2:30:36 PM",
patternCreateDate: "Mar 2, 2016 2:30:36 PM"
}
}
}
]
}
},
{
"screen": {
"name": "desktop",
"parameters": {
"width": 768,
"height": 1024
},
"pattern": "568b54a4e63e740bfc2210e5",
"result": {
"artifact": "aa8b54a4e63e740bfc2210e5",
"status": "OK"
},
"comparators": [
"layout:" {
"result": {
"artifact": "bb8b54a4e63e740bfc2210e5",
"status": {
"status": "SUCCESS",
currentCreateDate: "Mar 2, 2016 2:30:36 PM",
patternCreateDate: "Mar 2, 2016 2:30:36 PM"
}
}
}
]
}
},
{
"screen": {
"name": "mobile",
"parameters": {
"width": 320,
"height": 480
},
"pattern": "568b54a4e63e740bfc2210e6",
"result": {
"artifact": "aa8b54a4e63e740bfc2210e6",
"status": "OK"
},
"comparators": [
"layout:" {
"result": {
"artifact": "bb8b54a4e63e740bfc2210e5",
"status": {
"status": "SUCCESS",
currentCreateDate: "Mar 2, 2016 2:30:36 PM",
patternCreateDate: "Mar 2, 2016 2:30:36 PM"
}
}
}
]
}
},
{
"status-codes": {
"comparators": [
"status-codes": {
"parameters": {
"filterRange": "400,600"
},
"result": {
"artifact": "bb8b54axxxxe740bfc2210e5",
"status": {
"status": "SUCCESS"
}
}
}
]
}
},
{
"js-errors": {
"comparators": [
"js-errors": {
"dataFilters": [
"js-errors-filter": {
"source": "http://w.iplsc.com/external/jquery/jquery-1.8.3.js",
"line": "2"
},
"result": {
"artifact": "aaab54axxxxe740bfc2210e5",
"status": {
"status": "SUCCESS"
}
}
]
}
]
}
}
]
}
]
}
]
}
}
Each step defined in the original suite is stored in this collection with all the information necessary to run it.
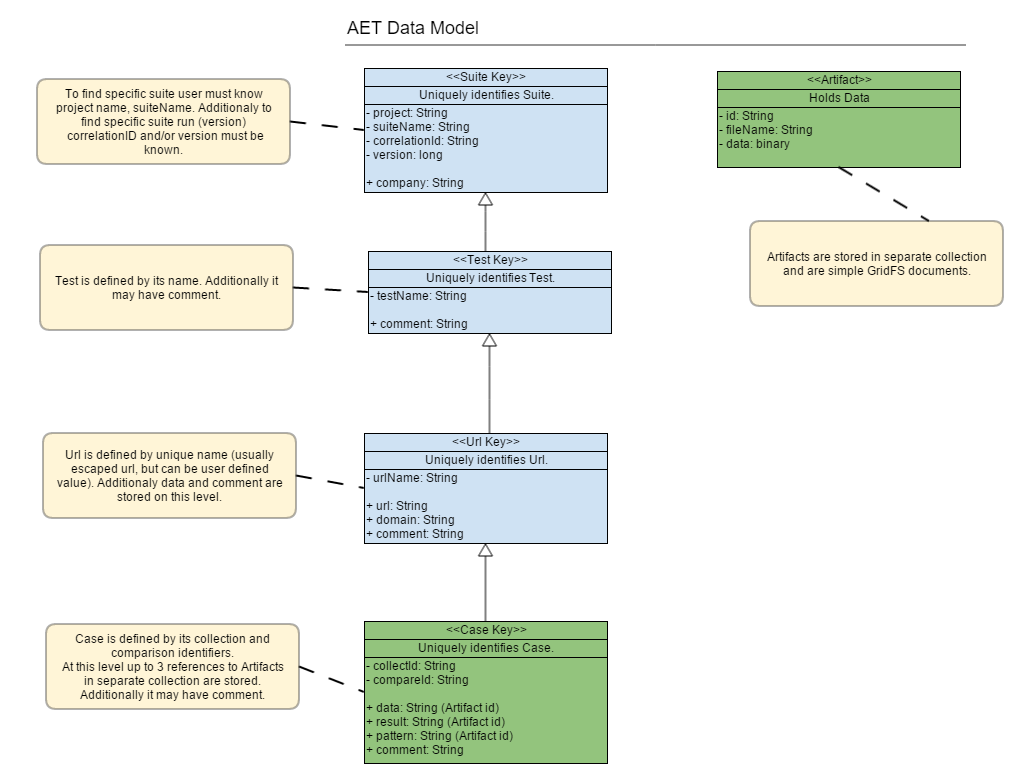
Metadata is a simple MongoDB collection. It contains keys (objectId) of GridFS artifacts stored in the Artifacts collection.
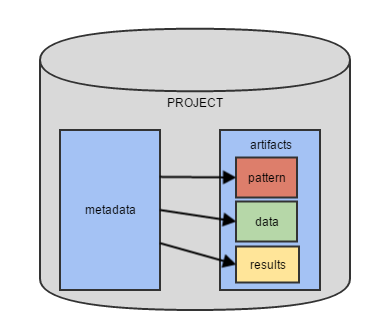
Metadata is persisted after a full suite run. At the beginning of processing, pattern keys are fetched from the last run if it was performed.
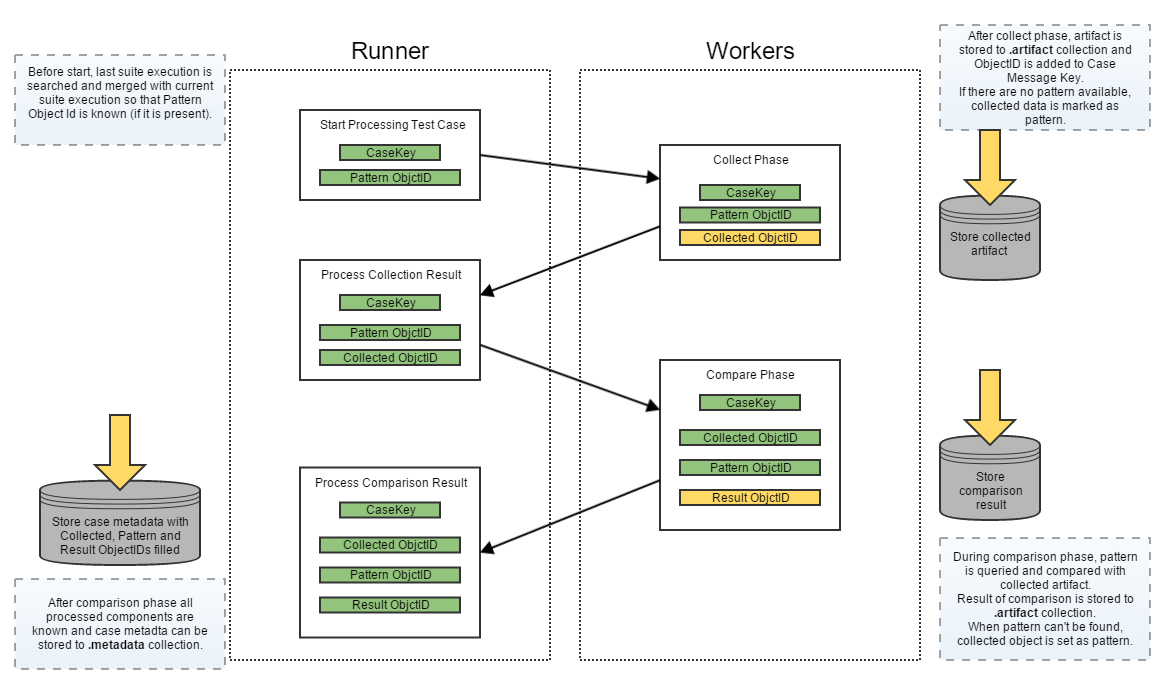
Artifacts is a GridFS collection (it consists of two collections: .files and .chunks). It holds binary artifacts (e.g. screenshots, source etc.). Each file has its ObjectId which is a reference to it. This collection has no knowledge of its context, artifacts are not marked as pattern/result etc.
AET log files can be found on Apache Karaf directory, in C:\content\karaf\data\log folder. Logs are split into four files:
karaf.log
Dedicated for logging Apache Karaf activities such as starting Karaf, starting AET bundles, configurations binding, etc.
runner.log
Dedicated for logging AET runner activities, such as running new test, changes in test suite run lifecycle, communication between runner and workers, JMS messages management, e.t.c.
worker.log
Dedicated for logging AET workers activities, such as collecting, comparing, modifying data, saving data do Mongo DB, etc.
cleaner.log
Dedicated for logging Cleaner activities (removing old Artifacts from Mongo DB, etc.).
Each log record has common structure:
    1                       2       3                           4                               5       6
2015-03-19 15:22:26,307 | INFO  | worker                   | CollectorMessageListenerImpl       86 | CollectorJobData [Collector4] message arrived with 1 urls. CorrelationId: cognifide-project-test-suite-1426774946010 RequestMessageId: ID:FLANNEL-56766-1426771932253-1:1:1:1:2
2015-03-19 15:22:28,650 | INFO  | worker                   | CollectorDispatcherImpl            41 | Start collection from http://www.cognifide.com, with 4 steps to perform. Company: cognifide Project: project TestSuite: test-suite Test: test1
2015-03-19 15:22:28,651 | DEBUG | worker                   | CollectorDispatcherImpl            53 | Performing collection step 1/4: open named open with parameters: {} from http://www.cognifide.com. Company: cognifide Project: project TestSuite: test-suite Test: test1
2015-03-19 15:22:29,351 | DEBUG | worker                   | CollectorDispatcherImpl            53 | Performing collection step 2/4: sleep named sleep with parameters: {duration=1500} from http://www.cognifide.com. Company: cognifide Project: project TestSuite: test-suite Test: test1
2015-03-19 15:22:29,351 | DEBUG | job-common               | SleepModifier                      27 | Sleeping for 1500 milliseconds
2015-03-19 15:22:30,851 | DEBUG | worker                   | CollectorDispatcherImpl            53 | Performing collection step 3/4: screen named screen with parameters: {} from http://www.cognifide.com. Company: cognifide Project: project TestSuite: test-suite Test: test1
2015-03-19 15:22:31,804 | DEBUG | datastorage-gridfs-impl  | GridFsStorage                     600 | Saving node with key: PatternMetadata{company=cognifide, project=project, testSuiteName=test-suite, environment=win7-ff16, artifactType=PATTERNS, domain=null, version=null} and file name: result.json
2015-03-19 15:22:31,813 | INFO  | datastorage-gridfs-impl  | GridFsHelper                      428 | Index created; Database: cognifide; Collection: project.files
2015-03-19 15:22:31,814 | DEBUG | datastorage-gridfs-impl  | GridFsStorage                     600 | Saving node with key: PatternMetadata{company=cognifide, project=project, testSuiteName=test-suite, environment=win7-ff16, artifactType=PATTERNS, domain=null, version=null} and file name: screenshot.png
...
where:
- Log record date and hour,
- Log level (INFO, DEBUG or ERROR),
- Name of the system module where information is logged,
- Name of the class,
- Line of code,
- Log message.
AET logging can be configured in org.ops4j.pax.logging.cfg file in C:\content\karaf\data\etc folder.
This configuration file specifies among others log files destination folder, log level and pattern, log file maximum size.
Besides technical improvements within this version we've updated the W3C validator to the most recent version (15.6.29).
This version provides mostly technical changes that improve logging and release process automation.
Consider having more than one AET environment. What if one of them is returning errors on your page? Now it is possible to compare all patterns collected in different environments to check whether the page is really broken or maybe it is just a broken pattern. It is easier to maintain, because all environments may use the same suite, only patterns may be different.
We've added the possibility to use regular expressions in filters. Thanks to that AET users are now able to filter all the messages using the same message pattern. It is useful i.e. in filtering W3C errors which may be parametrized and thanks to this they may differ in small details. Regular expressions help to handle such cases.
AET 2.0 brings new reporting capabilities and improved performance. We have decided to label the new features as BETA and improve them based your feedback as it means a lot to us. Stay tuned!
We keep evolving the AET architecture and optimizing reporting performance. We have introduced new web application reports, which are now generated on the client-side. Also, we have optimized database model queries and decreased number of calls by a factor of 10. If you’ve ever been working on a release and discovered that the AET database has become overloaded, we have removed data storage duplications so you don’t need to worry any longer!
The reporting interface has been turned into a modern and responsive client-side application. Now it’s easy to search and filter results from your test case. If you are tired of re-running your tests after accepting patterns don’t worry, now all changes are applied on the fly. Additionally you can share a link to a test result that you are concerned about and share with your team just by copying the test URL and pasting to JIRA.
AET 2.0 introduces an accessibility report that displays validation output of page accessibility analysis using the HTML_CodeSniffer library. Results show the total count of errors, warnings and notice type violations.
Now it’s possible to test client-side performance in an agile and incremental fashion. Brand new reports show overall scores along with a list of rules with individual grades. The performance analysis is based on the YSlow tool.
This section contains answers for frequently asked questions. If you can't find an answer to your question here please use the Issues Tool to raise a question.
- 1. Setup and first steps
- 2. Environment and software
-
3. User interface and reports
- 3.1 What browser should I use to browse AET reports?
- 3.2 I would like to compare pages between two environments/domains. How can I do that with the AET Tool?
- 3.3 How can I access pages that require authentication to enter?
- 3.4 How can I simulate another user agent?
- 3.5 What can I do with elements that render differently each time a page is opened and it occurs in changes detected each time?
- 3.6 I want to check how my page behaves on mobile devices, how can I do that?
- 3.7 How to get the latest report for the AET test suite?
- 4. Best practices
You need Maven and Java installed to run AET and Chrome browser to see reports if you have AET environment already set up. See more information in Running Suite section. To setup AET you need VirtualBox 5.1.14 to run AET VM. See more details in Basic Setup section.
You need Maven and Java installed to run AET and Chrome browser to see reports. See more information in Running Suite section. To start AET suite you need 2 XML files:
- pom.xml that defines how to run AET Client Application,
- suite.xml that defines AET suite.
To run suite simply execute this command:
mvn aet:run
from the directory where you have two above XML files.
Next, you will see processing progress. After a
SUCCESSFUL BUILD
explore target directory and open redirect.html in Chrome browser file to see the report.
AET tests are triggered by AET Maven Client Application. Thanks to this you may simply
run mvn aet:run from your favourite CI tool (e.g. Jenkins or
Bamboo).
When running AET for the first time AET has no patterns. The first collected screenshots will be treated as patterns, so the first run will detect no changes. The same is true when a new test or url is added to already existing suite - new records will have patterns collected during the first suite run.
AET currently uses Firefox 38.6.0 ESR as default browser. Information about current versions of components used by AET can be found in Third-party software used by system section.
Yes, AET uses MongoDB where all data collected during AET suite processing is stored.
You can add custom fonts to AET virtual machine. To do so, place desired fonts inside
usr/share/fonts or /usr/share/fonts/truetype directories, AET's FireFox should use them.
Other idea is to install fonts with e.g.:
yum groupinstall chinese-support
yum groupinstall arabic-support
See more details in answers for this AET question.
AET reports are dedicated and tested with Chrome browser, however they should also work fine with other modern browsers like FireFox or Edge.
3.2 I would like to compare pages between two environments/domains. How can I do that with the AET Tool?
The AET System enables comparison of the same page (set of pages) between different environments (domains). To do so, simply change domain parameter (either by change in suite definition or using aet run command) when running following tests. All data collected during those suite runs will be compared with the same patterns (which are independent of domain attribute).
There are two possible solutions. For the Basic Authentication you may use Header Modifier
with Authorization key set:
<header key="Authorization" value="Basic emVuT2FyZXVuOnozbkdAckQZbiE=" />The string in value is base64 encoded
username:password string.
The other way is to use Login Modifier that can pass simple login form.
Use Header Modifier to achieve that. Just add header modifier with key 'User-Agent'
and requested value.
3.5 What can I do with elements that render differently each time a page is opened and it occurs in changes detected each time?
Use Hide Modifier to hide those elements with css or xpath selectors.
AET is not integrated with mobile devices. However, you may simulate mobile resolution and check if your page changes its rendering breakpoints for different resolutions. Use Resolution Modifier to simulate different resolutions.
AET report are accessible by an URL with suite execution identifier passed in query string, i.e.:
http://localhost:8181/report/report.html?company=aet&project=aet&correlationId=aet-main-1234567890
In the example above the latest version of suite with correlation ID of aet-main-1234567890.
To see tha last version of suite without knowing correlationId use the URL of following form:
http://localhost:8181/report/report.html?company=<company>&project=<project>&suite=<suite>
i.e.:
http://localhost:8181/report/report.html?company=aet&project=aet&suite=main
4.1 I want to check how my page looks on several devices - what is the best way do configure a suite?
You may configure several Resolution Modifiers and Screen Collectors
within single <collect> phase. Please remember that it is a good practice to give tested page
the time to adjust after changing the resolution and before collecting a screenshot.
Example test configuration may look like this:
<collect>
	<open/>
	<wait-for-page-loaded />
	<resolution width="1280" height="1024"/>
	<sleep duration="1000"/>
	<screen  name="desktop"/>
	<resolution width="320" height="480"/>
	<sleep duration="1000"/>
	<screen  name="mobile"/>
</collect>With version 2.1.0 we are supporting regular expressions for following filters:
Please notice that the change introduced for W3C HTML5 Issues Filter is backward incompatible:
For version 2.0.x we were expecting that message parameter contains a prefix of error message.
From 2.1.x we need to use messagePattern parameter with JAVA regular expression. To match with a prefix we need to provide i.e.: messagePattern="The first occurrence of.*". The .* is needed here to match all errors with given prefix.
With the new version we have refactored our maven plugin. Please update the AET plugin version in your pom.xml. Previous versions of maven plugin are not compatible with new AET version!