-
Notifications
You must be signed in to change notification settings - Fork 12
1. Creating First Ticket
Visit http://emreeren.github.io/pmpos3 to start the demo application.
When you first start the application you'll see the login screen. Before logging in you need to setup a network for yourself.
By default PM-POS will connect to DEMO network. To start a new network for yourself click on Change Network button and type a network name for yourself.

I'm logging in to My Cafe network. Anyone logs in to My Cafe network will be able to join to your network and create tickets. You can type anything as the network name.

Clicking Submit button will change the netwok name.

HINT: You can test multiple terminal connections by opening application URL on separate browser tabs. When you do that don't forget to change the network name for the new appliation instances.
We don't have a user configuration yet so any PIN will work fine. Type a random 4 digits PIN number and login to the application.
When you first login you'll see the Dashboard page. There is a placeholder for the dashboard page fow now.

Click Menu button to see the appliation menu.

Click on Management > Card Types menu item to list the current Card Types.

We don't have a card type yet. We need card types to be able to create new cards. Click on + button to add a new Card Type.

I entered Tickets as the Card Type name and Ticket as the Reference Name. That means I'd like to reference a card with Ticket name. Click Check Mark icon to save the new Card Type.

Now I can see Tickets Card Type listed on Card Types screen. Now I can create cards.
To create a Ticket We'll create a Card and set type of the Card as Tickets. To do this click on Cards menu item on main menu.

Cards page shows nothing at the moment. We need to change Card Type to Tickets by clicking drop down arrow and choose Tickets.

Clicking on Tickets should display all Ticket Cards. We don't have a ticket now.

Click on + button to create a new Ticket Card.

On the title of the screen we can see we're creating a new Ticket (remember the reference name of Card Type). We have an empty card on the screen. Click on Card Menu button to see the available Card Actions.

These commands are useful to create & tag the cards. In production user will not be able to access this menu and executes these actions by using command buttons but for testing purposes we're giving direct access to these commands. Now Click on Set Card Tag Menu Item.

We should see a popup dialog to setup the tag properties. Name tag have a special meaning and when used PM-POS uses this tag value while listing Cards. We can use it as Ticket Number for Ticket Cards. Since we don't have a number generator feature yet we'll type the ticket number manually. Type Name as the Tag Name and A0001 as the Tag Value. Other values are not needed now. Click on Submit button to close the dialog.
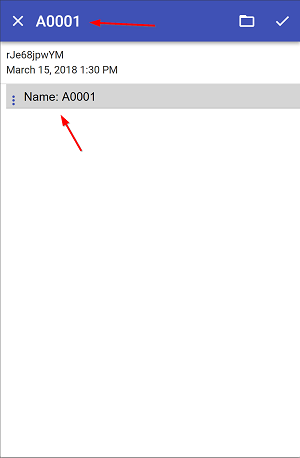
Now our Card have a Name and Name also appears on title.
Orders will be sub cards of Ticket Card. To create a Sub Card click on Card Menu and select Create Card menu Item.
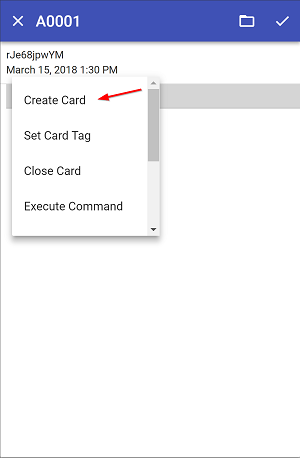
Clicking it will create an empty sub card under Ticket Card.
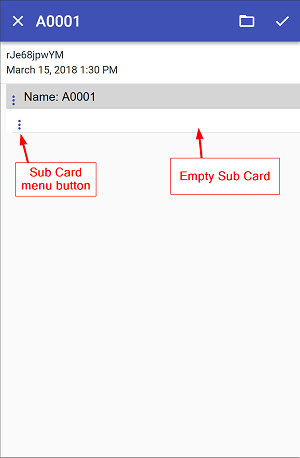
To set order properties we'll tag the sub card. Click on Sub Card Menu and select Set Card Tag command.

We'll see Tag Properties dialog.

We don't need a Tag Name for now. We'll set Tag Value as Hamburger, Quantity as 1, Amount as 9 and Source as Kitchen. To create an sale transaction we need to set at least Quantity and Source values. That will be an inventory transaction. We'll use Amount value to set the Price. We need this value to make it an financial transaction. Financial transactions gives a value to cards so we can track card balances.
Click Submit button to close the dialog.
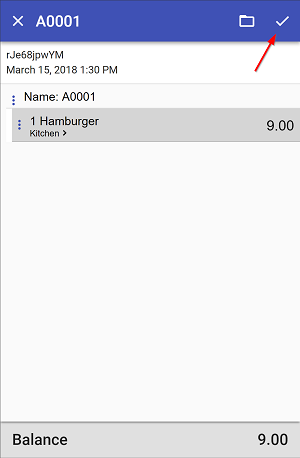
Congratulations you created your first Ticket. However nothing submitted yet so other terminals will not be able to access this ticket. Click on Check Mark button to Submit the Ticket and return to the Cards Page.
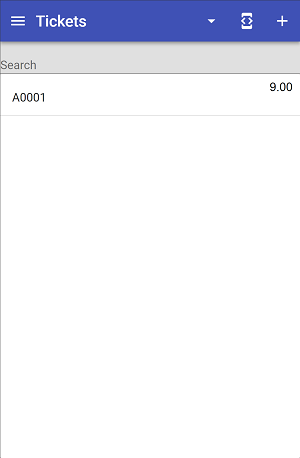
We should see our ticket listed on Cards Page. You can create a new browser tab or open application on another device to see if this ticket is accessible on other terminals. Don't forget to setup the Network Name before logging in.