![]()


abspy is a Python tool for 3D adaptive binary space partitioning and beyond. It adaptively partitions ambient 3D space into a linear cell complex using planar primitives, dynamically generating an adjacency graph in the process. Designed primarily for compact surface reconstruction, abspy also supports a range of other applications.

- Manipulation of planar primitives from point cloud or reference mesh
- Linear cell complex creation with adaptive binary space partitioning (a-BSP)
- Dynamic BSP-tree (NetworkX graph) updated locally upon primitive insertion
- Support of polygonal surface reconstruction with graph cut
- Compatible data structure with Easy3D on point cloud, primitive, mesh and cell complex
- Robust spatial operations underpinned by the rational ring from SageMath's exact kernel
Create a conda environment with the latest abspy release and all its dependencies installed:
git clone https://github.com/chenzhaiyu/abspy && cd abspy
conda env create -f environment.yml && conda activate abspyStill easy! Create a conda environment and enter it:
conda create --name abspy python=3.11 && conda activate abspyInstall the dependencies:
# You may replace `conda` with `mamba` for faster package parsing
# conda install mamba -c conda-forge
conda install -c conda-forge networkx numpy tqdm scikit-learn matplotlib colorlog scipy trimesh rtree pyglet sage=10.2
Preferably, the latest abspy release can be found and installed via PyPI:
pip install abspyOtherwise, you can install the latest version locally:
git clone https://github.com/chenzhaiyu/abspy && cd abspy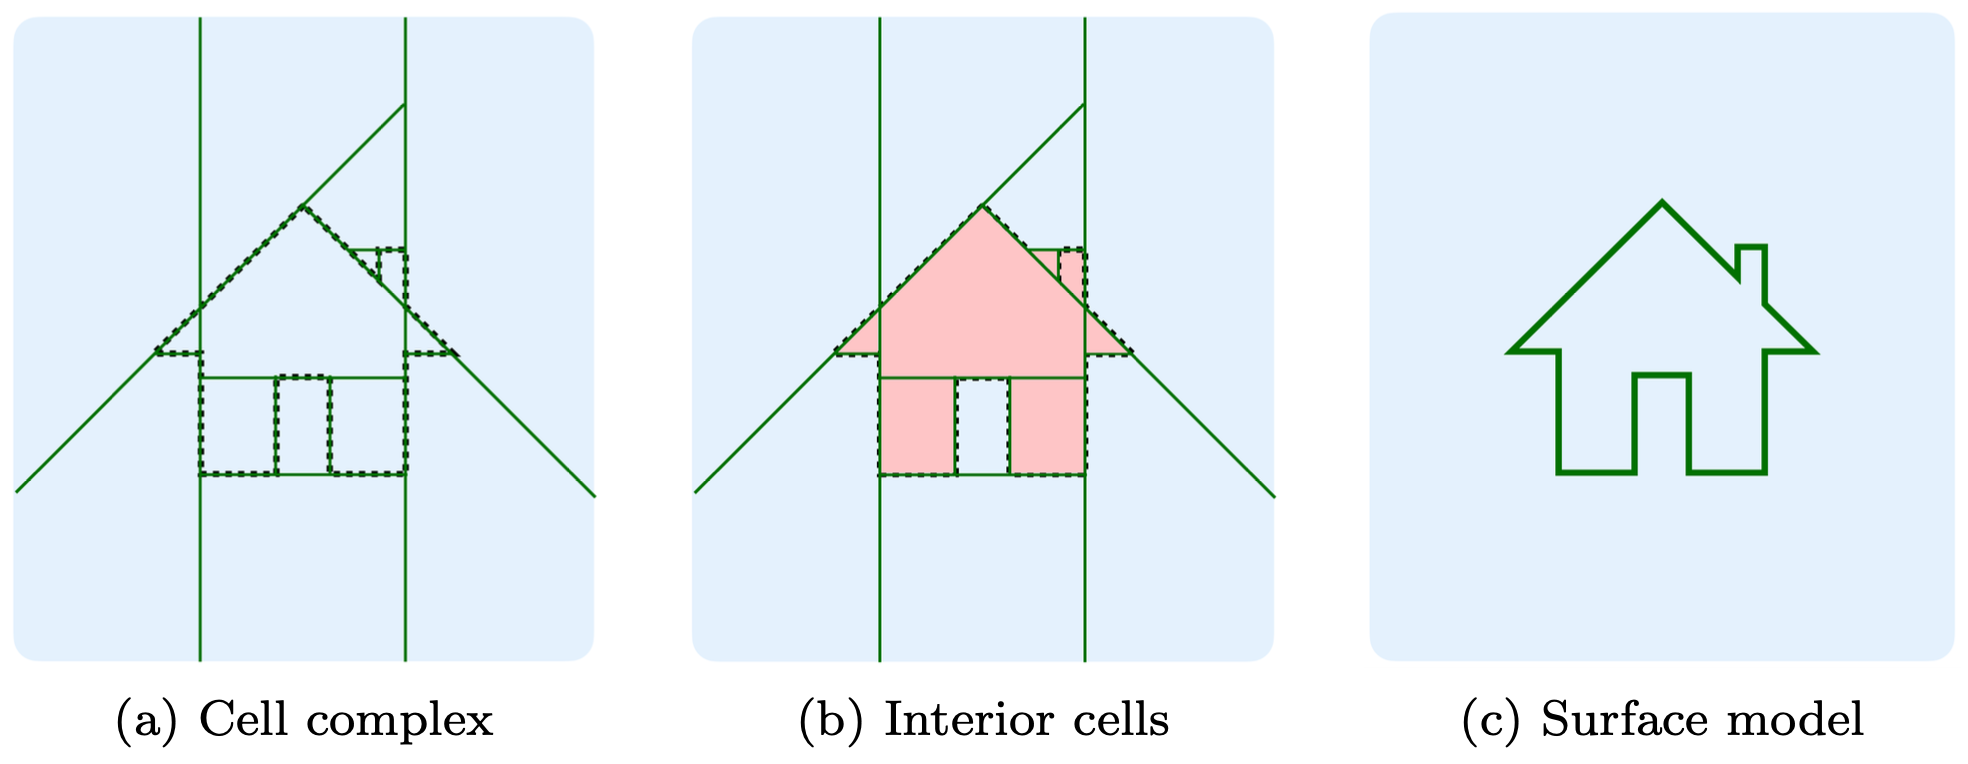
pip install .The example loads a point cloud to VertexGroup (.vg), partitions ambient space into a cell complex, creates the adjacency graph, and extracts the object's outer surface.
from abspy import VertexGroup, AdjacencyGraph, CellComplex

# load a point cloud in VertexGroup
vertex_group = VertexGroup(filepath='points.vg')

# normalise point cloud
vertex_group.normalise_to_centroid_and_scale()

# additional planes to append (e.g., a bounding plane)
additional_planes = [[0, 0, 1, -vertex_group.aabbs[:, 0, 2].min()]]

# initialise cell complex
cell_complex = CellComplex(vertex_group.planes, vertex_group.aabbs, vertex_group.obbs, vertex_group.points_grouped, build_graph=True, additional_planes=additional_planes)

# refine planar primitives
cell_complex.refine_planes()

# prioritise certain planes (e.g., vertical ones)
cell_complex.prioritise_planes(prioritise_verticals=True)

# construct cell complex
cell_complex.construct()

# print info about cell complex
cell_complex.print_info()

# build adjacency graph from cell complex
adjacency_graph = AdjacencyGraph(cell_complex.graph)

# assign weights (e.g., occupancy by neural network prediction) to graph
adjacency_graph.assign_weights_to_n_links(cell_complex.cells, attribute='area_overlap', factor=0.001, cache_interfaces=True)
adjacency_graph.assign_weights_to_st_links(...)

# perform graph cut to extract surface
_, _ = adjacency_graph.cut()

# save surface model to an OBJ file
adjacency_graph.save_surface_obj('surface.obj', engine='mesh')The example loads a mesh to VertexGroupReference, partitions ambient space into a cell complex, identifies cells inside reference mesh, and visualizes the cells.
from abspy import VertexGroupReference
vertex_group_reference = VertexGroupReference(filepath='mesh.obj')

# initialise cell complex
cell_complex = CellComplex(vertex_group_reference.planes, vertex_group_reference.aabbs, vertex_group_reference.obbs, build_graph=True)

# construct cell complex
cell_complex.construct()

# cells inside reference mesh
cells_in_mesh = cell_complex.cells_in_mesh('mesh.obj', engine='distance')

# save cell complex file
cell_complex.save('complex.cc')

# visualise the inside cells
if len(cells_in_mesh):
    cell_complex.visualise(indices_cells=cells_in_mesh)
Please find the usage of abspy at API reference, with self-explanatory examples in ./tests/test_*.py.
For the data structure of a .vg/.bvg file, please refer to VertexGroup.
Please see the Contribution Guide for more information.
- How can I install abspy on Windows?
For Windows users, you may need to build SageMath from source or install all other dependencies into a pre-built SageMath environment. Otherwise, virtualization with docker may come to the rescue.
- How can I use abspy for surface reconstruction?
As shown in Example 1, the surface is defined between adjacent cells where one is inside and the other outside. For more information, please refer to Points2Poly which integrates abspy with deep implicit fields, and PolyGNN which learns a piecewise planar occupancy function supported by abspy, for 3D building reconstruction.
See the MIT license for details.
If you use abspy in a scientific work, please consider citing the paper:
@article{chen2022points2poly,
  title = {Reconstructing compact building models from point clouds using deep implicit fields},
  journal = {ISPRS Journal of Photogrammetry and Remote Sensing},
  volume = {194},
  pages = {58-73},
  year = {2022},
  issn = {0924-2716},
  doi = {https://doi.org/10.1016/j.isprsjprs.2022.09.017},
  url = {https://www.sciencedirect.com/science/article/pii/S0924271622002611},
  author = {Zhaiyu Chen and Hugo Ledoux and Seyran Khademi and Liangliang Nan}
}