Manage multiple installations of JDK on a Windows computer. JVMS, Download Now!
There are situations where the ability to switch between different versions of JDK can be very useful. For example, if you want to test a project you're developing with the latest bleeding edge version without uninstalling the stable version of JDK, this utility can help.
- Download Now
- decompression zip and copy jvms.exe to a path what you want
- run cmd or powershell as administrator
- cd to folder where
jvms.exein - run
jvms.exe init - Setup is complete ! Switch and install jdk see Usage Section
NAME:
   jvms - JDK Version Manager (JVMS) for Windows

USAGE:
   jvms.exe [global options] command [command options] [arguments...]

VERSION:
   2.0.0

COMMANDS:
     init        Initialize config file
     list, ls    List the JDK installations.
     install, i  Install remote available jdk
     switch, s   Switch to use the specified version.
     remove, rm  Remove a specific version.
     rls         Show a list of versions available for download.
     proxy       Set a proxy to use for downloads.
     help, h     Shows a list of commands or help for one command

GLOBAL OPTIONS:
   --help, -h     show help
   --version, -v  print the version
how to install and switch jdk. see:
- run cmd or powershell as administrator
jvms rlslist available jdk version for downloadjvms install 1.8.0_31install jdk 1.8.0_31jvms lslist installed jdkjvms switch 1.8.0_31switch jdk version to 1.8.0_31
First and foremost, this version of jvms has no dependency on other lib. It's written in Go, which is a much more structured
approach than hacking around a limited .bat file. It does not rely on having an existing jdk installation.
The control mechanism is also quite different. There are two general ways to support multiple jdk installations with hot switching capabilities.
The first is to modify the system PATH any time you switch versions, or bypass it by using a .bat file to mimic the jdk executable and redirect
accordingly. This always seemed a little hackish to me, and there are some quirks as a result of this implementation.
The second option is to use a symlink. This concept requires putting the symlink in the system PATH, then updating its target to
the jdk installation directory you want to use. This is a straightforward approach, and seems to be what people recommend.... until they
realize just how much of a pain symlinks are on Windows. This is why it hasn't happened before.
In order to create/modify a symlink, you must be running as an admin, and you must get around Windows UAC (that annoying prompt). As a result, JVMS for Windows
maintains a single symlink that is put in the system PATH during jvms init only. Switching to different versions of JDK is a matter of
switching the symlink target. As a result, this utility does not require you to run jvms switch x.x.x every time you open a console window.
When you do run jvms switch x.x.x, the active version of jdk is automatically updated across all open console windows. It also persists
between system reboots, so you only need to use jvms when you want to make a change.
Overall, this project brings together some ideas, a few battle-hardened pieces of other modules, and support for newer versions of JDK.
I also wrote a simple data feed containing a list of jdk versions. It's free for anyone to use.
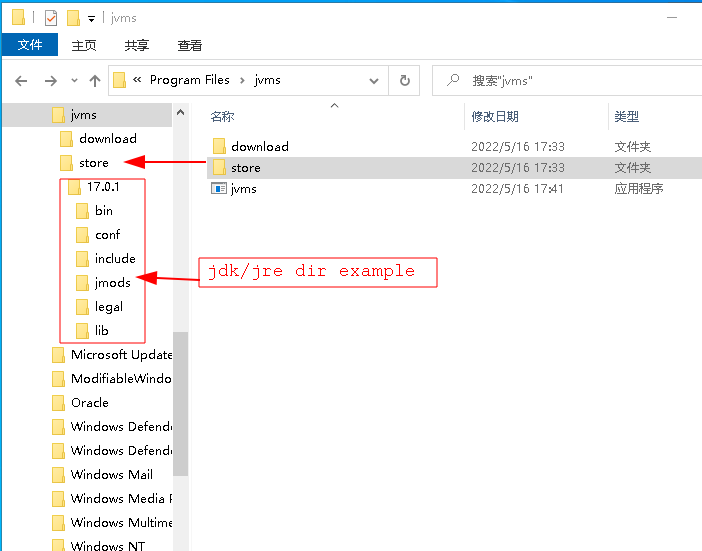
e.g: add the jdk 17.0.1
- copy jdk home folder to
jvms/store - rename folder to
17.0.1 jvms listcheck thisjvms switch 17.0.1java -versioncheck jdk verison
- create a json file. eg.
index.json - add you jdk download link to it. The format is like this:
[ { "version":"1.9.0", "url":"http://192.168.1.101/files/jdk/1.9.0.zip" } ] - copy this file to a static file server like nginx, apache etc.
- run
jvms init --originalpath http://192.168.1.101/files/index.jsonby the way,jvms init --java_homecan modify default JAVA_HOME - the run
jvms rlsorjvms install xwill list or install your jdk version
- open jdk_home folder
- compression all file to
*.zipfile - copy zip file to your server
- add this zip file link to index.json
MIT.

