These docs are a walkthrough on how I step up my Anycubic Kossel Linear Plus.
First you need to build the printer from the kit.
- Load up some filament and preheat the nozzle and the bed to confirm they all function.
- Push the filament through to ensure there are no clogs.
- Go into the settings and manually move the effector along X,Y, and Z and move the extruder.
Before doing anything else with the printer I reccomend updating the firmware if it isn't already at Marlin 1.1.9. The default firmware the printer comes loaded with is outdated and poorly designed.
- Download customized Marlin 1.1.9 by jeyman
- Download and install the Arduino IDE
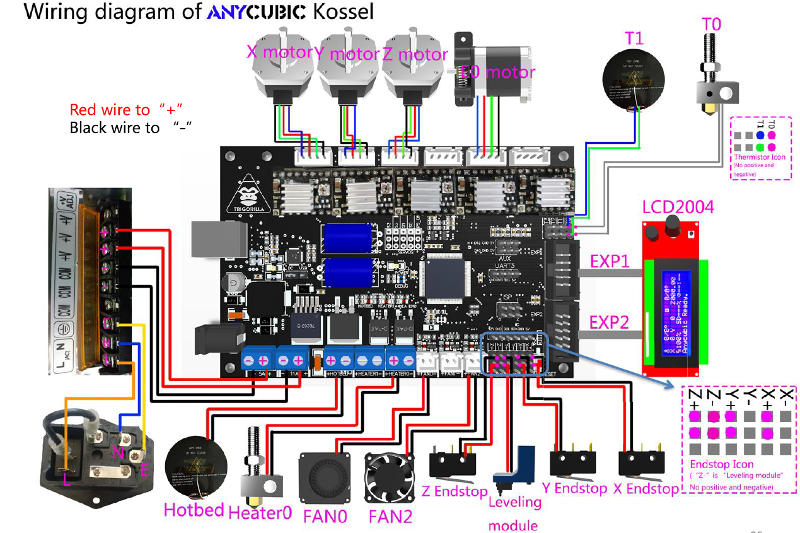
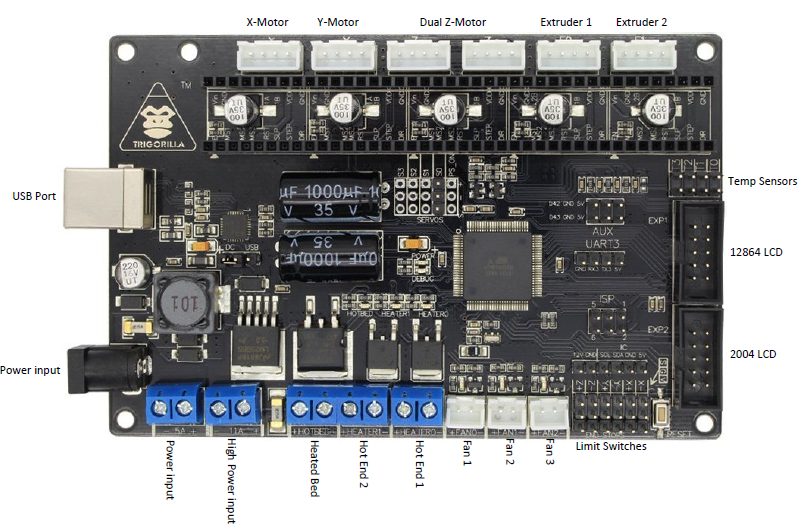
- I'm not sure if it is neccesary for Windows/Earlier Macbooks but go ahead and download the drivers for the TriGorilla board here. 3a. If you are using a Macbook Pro 2017 or newer you need to download and install the drivers above. Without them the only Serial ports that will show in the Arduino IDE are bluetooth.
- Launch the Arduino IDE. Unzip the custom Marlin zip and open the IDE into the extracted folder.
- Open Marlin.ino in the Arduino IDE
- Compline Marlin.ino
- Connect your computer to the TriGorilla board using the cable in the kit.
- Set up the Arduino IDE Board: Arduino/Genuino Mega or Mega 2560 and Processor: Processor: ATMega2560 (Mega2560)
- Hit upload! It will take a while.
As of when I wrote this Ultimaker Cura does not come with a printer or extruder profile for the AKLP. Here's how to add one.
- Download Custom Cura profile by jdharris
- Unzip and go into the Anycubic Kossel Linear Plus folder, and the New Profiles folder.
- Copy the printer profile.json into your Cura/resources/definitions: 3a. On Mac this can be found by going to the Applications folder and right clicking the Cura app and then choosing show package contents. Or go here: /Applications/Ultimaker Cura.app/resources/definitions/ 3b. On Windows go here: C:\Program Files\Ultimaker Cura 3.x\resources\definitions\
- Do the same for the extruder profile.json. 4a. For Mac repeat the same steps except go to resources/extruders. /Applications.Ultimaker Cura.app/resources/definitions/ 4b. For Windows go here: C:\Program Files\Ultimaker Cura 3.x\resources\extruders
- Open Cura and add a new printer, you should be able to find Anycubic Kossel Plus under Other.
Much better than the autocalibration in the default firmware. Takes a few steps but gets it perfect every time.
- Connect the probe (v2)
- Go to Prepare - Delta Calibration - Autocalibration. It will measure and calibrate up to 7 times in a row.
- Go to Prepare - Delta Calibration - Set Delta Height. Probe will come down once to calculate height.
- Go to Prepare - Delta Calibration - Store Settings. Machine will beep.
- Remove the Probe.
- Go to Prepare - Auto Home
- Go to Prepare - Move Axis - Soft Endstops and change it to Off
- Using Move Z-Axis in the same menu move the Z down to a height that is less than 10 mm. Use 10mm until you hit 10-20, then 1mm until you hit less than 2mm. Then use 0.1mm until you come into contact with the paper - explained further in the next steps.
- Get a sheet of plain printer paper, or what I prefer is a slightly thicker piece of paper like a Flashcard.
- Put the paper undeath the nozzle. Continually move the paper back and forth while simultaniously moving the nozzle down in 0.1mm increments until you cannot move it anymore. 10a. You should notice the nozzle touching the paper in two steps. First it will graze and make the paper harder to move, then it will clamp down and make it impossible. If you do not notice these two steps then in the following steps record 0.X5mm instead of 0.Xmm.
- Record the number shown once the paper cannot be moved anymore. Usually it is a negative number. Example: -0.3mm or 0.35mm. Make sure to note if it is positive or negative.
- Go to Prepare - Delta Calibration - Delta Settings and adjust the Height by subtracting the Z offset noted above. 12a. For example if the Z offset was -0.3mm and the height is 283.35 you do: 283.35 - (-0.3mm) = 286.35 height. 12b. When adjusting the height make sure you are adjusting the Tenths and Hundreths places correctly. I spent a good half hour adjusting the Hundreths instead of the Tenths and kept wondering why nothing was changing.
- Go to Prepare - Auto Home
- Go to Control - Motion - Probe Z-Offset and subtract the noted Z Offset as shown above. Usually this number is Negative. Example: -15.35 - (-0.35) = -15.
- Go to Control - Store Settings
- Go to Prepare - Auto Home
- Go to Prepare - Move Axis and move the Z axis down in the same way detailed above. If the nozzle comes into contact and the paper can no longer be moved at Z=0 00.0 (+/- 0.1mm) then you are good to go!
Optional:
Personally I don't do these steps as every time I do it messes with the calibration, but you are welcome to give them a try:
- Reattach the probe
- Go to Prepare - Level Bed
- Go to Prepare - Auto Home
- Remove the Probe
- Check that the nozzle meets the paper at Z = 000.0 (+/- 0.1mm ) as shown above.
I highly recomend Octopi as it makes life easier than using the SD card all the time. Simply follow the instructions on their website as they have likely updated since I wrote this guide.
The buildtak that came with the printer will go bad quick, so make sure to buy some and cut it down to the size of the bed.
Bed Clips These are nice they help keep the bed in place. Make sure to print these out of ABS or PETG as PLA will melt on the heated bed.
Top Caps These help keep the dust and debris away from the linear rails.
Bottom Corner Covers These do the same for the motors.
Tennis Ball Feet These help dampen the vibration and noise. I'd print these somewhere between 95-99% size to ensure a snug fit with the tennis ball. You can also just glue the ball in the place.
Fan Shroud Helps with print quality.
Extra stuff and backups: