Welcome to the one and only Image Recognizer Bot Workshop
The following guide will help you develop step by step your own Image Recognizer bot without the need of any code experience. We will use the Bot Framework Composer, which is a open-source visual authoring canvas for developers and multidisciplinary teams to build bots. By the end of the workshop, you would have created a bot capable of receiving and describing an image of your choice using Azure AI Cognitive Services.
- From an architectural perspective, the following Azure services are being used:
- Web App
- Storage account
- App Service
- Azure Cognitive Services:
- LUIS (Language Understanding Intelligent Service)
- Computer Vision API
It's important to ensure all of the following prerequisites are met:-
-
An Azure subscription
-
NOTE:- Please take notice of the Bot Framework Composer version number and ensure that version is being used for this lab
Bot Framework Composer is an open-source, visual authoring canvas for developers and multi-disciplinary teams to design and build conversational experiences with Language Understanding and QnA Maker, and a sophisticated composition of bot replies (Language Generation). Within this tool, you'll have everything you need to build a sophisticated conversational experience.
- A visual editing canvas for conversation flows
- In context editing for language understanding (NLU)
- Tools to train, test and manage language understanding (NLU) and QnA components
- Language generation and templating system
- A ready-to-use bot runtime executable
We will now begin to build out our bot locally and publish it to Azure later, when we wish to connect to our bot through channels such as Microsoft Teams.
-
Open the Bot Framework Composer application by searching through it in the start menu

-
Click on New --> Create from Template -> Echo Bot -> name your bot ImageRecognizerBot and click OK


-
You will notice it creates by default two dialogs, one called "Unknown Intent" and the other called "Greeting". "Unknown Intent" is the dialog that is run when Language Understanding is not able to determine the intent for the user. Greeting is run when a user joins a chat with the bot.
- Select the Greeting dialog, click on Send a response and replace -${WelcomeUser()} with following response:-
- Hi there! I am the Image Recognizer Bot, how can I help you today?
- Why hello there, it's me, the one and only Image Recognizer Bot, how can I assist you today?
The above demonstrates that you can greet your user with a variation of responses. Your bot will pick which one at random and display the respective response. This feature is great because it makes your bot sound less robotic compared to when it sends the exact same response each time.

-
We will now extend our bot by adding a new intent and dialog called UploadImage. In order for our bot to detect this intent, we need to give it a few example utterances/sentences that demonstrates this intent. These utterances are then used by LUIS (Language Understanding Intelligent Service) to train the model for mapping our user's utterances with this intent.
-
Click on + Add and then Add new trigger on ImageRecognizerBot
-
Name the dialog UploadImage dialog and provide the following example utterances to train LUIS
- I would like to upload an image
- analyse my picture
- describe an image

-
-
Now it's time to populate our UploadImage dialog to capture image uploads from our user,
-
Click + -> Ask a question -> File or attachment
-
Click on Bot Asks (Attachment) and paste in the following text:-
- Sure! Please upload the image you would like me to analyse?

-
-
Click on User Input and name the property dialog.attachment and Output format as all
This basically means we can store and access the properties of our uploaded image via the variable dialog.attachment. Because we are using the property dialog to store our variable, the lifetime of our variable will persist to the same lifetime as our dialog. To learn more about memory state, please visit https://docs.microsoft.com/en-us/composer/concept-memory.

-
Click on + -> Send a response and input the following text into the Language Generation box.
[HeroCard
title = Here is the photo you uploaded!
image = ${dialog.attachment[0].contentUrl}
]
It is possible to send bot responses that have enriched content beyond plaintext. This is when elements like HeroCard come in handy to display content such as images. More information on different type of cards can be found here:- https://docs.microsoft.com/en-us/composer/how-to-send-cards#card-types.

-
Let's configure our bot to speak with LUIS
- Click on the Settings cog icon located at the bottom left of the screen.
- In the Bot Settings JSON text box, scroll down to the luis section and replace authoringKey's key value with the authroingKey provided by your instructor.
- In the same LUIS section, replace endpoint's key value with https://westeurope.api.cognitive.microsoft.com
- Also, change the authoringRegion to westeurope

-
Time to run and test our bot works okay!
- Click on Start Bot
- Click Okay
- Click on Test in Emulator

-
Before we ask our bot to analyse an image, we need to provide one. As such, lets download Mr.Bean's picture from Flickr (because why not :)). Click the following link which will automatically download Mr's Bean image https://live.staticflickr.com/4244/34613307720_d29cf0dd97_o_d.jpg.
-
Ask the bot to analyse your image. Use the below transcript screenshot as an example on how to do that. When it asks to upload an image, click on the Attachment icon -> Browse to your Downloads folder and select the image you just downloaded (e.g. 34613307720_d29cf0dd97_o_d.jpg).

Your bot should have returned a preview of the image you uploaded. This is an indication everything is working fine - well done! Next step will be to connect to Azure AI Cognitive Service to describe our image and for our bot to return the result.
-
Let's now add a step to send our uploaded images to be analysed by Azure AI Cognitive Service called Computer Vision. Before we can do this however, we will need to deploy Computer Vision via Azure.
-
Open a new tab and navigate to https://portal.azure.com
-
Click on Create a new resource

-
Search for Computer Vision and when the option appears in the dropdown menu, click on it.

-
Click Create

-
Fill out the form:-
- Resource group:- select your resource group you want to deploy the bot to e.g. labuser1000-ImageRecognizerBot
- Region:- select North Europe.
- Name:- name your Computer Vision API e.g. labuser1000-ImageRecognizerBot-computervision
-
Click on Review + create and then Create


-
Once deployed, click on Go to Resource

-
Click on Keys and Endpoint from the left handside menu and take note (e.g. in notepad) of Key 1 and the Endpoint.

-
-
Switch back to Composer and the UploadImage dialog. Click on the + button, the one just before the HeroCard response -> Access External Resources - > Send an HTTP Request
- Select the HTTP method as POST
- Set the URL to XXXX/vision/v2.1/analyze?visualFeatures=Description,Tags&subscription-key=YYYY
- Replace XXXX with the Computer Vision endpoint and YYYY with the Key 1 (obtained from the previous step).
- In the Body paste the following:-
{"url":"${dialog.attachment[0].contentUrl}"} - Under the Result property, input dialog.visionApiResponse
This will basically output the response of the Vision API call into that variable. More information about sending HTTP requests in Composer can be found here.

-
Let's modify the HeroCard response to reflect the results from the Computer Vision response. Replace its content with the following:-
[HeroCard
    title = Here is the attachment
    text = Description:- ${dialog.visionApiResponse.content.description.captions[0].text}  \r\n Tags:- ${replace(string(dialog.visionApiResponse.content.description.tags),'\r\n', '')}
    image = ${dialog.attachment[0].contentUrl}
 ]
As you can see above, we are accessing the properties of the dialog.visionApiResponse, which is the response given back when we performed the HTTP request above to the Computer Vision API. In addition, I used \r\n to generate a linebreak in the response and used the builtin replace function to remove the linebreaks from the HTTP response making it more readable.
-
To have this solution also work with Microsoft Teams, the attachment is accessible by the variable ${dialog.attachment[0].content.downloadUrl} instead of ${dialog.attachment[0].contentUrl}. This is due to the file being behind an authenticated link. If you're interested to know more, have a look here.
- Click on the "+" button, the one just before the Send an HTP request action -> Create a condition -> Branch: If/Else
- In the Condition field, set it to:-
exists(dialog.attachment[0].content.downloadUrl)

- Under True click on + -> Manage properties -> Set a property
- Under the Property field, set it to:-
dialog.attachment[0].contentUrl - Under Value set it to:-
${dialog.attachment[0].content.downloadUrl}

-
Go ahead and click on Restart the bot located on the top right of the screen and afterwards on Test in Emulator
- Click on the Settings icon and ensure the tickbox Bypass ngrok for local addressess is unticked
- Click Save
- Swith back to the Live Chat tab

- Try asking the bot to analyse your picture again and upload the same picture. You should see a response similar to the screenshot below:-


In order to speak with our bot outside of our over channels such as Teams
-
Find out the location of your bot by clicking on the Home icon and reviewing the Location column. Take note of this, e.g. in a Notepad. E.g. C:/Users/hussel/ImageRecognizerBot

-
We will also need to know the Azure Subscription Id of the subscription we will deploy our bot to:-
-
Switch back to the browser tab where you have the Azure Portal already opened OR navigate to https://portal.azure.com
-
In the Search Bar type in Subscriptions and click on Subscriptions from the dropdown menu
-
Find your subscription you want to use and take note of the Subscription Id, you will need this in the next step.


-
-
Now we will open PowerShell to run Bot Framework Composer scripts to deploy your bot solution to Azure.
-
Open PowerShell

-
Copy and paste the following command, but replace {LOCATION} with the location of your bot (taken) from the previous step:-
cd "{LOCATION}\scripts"
-
Run the following command:-
npm install # Modified the original composer template to exclude qnamaker as we have already deployed this in the first step. This will override the template created by the Bot Framework Composer Invoke-WebRequest -Uri "https://github.com/samaea/Image-Recognizer-Bot-Workshop/raw/master/downloads/template-with-preexisting-rg.json" -OutFile "./DeploymentTemplates/template-with-preexisting-rg.json" # Modifying the script to make it easier to deploy to an existing resource group (Get-Content -path .\provisionComposer.js -Raw).replace('resourceGroupName = `${name}-${environment}`;','resourceGroupName = `${name}`;').replace('${name}-${environment}','${name}').replace('return await client.resourceGroups.createOrUpdate(resourceGroupName, param);','//return await client.resourceGroups.createOrUpdate(resourceGroupName, param);') | Set-Content -Path .\provisionComposer.js -
Run the following command, but replace the following values:-
- <YOUR AZURE SUBSCRIPTION ID> with the subscription id you noted in the previous step
- <NAME OF YOUR RESOURCE GROUP> with the name of your Azure Resource Group. For example, AspireUser900-Bot
- <APP PASSWORD> with a password that is at least 16 characters long with at least one number, one letter, and one special character. You can use your own password or even an online password generator such as https://www.random.org/passwords/?num=1&len=16&format=html&rnd=new. Afterwards, just add an @ symbol at the end of the random password in order to meet the minimum password requirement e.g. mAgZj3B4CQbqeZG9@.
node provisionComposer.js --subscriptionId=<YOUR AZURE SUBSCRIPTION ID> --name=<NAME OF YOUR RESOURCE GROUP> --appPassword=<APP PASSWORD> --environment=dev --createLuisAuthoringResource false --location westeurope--createCosmosDb false

It is recommended to use CosmosDB for the Bot's state storage, but it takes around 10 minutes to deploy. As such, to make the deployment quicker, we've disabled it by using the createCosmosDB flag to false.
- Assuming you have the same outcome as the above screenshot, you will be asked to navigate to https://microsoft.com/devicelogin and enter the code provided to authenticate into Azure. Please do this and select the correct account.


- Switch back to PowerShell upon successful authentication. You should notice everything is now deploying to Azure. When it finishes, it will output a JSON file which we will use in Bot Framework Composer. Copy the output from the terminal somewhere like Notepad, everything from the first open bracket until the last bracket, for example:-
{
 "accessToken": "XXXX",
 "name": "XXXX",
 "environment": "dev",
 "settings": {
   "applicationInsights": {
     "InstrumentationKey": "XXXX-XXXX-XXXX-XXXX-XXXX"
   },
   "cosmosDb": {
     "cosmosDBEndpoint": "XXXX",
     "authKey": "XXXX",
     "databaseId": "XXXX",
     "collectionId": "XXXX",
     "containerId": "XXXX"
   },
   "blobStorage": {
     "connectionString": "XXXX",
     "container": "XXXX"
   },
   "luis": {
     "authoringKey": "XXXX",
     "authoringEndpoint": "",
     "endpointKey": "XXXX",
     "endpoint": "https://westeurope.api.cognitive.microsoft.com/",
     "region": "westeurope"
   },
   "MicrosoftAppId": "XXXX-XXXX-XXXX-XXXX-XXXX",
   "MicrosoftAppPassword": "XXXXXX"
 },
 "hostname": "XXXX-ImageReconigzer-Bot-dev",
 "luisResource": "XXXX-ImageReconigzer-Bot-dev-luis"
}
Congratulations - all the required Azure Services have now been deployed! We also have the required connection strings that we can use to feed to Composer in order to deploy our bot to Azure
-
-
Swith back to Composer
-
Click on the Publish icon and then on Add a new Profile

-
For the Name give it any name e.g. Azure Publish Profile
-
For the Publish Destination select Publish bot to an Azure Web App (Preview)
-
Paste the JSON output from the previous step into the Publish Configuration field
-
Locate the authoringKey key in Publish Configuration and insert your LUIS authoring key in between the two qoutations.
-
Click Save

-
Click on Publish to select profile
-
After a couple of minutes, you should receive Success

Congrats! You've now deployed your bot to Azure, which means you can access it from anywhere in the world!
-
-
Switch to the web browser that has Azure Portal already loaded OR navigate to https://portal.azure.com.
- Click on Resource Groups
- Select your resource group (e.g. SamAEA-ImageRecognizerBot)
You should now be able to see all the Azure services deployed by the PowerShell script we ran earlier.
- Select your bot resource
- Click on Test in Webchat

- Feel free to chat with it like you did locally!


We will now activate the Teams Channel so that you can communicate via text messaging with your Image Recognizer Bot via Teams.
-
Enable our bot to be surfaced through Microsoft Teams
-
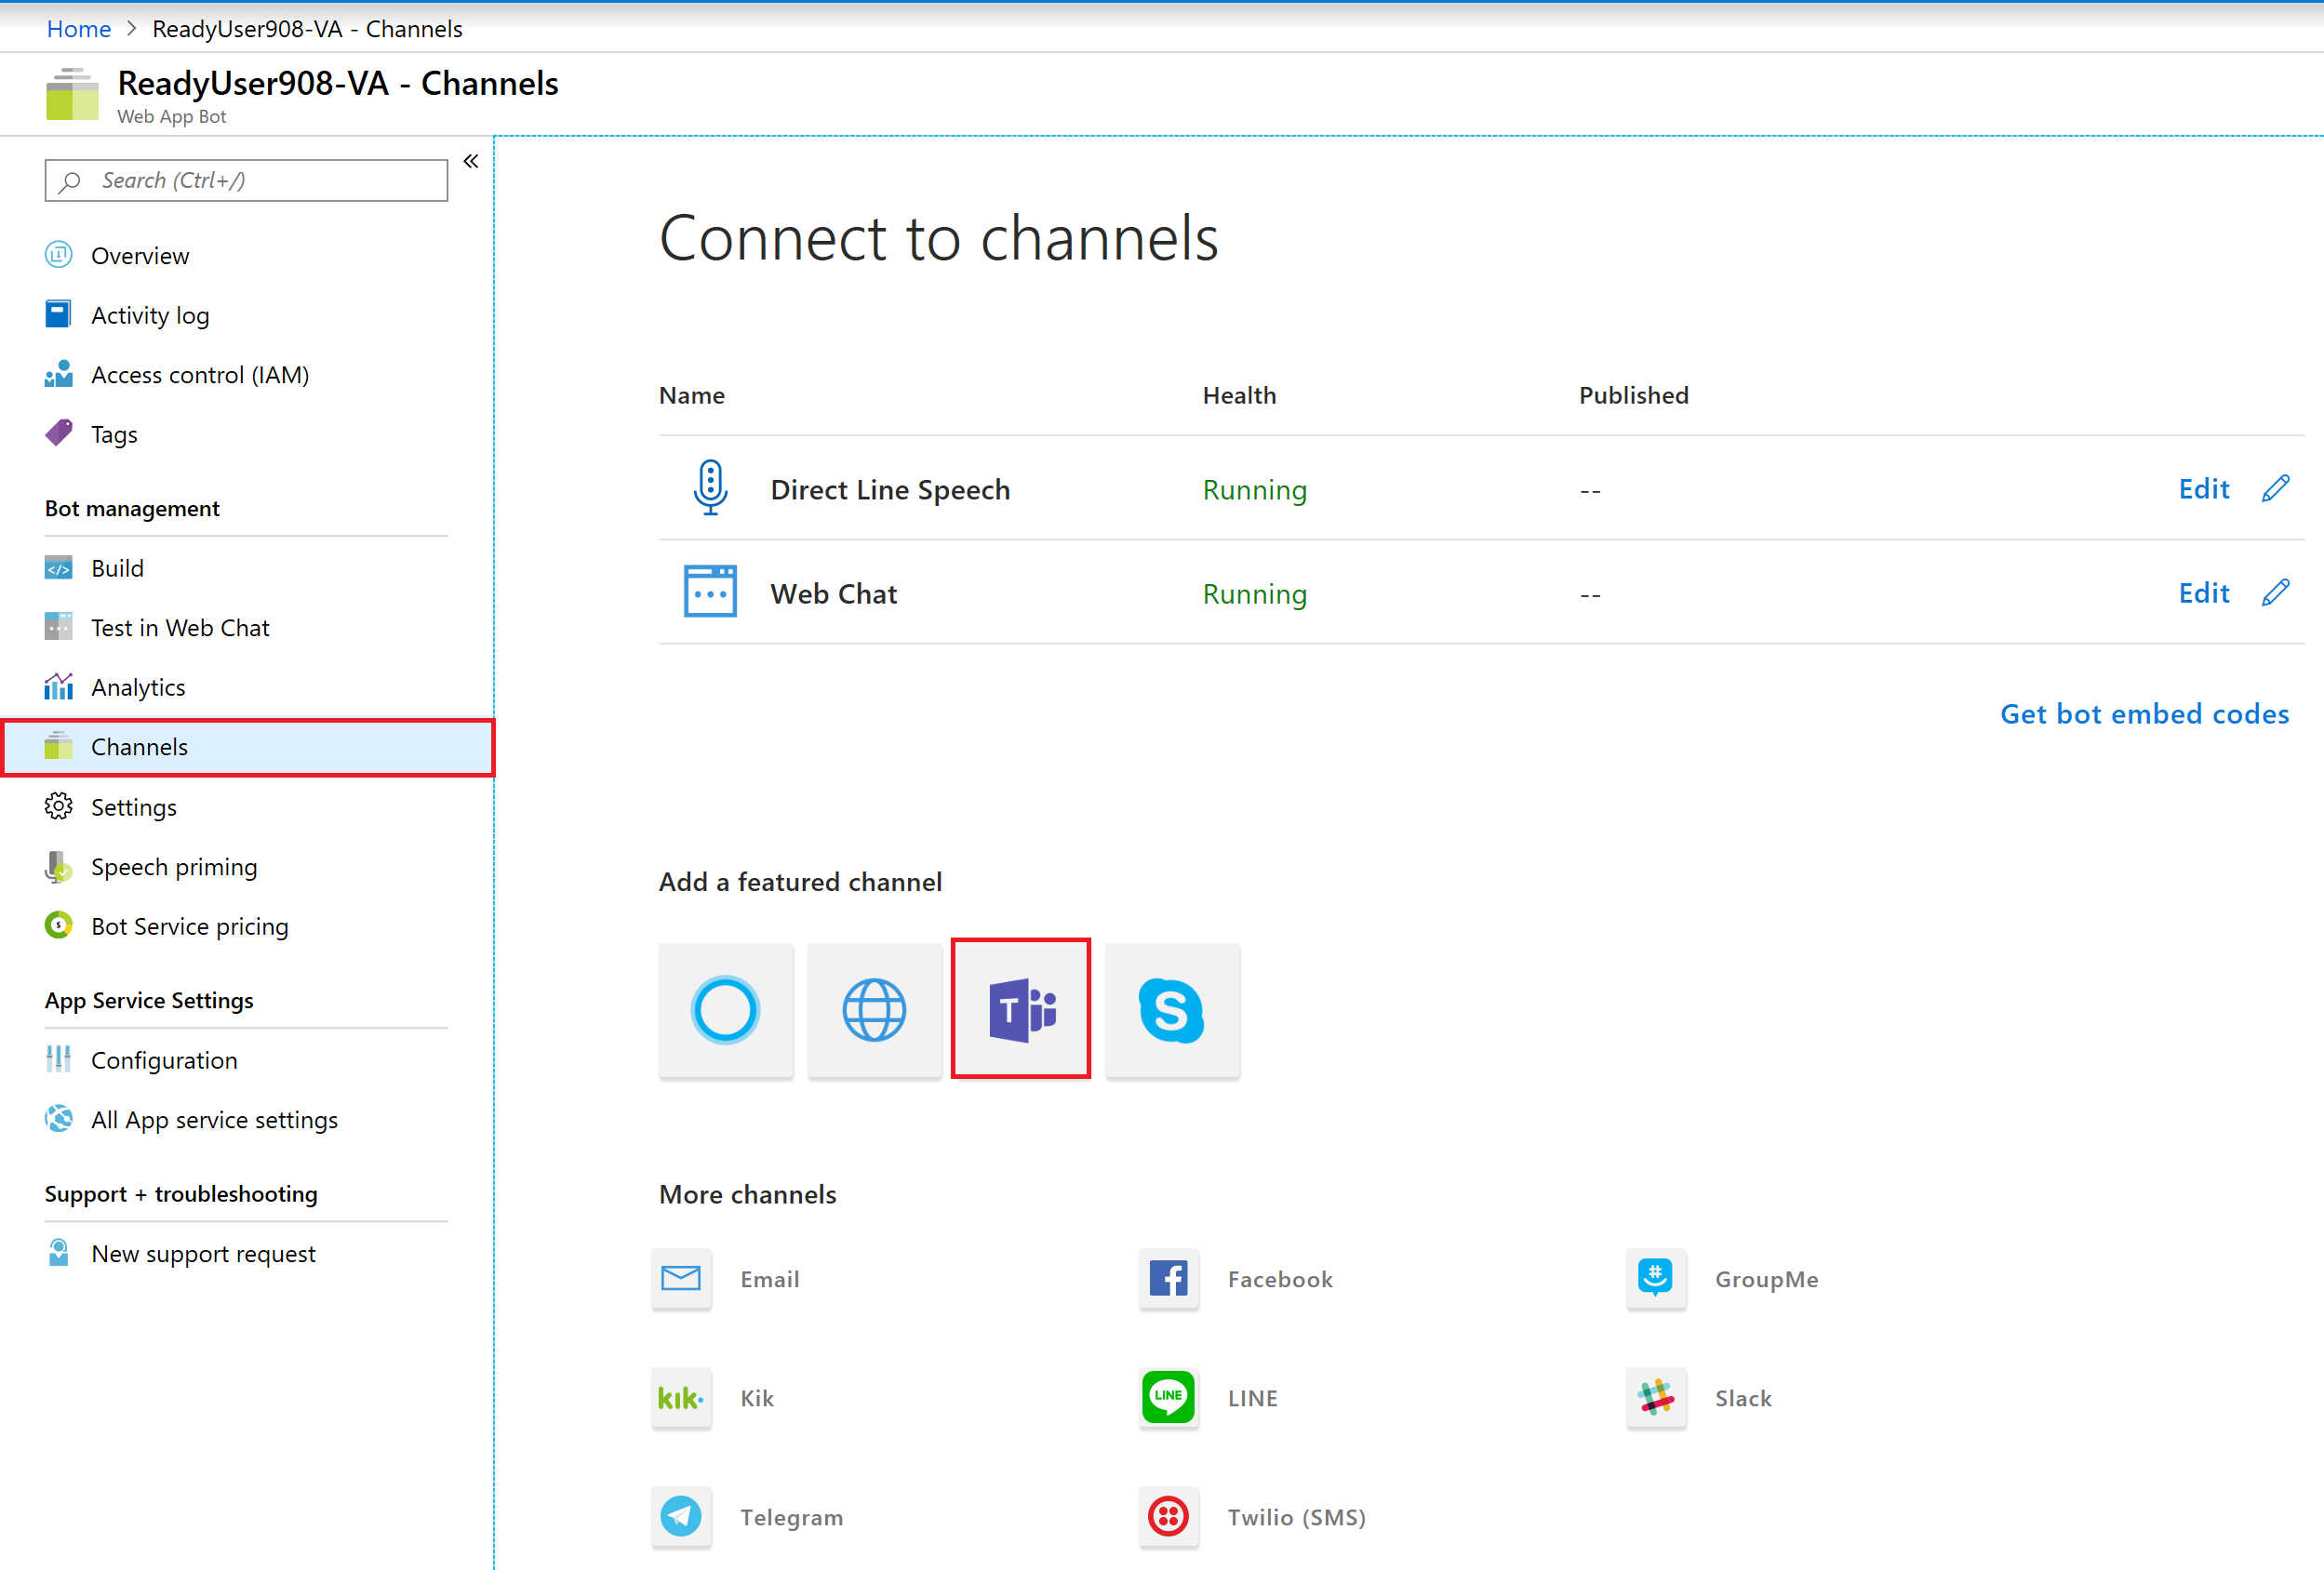
In the same browser tab we had opened in the previous step, click on Channels
-
Click on the Teams icon

-
"Terms of Service" window may appear. If so, click on Check the box and click ok
-
Click on the Save button

-
-
Time to create a Teams manifest file to install our bot into Teams. If you're interested to find out more information, you can find this here
- Download a premade Teams manifest ZIP file by clicking here
- Open File Explorer and go to your Downloads folder.
- Right click on the RecognizerBot.zip and click on Extract All...

- Click on Extract

- Open the manifest.json

- Replace the two values of b67388d7-e144-4ae2-9394-9273f56c4265 with your bot ID. This can be found from the JSON outputted in the PowerShell terminal in the previous steps. It will be called MicrosoftAppId

- Save the notepad file
- Switch back to the File Explorer and highlight all the three files in the folder, right click using your mouse and select Send To -> Compressed (zipped) folder

This will save a file called manifest.zip in that same folder which we will use in the next step.
-
Open Teams
- Click on the Ellipsis (...)
- Click on More apps
- Click on Upload a custom app

- Browse to Downloads -> RecognizerBot folder and select the manifest.zip you created in the previous step

- Click on Add for me

- The bot should now appear in Teams and you will now be able to analyse images in Teams, whether that's over the Desktop app or even Mobile app!


You have successfully created your own Image Analyser Bot, congrats! This guide will stay publicly available, so if you wish to create a demo for internal or external meetings, you can do so by performing the steps within your Azure Subscription since the Lab Service will be shut down after MS Ready to avoide costs.
Worth mentioning: developing a chatbot like you just did within an hour or so, would not be possible with the Azure PaaS Services and templates we were using. This is a huge benefit for the application development teams and accelerate pilots and new projects.