


Documentation | Usage Examples | Free Cloud Service
The Synthetic Data SDK is a Python toolkit for high-fidelity, privacy-safe Synthetic Data.
- LOCAL mode trains and generates synthetic data locally on your own compute resources.
- CLIENT mode connects to a remote MOSTLY AI platform for training & generating synthetic data there.
- Generators, that were trained locally, can be easily imported to a platform for further sharing.
The SDK allows you to programmatically create, browse and manage 3 key resources:
- Generators - Train a synthetic data generator on your existing tabular or language data assets
- Synthetic Datasets - Use a generator to create any number of synthetic samples to your needs
- Connectors - Connect to any data source within your organization, for reading and writing data
| Intent | Primitive | API Reference |
|---|---|---|
| Train a Generator on tabular or language data | g = mostly.train(config) |
mostly.train |
| Generate any number of synthetic data records | sd = mostly.generate(g, config) |
mostly.generate |
| Live probe the generator on demand | df = mostly.probe(g, config) |
mostly.probe |
| Connect to any data source within your org | c = mostly.connect(config) |
mostly.connect |
mostlyai-sdk.mp4
- Broad Data Support
- Mixed-type data (categorical, numerical, geospatial, text, etc.)
- Single-table, multi-table, and time-series
- Multiple Model Types
- State-of-the-art performance via TabularARGN
- Fine-tune Hugging Face hosted language models
- Efficient LSTM for text synthesis from scratch
- Advanced Training Options
- GPU/CPU support
- Differential Privacy
- Progress Monitoring
- Automated Quality Assurance
- Quality metrics for fidelity and privacy
- In-depth HTML reports for visual analysis
- Flexible Sampling
- Up-sample to any data volumes
- Conditional generation by any columns
- Re-balance underrepresented segments
- Context-aware data imputation
- Statistical fairness controls
- Rule-adherence via temperature
- Seamless Integration
- Connect to external data sources (DBs, cloud storages)
- Fully permissive open-source license
Install the SDK via pip (see Installation for further details):
pip install -U mostlyai # or 'mostlyai[local]' for LOCAL modeGenerate synthetic samples using a pre-trained generator:
# initialize the SDK
from mostlyai.sdk import MostlyAI
mostly = MostlyAI()

# import a trained generator
g = mostly.generators.import_from_file(
  "https://github.com/mostly-ai/public-demo-data/raw/dev/census/census-generator.zip"
)

# probe for 1000 representative synthetic samples
df = mostly.probe(g, size=1000)
df
Generate synthetic sampels based on fixed column values:
# create 10k records of 24y male respondents
df = mostly.probe(g, seed=[{"age": 24, "sex": "Male"}] * 10_000)
df
And now train your very own synthetic data generator:
# load original data
import pandas as pd
original_df = pd.read_csv(
  "https://github.com/mostly-ai/public-demo-data/raw/dev/titanic/titanic.csv"
)

# train a single-table generator, with default configs
g = mostly.train(
  name="Quick Start Demo - Titanic",
  data=original_df,
)

# display the quality assurance report
g.reports(display=True)

# generate a representative synthetic dataset, with default configs
sd = mostly.generate(g)
df = sd.data()

# or simply probe for some samples
df = mostly.probe(g, size=100)
dfThe SDK is being developed with a focus on efficiency, accuracy, and flexibility, with best-in-class performance across all three. Results will ultimately depend on the training data itself (size, structure, and content), on the available compute (CPU vs GPU), as well as on the chosen training configurations (model, epochs, samples, etc.). Thus, a crawl / walk / run approach is recommended — starting with a subset of samples training for a limited amount of time, to then gradually scale up, to yield optimal results for use case at hand.
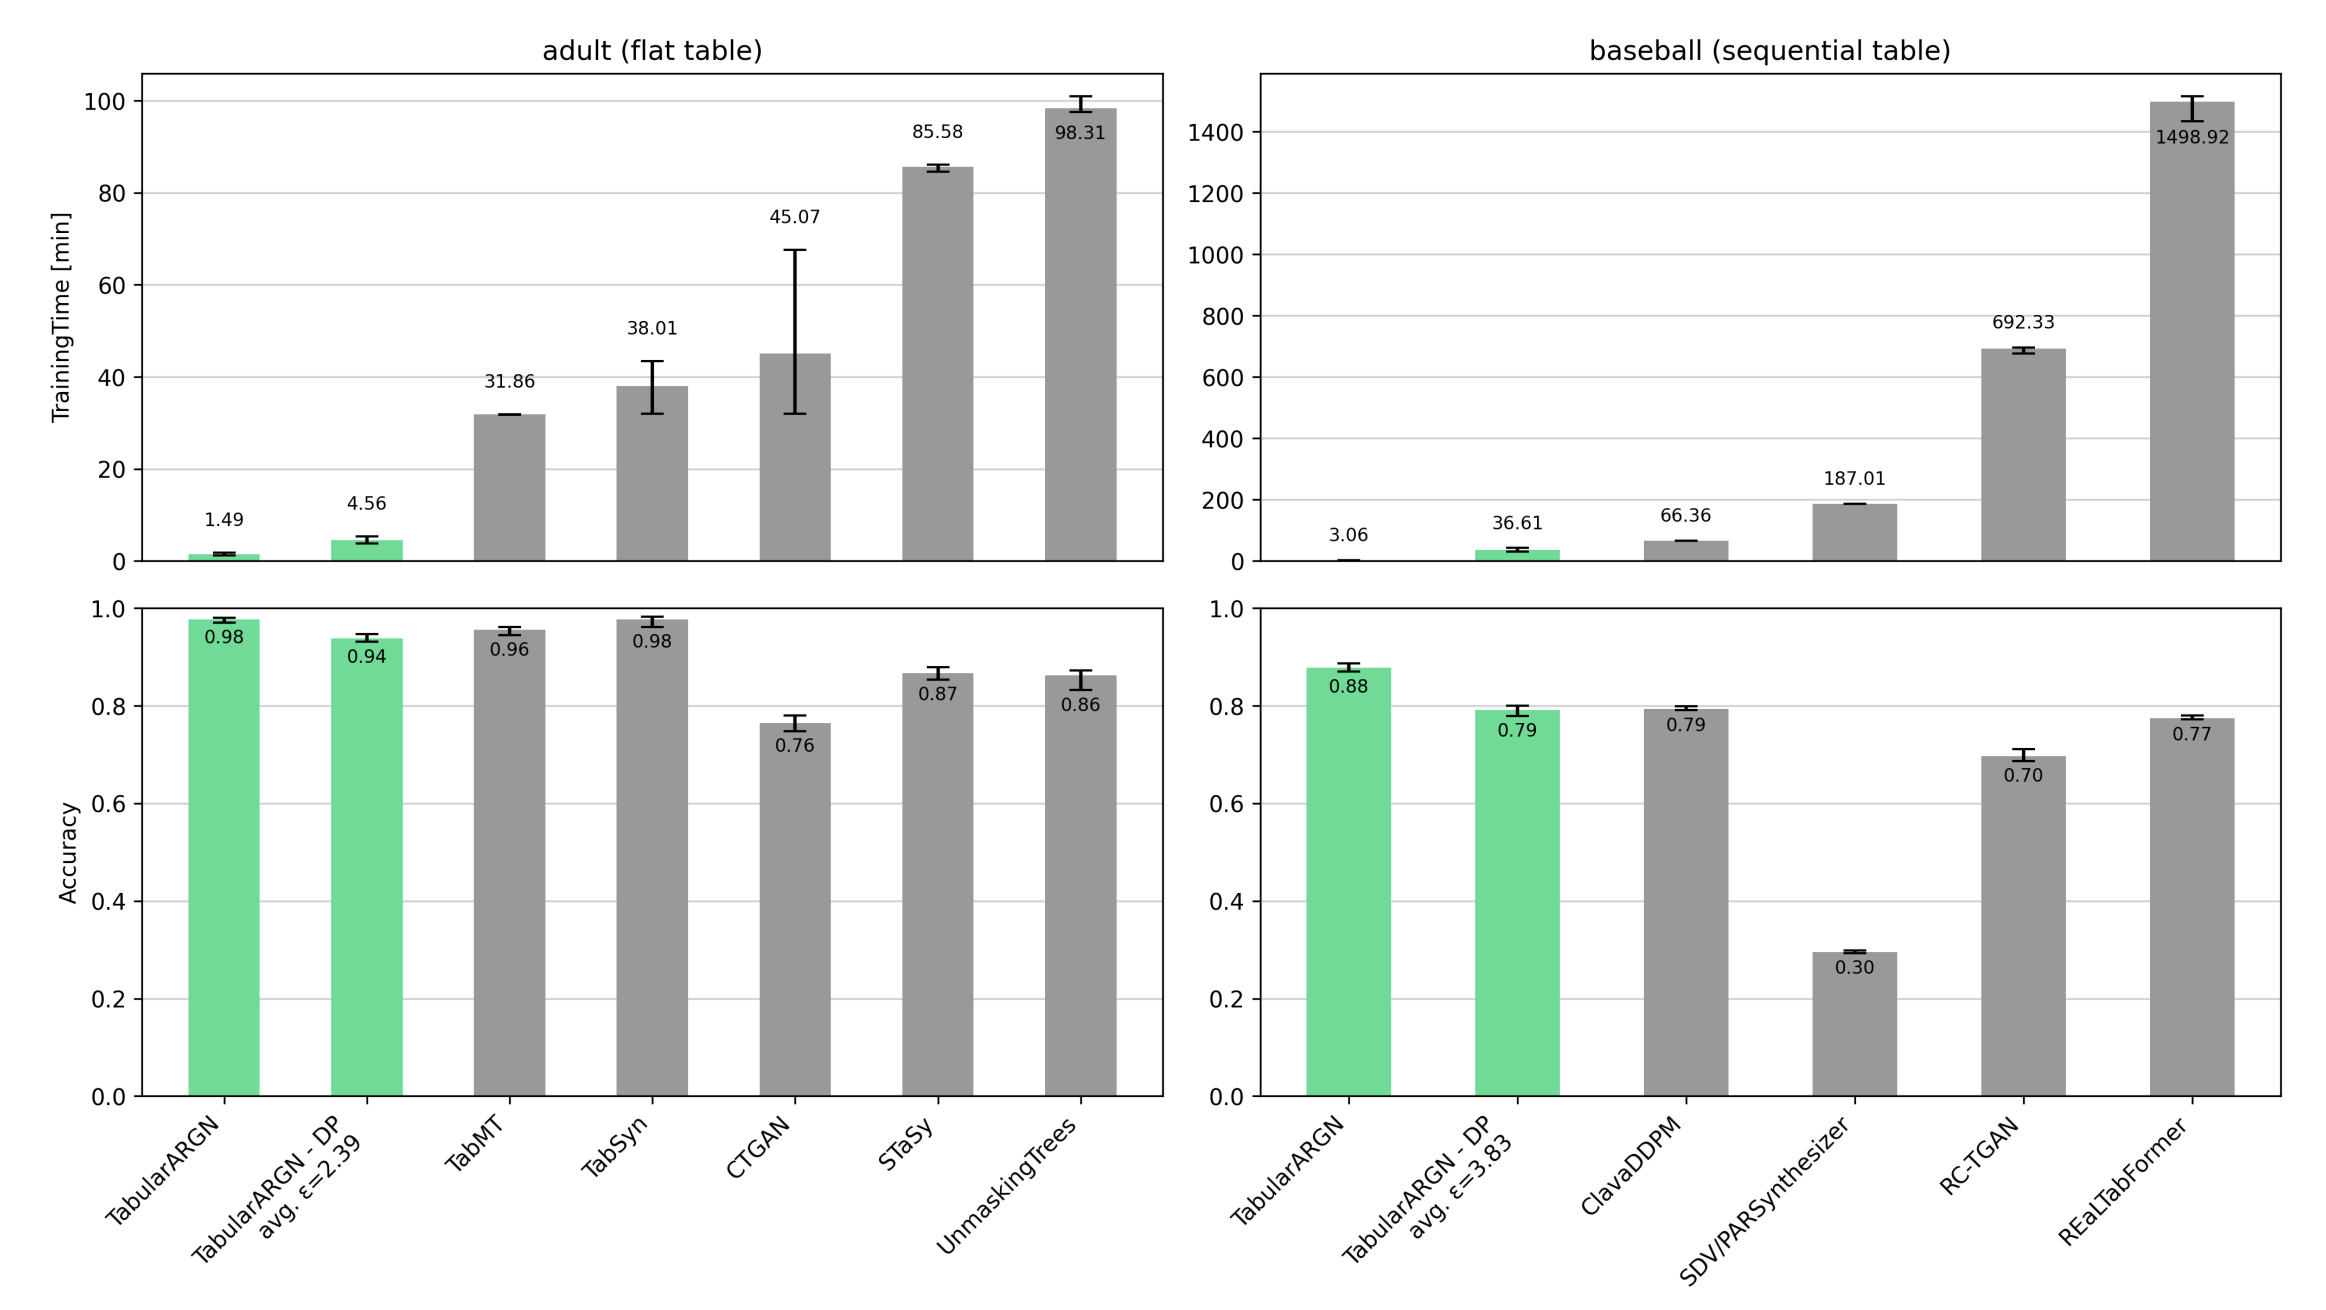
Tabular models within the SDK are built on TabularARGN (arXiv:2501.12012), which achieves best-in-class synthetic data quality while being 1–2 orders of magnitude more efficient than comparable models. This efficiency enables the training and generation of millions of synthetic records within minutes, even on CPU environments.
The default language model is a basic, non-pre-trained LSTM (LSTMFromScratch-3m), particularly effective for textual data with limited scope (short lengths, narrow variety) and sufficient training samples.
Alternatively, any pre-trained SLM available via the Hugging Face Hub can be selected to be then fine-tuned on the provided training data. These models start out already with a general world knowledge, and then adapt to the training data for generating high-fidelity synthetic samples even in sparse data domains. The final performance will once again largely depend on the chosen model configurations.
In either case, a modern GPU is highly recommended when working with language models.
Use pip (or better uv pip) to install the official mostlyai package via PyPI. Python 3.10 or higher is required.
It is highly recommended to install the package within a dedicated virtual environment using uv (see here):
Setup of uv on Unix / macOS
# Install uv if you don't have it yet
curl -Ls https://astral.sh/uv/install.sh | bash

# Create and activate a Python 3.12 environment with uv
mkdir ~/synthetic-data-sdk; cd ~/synthetic-data-sdk
uv venv -p 3.12

# Activate virtual environment
source .venv/bin/activate
Setup of uv on Windows
# Install uv if you don't have it yet
irm https://astral.sh/uv/install.ps1 | iex

# Create and activate a Python 3.12 environment with uv
mkdir ~/synthetic-data-sdk; cd ~/synthetic-data-sdk
uv venv -p 3.12

# Activate virtual environment
.venv\Scripts\activate
Run Jupyter Lab session via uv
# Optionally launch jupyter session after SDK installation
uv run --with jupyter jupyter labThis is a light-weight installation for using the SDK in CLIENT mode only. It communicates to a MOSTLY AI platform to perform requested tasks. See e.g. app.mostly.ai for a free-to-use hosted version.
uv pip install -U mostlyaiThis is a full installation for using the SDK in both CLIENT and LOCAL mode. It includes all dependencies, incl. PyTorch, for training and generating synthetic data locally.
uv pip install -U 'mostlyai[local]'or alternatively for a GPU setup on Linux (needed for LLM finetuning and inference):
uv pip install -U 'mostlyai[local-gpu]'On Linux, one can explicitly install the CPU-only variant of torch together with mostlyai[local]:
# uv pip install
uv pip install --index-strategy unsafe-first-match -U torch==2.6.0+cpu torchvision==0.21.0+cpu 'mostlyai[local]' --extra-index-url https://download.pytorch.org/whl/cpu
# standard pip install
pip install -U torch==2.6.0+cpu torchvision==0.21.0+cpu 'mostlyai[local]' --extra-index-url https://download.pytorch.org/whl/cpuNote for Google Colab users: Installing any of the local extras (
mostlyai[local], ormostlyai[local-gpu]) will downgrade Numpy from 2.0 to Numpy 1.26, due to Opacus dependency. You'll need to restart the runtime after installation for the changes to take effect.
Add any of the following extras for further data connectors support in LOCAL mode: databricks, googlebigquery, hive, mssql, mysql, oracle, postgres, snowflake. E.g.
uv pip install -U 'mostlyai[local, databricks, snowflake]'As an alternative, you can also build a Docker image, which provides you with an isolated environment for running the SDK in LOCAL mode, with all connector dependencies pre-installed. This approach ensures a consistent runtime environment across all systems. Before proceeding, make sure Docker is installed on your system.
Build the image
If your environment is capable of executing Makefile (see here), then execute make docker-build.
Otherwise, use DOCKER_BUILDKIT=1 docker build . --platform=linux/amd64 -t mostlyai/mostlyai instead.
Start the container
This will launch the SDK in LOCAL mode on port 8080 inside the container.
If your environment is capable of executing Makefile, then execute make docker-run. Or make docker-run HOST_PORT=8080 to forward to a host port of your choice. One could also mount the local_dir via make docker-run HOST_LOCAL_DIR=/path/to/host/folder to make the generators and synthetic datasets directly accessible from the host.
Otherwise, use docker run --platform=linux/amd64 -p 8080:8080 mostlyai/mostlyai instead. Optionally, you can use the -v flag to mount a volume for passing files between the host and the container.
Connect to the container
You can now connect to the SDK running within the container by initializing the SDK in CLIENT mode on the host machine.
from mostlyai.sdk import MostlyAI

mostly = MostlyAI(base_url="http://localhost:8080")For air-gapped environments (without internet access), you must install the package using the provided wheel files, including any optional dependencies you require.
If your application depends on a Hugging Face language model, you’ll also need to manually download and transfer the model files.
Download models from Hugging Face Hub
On a machine with internet access, run the following Python script, to download the Hugging Face model to your local Hugging Face cache.
#! uv pip install huggingface-hub
from pathlib import Path
from huggingface_hub import snapshot_download
path = snapshot_download(
    repo_id="Qwen/Qwen2.5-Coder-0.5B",  # change accordingly
    token=None,  # insert your HF TOKEN for gated models
)
print(f"COPY `{Path(path).parent.parent}`")
Next, transfer the printed directory to the air-gapped environment's cache directory located at ~/.cache/huggingface/hub/ (respectively to HF_HOME, if that environment variable has been set).
Please consider citing our project if you find it useful:
@software{mostlyai,
    author = {{MOSTLY AI}},
    title = {{MOSTLY AI SDK}},
    url = {https://github.com/mostly-ai/mostlyai},
    year = {2025}
}