If you like or use this project, please provide feedback to author - Star it ★.
Please read How to install Zenoss 5 successfully. More than 2000 sucessfull Zenoss 5 installations = 2300 hours of Zenoss 5 installation (Dec 2015).
Auto-deployment script for Zenoss 5 on CentOS 7.x / Red Hat Enterprise Linux 7.x / Ubuntu 14. A 64-bit build is required.
The script included in this directory will automatically install Zenoss 5 Core / Resource Manager 5, Control Center and some install/deploy extra projects for you.
Note: This autodeploy script was not tested with Zenoss 5.1.x version! Developement of this project is driven by customer. If you are just user, then you can still create pull request with your support of Zenoss 5.1.x. All PRs will be reviewed.
Please donate to author, so he can continue to publish another awesome projects for free:

Usage of auto-deployment script:
# cd /tmp
# curl -O https://raw.githubusercontent.com/monitoringartist/zenoss5-core-autodeploy/master/core-autodeploy.sh
# chmod +x core-autodeploy.sh
# ./core-autodeploy.sh
User feedback:
I tried to use your script to deploy zenoss 5 and docker wont start. I'm very disappointed.
I agree. This script is not magic Unicorn, which will solve all Zenoss 5 deployment problems (wrong filesystems types, not compatible OS, ...). That's the reason, why script prints link to manual installation guide, which is your safe option for Zenoss 5 installation.
The script will take several minutes (around 15-30) to complete. When done, you should be able to visit Control Center in a web browser to start Zenoss 5 application. Easy Zenoss installation.
Script requires mounted filesystems:
/var/lib/docker
/opt/serviced/var
/opt/serviced/var/volumes
/opt/serviced/var/backups
Or you can pass a block device for automatic formatting and mounting of required filesystem(s). Confirmation is needed before formatting. Available options:
# ./core-autodeploy.sh -d </var/lib/docker block device> -s </opt/serviced/var block device>
 -v </opt/serviced/var/volumes block device> -b </opt/serviced/var/backups block device>

# ./core-autodeploy.sh -d /dev/sdb1 -s /dev/sdb2 -v /dev/sdc1 -b /dev/sdd1
-x parameter provides extra projects for Control Center/Zenoss:
-
grafana-demo - deploy [Grafana demo for Control Center] (https://github.com/monitoringartist/control-center-grafana-demo), Full version
-
zabbix - deploy [Zabbix for Control Center] (https://github.com/monitoringartist/control-center-zabbix)
-
elasticsearch - deploy [Elasticsearch for Control Center] (https://github.com/monitoringartist/control-center-elasticsearch)
-
zenoss-searcher - deploy [Zenoss searcher for Control Center] (https://github.com/monitoringartist/control-center-zenoss-searcher)
-
jenkins - deploy [Jenkins for Control Center] (https://github.com/monitoringartist/control-center-jenkins)
-
gerrit - deploy [Gerrit for Control Center] (https://github.com/monitoringartist/control-center-gerrit)
Example:
# ./core-autodeploy.sh -x grafana-demo,zabbix,elasticsearch,zenoss-searcher,jenkins,gerrit
For advandced users only (you must be familiar with documentation, so you will be able identify some script warnings/errors, which can be ignored):
# # install Zenoss 5 Core host
# ./core-autodeploy.sh -h '<MASTER IP>'

# # install Resource Manager 5 master, it will fail if your Docker hub account doesn't have access to private Zenoss repositories
# ./core-autodeploy.sh -r resmgr -u <DOCKER HUB USERNAME> -e <DOCKER HUB EMAIL> -p '<DOCKER HUB PASSWORD>'

# # install Resource Manager 5 host, it will fail if your Docker hub account doesn't have access to private Zenoss repositories
# ./core-autodeploy.sh -r resmgr -h '<MASTER IP>' -u <DOCKER HUB USERNAME> -e <DOCKER HUB EMAIL> -p '<DOCKER HUB PASSWORD>'

# # install Resource Manager 5 master + pull Service Impact Docker image, it will fail if your Docker hub account doesn't have access to private Zenoss repositories
# ./core-autodeploy.sh -r resmgr -i impact -u <DOCKER HUB USERNAME> -e <DOCKER HUB EMAIL> -p '<DOCKER HUB PASSWORD>'
See [full installation log] (https://github.com/monitoringartist/zenoss5-core-autodeploy/blob/master/doc/installation-log-aws-ec2.txt) of autodeployement on AWS EC2 spot test instance.
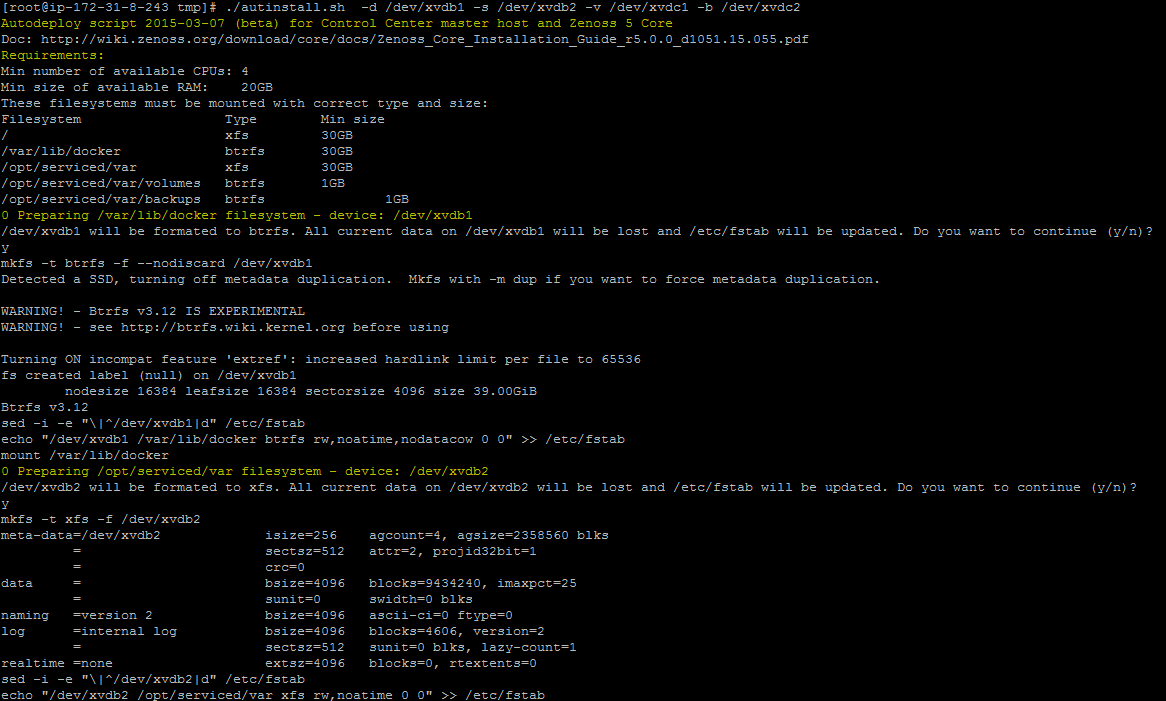
[root@ip-172-31-8-243 tmp]# ./core-autodeploy.sh  -d /dev/xvdb1 -s /dev/xvdb2 -v /dev/xvdc1 -b /dev/xvdc2
Autodeploy script 2015-03-07 for Control Center master host and Zenoss 5 Core
Install guide: http://wiki.zenoss.org/download/core/docs/Zenoss_Core_Installation_Guide_r5.0.0_latest.pdf
Requirements:
Min number of available CPUs: 4
Min size of available RAM:    20GB
These filesystems must be mounted with correct type and size:
Filesystem                  Type        Min size
/                           xfs         30GB
/var/lib/docker             btrfs       30GB
/opt/serviced/var           xfs         30GB
/opt/serviced/var/volumes   btrfs       1GB
/opt/serviced/var/backups   btrfs       1GB
0 Preparing /var/lib/docker filesystem - device: /dev/xvdb1
/dev/xvdb1 will be formated to btrfs. All current data on /dev/xvdb1 will be lost and /etc/fstab will be updated. Do you want to continue (y/n)?
y
mkfs -t btrfs -f --nodiscard /dev/xvdb1
Detected a SSD, turning off metadata duplication.  Mkfs with -m dup if you want to force metadata duplication.

WARNING! - Btrfs v3.12 IS EXPERIMENTAL
WARNING! - see http://btrfs.wiki.kernel.org before using

Turning ON incompat feature 'extref': increased hardlink limit per file to 65536
fs created label (null) on /dev/xvdb1
        nodesize 16384 leafsize 16384 sectorsize 4096 size 39.00GiB
Btrfs v3.12
sed -i -e "\|^/dev/xvdb1|d" /etc/fstab
echo "/dev/xvdb1 /var/lib/docker btrfs rw,noatime,nodatacow 0 0" >> /etc/fstab
mount /var/lib/docker
0 Preparing /opt/serviced/var filesystem - device: /dev/xvdb2
/dev/xvdb2 will be formated to xfs. All current data on /dev/xvdb2 will be lost and /etc/fstab will be updated. Do you want to continue (y/n)?
y
mkfs -t xfs -f /dev/xvdb2
meta-data=/dev/xvdb2             isize=256    agcount=4, agsize=2358560 blks
         =                       sectsz=512   attr=2, projid32bit=1
         =                       crc=0
data     =                       bsize=4096   blocks=9434240, imaxpct=25
         =                       sunit=0      swidth=0 blks
naming   =version 2              bsize=4096   ascii-ci=0 ftype=0
log      =internal log           bsize=4096   blocks=4606, version=2
         =                       sectsz=512   sunit=0 blks, lazy-count=1
realtime =none                   extsz=4096   blocks=0, rtextents=0
sed -i -e "\|^/dev/xvdb2|d" /etc/fstab
echo "/dev/xvdb2 /opt/serviced/var xfs rw,noatime 0 0" >> /etc/fstab
mount /opt/serviced/var
...
Start of autodeployement:
 Part of autodeployement:
 Host stat in Control Center:
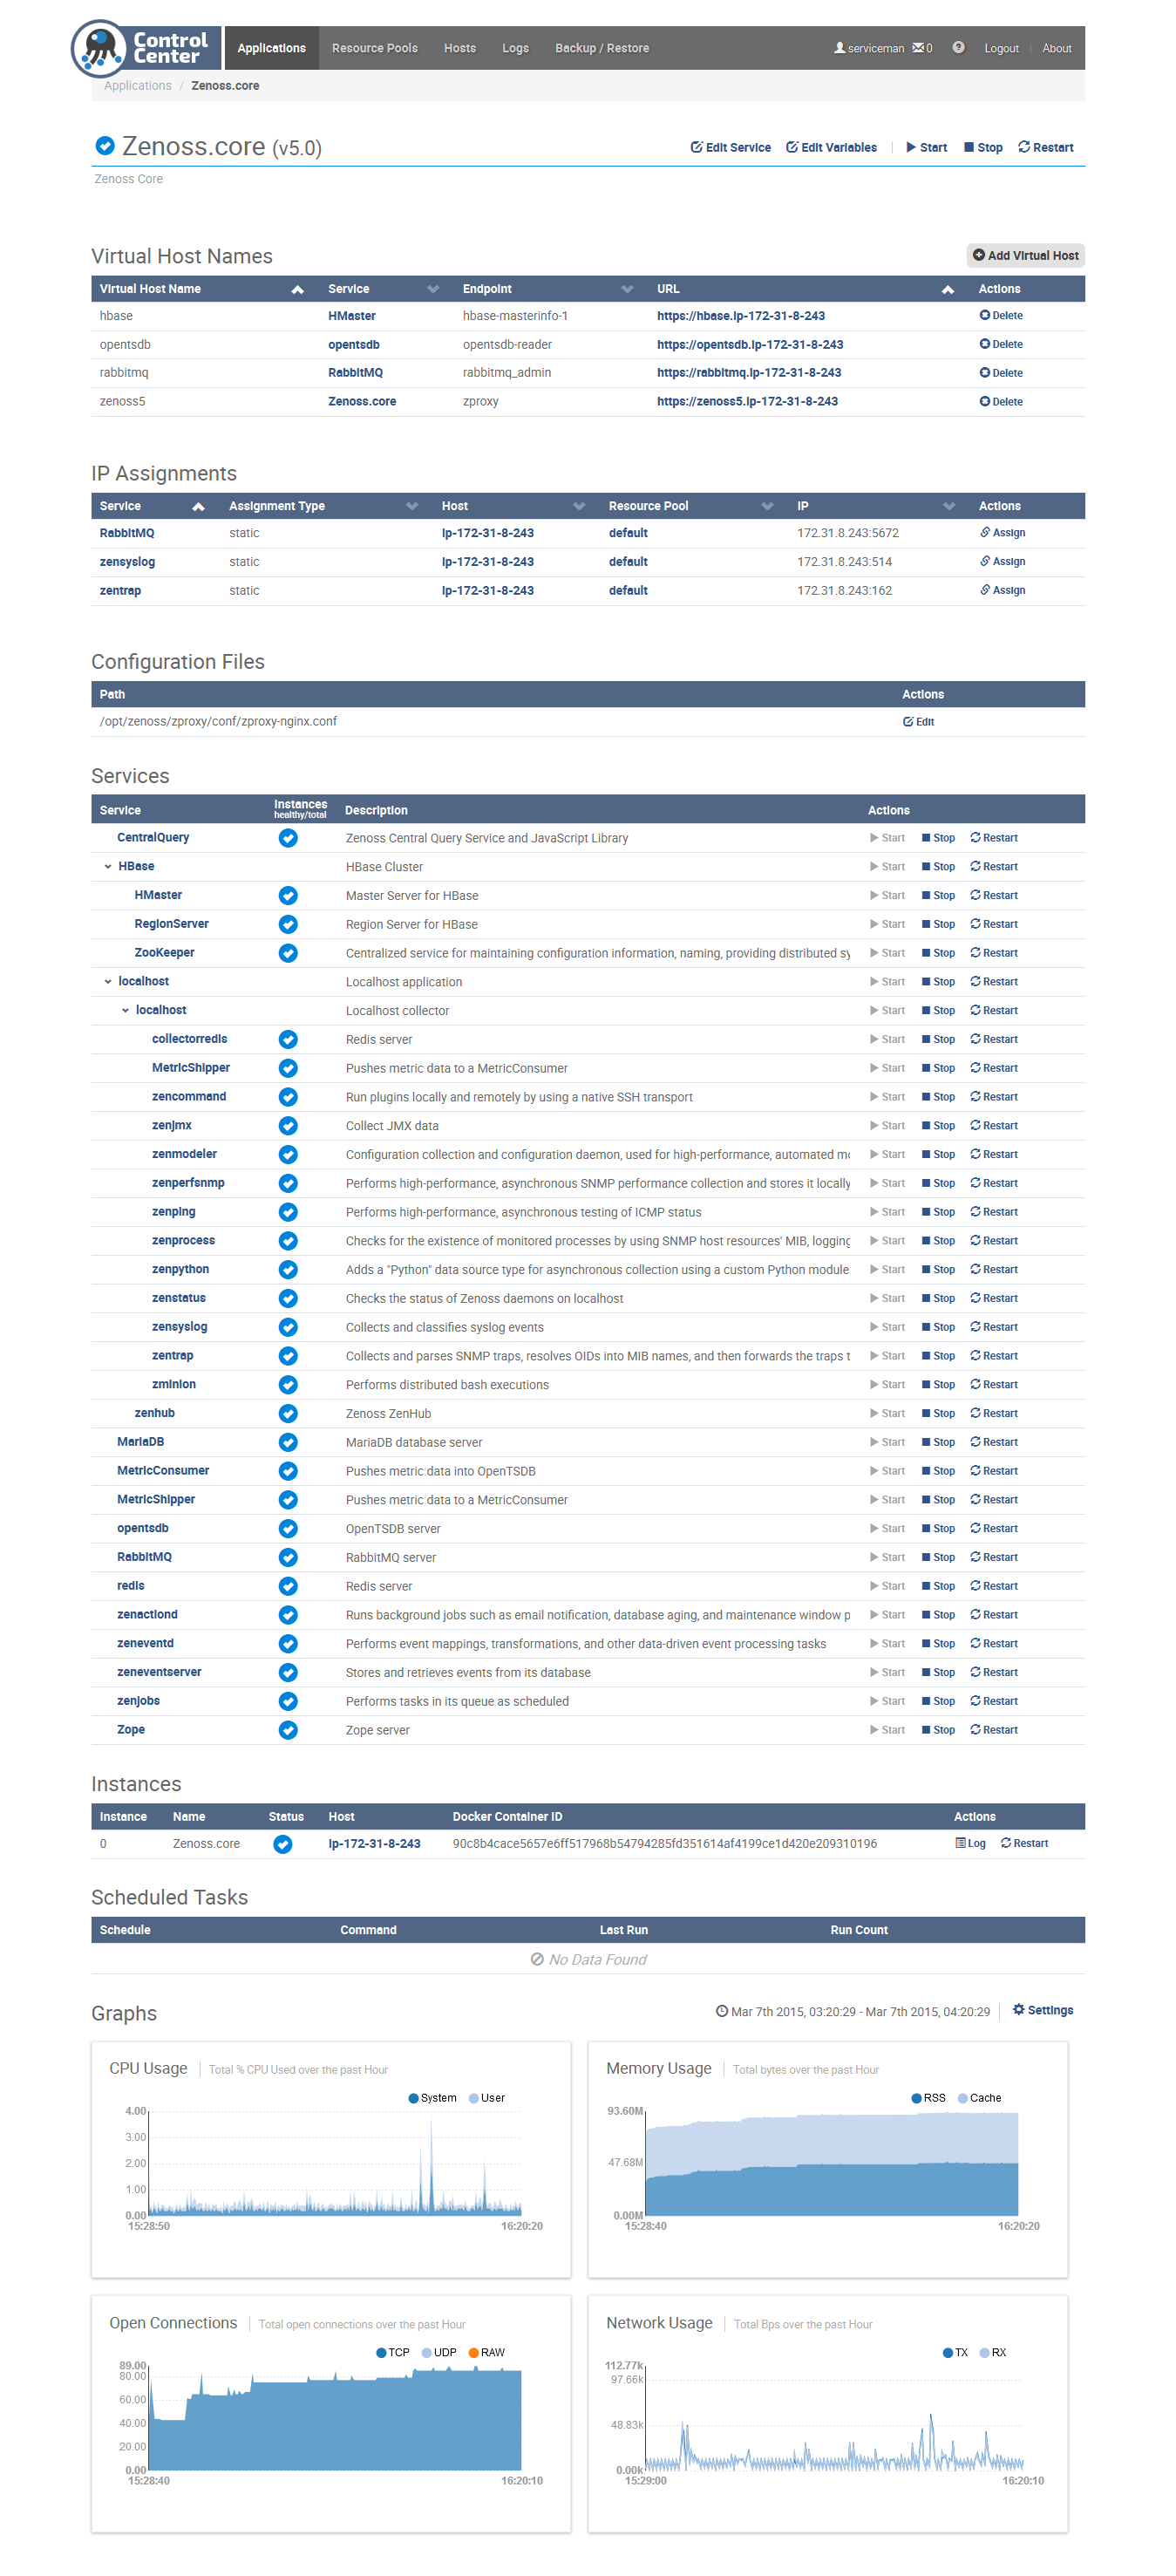
 Zenoss Core 5 application overview in Control Center:
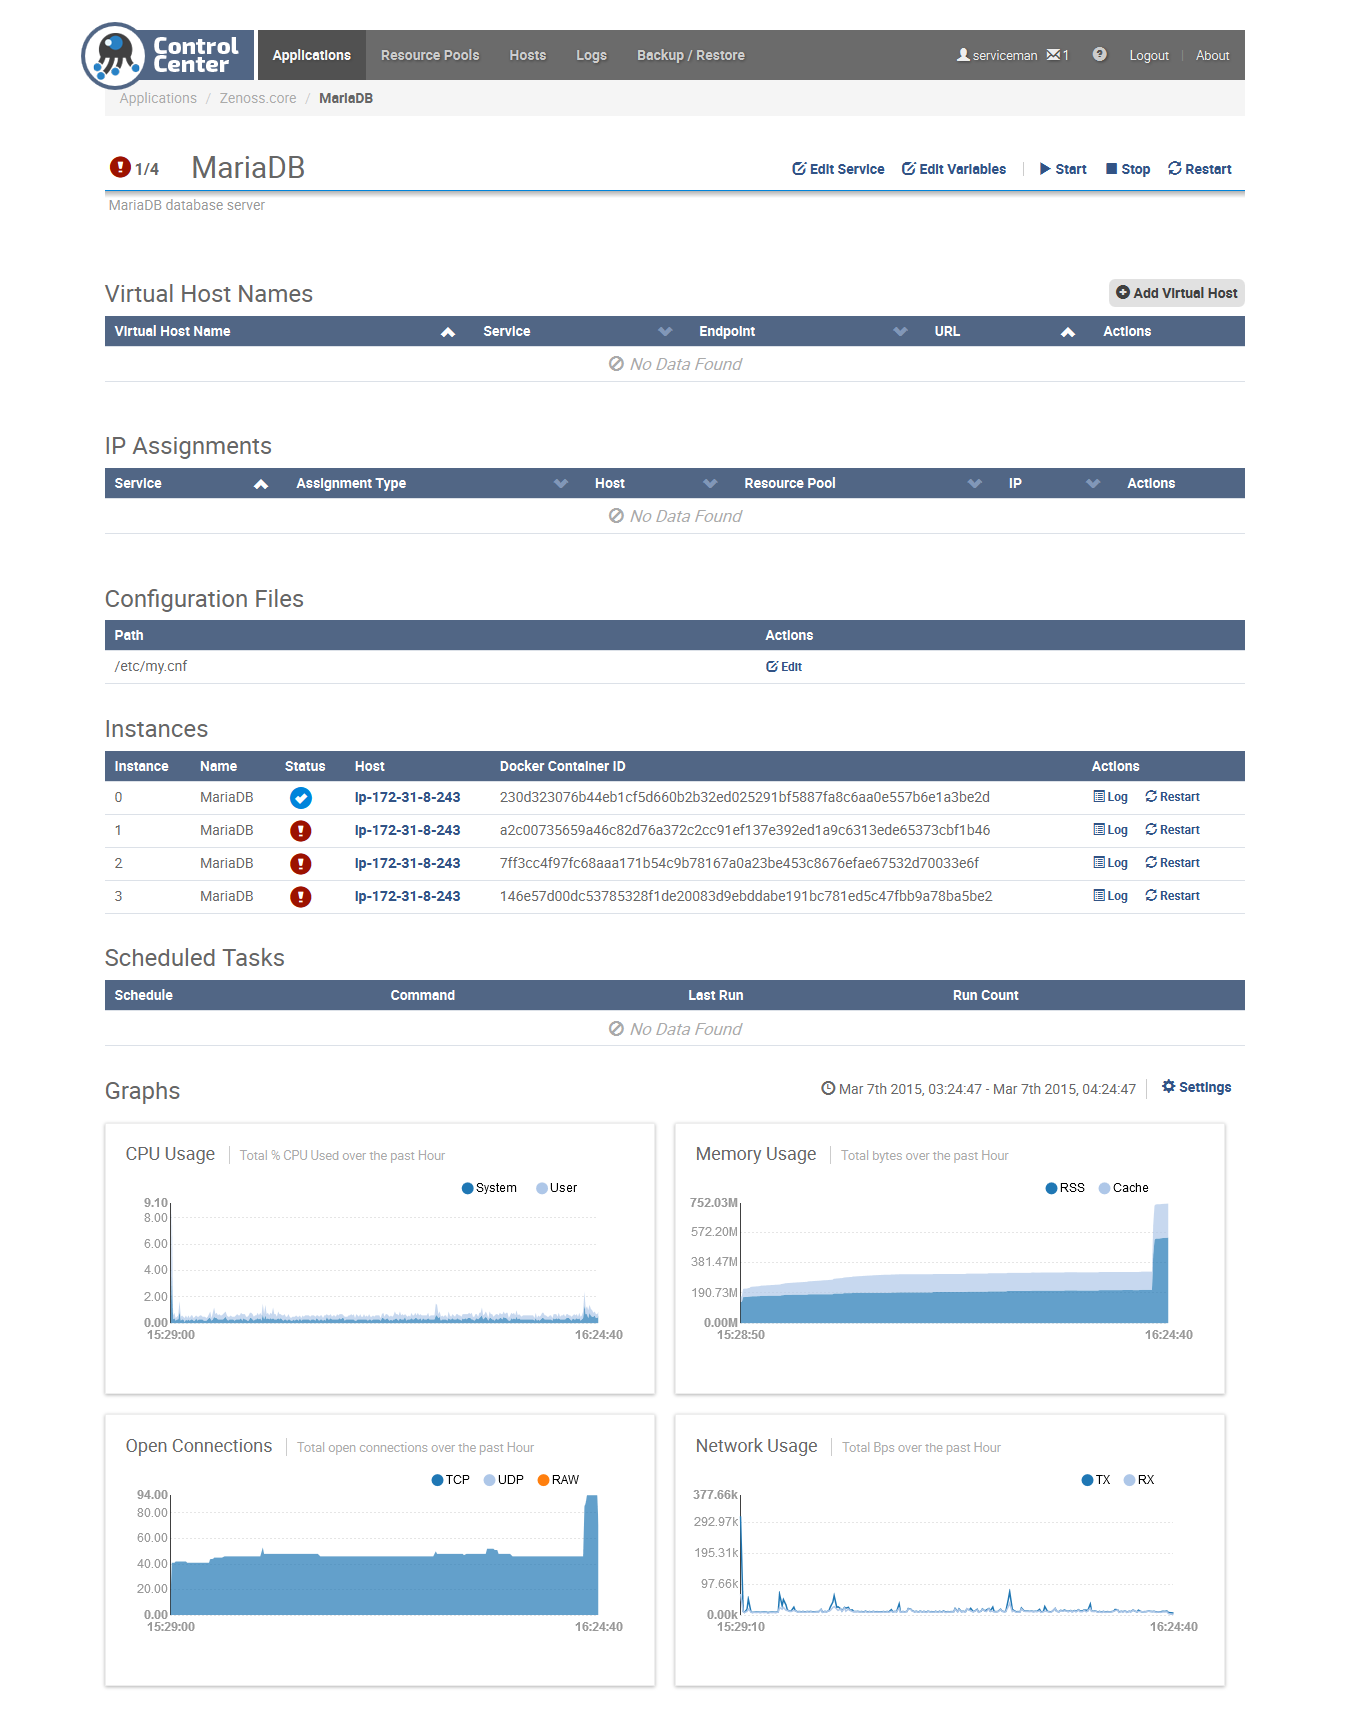
 4 instances of MariaDB in Control Center:
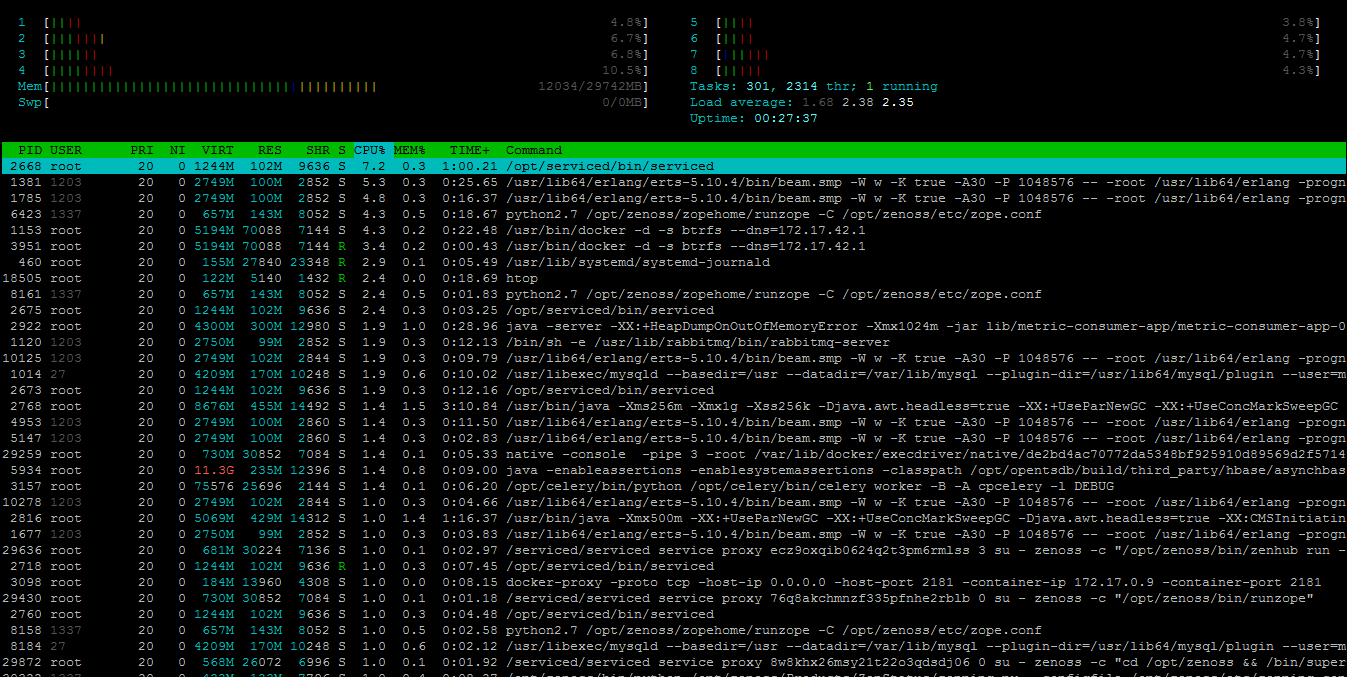
 htop of running Zenoss Core 5 with 0 monitored devices:
If you have any problems, please ask Zenoss community (IRC/forum/Github issue
tracker) for help and provide full output (http://pastebin.com) from auto-deploy script
and journalctl -u systemd -f (RHEL/Centos) / tailf /var/log/upstart/serviced.log (Ubuntu) command please.
Or follow manual installation guide.
Be aware that script activities (e.g. installation issues, sucessfull installation) are tracked anonymously by Google Analytics.
Devops Monitoring zExpert, who loves monitoring systems, which start with letter Z. Those are Zabbix and Zenoss.
Professional monitoring services:
[]
(http://www.monitoringartist.com 'DevOps / Docker / Kubernetes / Zabbix / Zenoss / Monitoring')