This is a mini project and repository for my own self-learning on Nuxt.js and Vue.js as part of my role in Dell's TMX Validation, Automation and Transition team.

- Nuxt.js v2
- Vuex
- Tailwind CSS
# install dependencies
$ npm install

# serve with hot reload at localhost:3000
$ npm run dev

# build for production and launch server
$ npm run build
$ npm run start

# generate static project
$ npm run generate
For detailed explanation on how things work, check out the documentation.
Reference: https://tailwindcss.com/docs/guides/nuxtjs
Since this project is using Tailwind CSS, we first need to create a new tailwind.config.js file by using the following commands to install Tailwind CSS and its peer dependencies, as well as @nuxt/postcss8. Then, run the init command to generate the tailwind.config.js file.
Using @latest is required because Nuxt installs PostCSS v7 and Autoprefixer v9 by default.
npm install -D tailwindcss postcss@latest autoprefixer@latest @nuxt/postcss8
npx tailwindcss init
Then, in your nuxt.config.js file, enable the @nuxt/postcss8 plugin and add tailwindcss and autoprefixer to the build.postcss.plugins object:
export default {
  build: {
    postcss: {
      plugins: {
        tailwindcss: {},
        autoprefixer: {},
      },
    },
  },
};
After that, add the paths to all of your template files in your tailwind.config.js file.
We will also be using Tailwind's checkbox, so use npm to install it and add the plugin inside tailwind.config.js.
npm install -D @tailwindcss/forms// tailwind.config.js
// ...
plugins: [require("@tailwindcss/forms")],
// ...In Nuxt.js, we have 3 important fixed directories related to views which are:
componentslayoutpages
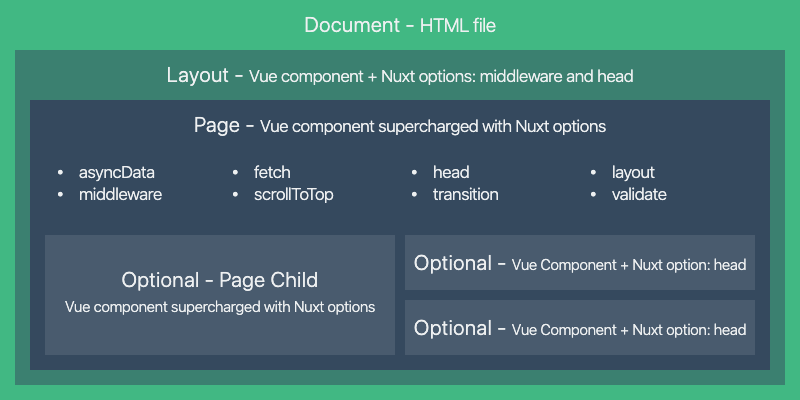
For this project, we did not use layout. But files inside pages represent – as the name states – each page inside your app. Each page may consist of multiple components, which are located inside the components directory.
This app consists of 2 components:
Todo.vueTask.vue
Todo.vue represents the main Todo view which Task.vue represents the display of each todo tasks. Task.vue is nested inside Todo.vue.
To register Todo.vue inside our page, we need to include it inside page/index.vue.
<template>
  <main>
    <Todo />
  </main>
</template>The store directory contains the Vuex Store files. The Vuex Store comes with Nuxt out of the box but is disabled by default. To enable it, we need to create a new store/index.js file.
The following are the four building blocks of a Vuex module:
// store/index.js

export const state = () => ({});

export const mutations = {};

export const actions = {};

export const getters = {};
The following slides from Scrimba's The Vue.js Bootcamp provides a good analogy on how Vuex terminology compares with Vue.js' basic terminology:


Since state represents data, the data in our app would be the list of todos a.k.a. tasks. By default, we do not have any tasks so we will initialise it as an empty array:
// store/index.js

export const state = () => ({
  tasks: [],
});
The YouTube tutorial that I referred to used an all-caps naming convention for all Vuex functions, although camelCase is used in Nuxt's official documentation. For this app, I'm sticking with the former.
In this app, a task object consists of 2 keys: content which is a string that represents the task themselves and status which is a boolean (default is false) and represents the task's completion status.
Next is mutations which are usually CUD operations involved in the app. This includes the add and remove tasks as well as the ability to toggle each task's completion status.
// store/index.js

// Mutation for adding a new task
ADD_TASK(state, task) {

    // Add new task at the end
    state.tasks.push({ content: task, status: false })

},
// store/index.js
// Mutation for removing a new task
REMOVE_TASK(state, task) {
// Remove only 1 instance of the associated task
// param: index of task to remove, how many instances to remove
state.tasks.splice(state.tasks.indexOf(task), 1);
},// store/index.js
// Mutation to toggle task status
TOGGLE_TASK(state, task) {
// Invert task status
task.status = !task.status;
},Now that the Vuex store has been configured, we need to go back to Todo.vue and configure it next to refer to the Vuex store.
Firstly, we need to initialise a new data object that represents the task that the user will type in before passing to Vuex. We shall name it as newTask. This
Remember that in components, data is a function and therefore needs to return an object.
// components/Todo.vue

  data() {
    return {
      newTask: "",
    };
  },
Next, we need to declare a method for adding the task, which will invoke the Vuex's ADD_TASK mutation using this.$store.commit. We first need to surround it in an if-statement (can also use try-catch) that checks whether newTask is empty. Only when it is not that we invoke the mutation using this.$store.commit and set newTask back to an empty string.
// components/Todo.vue

  methods: {
    addTask() {
      if (this.newTask) {
        this.$store.commit("ADD_TASK", this.newTask);
        this.newTask = "";
      }
    },
  },
In the template section, we also need to include a v-model directive assigned to newTask to the input tag to bind them together. I added an additional keyup.enter event for the addTask method to give the user a shortcut to submit the new task using the Enter key.
// components/Todo.vue

 <input
    placeholder="New Task"
    // ...
    v-model="newTask"
    @keyup.enter="addTask"
 />
Alternatively, the submit button must also have a click event in case the user clicks the button for submitting a new task.
// components/Todo.vue

<button
    // ...
    @click="addTask"
>
Finally, we need to include Task.vue component inside Todo.vue to display the tasks. Since there can obviously be more than 1 task and the tasks are stored inside a list/array, we need to use the expanded v-for directive, with the value and key specified to iterate through the tasks state. This can be accessed using $store.state command.
// components/Todo.vue

<Task v-for="(task, i) in $store.state.tasks" :key="i" :task="task" />This component is responsible for displaying the task and their respective information (content, status).
Since this component is nested inside the Task.vue component, a component-to-component communication requires the uses of props. Task.vue will accept a prop called task for it to display the necessary information.
// components/Task.vue

props: ["task"],
In this component, we will utilise both methods and computed properties.
removeTask method is declared here for invoking Vuex REMOVE_TASK mutation since the delete functionality is located in this component instead of its parent (Todo.vue).
// components/Task.vue

  methods: {
    removeTask() {
      this.$store.commit("REMOVE_TASK", this.task);
    },
  },
However, we have to use a technique known as two-way computed property with a setter for completion status toggling functionality to be reactive. The setter will invoke the TOGGLE_TASK mutation via this.$store.commit while the getter simply retrieves the relevant task.
// components/Task.vue

  computed: {
    toggleStatus: {
      get: function () {
        return this.$store.state.tasks[this.task];
      },
      set: function (val) {
        this.$store.commit("TOGGLE_TASK", this.task);
      },
    },
  },
Lastly, we need to update the template with the necessary directives. I used a v-if and v-else directives for the checkbox input to display it as checked/unchecked depending on the task.status. The checkbox input is also bounded to the toggleStatus computed property via the v-model directive, while the delete button contains the click event set to the removeTask method.
// components/Task.vue

  <button
    // ...
    @click="removeTask"
  >
// components/Task.vue
<input
v-if="task.status"
// ...
type="checkbox"
v-model="toggleStatus"
checked
/>
<input
v-else
// ...
type="checkbox"
v-model="toggleStatus"
/>If you reached this point, the app should be fully working with a caveat: All the tasks will be gone upon refresh which makes the app rather useless.
To ensure that your data will persist even after refresh, we need to use localStorage.
Firstly, we need to use localStorage's setItem method to save the state of our store in each mutation to ensure that any changes made will persist in localStorage.
// store/index.js

export const mutations = {
  // Nuxt.js convention to use all-caps for mutation name
  // Mutation to add new task
  ADD_TASK(state, task) {
    // Add new task at the end
    state.tasks.push({ content: task, status: false });

    // Store the state object as a JSON string
    localStorage.setItem("store", JSON.stringify(state));
  },

  // Mutation to remove task
  REMOVE_TASK(state, task) {
    state.tasks.splice(state.tasks.indexOf(task), 1);

    // Store the state object as a JSON string
    localStorage.setItem("store", JSON.stringify(state));
  },

  // Mutation to toggle task status
  TOGGLE_TASK(state, task) {
    task.status = !task.status;

    // Store the state object as a JSON string
    localStorage.setItem("store", JSON.stringify(state));
  },
};
The next step is to create a new mutation called INITIALISE_STORE (it can be other names). This is because once a user hits refresh, the state of the tasks in the store will revert. With our data now stored with every update, we need to retrieve the data on page load. When the user re-accesses the app, we need to replace the existing, empty store with the contents of our storage.
Inside this mutation, check if the localStorage item exists. We will replace the current state if it does exist by using Vuex's replaceState method.
// store/index.js

  INITIALISE_STORE(state) {
      // Check if the ID exists
      if (localStorage.getItem('store')) {

          // Replace the state object with the stored item
          this.replaceState(
              Object.assign(state, JSON.parse(localStorage.getItem('store')))
          );
      }
  },
The last stage is to call this mutation when the Vue app is created. We want this to happen at the earliest point which, based on the Vue lifecycle hooks is during the beforeCreate() method.
// pages/index.vue

  beforeCreate() {
    if (!process.client) return;
    const savedData = localStorage.getItem("store");

    if (savedData) {
      this.$store.commit("INITIALISE_STORE");
    }
  },