It is recommended to install docsify-cli globally, which helps initializing and previewing the website locally.
# Install nvm appropriately for your os

# Install a newish npm version (at time of writing 18)
nvm install --latest-npm
nvm use 18.9.0

# Install docsify
npm i docsify-cli -g

# Run this local dev site
npx netlify-cli devRun the local server with docsify serve. You can preview your site in your browser on http://localhost:3000.
docsify serve docs?> For more use cases of docsify-cli, head over to the docsify-cli documentation.
README.mdacts as the home page
You can easily update the documentation in README.md, of course you can add more pages.
Software development guide for MapAction

Image Source: https://github.com/ybouz2/project-tech/wiki/Coding-standarts
(Library guides. Library Guides. (n.d.). Retrieved September 22, 2022, from https://guides.lib.berkeley.edu/ )
Documentation effectively connects humans and machines.
Why writing documentation is important:
-
For you:
- You will be using your code in 6 months
- You want people to use your code and give you credit
- You want to learn self-determination
- Others would be encouraged to contribute to your code
-
For others:
- Others can easily use your code and build upon it
-
For science:
- Advance the science
- Encourage open science
- Allow reproducibility and transparency
What should you document about your research? Everything! All the data, notes, code, and materials someone else would need to reproduce your work.
Consider the following questions:
- How is your data gathered?
- What variables did you use?
- Did you use any code to clean/analyze your data?
for Documenting your project
-
Include a README file that contains
- A brief description of the project
- Installation instructions
- A short example/tutorial
-
Allow issue tracker for others
-
Write an API documentation
- What a function does
- What are the function's parameters or arguments are
- What a function returns
-
Document your code
-
Apply coding conventions, such as file organization, comments, naming conventions, programming practices, etc.
-
Include information for contributors
-
Include citation information
-
Include licensing information
-
Link to your e-mail address at the end
-
List all the versions of the files along with the major edits you did in each version

Sphinx makes it easy to create intelligent and beautiful documentation.
TLDR: See the quickstart
Here are some of Sphinx’s major features:
-
Output formats: HTML (including Windows HTML Help), LaTeX (for printable PDF versions), ePub, Texinfo, manual pages, plain text
-
Extensive cross-references: semantic markup and automatic links for functions, classes, citations, glossary terms and similar pieces of information
-
Hierarchical structure: easy definition of a document tree, with automatic links to siblings, parents and children
-
Automatic indices: general index as well as a language-specific module indices
-
Code handling: automatic highlighting using the Pygments highlighter
-
Extensions: automatic testing of code snippets, inclusion of docstrings from Python modules (API docs) via built-in extensions, and much more functionality via third-party extensions.
-
Themes: modify the look and feel of outputs via creating themes, and re-use many third-party themes.
-
Contributed extensions: dozens of extensions contributed by users; most of them installable from PyPI.
Sphinx uses the reStructuredText markup language by default, and can read MyST markdown via third-party extensions. Both of these are powerful and straightforward to use, and have functionality for complex documentation and publishing workflows. They both build upon Docutils to parse and write documents.
Please have a quick look at Markdown syntax to see how easy it is to write in your next project!
Use sentence case for section titles, unless rules require differently, such as the use of special names.
Keep documentation simple. If something does not need to be explained, don’t explain it. Don’t over-complicate simple concepts.
PEP8 coding conventions for the Python code comprising the standard library in the main Python distribution. Please see the companion informational PEP describing style guidelines for the C code in the C implementation of Python.
This document and PEP 257 (Docstring Conventions) were adapted from Guido’s original Python Style Guide essay, with some additions from Barry’s style guide [2].
This style guide evolves over time as additional conventions are identified and past conventions are rendered obsolete by changes in the language itself.
Many projects have their own coding style guidelines. In the event of any conflicts, such project-specific guides take precedence for that project.
Black is the uncompromising Python code formatter. By using it, you agree to cede control over minutiae of hand-formatting. In return, Black gives you speed, determinism, and freedom from pycodestyle nagging about formatting. You will save time and mental energy for more important matters.
Blackened code looks the same regardless of the project you're reading. Formatting becomes transparent after a while and you can focus on the content instead.
Black makes code review faster by producing the smallest diffs possible.
Try it out now using the Black Playground. Watch the PyCon 2019 talk to learn more.
Flake8 is a wrapper around these tools:
-
PyFlakes
-
pycodestyle
-
Ned Batchelder’s McCabe script
Flake8 runs all the tools by launching the single flake8 command. It displays the warnings in a per-file, merged output.
It also adds a few features:
files that contain this line are skipped:

    # flake8: noqa
    lines that contain a # noqa comment at the end will not issue warnings.

    You can ignore specific errors on a line with # noqa: <error>, e.g., # noqa: E234. Multiple codes can be given, separated by comma.

    Git and Mercurial hooks

    Extendable through flake8.extension and flake8.formatting entry points
See the quickstart documentation for how to install and get started with Flake8.
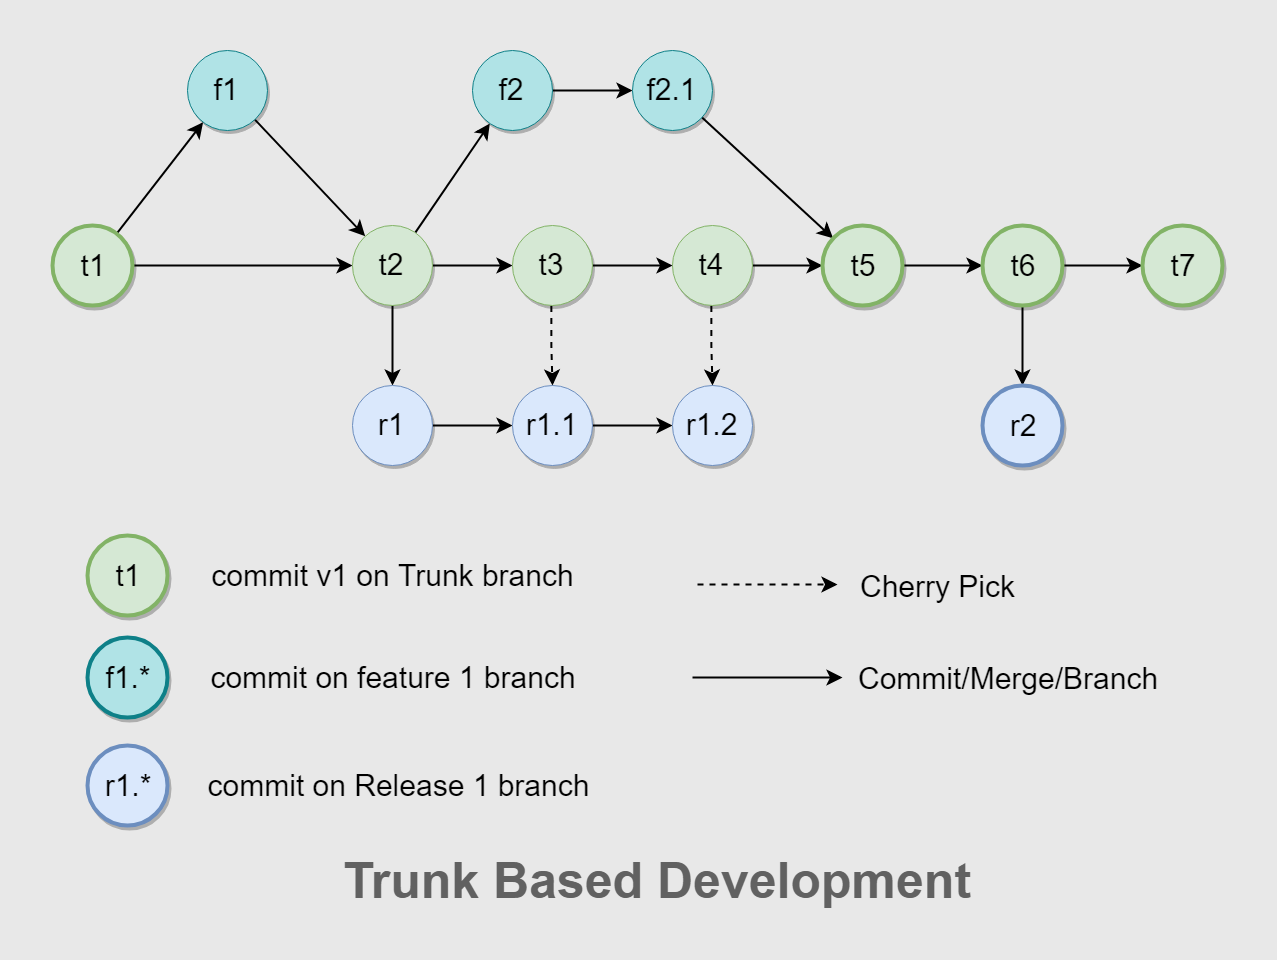
In trunk-based development, developers push code directly into trunk. Changes made in the release branches—snapshots of the code when it's ready to be released—are usually merged back to trunk (depicted by the downward arrows) as soon as possible. In this approach, there are cases where bug fixes must be cherry picked and merged into releases (depicted by the upward arrow), but these cases are not as frequent as the development of new features in trunk. In cases where releases happen multiple times a day, release branches are not required at all, because changes can be pushed directly into trunk and deployed from there. One key benefit of the trunk-based approach is that it reduces the complexity of merging events and keeps code current by having fewer development lines and by doing small and frequent merges.
Learn why this version control management practice is common practice among DevOps teams.
Google Cloud. 2022. DevOps tech: Continuous integration | DevOps capabilities | Google Cloud. [online] Available at: https://cloud.google.com/architecture/devops/devops-tech-continuous-integration [Accessed 7 October 2022].
Software systems are complex, and an apparently simple, self-contained change to a single file can have unintended side effects on the overall system. When a large number of developers work on related systems, coordinating code updates is a hard problem, and changes from different developers can be incompatible.
The practice of continuous integration (CI) was created to address these problems. CI follows the principle that if something takes a lot of time and energy, you should do it more often, forcing you to make it less painful. By creating rapid feedback loops and ensuring that developers work in small batches, CI enables teams to produce high quality software, to reduce the cost of ongoing software development and maintenance, and to increase the productivity of the teams.
How to implement CI When your organization practices CI, your developers integrate all their work into the main version of the code base (known as trunk, main, or mainline) on a regular basis. DevOps Research and Assessment (DORA) research (PDF) shows that teams perform better when developers merge their work into trunk at least daily. A set of automated tests is run both before and after the merge in order to validate that the changes don't introduce regression bugs. If these automated tests fail, the team stops what they are doing to fix the problem immediately.
CI ensures that the software is always in a working state, and that developer branches don't diverge significantly from trunk. The benefits of CI are significant: research (PDF) shows that it leads to higher deployment frequency, more stable systems, and higher quality software.
The key elements in successfully implementing continuous integration are:
Each commit should trigger a build of the software. Each commit should trigger a series of automated tests that provide feedback in a few minutes. To implement these elements, you need the following:
An automated build process. The first step in CI is having an automated script that creates packages that can be deployed to any environment. The packages created by the CI build should be authoritative and used by all downstream processes. These builds should be numbered and repeatable. You should run your build process successfully at least once a day. A suite of automated tests. If you don't have any, start by writing a handful of unit and acceptance tests (PDF) that cover the high-value functionality of your system. Make sure that the tests are reliable. That way, when they fail, you know there's a real problem, and when they pass, you're confident there are no serious problems with the system. Then ensure that all new functionality is covered by tests. Those tests should run quickly, to give developers feedback as soon as possible. Your tests should run successfully at least once a day. Ultimately, if you have performance and acceptance tests, the developers should get feedback from them daily. A CI system that runs the build and automated tests on every check-in. The system should also make the status visible to the team. You can have some fun with this—for example, you can use klaxons or traffic lights to indicate when the build is broken. Don't use email notifications; many people ignore email notifications or create a filter that hides notifications. Notifications in a chat system is a better and more popular way of achieving this. Continuous integration, as defined by Kent Beck and the Extreme Programming community where the term originated, also includes two further practices, which are also predictive of higher software delivery performance:
The practice of trunk-based development in which developers work off trunk/mainline in small batches. They merge their work into a shared trunk/mainline at least daily, rather than working on long-lived feature branches. An agreement that when the build breaks, fixing it should take priority over any other work. CI requires automated unit tests. These tests should be comprehensive enough to give you confidence that the software works as expected. The tests must also run in a few minutes or less. If the automated unit tests take longer to run, developers won't want to run them frequently. If the tests are run infrequently, then a test failure can originate from many different changes, making it hard to debug. Tests that are run infrequently are hard to maintain.
Creating maintainable suites of automated unit tests is complex. A good way to solve this problem is to practice test-driven development (TDD), in which developers write automated tests that initially fail, before they implement the code that makes the tests pass. TDD has several benefits, one of which is that it ensures developers write code that's modular and easy to test, which reduces the maintenance cost of the resulting automated test suites. Many organizations don't have maintainable suites of automated unit tests and, despite that, still don't practice TDD.
GitHub limits the size of files you can track in regular Git repositories. Learn how to track or remove files that are beyond the limit. To find out more please see here.
Git LFS handles large files by storing references to the file in the repository, but not the actual file itself. To work around Git's architecture, Git LFS creates a pointer file which acts as a reference to the actual file (which is stored somewhere else). GitHub manages this pointer file in your repository. When you clone the repository down, GitHub uses the pointer file as a map to go and find the large file for you.
Using Git LFS, you can store files up to:
- GitHub Free 2 GB
- GitHub Pro 2 GB
- GitHub Team 4 GB
- GitHub Enterprise Cloud 5 GB
Stolee, D., 2022. Get up to speed with partial clone and shallow clone | The GitHub Blog. [online] The GitHub Blog. Available at: https://github.blog/2020-12-21-get-up-to-speed-with-partial-clone-and-shallow-clone/ [Accessed 7 October 2022].
As your Git repositories grow, it becomes harder and harder for new developers to clone and start working on them. Git is designed as a distributed version control system. This means that you can work on your machine without needing a connection to a central server that controls how you interact with the repository. This is only fully realizable if you have all reachable data in your local repository.
What if there was a better way? Could you get started working in the repository without downloading every version of every file in the entire Git history? Git’s partial clone and shallow clone features are options that can help here, but they come with their own tradeoffs. Each option breaks at least one expectation from the normal distributed nature of Git, and you might not be willing to make those tradeoffs.
Partial clones are relatively new to Git, but there is an older feature that does something very similar to a treeless clone: shallow clones. Shallow clones use the --depth= parameter in git clone to truncate the commit history. Typically, --depth=1 signifies that we only care about the most recent commits. Shallow clones are best combined with the --single-branch --branch= options as well, to ensure we only download the data for the commit we plan to use immediately.
The object model for a shallow clone is shown in this diagram:
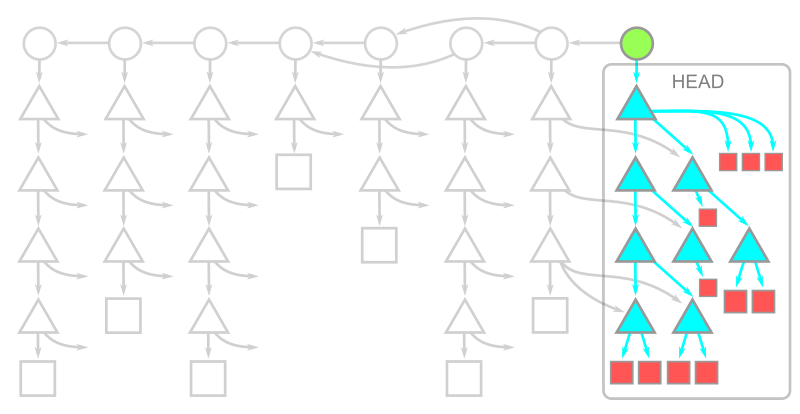
Here, the commit at HEAD exists, but its connection to its parents and the rest of the history is severed. The commits whose parents are removed are called shallow commits and together form the shallow boundary. The commit objects themselves have not changed, but there is some metadata in the client repository directing the Git client to ignore those parent connections. All trees and blobs are downloaded for any commit that exists on the client.
Since the commit history is truncated, commands such as git merge-base or git log show different results than they would in a full clone! In general, you cannot count on them to work as expected. Recall that these commands work as expectedly in partial clones. Even in blobless clones, commands like git blame -- will work correctly, if only a little slower than in full clones. Shallow clones don’t even make that a possibility!
The other major difference is how git fetch behaves in a shallow clone. When fetching new commits, the server must provide every tree and blob that is “new” to these commits, relative to the shallow commits. This computation can be more expensive than a typical fetch, partly because a well-maintained server can make use of reachability bitmaps. Depending on how others are contributing to your remote repository, a git fetch operation in a shallow clone might end up downloading an almost-full commit history!
Here are some descriptions of things that can go wrong with shallow clones that negate the supposed values. For these reasons we do not recommend shallow clones except for builds that delete the repository immediately afterwards. Fetching from shallow clones can cause more harm than good!
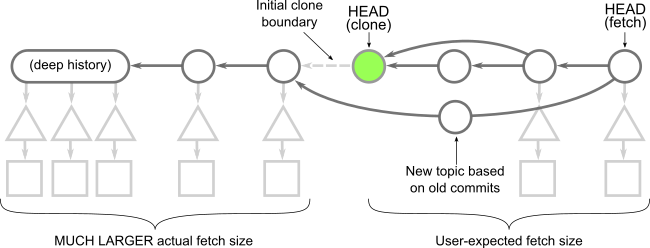
Remember the “shallow boundary” mentioned earlier? The client sends that boundary to the server during a git fetch command, telling the server that it doesn’t have all of the reachable commits behind that boundary. The client then asks for the latest commits and everything reachable from those until hitting a shallow commit in the boundary. If another user starts a topic branch below that boundary and then the shallow client fetches that topic (or worse, the topic is merged into the default branch), then the server needs to walk the full history and serve the client what amounts to almost a full clone! Further, the server needs to calculate that data without the advantage of performance features like reachability bitmaps.
Google Cloud. 2022. DevOps tech: Continuous integration | DevOps capabilities | Google Cloud. [online] Available at: https://cloud.google.com/architecture/devops/devops-tech-continuous-integration [Accessed 7 October 2022].
Use case example:
We have Bitbucket connected with Bamboo. We are planning to set up another Bamboo instance in our European office (We are in the US) but our Stash (Git) server is also located in the US. Doing Git clones or pulls from Europe to the US will take an exponential amount of time. If the repository is cached on the Bamboo server or Agents, builds would become faster because the Git/Bitbucket repository lives in a different part of the world. Where does Bamboo store the repository cache? If we are running elastic agents is the code still cached on the server somewhere after the agent expires?
Repository caching means that code is first fetched from the repository to a local cache and then another fetch is made from this cache to your plan's workspace that is located under the plan's working directory. Repository caching happens automatically on the Bamboo Server for its internal operations and its Local Agents and is enabled by default on Remote and Elastic Agents (it can be disabled). When using a repository cache, on the first run of a plan, Bamboo performs a full clone and stores the data in a local cache directory and completes the build. On subsequent builds, Bamboo does a git fetch from the remote repository to see if there are additional changes and if so, updates the local cache. Similar to the first run, the data for the plan is then checked out from the local cache. Hence, a faster checkout. To get a better understanding, you can enable "verbose logs" located under the advanced settings of the repository, trigger a build, and follow the sequence of events.
Depending on the type of workload such as in large repositories; multiple plans using the local cache and producing a disk bottleneck, or also on very active repositories whose Build plans have a requirement to be linked to the latest changes, etc, it may be necessary to not use any caching and instead use the latest version from the repository. You can disable the repository caching on agents by unsetting the "Enable repository caching on agents" option on the Repository configuration.
The git cache is used even when different plans checkout the same repository to prevent duplicate and unnecessary checkouts of the same repository between plans.
In some cases, you may want to make a change to your source code but you don't want to invoke a build. For example, you might not want to invoke a build when you update documentation or configuration files.
In such scenarios, you can include [skip ci] or [ci skip] in the commit message, and a build will not be invoked.
If you want to run a build on that commit later, use the Run trigger button in the Triggers page.

dzone.com. 2022. Webhooks vs. Polling: You're Better Than This - DZone Integration. [online] Available at: https://dzone.com/articles/webhooks-vs-polling-youre-better-than-this-1 [Accessed 7 October 2022].
While polling and webhooks both accomplish the same task, webhooks are far more efficient. Zapier found that over 98.5% of polls are wasted. In contrast, webhooks only transfer data when there is new data to send, making them 100% efficient. That means that polling creates, on average, 66x more server load than webhooks. That’s a lot of wasted time, and if you’re paying per API call, a whole lot of wasted money.
Attentiveness to the build process will enable optimisation of build-times. The virtue of this is that cummulatively much time will be saved, it could also be financially beneficial in terms of cloud or server billing and resources. This can be acheived in certain instances via caching files, analysing slow downloads or dependencies, looking for possibilities to parallelize and/or concurrently run elements of the build, time slow areas of builds and deduce the root causes and whether they can be improved upon.
See this post for some introductory information on enhancing your next Github Actions build for example.
En.wikipedia.org. 2022. Long-term support - Wikipedia. [online] Available at: https://en.wikipedia.org/wiki/Long-term_support [Accessed 7 October 2022].
Long-term support (LTS) is a product lifecycle management policy in which a stable release of computer software is maintained for a longer period of time than the standard edition. The term is typically reserved for open-source software, where it describes a software edition that is supported for months or years longer than the software's standard edition.
Short term support (STS) is a term that distinguishes the support policy for the software's standard edition. STS software has a comparatively short life cycle, and may be afforded new features that are omitted from the LTS edition to avoid potentially compromising the stability or compatibility of the LTS release
LTS applies the tenets of reliability engineering to the software development process and software release life cycle. Long-term support extends the period of software maintenance; it also alters the type and frequency of software updates (patches) to reduce the risk, expense, and disruption of software deployment, while promoting the dependability of the software. It does not necessarily imply technical support.
Investopedia. 2022. Bleeding Edge Technology. [online] Available at: https://www.investopedia.com/terms/b/bleeding-edge-technology.asp#:~:text=our%20editorial%20policies-,What%20Is%20Bleeding%20Edge%20Technology%3F,in%20most%20cases%2C%20the%20consumer. [Accessed 7 October 2022].
Bleeding-edge technology refers to a type of technology released to the public even though it has not been thoroughly tested and may be unreliable. Bleeding edge technology usually comes with a degree of risk and expense for the end-user—in most cases, the consumer.
Bleeding edge technology has a certain amount of risk, with early adopters facing a significant downside if the technology misses the mark. Consumers may not be that familiar with the product, it may not be thoroughly tested and it may have glitches that can't be quickly or easily fixed. Consumers that become early adopters could lose money, time, or sensitive information if the technology fails to deliver on its promises.
En.wikipedia.org. 2022. Software release life cycle - Wikipedia. [online] Available at: https://en.wikipedia.org/wiki/Software_release_life_cycle#:~:text=Also%20called%20production%20release%2C%20the,This%20release%20goes%20to%20production. [Accessed 7 October 2022].
Also called production release, the stable release is the last release candidate (RC) which has passed all stages of verification and tests. The remaining bugs are considered as acceptable. This release goes to production.
Always favour stable releases when using third party libraries, dependencies, drivers, or other software of any kind.
Some software products (e.g. Linux distributions) also have long term support (LTS) releases which are based on full releases that have already been tried and tested, and receive only security updates. This allows developers to allocate more time toward product development instead of updating code or finding and fixing newly introduced bugs due to outdated assumptions about the used system, language or underlying libraries.
Github pulse provides a great way to check the current or historical activity on a particular project or piece of software. This can be a good indicator of how well supported or maintained it is. A worthy consideration when establishing a preferable choice from a selection of competitors for a particular task, is how actively maintained that choice of software is.
A version number is essential for releasing your package. Semantic versioning is a useful method for informative versioning.
It can be useful to store this in a separate file, so that it can be referenced from multiple places (e.g. setup.py and the main documentation).
Git tagging can be used to mark significant points in your projects development. These tags can also be used to trigger version releases, for example using GitHub Actions.
- In the setup.py file setup(...) function call, include include_package_data = True.
- Alongside your setup.py file, provide a MANIFEST.in file.
- The MANIFEST.in file should list any non-python files that you wish to include distributions.
- A MANIFEST.in file includes single files, or all files of a type, as below:
    include README.rst
    recursive-include examplepackage/examples *.csv
Benefits , W., 2022. Why Use Docker? Advantages and Benefits. [online] Knowledgehut.com. Available at: https://www.knowledgehut.com/blog/devops/why-use-docker [Accessed 12 October 2022].
Q1: What are the three benefits of Docker? Answer: Dockers are preferred by users for its main benefits such as its Performance, Scalability, and Profitability.
Q2. What is Docker Compose? Answer: Compose is a Docker application that allows you to define and operate multi-container Docker applications. Users can create application's services using Compose using a YAML file. Then the user can build and start all of the services from their setup with a single command.
Q3. Is Docker free of cost? Answer: Small enterprises (with less than 250 people and less than $10 million in yearly revenue), personal usage, education, and non-commercial open-source initiatives can continue to utilise Docker Desktop for free. For commercial use in bigger businesses, it requires a premium subscription (Pro, Team, or Business) for as little as $5 per month.
Q4. What is the main difference between docker and container? Answer: Docker is a service that manages containers. Container, on the other hand, is software that bundles up code and all of its dependencies so that programs may operate quickly and reliably in different computing environments.
Many of the users ask the most common question: Why use docker? The answer is, Containerizing programs have a variety of advantages which include:
You may deploy your containerized program to any other system that runs Docker after testing it. You can be confident that it will perform precisely as it did during the test.
Although virtual machines are an alternative to containers, containers do not contain an operating system (whereas virtual machines do), which implies that containers have a considerably smaller footprint and are faster to construct and start than virtual machines.
Containers' portability and performance advantages can aid in making your development process more fluid and responsive. Using containers and technology like Enterprise Developer Build Tools for Windows to improve your continuous integration and continuous delivery processes makes it easier to provide the appropriate software at the right time. Enterprise Developer Build Tools for Windows is a component of Enterprise Developer that provides all of Enterprise Developer's features for compiling, building, and testing COBOL code without the need for an IDE.
Any supporting software your application requires is likewise included in a Docker container that hosts one of your applications. It's not a problem if other Docker containers include apps that require different versions of the same supporting software because the Docker containers are completely self-contained.
This also implies that as you progress through the stages of your development lifecycle, you can be confident that a picture you create during development will operate identically in testing and, potentially, in front of your users.
If the demand for your apps necessitates, you can quickly generate new containers. You can use a variety of container management techniques when using multiple containers. For additional information on these choices, consult the Docker manual.
When utilizing Docker, you'll come across the following terminology:
A community resource for working with Docker that is hosted in the cloud. Docker Hub is mostly used for hosting images, but it is also used for user authentication and image-building automation. Anyone can upload images to Docker Hub for free. Individuals or organizations who contribute images to Docker Hub are not checked or verified in any way.
Docker Store is a cloud-based repository comparable to Docker Hub, except that the images on Docker Store have been contributed by commercial businesses that Docker has approved or certified.
A text file with the commands for creating a Docker image. The commands you can specify in a Dockerfile range from sophisticated (such as specifying an existing image to use as a base) to basic (such as specifying an existing image to use as a base) (such as copying files from one directory to another).
For example, you could make a Dockerfile that starts with the Ubuntu image and then adds the Apache web server, your application, and any other configuration parameters you need. The docker build command is used to create an image from a Dockerfile.
A self-contained, executable package that can be used in a container. A Docker image is a binary that contains all of the necessary components for executing a single Docker container and metadata specifying the container's requirements and capabilities.
An image contains everything needed to run an application, including the executable code, any software that the application relies on, and any necessary configuration settings. You can either create your images (using a Dockerfile) or use images created by others and made available in a registry (such as Docker Hub).
The docker build command is used to create an image from a Dockerfile. The docker run command is used to run an image in a container.
The term 'sandbox' refers to a computing environment in which everything that happens inside it stays inside the sandbox. If you run 'rm –rf' inside the sandbox, the contents of the sandbox will be deleted, but the host system that has the sandbox will be unaffected.
Docker images are a type of container Docker images consist of executable application source code and the tools required, libraries, and dependencies required for the application code to execute in a container. When you run the Docker image, it creates a single (or multiple) container instances from the code.
Although it is possible to create a Docker image from scratch, most developers use popular repositories. A single base image can be used to create several Docker images, and all of the created images will share the same stack.
Layers constitute Docker images, and each layer represents a different version of the given image. A new top layer is created whenever a developer makes certain modifications to the image required, and this top layer replaces the previous top layer as the current version of the image. Previous layers are kept in a rollback manner or re-used in future projects.
A new container layer is created whenever a container is formed from a Docker image. Changes to the container, which means adding or removing files, are only saved to the container layer and are only visible while the container is running. This iterative image-creation process improves overall efficiency because numerous live container instances can run from a single base image and share a stack.
The Docker daemon is an identical program that runs in the background The Docker daemon is a service that runs on your operating systems, such as Windows, macOS, or iOS. This particular service, which acts as the control center of the Docker implementation, produces and manages your Docker images for you using commands from the individual client.
Docker Register is a registry for Docker containers A Docker registry is a scalable open-source Docker image storage and distribution mechanism. The registry allows users to keep track of image versions in repositories by tagging them. Git, a version control tool, is also used to do this.
The Docker project promotes itself as "Docker for everyone". And the reason for this is the ease with which it can be used. Even a non-technical person can easily start and execute any Docker project with just a few commands because this technology is so simple to master and completely Open Source.
Assume that a team of four developers is working on a single project. In the meantime, one uses Windows, and the other uses Linux, and the third and fourth use macOS. As you can see, they are utilizing separate environments to create a single program or software, and they will be required to do things according to their machines, such as installing different libraries and files for their system and so on.
And in such circumstances, particularly on a higher or organizational level, frequently result in multiple conflicts and challenges throughout the software development life cycle. Containerization solutions like Docker, on the other hand, eliminate this issue.
Docker Compose is a useful service that allows users to run several containers as one. All individual containers here run in isolation mode, but they can communicate with one another if needed. The scripting language YAML, which implies Yet Another Markup Language and is based on XML, makes writing Docker Compose files more comfortable. Another excellent feature of Docker Compose is that users may use a single command to enable all services (containers).
You'll need to use a container orchestration tool to monitor and manage container lifecycles in more sophisticated setups. Although Docker has its identical orchestration tool (Docker Swarm), most developers prefer Kubernetes.
The term "single-host deployment" refers to the ability to execute everything on a single piece of hardware. YAML scripts provide for quick and easy configuration. Docker Compose increases productivity by reducing the time it takes to complete activities. Security - Because all containers are isolated from one another, the threat landscape is reduced.
Perlton, C., 2022. Python Environment Management Best Practices. [online] Blog.inedo.com. Available at: https://blog.inedo.com/python-environment-management-best-practices [Accessed 12 October 2022].
When you need to deploy and run Python scripts that others have written, it's important to run those in a well-managed Python environment. Otherwise, you run the risk of dependency conflicts, disorganization, and once-working scripts suddenly failing.
There are several choices to make when managing environments for your Python projects, this article will explain best practices to follow and common mistakes to avoid when doing so.
By default, pip installs packages onto a global Python environment with a Python interpreter, a standard library, and pre-installed packages. Functionally this means that all projects on a system will use the same directories to store and retrieve packages.
Virtual environments are often preferred due to their ability to keep projects separate. Global environments are best used when using Python for server management, running a quick Python script, or automating a server. Meanwhile, virtual environments are more appropriate for package management and complex Python projects.
In the Python world, a virtual environment is a folder containing packages and other dependencies that a Python project needs. Contrary to a global environment, virtual environments are isolated coding spaces where Python packages can be installed, upgraded, and used. When you install or upgrade a package, the old versions stay installed in your directory, so different virtual environments can utilize different package versions. You can also specify the specific version of Python you want for your project. You have free choice between starting Python 2.7, Python 3.6, Python 3.7, Anaconda 4.4.0, and so on.
Virtual environments prevent dependency, version, and permission conflicts by keeping Python projects separate. Global environments run the risk of causing a dependency conflict that may prevent your application from building due to packages being dependent on specific versions of other packages.
Consider two Python projects in a global environment that require NumPy 1.10 and NumPy 1.20 respectively. Python can’t differentiate between versions in the “site-packages” directory. So, both version 1.10 and version 1.20 would reside in the same directory with the same name.
Global environments often get cluttered with dozens of different packages that were installed for various projects. There is no great way to organize or manage these in a global environment, making it difficult to thoroughly test your application against a specific set of packages with known versions.
Virtual environments should always be used unless Python is being utilized for server management or running simple scripts. There are many different Python package managers and virtual environments to choose from that come with a variety of different features. It’s important to carefully consider the best virtual environment for your Python project.
Virtualenv is arguably the most popular and beginner-friendly Python virtual environment. It comes preinstalled with Python 2 as virtualenv and Python 3 as venv. The popular virtualenvwrapper extension adds additional features like tab completion and a single command to switch between environments.
Pipenv is a package and virtual environment management tool that aims to integrate the functionality of Pip and virtualenv into a single tool. It’s a great tool with helpful features but it’s more complex to learn than virtualenv.
Poetry is a feature-rich Python tool for project dependency management. It’s faster than most virtual environment tools and comes with a powerful CLI for managing Python projects.
Conda is a multi-purpose package and environment management system that supports both Python and other languages like Ruby, Scala, R, and C/C++. It’s used to create, save, load, and switch between environments in your local machine. Conda is favored by data scientists and comes pre-installed in both anaconda and miniconda.
The best way to make your work reproducible and keep your environment consistent is to include a requirments.txt file in your project’s root directory. A requirements.txt file contains a list of all the packages present in a project. Utilizing requirements.txt files can be done in two simple steps:
Use pip freeze to output installed packages suitable for a requirements file: C:> py -m pip freeze docutils==0.11 Jinja2==2.7.2 MarkupSafe==0.19 Pygments==1.6 Sphinx==1.2.2 Generate a requirements.txt file and then install it into another environment: env1\bin\python -m pip freeze > requirements.txt env2\bin\python -m pip install -r requirements.txt Requirements.txt files help ensure consistency across installations, deployments, and developers. They also help manage Python dependencies!
Ideally, you should have one new virtual environment for every Python-based project you work on. The main purpose of this is to keep the dependencies of every project isolated from both the system and each other.
If you have multiple projects that have roughly the same requirements, it might seem like a good idea to create a single virtual environment that both projects can share. The problem with this is that one of the projects could suddenly have requirements that break another project. The whole point of virtual environments is to isolate each project from other projects and their quirks.
The disk space and convenience saved is marginal and simply not worth it. Furthermore, using requirements.txt files makes it easy to set up a virtual environment for a project and install what it needs with a couple of commands.
Before a virtual environment can be used in a particular shell session, it has to be activated. Forgetting to active a virtual environment or activating the wrong one is an all too common mistake.
Once activated, virtual environments are treated as the default Python instance until it’s deactivated by running the deactivate command. Keep in mind that activating a virtual environment is for a specific session and not for the system as a whole.
When utilizing requirements.txt files, you should specify packages with exact version numbers. For example, use mypackage==3.2, not mypackage>=3.2.
If you don’t use specific versions of packages it will prevent one of the main benefits of using virtual environments: predictable builds. If you use >= instead of ==, there is no guarantee you, or someone else, will end up with the same version when the environment needs to be recreated.
Perlton, C., 2022. Python Environment Management Best Practices. [online] Blog.inedo.com. Available at: https://blog.inedo.com/python-environment-management-best-practices [Accessed 12 October 2022].
You are working on that fresh project and you see a bad piece of code somewhere. The wrong way to approach it is “nah, that’s someone else’s code, I’m not doing anything about it”, “I don’t have time to fix that – I have other tasks”, “I’ll surely break things if I change this”.
The problem is – bad code accumulates. Even if the piece is a small one, it adds up over time and soon enough you have that “big legacy project that was written by some incompetent guys and no one wants to support”. Someone once said that in six months all projects are “legacy”, because they have a lot of accumulated bad code. Or in other words – technical debt.
That’s why you should fix it immediately. When you see some, or somethinthing bad that’s not exaactly a great practice – fix it. Now. Or it will be too late, because then other code will start depending on that, and new code will follow the same practice (sometimes with copy/paste), and fixing it will be a nightmare. Let’s address the wrong statements above:
“nah, that’s someone else’s code, I’m not doing anything about it” – so, what? You are in that project, you have the “right” to modify it. If the other person has written their code in a bad way, it might be that they even don’t know it’s bad – so they won’t fix it. And I don’t think they will get offended if you fix it. They might, but that’s not your problem. “I don’t have time to fix that – I have other tasks” – this is a task as well. And you can raise an issue/ticket in your issue tracker that says “refactor X”, and then log hours there. You can delay it until the next sprint (if agile). Problems with management insisting on making new things rather than fixing the old ones? Tell them to go read “Refactoring”…or Spolsky…or this blog. (It won’t help, but anyway) “I’ll surely break things if I change this” – possibly, yes. Hm, wait, you have unit-tests, right? And integration tests, and build-acceptance tests? If not – go ahead and fix that first. Then you won’t be so afraid of breaking things. Code reviews are also important in regard to this problem. If all code that gets committed is code-reviewed, the chance that a bad piece will go in unnoticed is decreasing. It still happens, but more rarely.
The only problem with that approach is – how can you be certain a piece of code is bad? Well, here comes experience, knowledge of best practices, patterns. I can’t give you a recipe for that. But you should have a couple of people in your team that are capable of identifying bad code. If there is none – get Code Complete (and Effective Java (if your language is Java)).
So – fix that code immediately. It saves time and headaches, and makes you a bit more proud of the project, rather than “that’s something bad that some incompetent folks wrote, I was just doing some tasks on the side”. Because you can’t say that – if the project is bad, it’s your fault as well.
Docs.python-guide.org. 2022. Code Style — The Hitchhiker's Guide to Python. [online] Available at: https://docs.python-guide.org/writing/style/ [Accessed 13 October 2022].
If you ask Python programmers what they like most about Python, they will often cite its high readability. Indeed, a high level of readability is at the heart of the design of the Python language, following the recognized fact that code is read much more often than it is written.
One reason for the high readability of Python code is its relatively complete set of Code Style guidelines and “Pythonic” idioms.
When a veteran Python developer (a Pythonista) calls portions of code not “Pythonic”, they usually mean that these lines of code do not follow the common guidelines and fail to express its intent in what is considered the best (hear: most readable) way.
On some border cases, no best way has been agreed upon on how to express an intent in Python code, but these cases are rare.
While any kind of black magic is possible with Python, the most explicit and straightforward manner is preferred.
Bad
def make_complex(*args):
    x, y = args
    return dict(**locals())
Good
def make_complex(x, y):
    return {'x': x, 'y': y}
In the good code above, x and y are explicitly received from the caller, and an explicit dictionary is returned. The developer using this function knows exactly what to do by reading the first and last lines, which is not the case with the bad example.
While some compound statements such as list comprehensions are allowed and appreciated for their brevity and their expressiveness, it is bad practice to have two disjointed statements on the same line of code.
Bad
print('one'); print('two')

if x == 1: print('one')

if <complex comparison> and <other complex comparison>:
    # do something
Good
print('one')
print('two')

if x == 1:
    print('one')

cond1 = <complex comparison>
cond2 = <other complex comparison>

if cond1 and cond2:
    # do something
Arguments can be passed to functions in four different ways.
Positional arguments are mandatory and have no default values. They are the simplest form of arguments and they can be used for the few function arguments that are fully part of the function’s meaning and their order is natural. For instance, in send(message, recipient) or point(x, y) the user of the function has no difficulty remembering that those two functions require two arguments, and in which order. In those two cases, it is possible to use argument names when calling the functions and, doing so, it is possible to switch the order of arguments, calling for instance send(recipient='World', message='Hello') and point(y=2, x=1) but this reduces readability and is unnecessarily verbose, compared to the more straightforward calls to send('Hello', 'World') and point(1, 2).
Keyword arguments are not mandatory and have default values. They are often used for optional parameters sent to the function. When a function has more than two or three positional parameters, its signature is more difficult to remember and using keyword arguments with default values is helpful. For instance, a more complete send function could be defined as send(message, to, cc=None, bcc=None). Here cc and bcc are optional, and evaluate to None when they are not passed another value. Calling a function with keyword arguments can be done in multiple ways in Python; for example, it is possible to follow the order of arguments in the definition without explicitly naming the arguments, like in send('Hello', 'World', 'Cthulhu', 'God'), sending a blind carbon copy to God. It would also be possible to name arguments in another order, like in send('Hello again', 'World', bcc='God', cc='Cthulhu'). Those two possibilities are better avoided without any strong reason to not follow the syntax that is the closest to the function definition: send('Hello', 'World', cc='Cthulhu', bcc='God').
As a side note, following the YAGNI principle, it is often harder to remove an optional argument (and its logic inside the function) that was added “just in case” and is seemingly never used, than to add a new optional argument and its logic when needed.
The arbitrary argument list is the third way to pass arguments to a function. If the function intention is better expressed by a signature with an extensible number of positional arguments, it can be defined with the *args constructs. In the function body, args will be a tuple of all the remaining positional arguments. For example, send(message, *args) can be called with each recipient as an argument: send('Hello', 'God', 'Mom', 'Cthulhu'), and in the function body args will be equal to ('God', 'Mom', 'Cthulhu'). However, this construct has some drawbacks and should be used with caution. If a function receives a list of arguments of the same nature, it is often more clear to define it as a function of one argument, that argument being a list or any sequence. Here, if send has multiple recipients, it is better to define it explicitly: send(message, recipients) and call it with send('Hello', ['God', 'Mom', 'Cthulhu']). This way, the user of the function can manipulate the recipient list as a list beforehand, and it opens the possibility to pass any sequence, including iterators, that cannot be unpacked as other sequences.
The arbitrary keyword argument dictionary is the last way to pass arguments to functions. If the function requires an undetermined series of named arguments, it is possible to use the **kwargs construct. In the function body, kwargs will be a dictionary of all the passed named arguments that have not been caught by other keyword arguments in the function signature. The same caution as in the case of arbitrary argument list is necessary, for similar reasons: these powerful techniques are to be used when there is a proven necessity to use them, and they should not be used if the simpler and clearer construct is sufficient to express the function’s intention.
It is up to the programmer writing the function to determine which arguments are positional arguments and which are optional keyword arguments, and to decide whether to use the advanced techniques of arbitrary argument passing. If the advice above is followed wisely, it is possible and enjoyable to write Python functions that are:
- easy to read (the name and arguments need no explanations)
- easy to change (adding a new keyword argument does not break other parts of the code)
PyTest best practices Python testing
License
Readme
Modules
setup.py*
Requirements.txt
/docs
/tests