-
Notifications
You must be signed in to change notification settings - Fork 78
Samplefiles
In the test/samples directory, there are a number of example CSV files you can use to test out Redmine Importer. This page describes how to go through importing all of these files.
The samples show various features of Redmine Importer that require some preparation. To get ready, do the following (you will need to a be Redmine Administrator).
- Create a new project for testing these issues (e.g., "ImportTest").
- Make sure this project has the Tracker named "Bug" enabled on the Projects> ImportTest > Settings > Information tab.
- Remember to enable the Redmine Importer plugin for the test project on the Projects > ImportTest > Settings > Modules tab.
- Go to Administration > Custom Fields > Issues and click "New Custom Field".
- Add a field called "External Id"
- Enable this field for the "Bug" tracker
- Set the format to Text
- Check "Used as filter" (IMPORTANT!)
- Hit OK.
- Enable this field for the ImportTest project on the Projects > ImportTest > Settings > Information tab.
- If you want to be able to test importing watchers, add two users with logins ids of "test1" and "test2" and then add them to the test project in any role.
After that, you can import all the samples in the order given below (some are dependent on previous imports).
This example shows how to import all the standard fields that don't involve issue relationships, including Category and Target Version. At the Matching Columns screen, make sure all of your columns default correctly to the standard Redmine fields like below (they should default correctly without you taking any action).

This is a simple example of importing a value to the "External Id" custom field.
You don't need to change any of the default settings.
This is an example of how to update previously imported values (in this case, one of the issues from CustomField.csv). At the Column Matching screen, be sure to set the Unique Column to "External Id" and to turn on "Update Existing Issues":

This shows how to use Subject as the Unique Column to import parent/child relationships. At the Column Match screen, you'll need to set the Unique Column to "Subject" for this to import:

This shows how to combine parent/child relationships and custom fields. At the Column Match screen, you'll need to set the Unique Column to "External Id":

Finally, this is the most full-blown example of setting parent/child relationships, precedes/follows relationships, and custom fields. Set the Unique Column to "External Id":

You'll find you can re-import this many times by checking "Update Existing Issues" when you re-import it.
This file is optional but provides examples of how to import custom fields of type other than 'string'. In order to test this file, you will need to add a series of Custom Issue Fields to your test project. In particular, add:
- an integer field called "IntegerField"
- a float field call "FloatField"
- a boolean field called "BooleanField"
- a date field called "DateField"
- a user field called "UserField" (Redmine 1.2 only)
- a version field called "VersionField" (Redmine 1.2 only)
Finally, go to the project's Settings > Info tab and enable all the custom fields for your test project. When you're done, your "Custom Fields" admin page should look like the following on Redmine 1.1 (on Redmine 1.2 or later, the "UsedField" and "VersionField" should also be present):

Now import this file and make sure all of the fields auto-match. If you're on Redmine 1.1., the UserField and VersionField will default to "ignore":

This sample is purely optional.
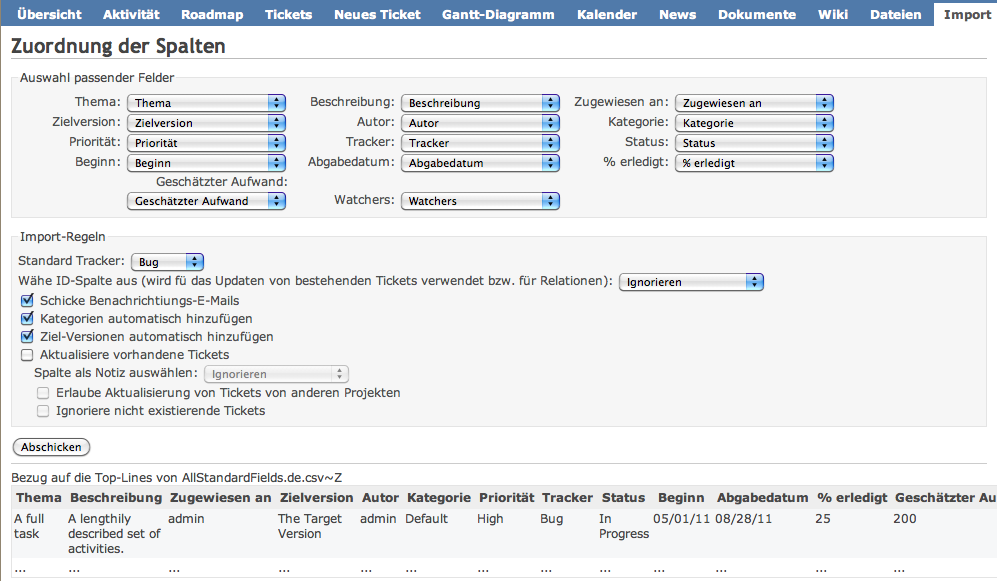
The contents of this file are the same as AllStandardFields.csv, but the column headings are in German. It demonstrates how the column auto-matching can optionally match localized column names. If you want to upload this sample file, you'll need to set your Redmine interface language to Deutsch (German). If your language is set, then at the Column Matching screen all the columns of this sample file should automatically be matched to their fields:

This file is optional; it demonstrates the expected error-reporting for various invalid fields.
This file is optional; it tests the error-handling behavior for typed custom fields. To import this file, you must have defined the typed custom fields as described above under TypedCustomFields.csv. To see the errors, import this file and be sure to turn off "Auto-create target versions."
After importing, an error screen like the below should be displayed.
