Español
Este repositorio contiene la documentacion para el badge oficial del HackConRD 2024.
English
This repository contains the documentation for the official HackConRD 2024 badge.
¿Qué son los badges?
Los badges son una expresión artística de la cultura hacker, son impulsados por la comunidad y dentro de ella se convierten en piezas memorables de colección. Este nicho/dinámica es popularmente conocida como "Badgelife". En esta primera iteración del badge oficial del HackConRD utilizamos el logo de la conferencia marcando así el inicio del Badgelife en nuestro hogar y querida comunidad del HackConRD <3.
What is a badge?
Badges are an artistic expression of hacker culture, they are driven by the community and within it they become memorable collector's items. This niche/dynamic is popularly known as “Badgelife”. For this first iteration of the official HackConRD badge we used the conference logo, thus marking the beginning of Badgelife in our home and beloved HackConRD community <3.
¿Cómo se utiliza un badge?
Los badges se utilizan con un lanyard colgado del cuello y se usan durante la conferencia, suelen contener desafíos y secretos ocultos que ponen a prueba tu curiosidad y habilidades de hacking.
How do you use a badge?
The badges are worn with a lanyard around the neck and worn during the conference, they usually contain challenges and hidden secrets that test your curiosity and hacking skills.
Video
BadgeLife - A Hackaday Documentary
El badge utiliza el microcontrolador ATTiny85, fabricado por Microchip Technology (anteriormente Atmel), es un popular microcontrolador AVR de 8 bits conocido por su tamaño compacto y versatilidad. Estas son algunas características generales del ATTiny85:
- Flash Memory: 8 KB
- SRAM: 512 bytes
- I/O Pins: 6
- Operating Voltage: 1.8V - 5.5V
- Clock Speed: 8 MHz
Estas características hacen que el ATTiny85 sea adecuado para una amplia gama de aplicaciones integradas, incluidos dispositivos IoT, sensores, electrónica de consumo y más, donde el espacio, el costo y la eficiencia energética son factores críticos.
En el siguiente enlace se encuentra el datasheet del ATTiny85:
The badge uses the ATTiny85 microcontroller, manufactured by Microchip Technology (formerly Atmel), is a popular 8-bit AVR microcontroller known for its compact size and versatility. These are some general features of the ATTiny85:
- Flash Memory: 8 KB
- SRAM: 512 bytes
- I/O Pins: 6
- Operating voltage: 1.8V - 5.5V
- Clock speed: 8 MHz
These features make the ATTiny85 suitable for a wide range of embedded applications, including IoT devices, sensors, consumer electronics and more, where space, cost and power efficiency are critical factors.
At the following link you will find the ATTiny85 data sheet:
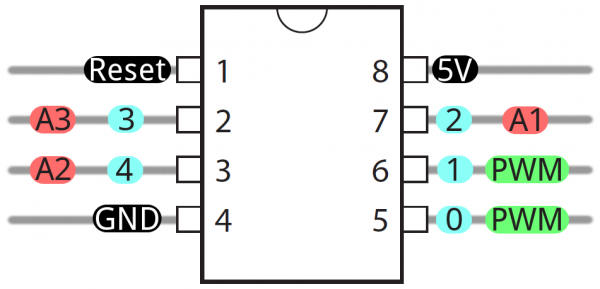
PINOUT
El badge se hizo con la intención de ser completamente abierto para la comunidad en general. En el zip HackConRD_Badge_Fab-main.zip podemos encontrar el archivo de KiCad con el diseño final.
The badge was made with the intention of being completely open to the community at large. In the HackConRD_Badge_Fab-main.zip zip we can find the KiCad file with the final design.
Español
Para la conferencia el badge viene con firmware desarrollado específicamente para el evento e incluye desafíos y secretos, pero es 100% reprogramable, incluyendo el bootloader.
English
At the conference the badge comes with firmware developed specifically for the event and includes challenges and hidden features, but it is 100% reprogrammable, including the bootloader.

-
5V
-
GND
-
RX
-
TX
-
I/O PIN 7
-
RESET PIN <-> BUTTON


No :D
El badge utiliza el PIN fisico 2 para controlar los LEDs aRGB.
Tambien podemos agregar LEDs aRGB externos y programar diferentes patrones de animacion con los 3 pines que se encuentran expuestos en el board (Al lado de D9).
Imaginate todas las animaciones de LEDs que ChatGPT puede generar por ti.
No :D
The badge uses physical PIN 2 to control the aRGB LEDs.
We can also add external aRGB LEDs and program different animation patterns with the 3 pins that are exposed on the board (Next to D9).
Imagine all the LED animations ChatGPT can generate for you.

5V
GND


El badge utiliza el PIN físico 3 para controlar el buzzer
El buzzer integrado puede utilizarse para generar melodias.
The badge uses physical PIN 3 to control the buzzer.
The built-in buzzer can be used to generate melodies.
Podemos utilizar el IDE de Arduino para quemar el bootloader a nuestro badge. Para esto, lo primero que debemos hacer es instalar el IDE de Arduino como tal y luego ir a File > Preferences > Additional Board Manager URLs e ingresamos el siguiente URL:
http://drazzy.com/package_drazzy.com_index.json
Este archivo JSON contiene el famoso proyecto ATTinyCore hecho por SpenceKonde, el cual nos permite utilizar las librerias de Arduino sobre el ATTiny.
Luego que especificamos el nuevo URL podemos ir a Tools > Board > Board Manager y buscamos el "ATTiny" en la barra de busqueda. Selecionamos el proyecto ATTinyCore el cual ya deberia ser visible y finalmente le damos a Install. Luego de esto los Boards de ATTiny aparecen en la seccion de Tools > Board > ATTinyCore
Nuestro chip es el ATTiny45/85 (Optiboot)
Optiboot se refiere al bootloader que utilizaremos, existen otros pero Optiboot es bastante popular para nuestro propósito que es hacer del ATTiny85 un playground donde podemos reprogramar el chip fácilmente. Ahora que Arduino IDE tiene instalado ATTinyCore podemos proceder a realizar las conexiones necesarias para instalar el bootloader. Para esto utilizamos la interfaz serial del badge y un Arduino Nano CON EL SKETCH Arduino ISP auxiliar (recomendado).
No sera necesario instalar el bootloader al badge de HackConRD 2024 ya que viene con el instalado. Esta seccion es solo para documentar como instalar el bootloader si fuese necesario, para mas informacion pueden ver el siguiente video, donde se explica el mismo proceso:
How To Program An Attiny85 With An Arduino Nano
We can use the Arduino IDE to burn the bootloader to our badge. For this, the first thing we must do is install the Arduino IDE as such and then go to File > Preferences > Additional Board Manager URLs and enter the following URL:
http://drazzy.com/package_drazzy.com_index.json
This JSON file contains the famous ATTinyCore project made by SpenceKonde, which allows us to use the Arduino libraries on the ATTiny.
After we specify the new URL we can go to Tools > Board > Board Manager and search for "ATTiny" in the search bar. We select the ATTinyCore project which should already be visible and finally click Install. After this, the ATTiny Boards appear in the Tools > Board > ATTinyCore section.
Our chip is ATTiny45/85 (Optiboot)
Optiboot refers to the bootloader that we will use, there are others but Optiboot is quite popular for our purpose, which is to make the ATTiny85 a playground where we can easily reprogram the chip. Now that the Arduino IDE has ATTinyCore installed we can proceed to make the necessary connections to install the bootloader. For this we use the serial interface of the badge and an auxiliary Arduino Nano WITH THE Arduino ISP SKETCH (recommended).
It will not be necessary to install the bootloader to the HackConRD 2024 badge since it comes with it installed. This section is only to document how to install the bootloader if necessary, for more information you can watch the following video, where the same process is explained:
How To Program An Attiny85 With An Arduino Nano
-
-
-
-
-
-
Finalmente, procedemos en el Arduino IDE con Tools > Burn Bootloader, con el mismo ATTiny45/85 (Optiboot) que habiamos seleccionado anteriormente.
Finally, we proceed in the Arduino IDE with Tools > Burn Bootloader, with the same ATTiny45/85 (Optiboot) that we had selected previously.
Para esto simplemente hacemos las conexiones al convertidor de USB a Serial con el badge, conectamos a la maquina y le damos "Upload" al código en el IDE de Arduino, al realizar esta acción el código compilara y si no hay errores de sintaxis se procedera a cargar el programa. Cuando el IDE empiece a cargar el programa (Cuando Arduino IDE diga Uploading) reiniciamos el badge PRESIONANDO el botón de reset para que el bootloader acepte la escritura del nuevo firmware en memoria.
For this we simply make the connections to the USB to Serial converter with the badge, connect to the machine and "Upload" the code in the Arduino IDE, when performing this action the code will compile and if successful (no syntax errors) it will proceed to load the program. When the IDE starts loading the program (When Arduino IDE says Uploading) we reset the badge by PRESSING the reset button so that the bootloader accepts writing the new firmware to memory.