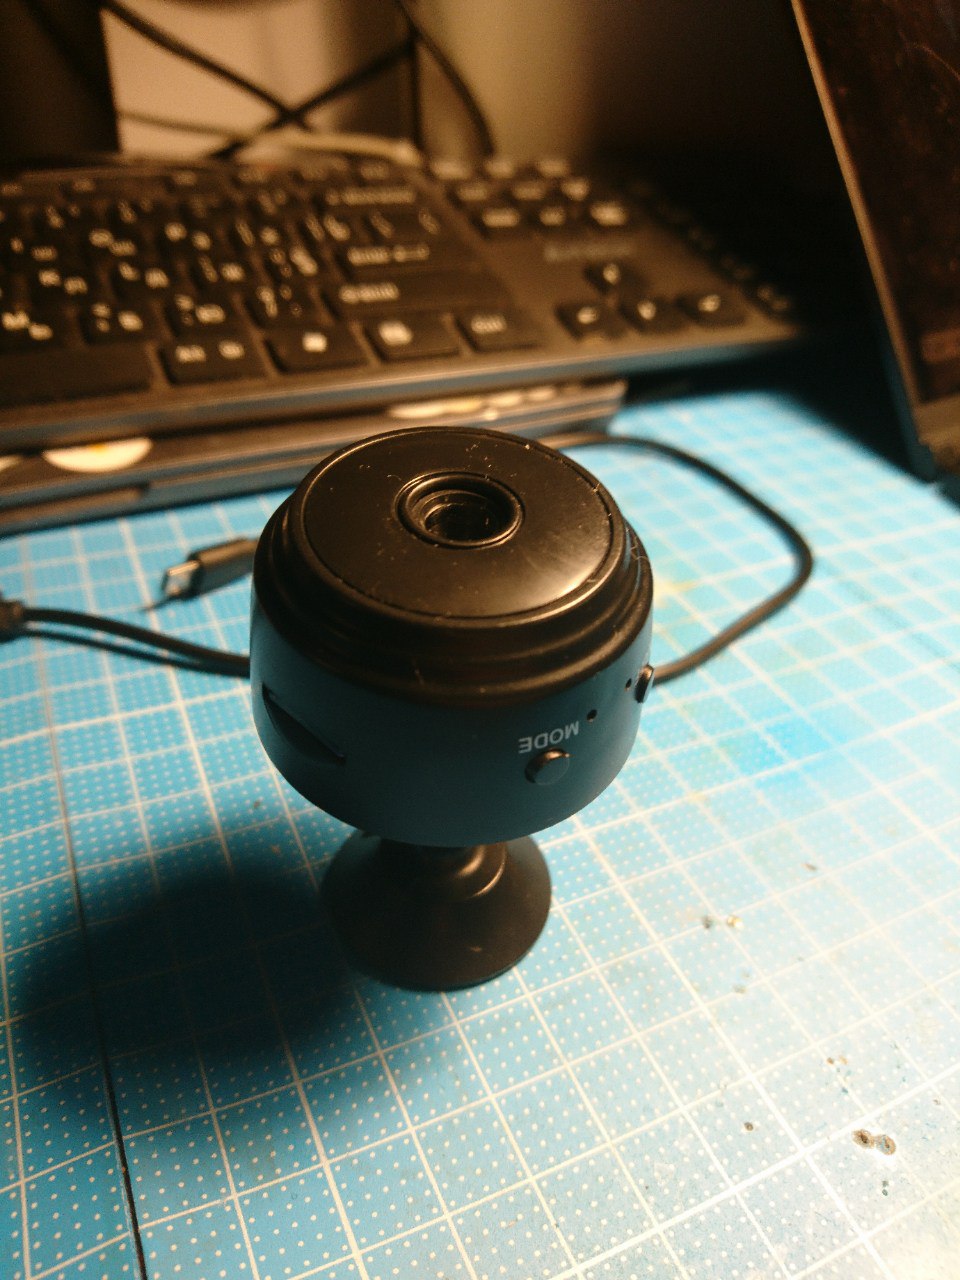
Note: This application has been tested only with camera version 202212011602 that uses the Chinese V720 app in AP mode. Please refer to the PCB images of the camera provided below for verification.
Discussion on the Home Assistant forum: Popular A9 Mini Wi-Fi Camera - The HA Challenge
This guide will help you set up and use the A9 V720 Naxclow Camera in two modes:
- AP Mode (Access Point Mode): The camera acts as a Wi-Fi hotspot, and you connect directly to it.
- STA Mode (Station Mode): The camera connects to your existing Wi-Fi network.
- Power On the Camera: Turn on your A9 V720 Naxclow camera.
- Connect to the Camera's Wi-Fi: On your device, connect to the camera's Wi-Fi AP. The AP name typically starts with the prefix
Nax, which likely refers to the manufacturer Naxclow. For example,Nax_210000211234.
- IP Range: The camera should assign an IP address in the range
192.168.169.xwith a subnet mask of255.255.255.0. - Default IP: By default, the camera's IP address is
192.168.169.1. - Configuration Interface: The camera does not have a web interface for configuration; it can only be configured via the mobile application.
- UART Configuration (Optional): If you have UART access, you can configure the camera's network settings using the
ifconfigandwificommands.
Warning: We do not recommend connecting the camera to the internet, as it may download update packages from external servers.
To list all recorded videos stored on the camera, use the following command:
python3 src/a9_naxclow.py -f
- The
-fargument can also be written as--filelist. - File Naming Convention: Camera filenames are in a datetime format containing full date, hour, and minute information, e.g.,
202301312016.avi. - Storage Structure: On the SD card, videos are saved in different folders by date, formatted as
[date]/[hour]/[minute].avi(e.g.,/20230131/20/16.avi).
To download a specific video file from the camera, use one of the following commands:
python3 src/a9_naxclow.py -d 20230131-20-16 -o out.avi
or
python3 src/a9_naxclow.py -d 202301312016 -o out.avi
-
Syntax Explanation:
python3 src/a9_naxclow.py -d [date-hour-minute] -o [output-file] -
The
-dargument can also be written as--download, and-oas--output. -
Date and Time Format: The date, hour, and minute can be obtained from the output of the
-fcommand. -
Default Output File: If the
-oargument is not provided, the script will save the file asout.avi. -
Recording Note: While downloading a file from the camera, recording is paused.
To start a live video stream, use the following command:
python3 src/a9_naxclow.py -l -o live.avi -r -i
- Save Stream to File: Use the
-oargument to specify an output file to save the captured stream. - Enable IR View: Use
-ior--irledto enable infrared (IR) mode. - Flip Camera View: Use
-ror--flipto flip the camera view. - Audio Note: There is no audio in the live recording by default. However, audio can be captured and saved by modifying the
show_live()function in thea9_live.pyfile. - Audio Format: The audio stream uses the G.711 A-law WAV format.
To connect the camera to your existing Wi-Fi network, use the following command:
python3 src/a9_naxclow.py --set-wifi [SSID] [PWD]
-
Parameters:
SSID: The name of your Wi-Fi access point.PWD: The password for your Wi-Fi network.
-
Example: To connect to an access point named
mifiwith the passwordmifimifi:python3 src/a9_naxclow.py --set-wifi mifi mifimifi -
Password Requirements: The password should be at least 8 characters long but not exceed 36 characters.
To use the camera over your network, you may need to start a fake server. This is because the camera tries to connect to its cloud servers, and by faking these, we can capture the camera's stream locally.
Use the following command to start the fake server:
python3 src/a9_naxclow.py -s
Important Configuration Steps:
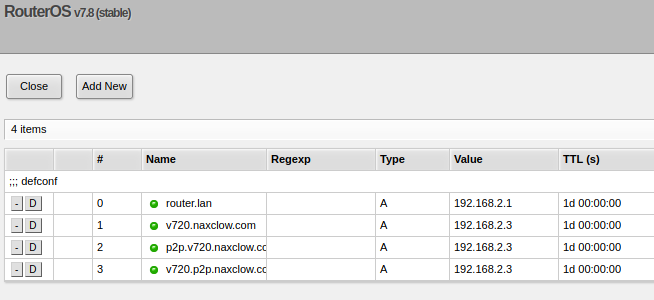
in my case 192.168.2.3 is a RPi server IP
- DNS Redirection: For the fake server to function correctly, you must set up DNS redirection on your home router. Redirect all domains ending with
*.naxclow.com(e.g.,v720.naxclow.com,v720.p2p.naxclow.com,p2p.v720.naxclow.com) to your server's IP address. - MQTT Broker: Ensure that an MQTT broker is installed on your server, or redirect
p2p.v720.naxclow.comto a public MQTT broker. - Further Details: For more information on how this works, please refer to fake_server.md.
After Configuration:
- Web Server Activation: The fake server will start a web server and listen for incoming messages from the camera.
- Available Cameras: Access the list of available cameras at
http://[FAKE_SERVER_IP]/dev/list(returns a JSON array). - Live Stream and Snapshot:
- Live MJPEG video stream:
http://[FAKE_SERVER_IP]/dev/[CAM_ID]/live - Snapshot:
http://[FAKE_SERVER_IP]/dev/[CAM_ID]/snapshot
- Live MJPEG video stream:
Port Configuration Notes:
- Port 80 Access Issues: If you encounter issues opening TCP port 80 without root privileges, consider the following solutions:
-
Run the server as root (e.g., using
sudo). -
Allow non-privileged users to use port 80 by executing:
sudo sysctl -w net.ipv4.ip_unprivileged_port_start=80 -
Ensure that no other HTTP server is running on your system.
-
- Proxy Configuration: If you are starting the fake server through an Nginx proxy, use the
--proxy-portargument to change the internal HTTP port of the fake server.
If you encounter any issues:
- Verbose Mode: Add the
-vor--verboseargument to the command for detailed logs. - Seeking Help: If the problem persists, please open a new issue on GitHub with the full logs attached. We are here to help!
- Disassembled App Sources: The disassembled sources of the original V720 app can be found in the
orig-appfolder. - Early Script Version: A very early version of the A9 script is available as
a9_old.py.
We discovered some manufacturer passwords in the UART logs:
com.naxclow.Camera

[WLAN_easyfReadId - 136]-Debug: SET wifi = (NAXCLOW)  (34974033A)
_wifi_easyjoin: ssid:NAXCLOW bssid:00:00:00:00:00:00 key:34974033A

_wifi_easyjoin: ssid:[ap0] bssid:00:00:00:00:00:00 key:1213aCBVDiop@  <-- Here, the SSID is from the most powerful AP in range
- Full Logs: The complete logs are available in the
docsdirectory atdocs/uart.log.
-
Hardware Details: The IP camera is built around the BL7252 MCU.
-
SDK Availability: The MCU SDK is available on GitHub as bdk_rtt. Please note that the original link (
https://github.com/bekencorp/bdk_rtt) appears to be inactive. -
Image Reference:
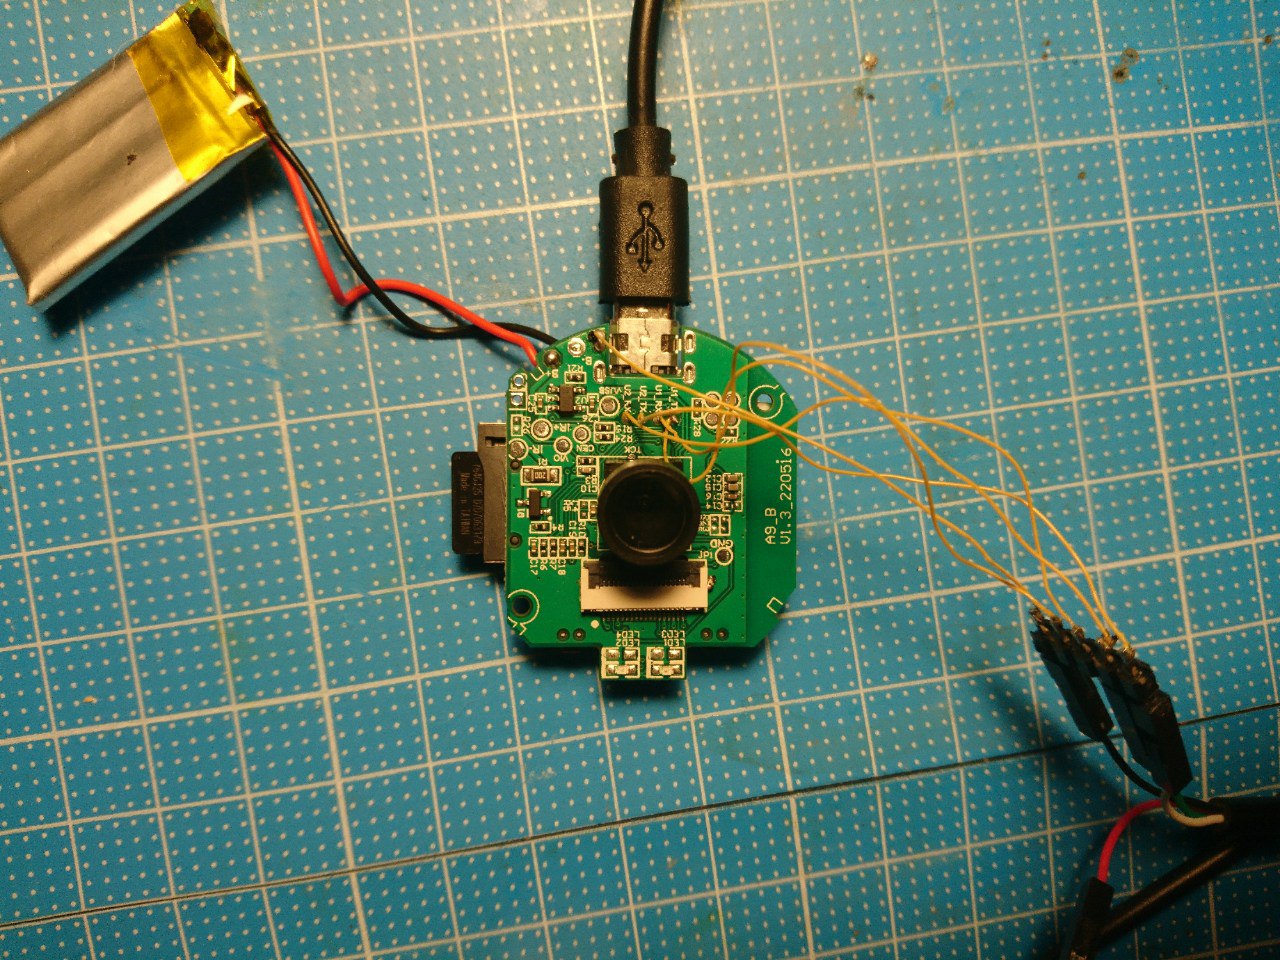
-
Additional Photos: All photos are available in the
imgfolder.
- Purchase Information: The camera can be found on AliExpress by searching for
A9 V720 camera. - Price Reference: As of January 31, 2023, the camera was priced at approximately €5.20.
We hope this guide helps you in using the A9 V720 Naxclow Camera with our script. If you have any questions or need further assistance, please feel free to reach out.