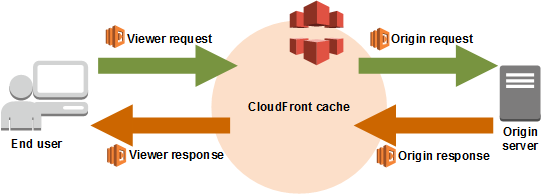
This project creates a template for a static website hosted on AWS S3 and secured with Google account authorisation This solution utilizes AWS Cloudfront + AWS Lambda@Edge solution. Please find details of the technology here
Picture: AWS
We also use Serverless framework to manage deployments to AWS.
PLEASE NOTE THAT ONLY index.html IS CONSIDERED AS SENSITIVE CONTENT AND PROTECTED WITH LAMBDA@EDGE VALIDATION
Only Google users from email domain defined in main.js are allowed to browse a site secured with current solution. Feel free to adjust to your needs
Following are the objects created in AWS in our approach:
- S3 bucket to host static content
- Cloudfront distribution with required configuration
- Lambda which validates authorization using Google account
- Lambda version and association of that version with Cloudfront distribution created (basically, that is notorious Lambda@Edge)
- Roles and Permissions required for Lambda and Lambda@Edge
Assuming that AWS account is already created
Since we use Google authorization mechanism
- Google Cloud Platform project must be created in order to manage credentials
- OAuth 2.0 client ID should be created in GCP project -> APIs & SErvices -> Credentials
- Open
serverless.ymland replace<static-site-bucket-name>with the name of the bucket you would like to create and use as static website - Open
main.jsand replaceGOOGLE_CLIENT_IDstring with Client ID of oauth client configured for your GCP project - Run
npm installassuming that you havenpminstalled on your machine - Run
sls deployassuming that you haveserverlessinstalled on your machine Usually it takes 15-20 minutes for AWS Cloudfront to copy files to edge locations
- Open
html_templates/main.htmland replaceclientIdvalue with oauth client id - Prepare your static site files with
index.htmlas an entry point - Load
main.html,index.htmland all other required files into AWS S3 bucket defined inserverless.ymlFurther,serverless-finchplugin could be used to automate copying site contents to S3
Navigate to AWS Cloudfront origin create after sls deploy completion.
Then edit the origin object and set following parameters:
- Restrict Bucket Access -> Yes
- Origin Access Identity -> Use an Existing Identity
- Your Idetities -> Choose an existing one. If not exists, choose Create a new one in Origin Access Identity parameter
- Grant Read Permissions on Bucket -> Yes, Update Bucket Policy After the permissions are set, verify that you can access your site via Cloudfront and can't via S3 static site link
If you want to attach a custom domain name to your Cloudfront distribution, you need to:
- Create a CNAME for your domain name in AWS Route53 or in another domain names provider of your choice
- Navigate to a Cloudfront distribution and add a CNAME created to a
Alternate Domain Names (CNAMEs)list