Azure template for Skype for Business lab deployment with Edge server, ADFS and Freeswitch PSTN Gateway. It creates an On-prem Skype for Business 2015 deployment ready to integrate with Cloud PBX

The intent of version V3 is to enable deployment of Office 365 CloudPBX with On-premise PSTN Connectivity Via On-Prem Skype for Business deployment. It includes folowing components:
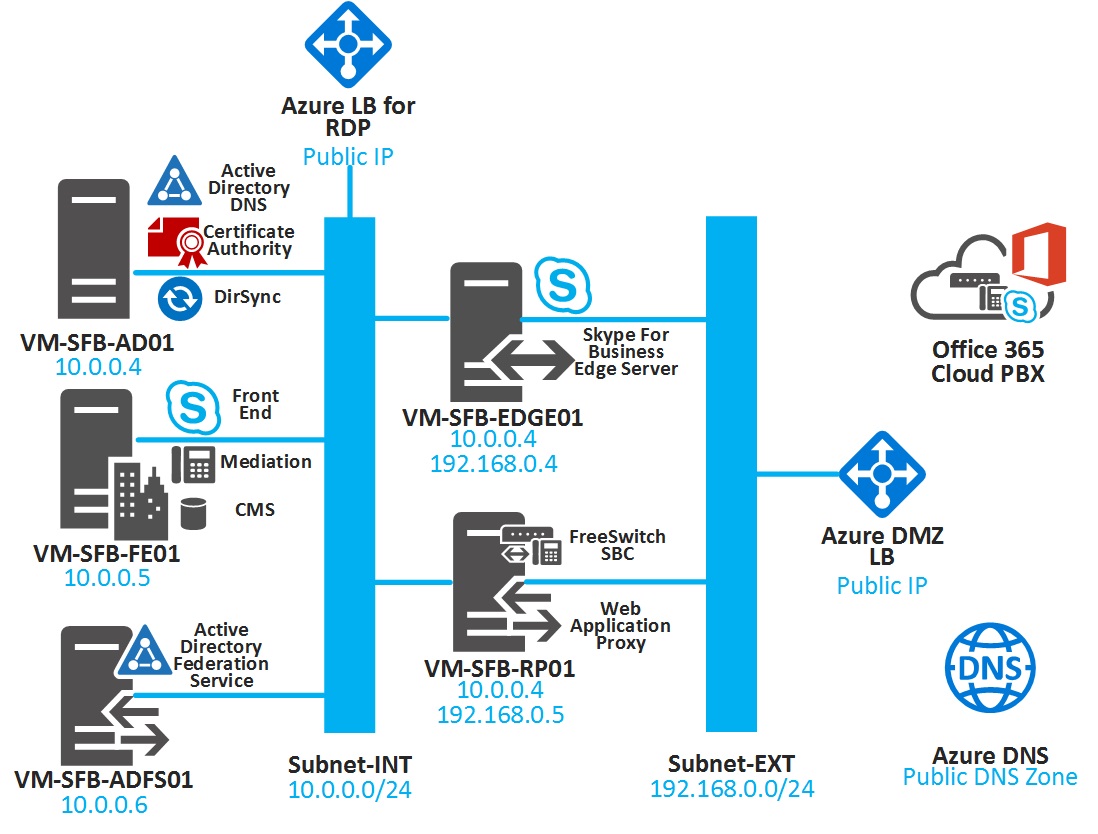
- VM-SFB-AD01: Active Directory Domain Controller, Certificate Authority and Internal DNS roles
- VM-SFB-FE01: Skype for Business Front End Standard Edition including Mediation server
- VM-SFB-ADFS01: Active Directory Federation Services server used for SSO with Azure Active Directory
- VM-SFB-RP01: Reverse Proxy to publish Federation service and Skype URLs. It also plays the role of PSTN Gateway leveraging Freeswitch an open-source telephony platform and X-lite to simulate PSTN calls
- VM-SFB-EDGE01: Skype For Business EDGE Server for remote connectivity, Hybrid and Federation purpose.
- Azure DNS Zone: A Public DNS zone which includes ADFS and Skype records. You still need to own or buy a domain, check post deployment guidelines.
This Azure template will deploy and configure automatically a complete Skype for Business 2015 setup in a minimum of #3hr30min, a kind of onprem virtual lab, mainly for training and test purpose. The Azure template will perform following tasks:
- Create infrastructure resources (Network Components, Loadbalancers, VM's)
- Perform instalation of VM extensions( DSC, script) these will include "windows feature" and software instalation.
- Configuration and user creation are performed trough VM custum script extensions.
Before starting the deployment there is some steps to follow:
- Using your Azure Tenant, Create an azure storage account (Locally redundant LRS) with a fileshare named skype where Skype for Business software will be accessible.
- Download needed software and put everything in the skype fileshare
- Depending on whether you want to implement Hybrid connectivity with Office365 it is needed to request public certificate from a public CA.(see below for guidlines)
- Then Click the "Deploy to Azure" button below. You need to be signed to your Azure tenant otherwise a signin request will be prompted.
- Fill parameters with recommended guidelines then start deployment by clicking the purshase button. (The deployment is free :) nothing to purshase except the normal VM consumption prices)

You can either deploy through the azure deploy button (which take less time) or via the azuredeploy.ps1 powershell script which requires to previously setup your machine with the right Azure modules.
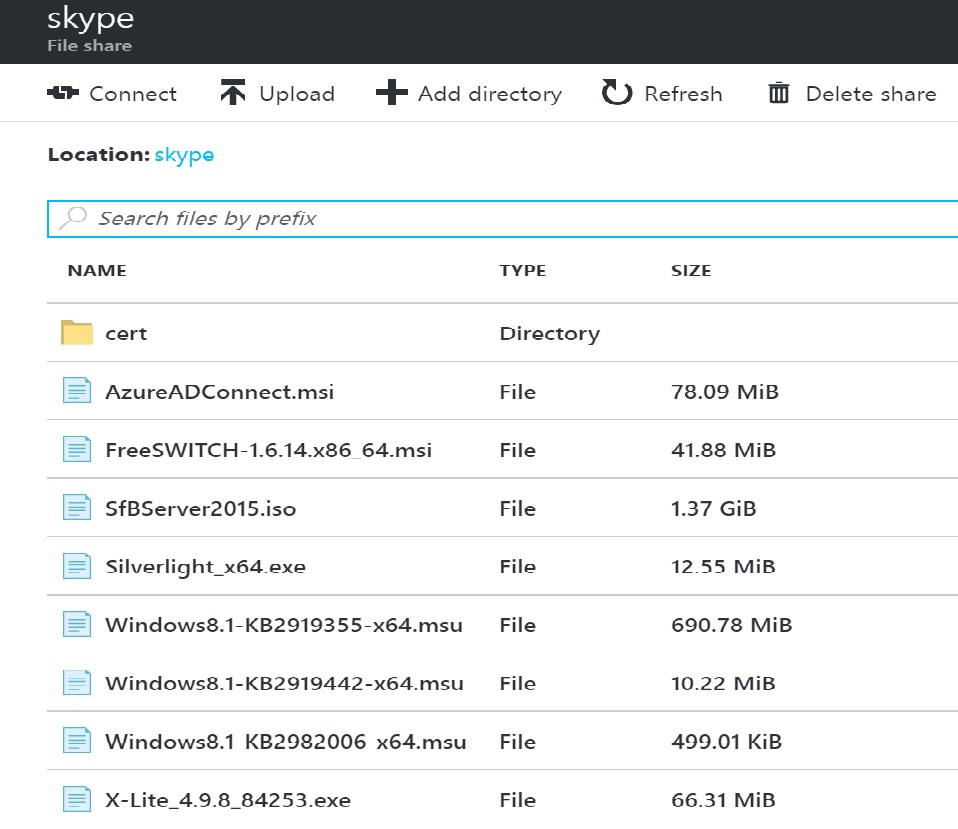
After creating a storage account name you need to create a Fileshare named skype in lowercase. The folder structure skype should look like this:
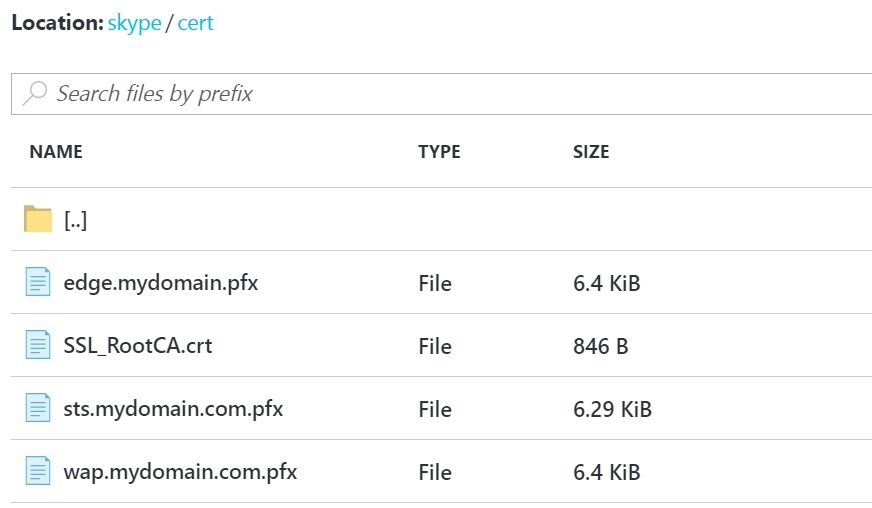
Cert folder will include your public certificates.
- Skype for business eval version (rename with SfBServer2015.iso)
- Azure AD connect : https://www.microsoft.com/en-us/download/details.aspx?id=47594
- Silverlight 64 bit : http://go.microsoft.com/fwlink/?LinkID=229321
- Freeswitch : http://files.freeswitch.org/windows_installer/installer/x64/FreeSWITCH-1.6.15-x64-Release.msi
- X-lite 64 bit : http://counterpath.s3.amazonaws.com/downloads/X-Lite_4.9.8_84253.exe
- Windows update :
The lab will need 3 certificates that will be exposed externally:
- sts.yourdomain.com.pfx (SSL for federation service url: whatever you want eg : sts.yourdomain.com)
- wap.yourdomain.com.pfx (SAN for Skype urls:SN:webext.yourdomain.com CN:webext.yourdomain.com,dialin.yourdomain.com,meet.yourdomain.com,lyncdiscover.yourdomain.com)
- edge.yourdomain.com.pfx (SSL for Access edge : sip.yourdomain.com)
It is possible to order one certificate with SN=sip.yourdomain.com and include all the needed SAN's in the Common Name. In this case you should make 3 copie of this one and rename them into above names.
For each of theses certificates the template gives you the option whether public or private. If Public is set to "false" the template will request a private CA from the domain controler. If public is set to "true" the template will expect that a public certificates is available and will try to download it from your storage account using the path "skype\cert" One could be set to public and others to private for example if you are not able to buy a SAN certificate for WAP you could get a free Public SSL for the federation service this will enable hybrid and ADFS SSO testing but not Shared sip configuration.
It is possible to get free SSL through the Let's encrypt project : https://www.sslforfree.com/ Not all public CA's are deployed into the root certificate store of servers but mainly deployed to client devices. If it is the case for your public Root CA you could add it into the folder "Skype\cert" with the name "SSL_RootCA.crt"
Certificate names: please respect carefully the certificate names above and give care to the case otherwise your 3 houres deployment will be unsucessful. Thoses certificates should be in pfx format (except SSL_RootCA.crt) and they MUST use the same password. There is many ways to convert other certificates format to pfx just ask Cortana.
You will have to fill some parameters like your storage account name and the ShareAccessKey as well as some other mandatory parameters below. - Please remember to use only numbers plus lower case letters for your resource group name because it is concatenated to create a storage account name which support only lower case. - Use the right region like Western Europe instead of Uk south as some regions doesn't support yet the types of VM's used. Otherwise your deployment will pop up some errors before starting deployment.
- domainName: The FQDN of the AD Domain eg: contoso.com or adatum.local
- adminUsername: The name of the Administrator of all your VM's and Domain Admin
- adminPassword: The password for the Administrator account: must be at least 12 caracters
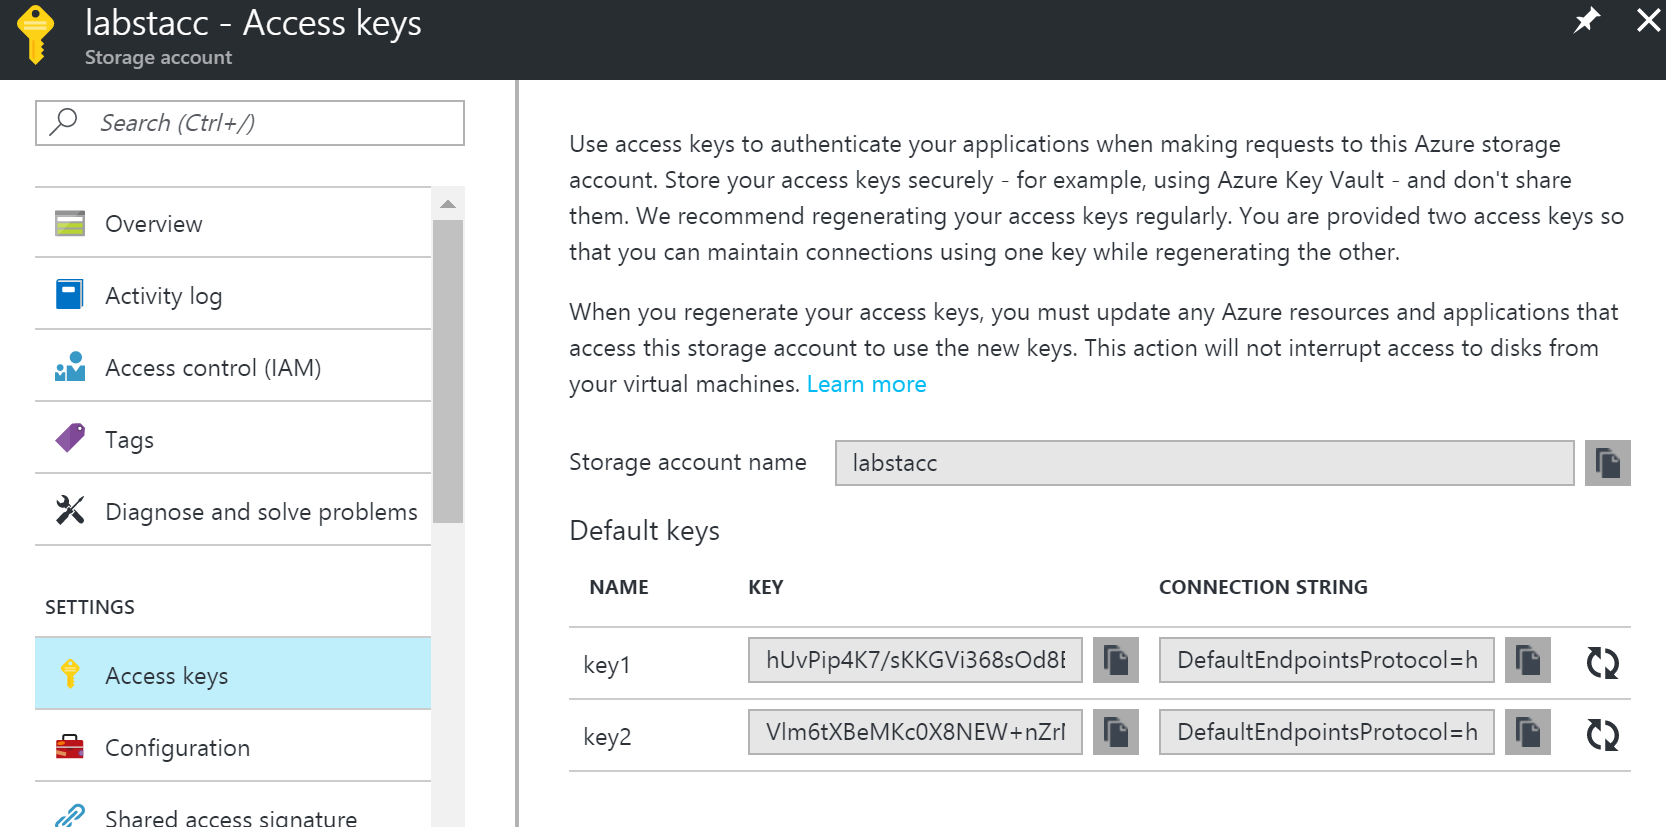
- ShareLocation: the name of your azure storage account - not the url - eg mystorage where you created your skype folder with all the source files
- ShareAccessKey: The token to used to access your storage account. You can find it on your storage account settings.
- StsServiceName: The name of your ADFS service eg sts.contoso.com that is present in the SSL certificate
- STSPublicCertificate: True if using public certificate for Federation Service
- WAPPublicCertificate: True if using public certificate for Skype URL's
- EdgePublicCertificate: True if using public certificate for Edge Server
- CertificatePassword : Only needed if at least one public certificate, should be the same password for all public certificate
How to get the Storage Access Key:
- Connect to VM-SFB-AD01 verify the DNS entries are correct and users are created under sfbusers OU
- Connect to VM-SFB-FE01 open Skype control pannel and verify that users are enabled for skype, verify that all skype services are started.
- Connect to VM-SFB-EDGE01 verify that all skype services are running
- Connect to VM-SFB-RP01 open Remote Access Management console and verify that skype url's are published
- Open your Azure DNS zone that have been created verify all records are present and copy the FQDN of your name servers
- Go to your Domain registrar and redirect your zone to Azure DNS using the Azure Name Servers. Check here for more details : https://docs.microsoft.com/en-us/azure/dns/dns-domain-delegation
- Try to ping your skype url's and verify that it resovle your DMZ load balencer public IP.
- Open your skype for business client and try to login with alias : [email protected] with the password you created in the parameters
- If the connection is sucessful try the same with your mobile
- Connect to VM-SFB-RP01 Install X-lite with the installer on the descktop and connect to SIPURI: 2000, password: 2000, Domain:10.0.0.7
- Try to call extension 1001 and verify that [email protected] skype clients ring.
- If all thoses steps are successful connect to VM-SFB-AD01 install AzureADconnect with the msi on the desktop and start configuring your Hybrid environement.
You could leverage Offices 365 scripts for configuring your Custom domain. It is possible to connect Freeswitch with external PSTN Providers post installation. In order to do that you have to modify freeswitch.xml file in the Reverse proxy located in ProgramFiles/Freeswitch/conf/freeswithc.xml. Then restart Freeswitch service. An example of PSTN poviders configuration is already there you just have to modify SIP domain parameters and credentials. For help check examples here
- Microphone not working via RDP for the windows 2016 reverse proxy
- When the microphone is not enabled X-lite don't send DTMF. In order to remediate this issue configure X-lite to use Sip Info method instead of RF2833