Build your own custom page layouts that allow you to showcase your content in your way.
Have you ever wanted to be able to choose what content shows up on a particular page, like your home page for instance? Or be able to build out a custom page layout, without having to create yet another page template?
If so, Curatable Content Blocks is the plugin for you. It allows you to easily mark a page (or another content type) as being a curated page. You then have the ability to build out a custom page layout, choosing from multiple row options. Then within each row, you have the ability to choose what blocks you want to use, again choosing from multiple options.
- First, download a zip via Github and upload it using the WP plugin uploader.
- Upload the entire
/curatable-content-blocksdirectory to the/wp-content/plugins/directory. - Activate Curatable Content Blocks through the 'Plugins' menu in WordPress.
There isn't any admin configuration currently needed. All configuration desired will be done through hooks and functions.
By default, the plugin adds the curation ability to normal pages. If that isn't desired, you can remove that support like this, in your own theme or plugin:
function prefix_remove_content_blocks_support() {
	remove_post_type_support( 'page', 'ccb-content-blocks' );
}
add_action( 'init', 'prefix_remove_content_blocks_support' );
To then add the curation ability to the content type(s) you want, do this:
function prefix_add_content_blocks_support() {
	add_post_type_support( 'post', 'ccb-content-blocks' );
}
add_action( 'init', 'prefix_add_content_blocks_support' );Once you have the curation ability on the post type(s) that you want, actually building out the layout is fairly easy. Go to the post type that you want to use and either create a new item or select one that already exists.
In the publish meta box (typically the first box in the right sidebar), you should see an option to mark this item as Curated Page.
![Curated Page checkbox] (https://cldup.com/UyzeXfycXS.png)
Once that checkbox is checked, the normal post editor should disappear, and you should then see the row adder.
![Row adder] (https://cldup.com/23Rx1aRNjv.png)
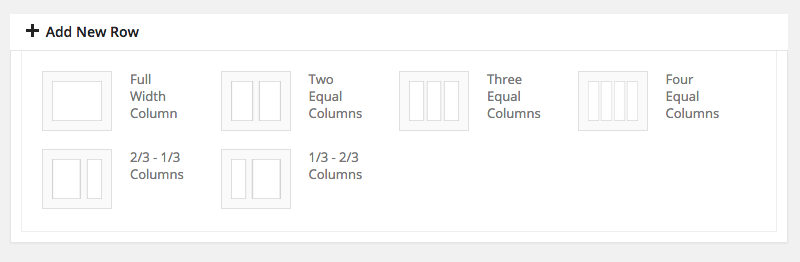
At this point, you can build out the layout you want, by adding various rows. Once you have at least one row added, you can then start adding blocks into each row.
![Add blocks to a row] (https://cldup.com/t5LWz9hMio.png)
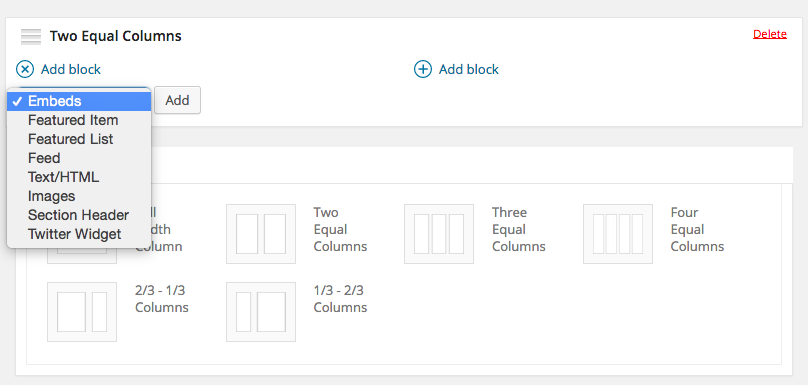
At any point, you can preview the item, to see how things will look, or save it.
If you want to add in additional row options, beyond what's already included, you can do that utilizing a helper function the plugin has. Note that you'll need to add your own admin and front end styling for any additional rows added.
function prefix_add_new_row_option() {
	// Options here are unique row ID, row name, row class and the number of columns row has.
	// ccb_register_row( $ID, $name, $class, array( 'columns' => $cols ) );
	if ( function_exists( 'ccb_register_row' ) {
		ccb_register_row( '1434-col', '1/4 - 3/4 Columns', 'col-1-4-3-4', array( 'columns' => 2 ) );
	}
}
add_action( 'after_setup_theme', 'prefix_add_new_row_option' );You can also fairly easily add in your own custom blocks. Note that in addition to the code snippet below, you'll need to include the class that contains all the code the block uses. Can see what code is needed by looking in the plugin folder at /includes/blocks/sample.php.
function prefix_add_new_block() {
	// Options here are unique block ID, block name, name of the PHP class block uses and optionally if you want to create a widget out of this block.
	// ccb_register_content_block( $ID, $name, $class_name, array( 'widget' => true ) );
	if ( function_exists( 'ccb_register_content_block' ) {
		ccb_register_content_block( 'featured-grid', 'Featured Grid', 'Prefix_Featured_Grid_Content_Block', array( 'widget' => true ) );
	}
}
add_action( 'after_setup_theme', 'prefix_add_new_block' );
You can also easily extend a block that already exists. For instance, if you want to change the output of the Featured Item block, you can create a new class within your theme/plugin that extends the CCB_Featured_Item_Content_Block class. Then within that new class, override the display method. Then include this new class within your theme/plugin and register it as above, making sure the at least the ID portion is the same as the block you want to override.
When you view, on the front end, a piece of content that's been marked as a curated page, the plugin loads a special curated page template. This template has quite a few hooks that you can use to add custom functionality, but if you want to override this template completely, just need to include a file called curated-page.php in the root of either your (parent) theme or child theme.
There are also plenty of hooks littered throughout this plugin, that allow you to modify and change behavior at various points. So be sure to look through the various files and see if there's a hook you can use, if you ever need to change/add any functionality.
If you identify any errors or have an idea for improving the plugin, please open an issue. We would love your input!