Home
This Wiki page collects information on how to get started using the micro:bit, particularly in an Engineering context. Anyone is welcome to make edits to the pages to update the information and add useful info. You can get some tips on how to contribute to the Wiki here.
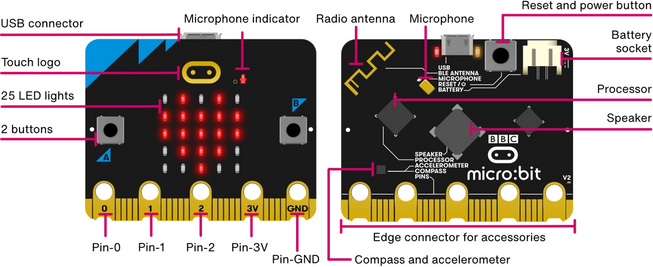
It's a mini 'computer' on a single small circuit board, which is cheap (~£15 each) that was developed to help children learn basic coding in school, and they are already in schools across the UK (and worldwide!). There are two main versions of the micro:bit - v1 (2016) and v2 (Oct 2020). The v2 is backwards compatible, but also adds a speaker, a microphone and significantly more on-board memory. This is an overview of the main features:
You can find a more comprehensive list of features here: https://microbit.org/get-started/user-guide/overview/
You can also find the more technical description and specifications here: https://tech.microbit.org/hardware/
Well, it's obviously a cliché, but the possibilities really are endless - it's a little computer that you can easily program to do pretty much anything that you want (within reason!). The basic projects suggested on the official site include things like using the micro:bit as a remote control for a robot using its onboard radio, using the accelerometer as a step-counter or using the magnetic-field sensor to create a simple burglar alarm. Because the micro:bit can be easily interfaced with other sensors and electronics (including servos and motors!) it can be used as the controller in a wide range of potential electronics projects - and the fact that it can be programmed very easily means that it should be easy to get started on a project, even if you are knew to coding. The aim for this Bitbucket repository is to bring together information and examples that allow undergraduate-level projects to get going more easily - and hopefully we can also use some of these projects as showcases in local schools to help demonstrate how powerful a micro:bit can be, which the pupils themselves probably already have some idea of how to program themselves!
There are lots of different ways that you can put your custom code onto the micro:bit, meaning it is incredibly flexible, and you can choose the way that is easiest for you to achieve what you are looking for in a particular application. The basic concept for programming it is that you use your favourite coding language (from the compatible ones!) to create your code, then compile it to create a .hex file, which can be drag-and-dropped onto the micro:bit, which appears as a USB-drive when plugged into your computer (this process is known as flashing the micro:bit hardware with your custom software).
This is made even simpler when using the Microsoft 'MakeCode' editor (provided you are using a recent version of Chrome or Edge as your browser - see here for more details), which allows you to connect directly to the micro:bit from the browser, updating the code with a single mouse-click.
This is drag-and-drop block-based coding, where it's really easy to see what a basic program is supposed to do - and is probably the easiest way to start to experiment with the capabilities of the micro:bit. Here's an example of a simple program:

Try it for yourself at https://makecode.microbit.org/.
You can also do Python programming for the micro:bit directly in your browser - more info available here.
Matlab can be a really useful tool for working with data from the micro:bit (although you can't use Matlab itself to create code that runs on the micro:bit, you would need to use Simulink for that). There is a separate page here for more info on how to work with Matlab.
There is a Support Package from Mathworks to allow interfacing directly with the micro:bit hardware, which you can either use to program the code which runs on the micro:bit itself, or you can run in 'external' mode where the data from the sensors feeds in real-time back to the code running on your computer. Again, more info available on this separate page.
There are plenty of other options too if you want to explore them, but hopefully the main ones of interest from an Engineering perspective will be covered on this Wiki (please update the page if you find something else that is of interest!).
If you're not already familiar with Scratch, it's definitely worth checking out to see what it is and what it can do, but my impression is that (at the moment) it is difficult to incorporate Scratch in an 'Engineering' context - as the micro:bit interface only allows limited functions, mainly designed to allow control of a 'game' running on the computer with the micro:bit.
This is one of the examples from the Scratch micro:bit page, which lets you control the saxophone angle (and musical pitch!) by tilting the micro:bit back and forth:

Besides being quite cool, Scratch deserves it's honourable mention because it also allows something pretty special - you can connect from your browser directly to the micro:bit via Bluetooth, meaning you can program it without even needing to plug it in to the computer. This is quite special, and hopefully Microsoft's MakeCode will be able to do this as well soon.
If you want to view the microbit sensor data live on a connected PC, it can be as simple as making a little MakeCode project like this one:

Once you have flashed your microbit with this directly from the browser (you need to be using Chrome or Edge as your browser for this to work), you should then see a button on the left 'Show Console - Device'. Click that and you can watch the live feed of the sensor data!
A simple extension of this is to have one microbit (remote) send its sensor data over the 'microbit radio' to another (connected to PC). I have created a pair of MakeCode projects to achieve this:
- micro:bit radioSender https://github.com/dgallichan/radioSender Needs to be on the 'remote' micro:bit
- micro:bit radioListener https://github.com/dgallichan/microbitRadiolistener Needs to be on the micro:bit connected to your PC