developer qt_ide
Content:
- Qt Creator Setup Guide
The development of the YIO Remote software doesn't require a physical YIO Remote or a Raspberry Pi! The software also runs on Linux, macOS and Windows desktops :-) Of course certain low-level functionality won't work, but otherwise it's fully functional including integrations. It's an easy and fast way to try out the software and developing new features without the cross compile and device deployment round trip overhead.
The software of the remote is written in Qt C++ and the user interface in QML with Qt Creator.
The build environment consists of the following parts:
- Qt Open Source Edition: runtime and developer tools.
- Buildroot for creating the Raspberry Pi SD card image. See Buildroot Setup.
For desktop development only (without cross compilation):
- Supported Linux, macOS or Windows PC with admin / root privileges.
- See supported platforms.
- At the moment the YIO remote software is actively developed on Linux, macOS and Windows.
Other platforms are neither tested nor currently supported in the qmake configuration. Please feel free to add other platforms!
- Internet connection for the Qt installer and to download the YIO projects.
- Recommended: Git client
For Buildroot cross compilation:
- A Linux box or VM, otherwise Docker Desktop.
- At least 20 GB of free space. A SSD is highly recommended.
- At least 4 GB RAM. More RAM = better file system caching.
- Fast CPU. More cores = quicker build times.
- Internet connection: packages will be downloaded during the build.
See Developer VM Setup on how to setup an Ubuntu Linux VM for development.
In order to get the code running on your machine you need to download and install the Qt open source license edition for Windows, Mac or Linux. The YIO Remote software is written for Qt 5.12 which is the runtime on the RPi Zero. Therefore, it's recommended to use the current 5.12.x release for development. Newer releases should work as long as no new features are being used.
The required Qt components and other OS specific pre-requisits are listed below. The Developer and Designer Tools are preselected and are required if you want the Qt Creator IDE.
In case you need to add, remove or change components post-install, start the MaintenanceTool application in the root of the Install directory (C:\Qt or ~/Qt by default).
Please use the downloaded Qt installer and not an available version from your Linux distribution. This avoids confusion caused by different Qt versions and developer tools. Each version of a Linux distribution usually comes with a different Qt version. If you download and install Qt for yourself, you can independently update the OS and the Qt environment.
The core developers are using Ubuntu desktop x64 (18.04 and 19.10). Other distros should work as well as long as they are supported.
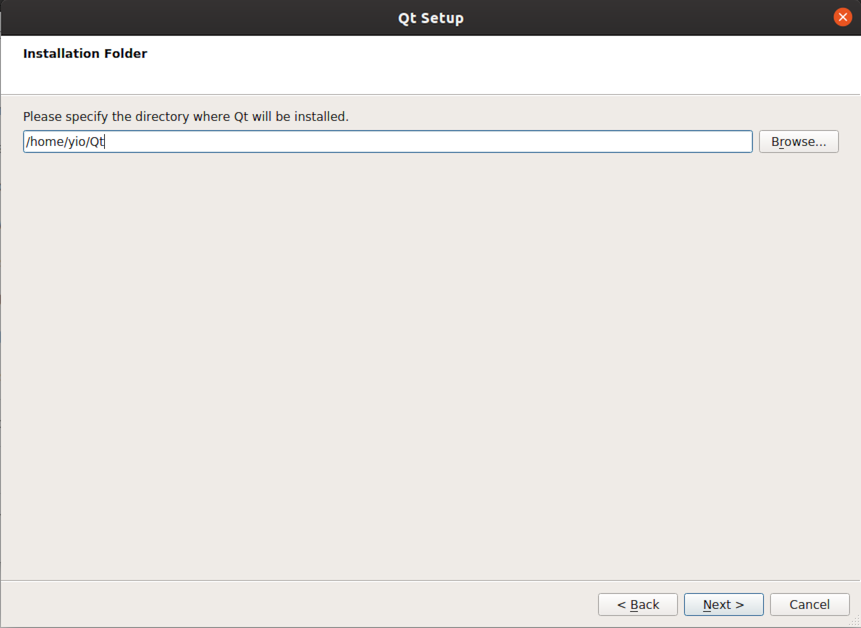
The downloaded Qt online installer might not have the file execute flags set. Open a terminal and execute:
chmod +x qt-unified-linux-*.run
Start the Qt online installer and select where to install it:
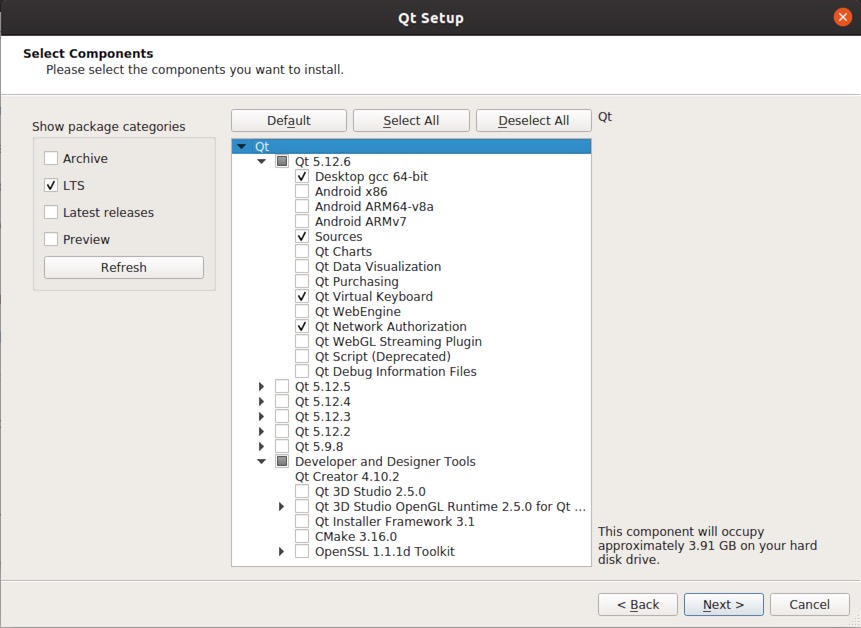
Selec the following Qt components from the latest 5.12.x LTS release:
- Desktop gcc 64-bit
- Sources
- Qt Virtual Keyboard
- Qt Network Authorization
XCode is required and must be installed to use Qt Creator on macOS. It should be launched at least once to complete initialization and to install the command line developer tools.
Required Qt components:
- macOS
- Sources
- Qt Virtual Keyboard
- Optional: iOS if you wish to run it on your Apple mobile device too (experimental & no priority at the moment)
The configuration of a Raspberry Pi cross compilation toolchain with Buildroot has been abandoned. It seems possible but very complicated. Please contact us if you have a working solution!
Use the Docker image for cross compilation and image creation. See Setup Buildroot.
Required Qt components:
- All MSVC entries
- MinGW 7.3.0 64-bit
- Sources
- Qt Virtual Keyboard
- Qt Debug Information Files
The configuration of a Raspberry Pi cross compilation toolchain with Buildroot has not been looked at. Please contact us if you have a working solution!
Use the Docker image for cross compilation and image creation. See Setup Buildroot.
The YIO software is divided into multiple modules. Each module has its own Git repository:
- remote-os contains the custom Linux build for Raspberry Pi Zero.
- remote-software contains the main remote application software.
- integrations.library contains all required header files and helper classes for integration plugins.
- Each integration is in its own integration.xy repository.
To build the YIO Remote software the modules must be checked out in the same root folder. The root folder is from now on referred to as $YIO_SRC. See section qmake Environment Variables for further information.
Attention: the integrations.library module MUST be checked out for remote-software and all integration plugins! It is a mandatory source dependency.
Checkout projects:
# define root directory for project checkout
YIO_SRC=~/projects/yio

mkdir -p $YIO_SRC
cd $YIO_SRC
git clone https://github.com/YIO-Remote/remote-os.git
git clone https://github.com/YIO-Remote/remote-software.git
git clone https://github.com/YIO-Remote/integrations.library.git
git clone https://github.com/YIO-Remote/integration.dock.git
# checkout optional integration plugins
git clone https://github.com/YIO-Remote/integration.home-assistant.git
git clone https://github.com/YIO-Remote/integration.homey.git
git clone https://github.com/YIO-Remote/integration.openhab.git
git clone https://github.com/YIO-Remote/integration.openweather.git
git clone https://github.com/YIO-Remote/integration.roon.git
git clone https://github.com/YIO-Remote/integration.spotify.git

# optional: switch to feature branch
# cd $YIO_SRC/remote-software
# git checkout feature/foobar
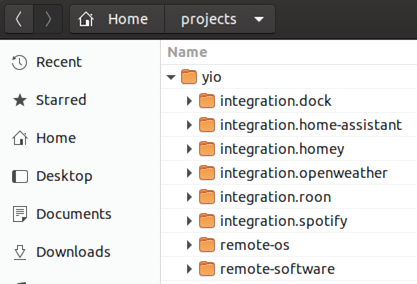
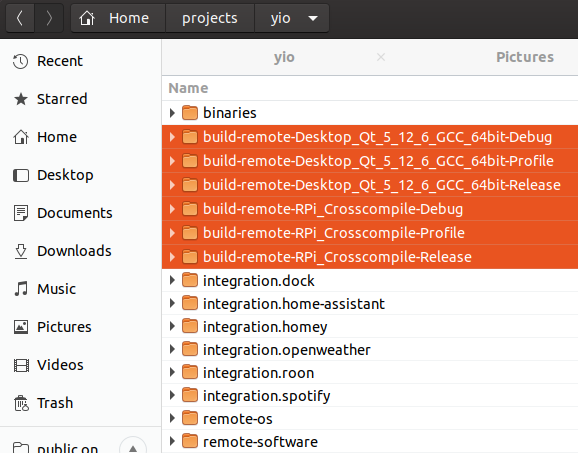
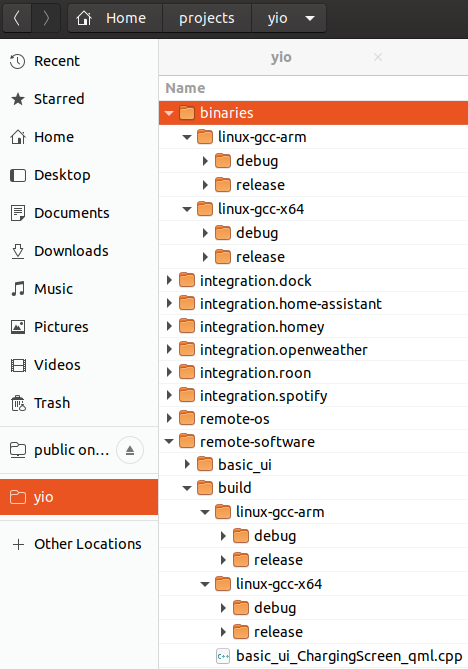
The folder structure should look like this now:
The following environment variables are optional but highly recommended to define in your user account:
| Variable | Description |
|---|---|
YIO_SRC |
Defines the root directory of the YIO projects. |
YIO_BIN |
Defines the output directory of the binary builds. |
QT_LINGUIST_DIR |
Optional: defines the directory where the lupdate and lrelease Qt Linguist tools are located. Required if auto-detection fails in qmake. |
If the YIO_### variables are not defined qmake will issue warnings, that the default location will be used:

QT_LINGUIST_DIR variable is required to set if the build issues following warning:
Project WARNING: Qt linguist cmd line tools lupdate / lrelease not found: translations will NOT be compiled and build will most likely fail due to missing .qm files!
The cross-compilation setup on Linux is documented in the Developer VM Setup topic.
-
Select Welcome, Projects and click Open Project.
Or through the main menu: File, Open File or Project...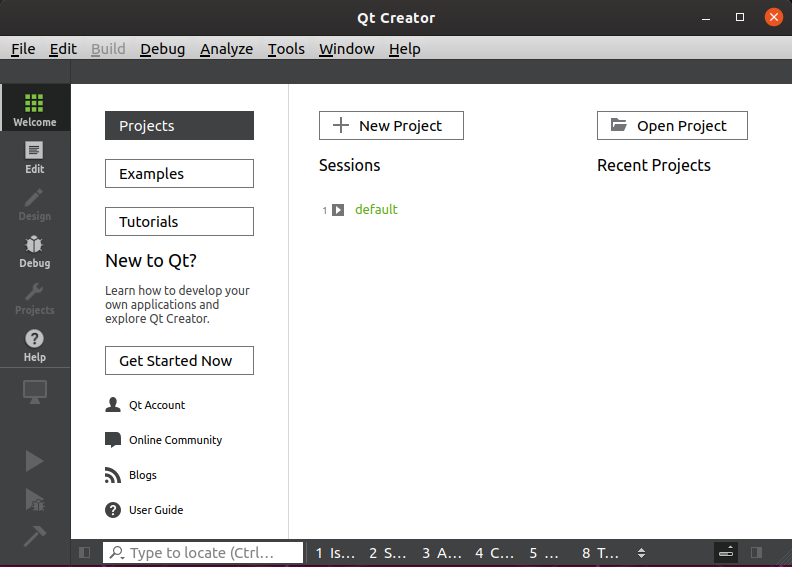
-
In the file dialog open the Qt project file from the remote-software project:
$YIO_SRC/remote-software/remote.pro -
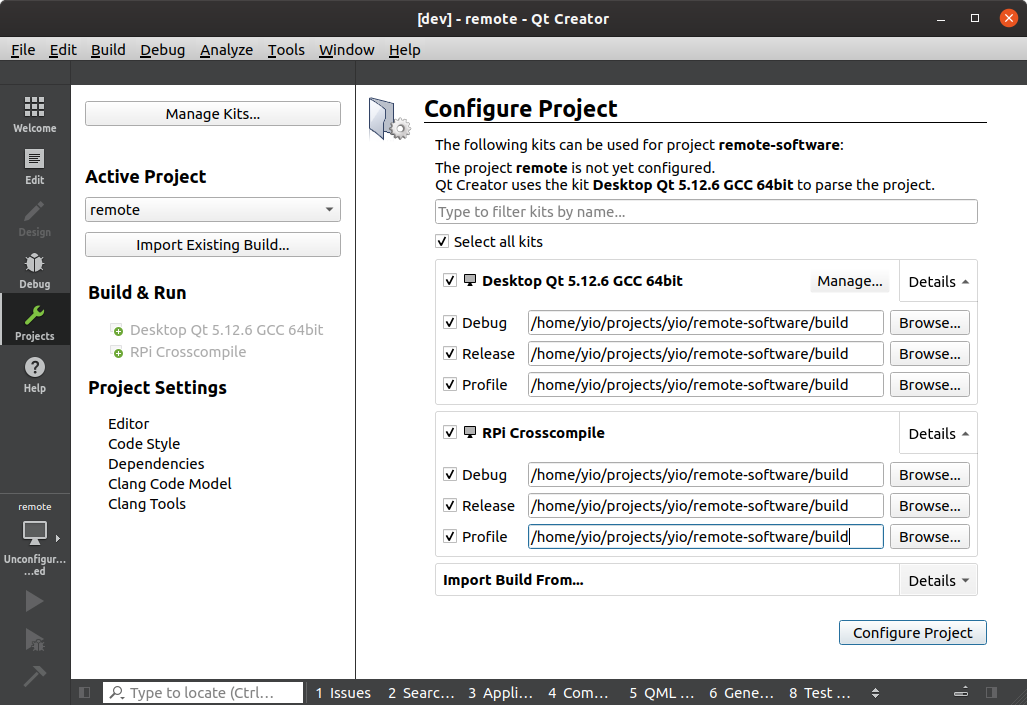
Check the Desktop Qt Kit in the right-hand panel to associate the project with a particular kit.
If you have defined a cross compilation kit you can select both to easily switch between local desktop development and Raspberry Pi cross compilation & remote deployment and execution. See Developer VM Setup about how to configure cross compilation on Linux.
-
Optional: Now would be a good time to change the shadow build output directories.
See next section for details.- Select the kit(s) in the right-hand panel underneath 'Configure Project'.
Do not select a kit in the left-hand list underneath 'Build & Run'! Otherwise you won't be able to easily set all directories at once. - Set the directories to the project's subdirectory ./build
- Select the kit(s) in the right-hand panel underneath 'Configure Project'.
-
Important: Click 'Configure Project' otherwise the changes are not saved.
-
-
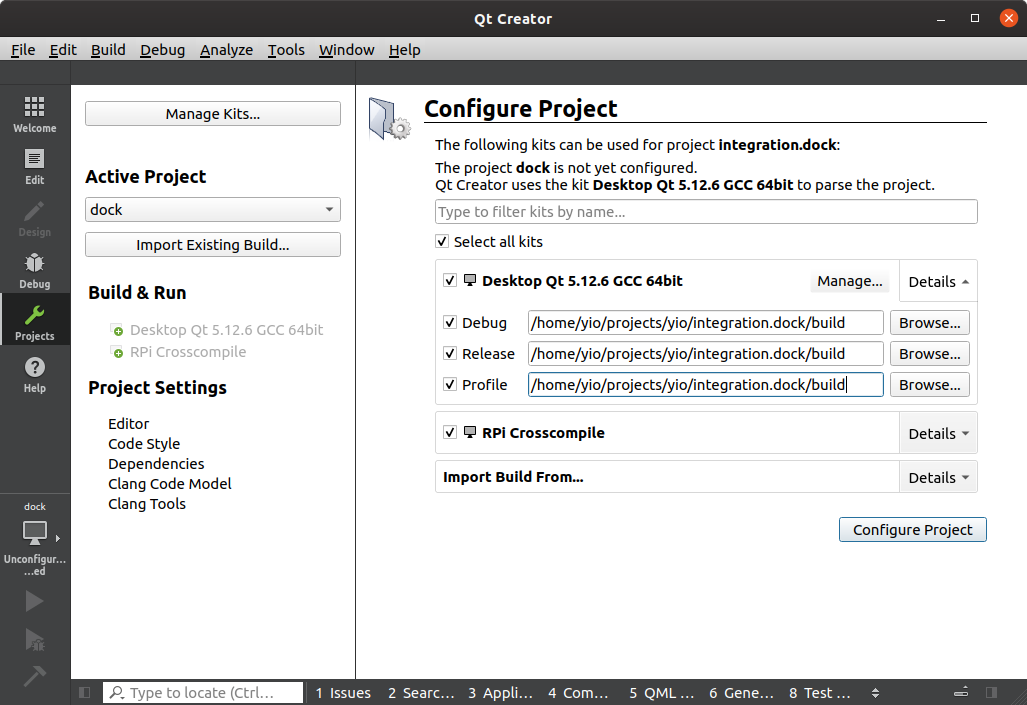
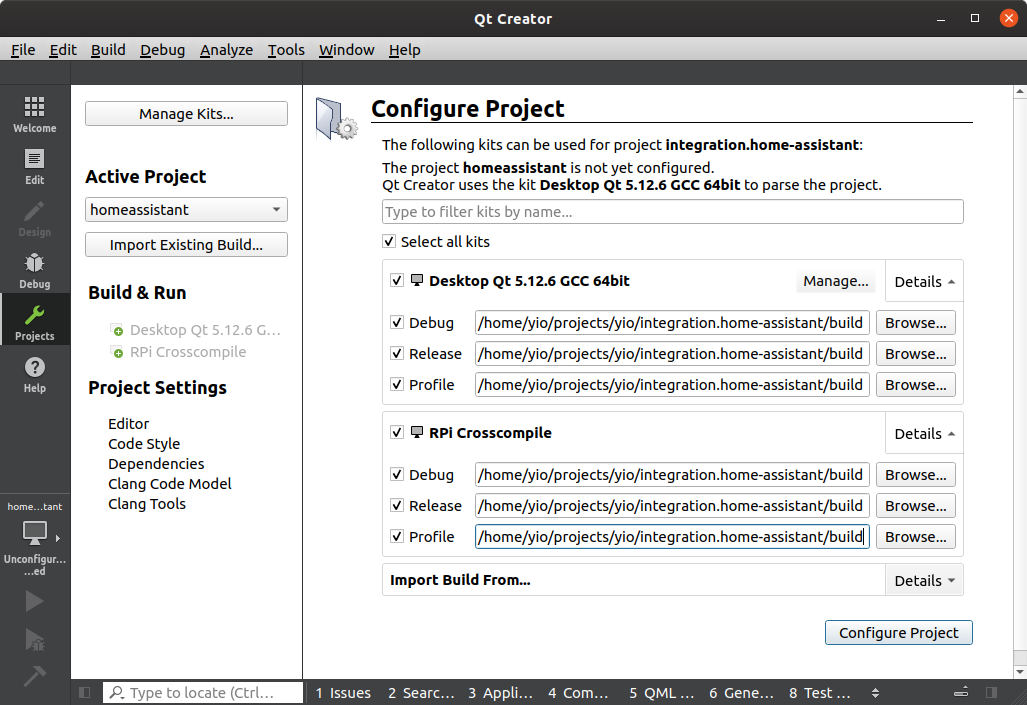
Repeat for integration.dock (required) and all optional integration plugin projects.
To keep the project structure clean it's recommended to change the default shadow build directory for all build configurations (build, profile, release) in all projects.
- By default, Qt Creator creates a separate build directory for each build configuration at the same level as the project directory. I.e. in $YIO_SRC.
- This will create 3 additional output directories in $YIO_SRC per project!
- Or even up to 6 additional directories if cross compilation is used.
- With a few integration projectes this suddenly leads to over 20 directories.
- Quite messy, isn't it?
Set the shadow build directory for all build configurations (build, profile, release) in all projects to:
$PROJECT_DIR/build
$PROJECT_DIR is the main directory of the Qt project (remote-software, integration.dock, etc).
- The YIO projects are setup to output intermediate build artefacts (object files, generated moc and qrc files) in a subdirectory of the project called
./buildand the final binaries in$YIO_BIN.
Different Qt kits and build types are still separated in subdirectories. - Example for the remote-software project:
For debug, profile and release set build directory to:/home/yio/projects/yio/remote-software/build
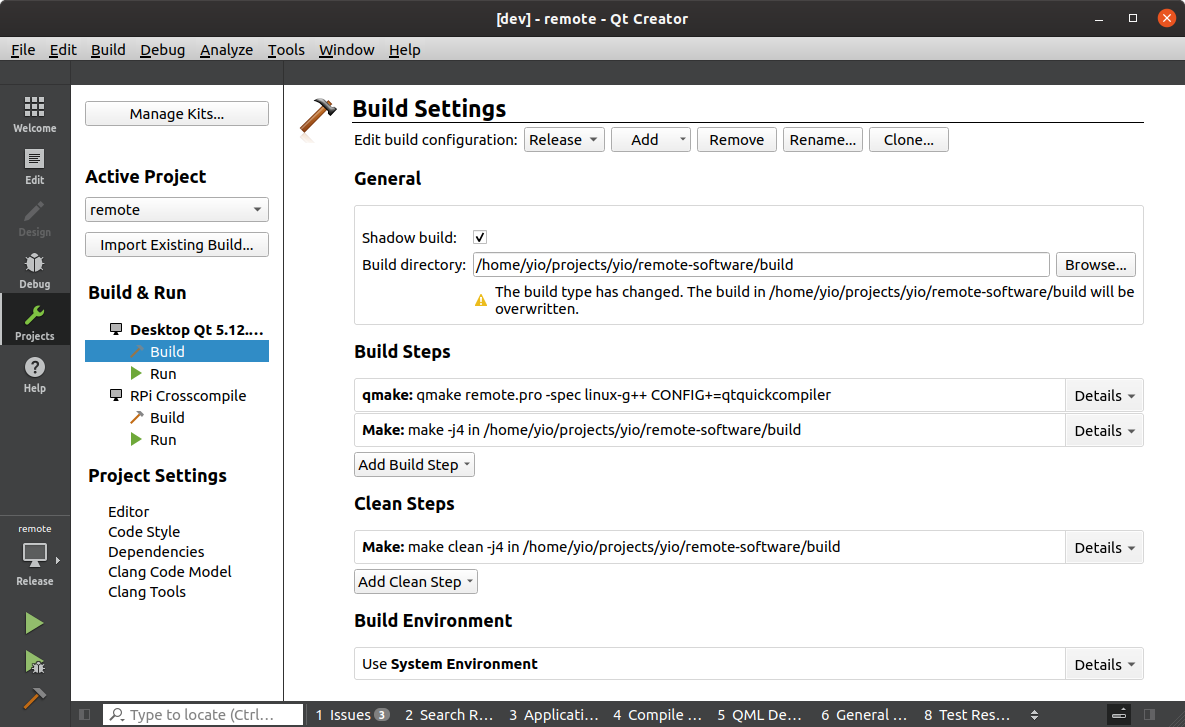
Yes, that's correct: the same directory for debug, profile and release builds per project.
Reason: The Qt shadow build directory is only being used for the generated qml source code. The compiled debug or release artefacts are stored in a different directory, set by qmake. (See remote-software/qmake-destination-path.pri and remote-software/qmake-target-platform.pri which are included in all Qt .pro project files).
The result is a clean project structure:
- Integration plugins must be built individually and are not automatically being built with the remote-software.
- Make sure you select the same build type - debug or release - for all projects.
Building the integration plugins and the remote-software project:
-
Select the build target in the left panel:
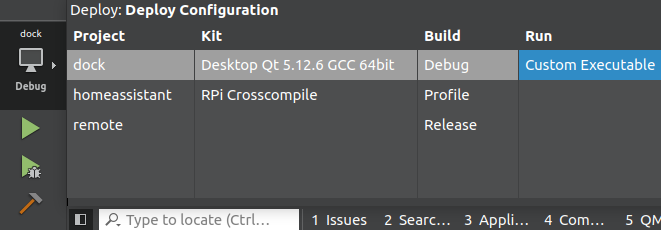
-
Click the hammer icon at the bottom left.
-
Check the issues panel for build errors and warnings (Alt+1).
-
Repeat for all projects.
-
Make sure integration.dock and and any optional integration plugins are built without errors.
-
Configure
remote-software/config.jsonfor your integration plugins. -
Make the remote project the default project.
Right click on the remote project in the projects tree view. -
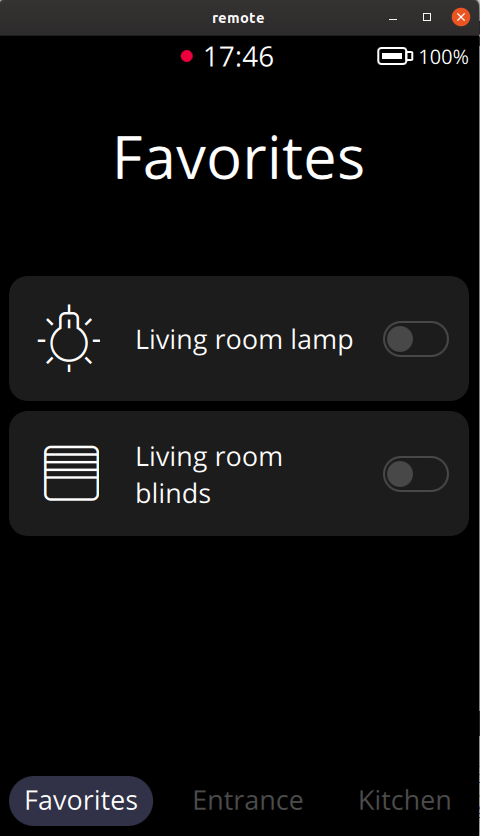
Click the green play button, or right click on the remote project and select Run.
-
The application starts and can be controlled with the mouse:
Home
YIO Remote API
Dock
FAQ
Supporters
Remote Firmware
Dock Firmware
YIO Homepage
YIO Community
YIO Github
YIO Discord Channel
YIO Facebook
YIO Instagram
YIO Twitter
YIO YouTube
YIO Translation

Dock
Remote
Supported IR Extenders
Home Assistant
Homey
openHAB
Roon
Spotify
YIO Dock
Build Environment
Setup Qt IDE
Setup PlatformIO IDE
Developer VM
Setup Buildroot
API
API
WebSocket API
Generic
SSH/SCP
Architecture
Coding Guidelines
Configuration File
Developing Integrations
Entity Types
Logging
Workflow
Git Workflow
Pull Requests
Continuous Integration