-
-
Notifications
You must be signed in to change notification settings - Fork 354
How to Maintain a RockWeb Environment for your Custom Rock Library Plugin Project(s)
If you are Plugin Developer and often update to a newer version of the Rock Core, this doc is for you!
The main topics in this doc are
- Organizing your GitHub repo for the solution
- Organizing your project's Visual Studio solution (*.sln)
- How to refresh your RockWeb installation/environment from updated builds of the Rock Core.
First, you should really have a GitHub account for your Plugin Project(s). Typically, this would be a account specifically for the Church that you are working for. So, let's say your church is called Some Awesome Church. So, you would probably have an Account called github.com/SomeAwesomeChurch.
Now, have a GitHub Repo for the Rock Plugin Project(s). Let's just call it Rock. So, the full repo name would be github.com/SomeAwesomeChurch/Rock.
Now, after pulling your Repo, etc., to your local machine, let's say you put it at c:\Projects\SomeAwesomeChurch-Rock\ This is where we are going to create the Visual Studio solution for all the plugin projects. So, whether you are going to just have one Plugin project for this church or dozens, let's just keep them all in one master solution.
In your c:\Projects\SomeAwesomeChurch-Rock\ folder, we'll want
- the RockWeb folder from a RockCore build
- a folder for each specific plugin
- the main solution file
So, let's say you just have one plugin so far. Here what the contents of your c:\Projects\SomeAwesomeChurch-Rock\ should look like
PotluckDinner\
RockWeb\
SomeAwesomeChurch-Rock.sln
and as you add additional plugins, you'll have a folder for each and add those projects to your main solution
NewPastorTraining\
PotluckDinner\
StaffVacationPlanner\
SummerCampSignup\
RockWeb\
SomeAwesomeChurch-Rock.sln
So, now that we have our folder and solution organized, we need to figure out how to keep RockWeb updated as newer versions of the Rock Core are released
Step 1 - Get the most recent version RockWeb from a RockCore build/install, but don't paste it into your solution folder just yet. Let's say this is on your hard drive as C:\Projects\RockCore\RockWeb
Step 2 - Clean up your \SomeAwesomeChurch\RockWeb folder
- Keep these
- Plugins (folder)
- web.config
- web.ConnectionStrings.config
- any other customizations you might have, for example:
- Assets\SomeAwesomeChurch\
- Css\SomeAwesomeChurch\
- Themes\SomeAwesomeChurch\
- Rename this
- web.config to web.SomeAwesomeChurch.config
- Delete everything else
Step 3 - Copy and Paste C:\Projects\RockCore\RockWeb into C:\Projects\SomeAwesomeChurch\
Step 4 - After copying, clean up some of the files that came from RockCore/RockWeb
- Delete from C:\Projects\SomeAwesomeChurch\RockWeb...
- contents of RockWeb\Cache
- contents of RockWeb\Logs
- all of the *.refresh files in RockWeb\Bin
- all of the *.pdb files in RockWeb\Bin
- Keep the *.xml files (and store them in your git repo). They are handy for showing inline documentation on stuff.
- If RockWeb\bin\.gitignore got overwritten with a copy from RockCore/RockWeb, revert it (we'll make a custom one in a later step)
Step 5 - Edit web.config
- manually copy the values for the following appSettings keys from web.SomeAwesomeChurch.config into web.config
<appSettings>
    <add key="RunJobsInIISContext" value="..." />
    <add key="EnablePageViewTracking" value="..." />
    <add key="AutoMigrateDatabase" value="..." />
    <add key="PasswordKey" value="..." />
    <add key="DataEncryptionKey" value="..." />
</appSettings>- After confirming that your appSettings values from web.SomeAwesomeChurch.config have been successfully merged into the real web.config, you can delete web.SomeAwesomeChurch.config
You only want some of the files in RockWeb\Bin to be commited/pushed to GitHub. A good rule-of-thumb is that the RockWeb\bin github repository should only include files that don't get copied into RockWeb\Bin as a result of building your solution. For example, here is what your .gitignore in RockWeb\Bin should look like
#NOTE: RockWeb\bin repository should only include files that don't get copied into RockWeb\Bin as a result of building your plugin

# for non-core RockWeb projects, ignore your project output, for example
#  com.yourchurch.yourproject.dll
#  com.yourchurch.yourproject.pbd
com.ccvonline.potluckdinner.dll
com.ccvonline.potluckdinner.pdb

#  also ignore EntityFramework related stuff, since that comes from the nuget package in your project
/EntityFramework.dll
/EntityFramework.xml
/EntityFramework.SqlServer.dll
/EntityFramework.SqlServer.xml
Using Smartgit (or whatever git client / diffs viewer you use), verify that the changes make sense, then commit and push them.
###Running "Update-Database" and "Add-Migration" Since we have multiple dbContexts in Plugin Projects (RockContext from Rock core, and xxContext for the Plugin Project, you'll have to careful of which context you specify. There are a couple of ways to do this.
-
Set AutoMigrateDatabase=True in web.config, and just launch Rock to create and update the core Rock Tables, then just simply use Update-Database and Add-Migrate as you would normally do, but being aware that this will be for your dbContext, not Rock's RockContext.
-
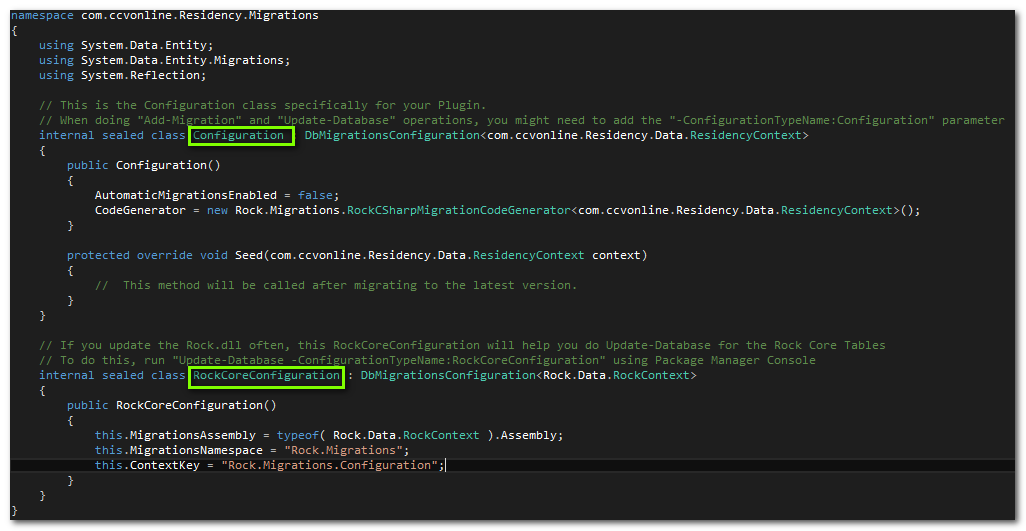
Have two configuration classes in your Configuration.cs. One for your Plugin and the other for RockCore. Then for all your Update-Database and Add-Migration operations, include a -ConfigurationTypeName: parameter. Here is what that would look like

###Special Note about Multiple Context migrations As of EntityFramework 6 Beta1 (and probably for the released version too), Add-Migration might try to include table changes from other dbContexts. The RockCSharpMigrationCodeGenerator will try to prevent this from happening, but it is something you will need to be aware of. Also, even if you use RockCSharpMigrationCodeGenerator, you will need to make an "Empty" migration for your plugin if Core tables where changed since your last Rock.dll update (you'll get an error otherwise).
###web.ConnectionStrings.config web.ConnectionStrings.config does not need to have the 'name="RockContext"' part changed, or any additional connectionString entries for your Plugin's dbContext. You might think it would, since we have multiple DbContexts, but if you followed instructions on How to make a Custom Rock Library Plugin you'll see that your context uses RockContext as the connectionstring.
That's about it!