Good day!
This repository contains the code for so-called "Project Theremin", a quick and dirty demonstration made for the student recruiment event Abipäivät held at the University of Oulu in year 2013. It consists of some code for Arduino, some code for Raspberry Pi (done in NodeJS) and some code for the browser (Chrome was used, but any browser supporting webaudio API and javascript should work). The demo was mostly done during the weekend because of tight schedule, so it has some rough corners.
Rough overview: when the components and the software are combined, it functions as a makeshift theremin, an instrument you play by waving your hands in the air. In other words, the demo uses a cheap ultrasound distance sensor and varies the frequency of a sound emitted from a software oscillator -- the closer you move your hand (or an object that the sound can bounce back from) the higher the frequency. Demo consists of ultrasound sensor, Arduino, Raspberry Pi and a computer running a browser, where the sound is generated using webaudio API.
For the Arduino code GPLv3, for the rest MIT. Check the LICENSE file.
The motivation of the project was to do something "cool" to show off to the students-to-be to attract them to the marketing stand from the flow of people. The schedule was quite tight, so there were some constraints due to this: a) the project should be something simple because of time constraints so that there could be a guarantee that something demoable is ready in due time b) there was not time to source for parts so we had to do with the components readily available. The latter part almost bit back when one of the components was fried (explained later :-), but luckily a replacement could be borrowed.
Additional requirements were that the demo should be somewhat tied to the studies at the department of information processing science and that is should have some low-level, "physical" stuff attached. Raspberry pi and embedded software were some ideas related to this.
So, with these specifications (and some brainstorming and going through boxes to find components) the pseudo-theremin seemed like a viable thing to do: the simplest form of it would be achievable in time, it would be noisy and a fun thing to play around with, it could be made more complex if time allows, there were components for it and with the concious decision to exploit web APIs it would also better match the silhouette of the department (since most of the studies are not concentrated on embedded software, but on the higher levels of the software stack) while also containing some low-level components. This meant some additional complexity (the theremin could have been created using just an Arduino or the Raspberry Pi), but such is life.
- HC-SR04 Ultrasonic sensor (or similar)
- Arduino
- Raspberry Pi running Linux
- Computer with a web browser
- Jumper wires
- Breadboard (optional, but recommended)
- USB cable to connect Arduino and RPi
- Active USB hub or external power source for Arduino (the sensor requires more oomph than the RPi USB port can offer)
- LAN cable to connect RPi and the computer
- PSU for the RPi
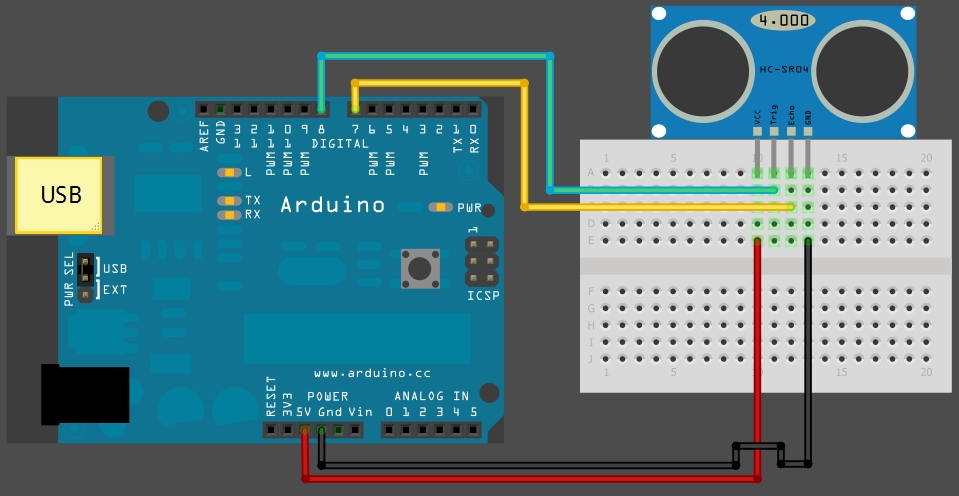
- The wiring of HC-SR04 and Arduino is quite simple, good instructions can be found here (spoiler: sensor GND to Arduino GND, sensor VCC to Arduino 5 volts, Trig to one of the digital pins or Arduino and Echo to another Arduino digital pin).
- Arduino is connected via USB to the RPi, and they communicate using serial-via-USB
- RPI and computer are connected using a LAN cable. In this case the computer was running a DHCP server, but using static IPs is also an option (and might make the life easier, since then we can avoid the reconfiguration of IP addresses from the code anytime the IP changes :-)
- Arduino and RPi need to be supplied with power
We start at the Arduino:
- The code in Arduino uses newPing library (GPLv3) to emit a short pulse to the Trig pin causes an ultrasonic ping and to listen the returning pulse from the Trig pin. The library handles the calculation which counts the distance the sound has traveled aka. the distance of an object
- This information is then written to the USB serial port, simple enough
And continue at the RPi:
- The code at the RPi is written in js using the NodeJS and does the following stuff: ..* It launches a very crude webserver in one port which always serves the index.html file to the requestee ..* It starts to listen a port for websocket connections ...* When connected, it accepts the connection and adds it to the list of open websocket connections ..* It begins to read the serial port from /dev/tty-something for the distance information ...* The distance information is parsed and then sent to each open websocket connection in JSON format
We finish with the browser code:
- The code is unsurprisingly in javascript
- On page load it adds a listener that listens for keyboard events, namely the space bar which is used to trigger the sound
- Websocket connection is opened for the distance data
- An oscillator and audiocontext is created, which create the actual sound
- The distance data is parsed when received and updated to be the frequency of the oscillator
- Result: when the space bar is pressed, a noise is emitted. The frequency of the noise depends on the value of the distance sensor

So, when the idea was decided, it was time to start to implement this stuff. In the first phase the sensor was wired to the Arduino and the data printed to the serial port, which was observed using the serial reader of the Arduino IDE. This part was working quite quickly. Next thing to tackle was the web browser code, meaning getting some sound created. This was quite easy also. The websocket did take a bit of researching, but was not too difficult in the end. The NodeJS functioned well in this project, where something was needed quickly. The callback-oriented programming (if I may call it that) made it easy to create a component that does multiple things in tandem and the global namespace of javascript made it easy to transfer data from one place to another without too much hassle. The initial version of the demo was constructed quite quickly and it seemed that there would be time to even do additional functionality, but then disaster struck. While testing on the crowded table the distance sensor and the LAN port of the RPi contacted, shorting the stuff. This resulted in a bit of smoke (proper prototyping) and malfunctioning distance sensor. Luckily the RPi and the Arduino did not seem to have taken damage. The lesson of the story: keep your table uncrowded and use the enclosures, if you have one. With bad luck the short could have killed more stuff and perhaps the whole demo, and that would have been a shame.
After this accident some time was wasted on checking that what works and what does not. Additionally this created a problem: a new sensor was needed. There could have been the possibility of creating similar demo with light sensor using mere components, but luckily a spare was found. This, however, delayed the project so that no additional stuff could be added. But this gives as another lesson: it is better to start simple, if the schedule is tight.
In the end, the demo was completed in time and was set up to the stand at the abipäivät, causing annoyance to the volunteers taking care of the stand. Sorry :-) At least I added the space bar functionality after a bit of testing it (earlier the sound was constantly on).
- Clean up the code, add tests
- Make the configuration easier, now it requires editing the source files
- Make the NodeJS web server behave properly
- Move the javascript in the index.html to a separate file
- Make the background colour of the webpage change based on the distance information, for added psychedelia ;-)
- Add option to create several oscillators and the possibility to tie them together
- Add option to "lock" oscillators to a frequency
- Add option to play chords with several oscillators
- Add option to hook up several distance sensors, for maximum cacophony!
- Etc, you can probably think more stuff yourself :-)