Welcome to the Web App DevOps Project repo! This application allows you to efficiently manage and track orders for a potential business. It provides an intuitive user interface for viewing existing orders and adding new ones.
- Features
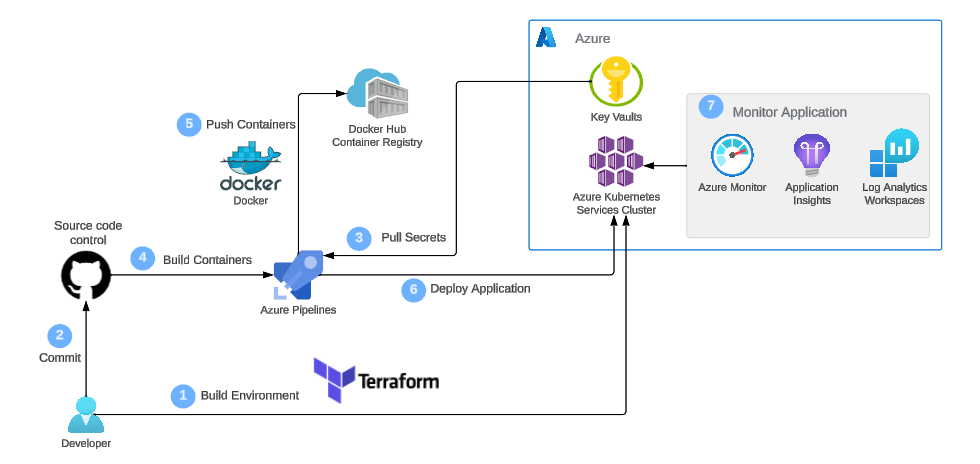
- Project Architecture
- Getting Started
- Technology Stack
- Delivery Date
- Docker
- Terraform
- Kubernetes
- Azure Devops
- Azure key Vault
- Contributors
- License
- Order List: View a comprehensive list of orders including details like date UUID, user ID, card number, store code, product code, product quantity, order date, and shipping date.

- Pagination: Easily navigate through multiple pages of orders using the built-in pagination feature.

- Add New Order: Fill out a user-friendly form to add new orders to the system with necessary information.

- Data Validation: Ensure data accuracy and completeness with required fields, date restrictions, and card number validation.
For the application to succesfully run, you need to install the following packages:
- flask (version 2.2.2)
- pyodbc (version 4.0.39)
- SQLAlchemy (version 2.0.21)
- werkzeug (version 2.2.3)
- azure-identity (version 1.15.0)
- azure-keyvault-secrets (version 4.7.0)
To run the application, you simply need to run the app.py script in this repository. Once the application starts you should be able to access it locally at http://127.0.0.1:5000. Here you will be meet with the following two pages:
-
Order List Page: Navigate to the "Order List" page to view all existing orders. Use the pagination controls to navigate between pages.
-
Add New Order Page: Click on the "Add New Order" tab to access the order form. Complete all required fields and ensure that your entries meet the specified criteria.
-
Backend: Flask is used to build the backend of the application, handling routing, data processing, and interactions with the database.
-
Frontend: The user interface is designed using HTML, CSS, and JavaScript to ensure a smooth and intuitive user experience.
-
Database: The application employs an Azure SQL Database as its database system to store order-related data.
This removed feature allowed users of the application to add a delivery date to their order. By navigating to the feature/add-delivery-date branch, this feature can be found and merged into main if needed.
Containerise the web application
- Use the
FROMinstruction and set python:3.8-slim as the base image - Set the working directory using the
WORKDIRinstruction to/app - Use the
COPYinstruction to copy the contents of your local directory into that of the/appdirectory - Ensure that the python packages listed in the
requirements.txtfile are installed. Use theRUN pip installcommand to achieve this - Specify port 5000 to be exposed using the
EXPOSEcommand - Use the
CMDinstruction to run the file to start the Flask application:["flask", "run", "--host=0.0.0.0"]
- Build docker image
- Build your docker image by running the
docker build -t <name of the image> .command
- Run docker container locally
- Run your container to ensure it works using the
docker run -p 5000:5000 <name of the image>command. - Test the app's functionality by accessing
http://127.0.0.1:5000
- Tag and push to docker hub
- Tag your docker image and specify image name, version, and Docker Hub repository
docker tag <name of the image> <docker-hub-username>/<image-name>:<tag>- Ensure you are logged into Docker hub before using the
docker pushcommand to push your image
- Verify image on docker hub
- Login to your docker hub account and verify that your image has been uploaded succesfully
- Test your image by pulling from docker hub and running it in your local environment

- Create the terraform project and its modules
- Initialise and name your project
- Create a directory for these modules:
networking-module,aks-cluster-module
variables.tf
resource_group_name- used to store the name of where the networking resources are to be deployed. This variable should be of typestringand have a defaultvaluelocation- used to store what Azure region the networking resources will be deployed to. This variable should be of typestringand have a defaultvaluevnet_address_space- used to store what address space will be used for the Virtual Network (VNet) later in this module. This variable should be of typelist(string)and have a defaultvalue.
main.tf
- Azure resource group - reference the
resource_group_name. - Virtual Network (VNet) - organises and controls communications between Azure resources
- Control Plane Subnet - hosts the control pane of the cluster and manages its components
- Worker Node Subnet - hosts the cluster's worker nodes
- Network Security Group (NSG) - a virtual firewall for controlling network traffic to and from azure resources. Ensure to define two inbound rules to allow both traffic and inbound SSH traffic from your public IP address only
outputs.tf
- vnet_id - to store the id of the VNet and connect the cluster to the defined VNet
- control_plane_subnet_id - specify where control pane components will be deployed
- worker_node_subnet_id - specify where the worker nodes will be deployed
- networking_resource_group_name - name of the azure resource group
- aks_nsg_id - used to specify network security group with the cluser for security
- Initialise the networking module
- run the
terraform initcommand within the networking module directory
variables.tf
-
aks_cluster_name - name of the cluster
-
cluster_location - region where the cluster will be deployed
-
dns_prefix - DNS prefix of the cluster
-
kubernetes_version - specifies which kubernetes version the cluster will use
-
service_principal_client_id - provides client id for the service principal
-
service_principal_secret - provides client secret for the service principal
-
Remember to add the output variables from the networking module: resource_group_name, vnet_id, control_plane_subnet_id, worker_node_subnet_id. And ensure all variables are of type string
main.tf
- define cluster resources including the AKS cluster, node pool and service principal
outputs.tf
-
aks-cluster-name - cluster name
-
aks_cluster_id - id of the cluster
-
aks_kubeconfig - allows the cluster to interact and be managed by kubectl
-
4: Initialise the cluster module
-
run the
terraform initcommand within the aks cluster module directory
- networking variables
- resource_group_name - insert descriptive name here
- location - insert azure region here
- vnet_address_space - ["10.0.0.0/16"]
- cluster variables
-
cluster_name - insert descriptive name here
-
location - insert azure region here
-
dns_prefix - myaks-project
-
kubernetes_version - 1.26
-
service_principal_client_id - client id
-
service_principal_secret - client secret
-
output variables from networking module include: resource_group_name, vnet_id, control_plane_subnet_id, worker_node_subnet_id and aks_nsg_id
-
run
terraform initcommand before runningterraform applyto create the cluster -
connect to the cluster to verify it has been created successfully and is operational

- Create the
application-manifest.yamlfile
- define the deployment as flask-app-deployment
- specify that the app will run on two replicas
- define a app label within the matchLabels of the selector field
- define labels for the pod template in the metadata section using the created app label
- set the service to use the TCP protocol on port 80, and set the target port to 5000
- implement the rolling updates strategy
- set the service type to ClusterIP
- Deploying kubernetes manifests to AKS
- ensure you are in the correct context before using the
kubectl apply -f application-manifest.yamlcommand to deploy the pods - the pods can be viewed using the
kubectl get podscommand

- Testing and validating deployments on AKS
- to test the deployments use port forwarding using the
kubectl port-forward <pod-name> 5000:5000command - the web application can then be accessed locally at
http://127.0.0.1:5000

- Initiate azure devops pipeline setup
- create your azure devops account if you have not already
- create the pipeline using the starter pipeline template
- set github at the source control system and select the repository you have chosen for this project
- Establish an azure devops docker hub connection
- create a personal access token on docker hub
- crate a service connectionon azure devops to use that token
- Configure pipeline for docker image build and push
- add a docker task to your pipeline by using the
buildandPushcommand - set the pipeline to automatically run each time there is a push to the main branch of your app repo
- run the pipeline to test the created image

- Establish an azure devops AKS connection
- create an AKS service connection within azure devops
- Configure pipeline for kubernetes deployment
- to add the deploy to kubernetes task to your pipeline config use the
deploy kubectlcommand

- Testing and validation of CI/CD pipeline
- check the status of your pods by using the
kubectl get podscommand - access the address of the cluster
Create metrics explorer charts
- Average Node CPU Usage - tracks the CPU usage of your AKS cluster's nodes
- Average Pod Count - displays the average number of pods running in your AKS cluster
- Used Disk Percentage - tracks how much disk space is being utilized
- Bytes Read and Written per Second - displays data transfer rates
Log analytics configuration
- Average Node CPU Usage Percentage per Minute
- Average Node Memory Usage Percentage per Minute
- Pods Counts with Phase
- Find Warning Value in Container Logs
- Monitoring Kubernetes Events
Setup alert rules
- Disk used percentage - must be set to trigger when the used disk percentage is over 90%. This alert should check every 5 mins and have a loopback of 15 mins
- CPU usage - must be triggered when cpu is over 80%
- Memory working set percentage - must be triggered when memory is over 80%

Create an azure key vault This is where sensitive information will be stored

Assign key vault administrator role
- assign the key vault administrator role to your microsoft entra id
Create secrets in key vault Ensure that all these secrets are assigned the values that were hardcoded from the code
- server name
- server username
- server password
- database name
Enable managed identity for AKS
- create a managed identity using the
az identity create -g resource-Group-name -n name-the-User-Identitycommand
Assign permissions to managed identity Assign the key vaults security officer role to the managed identity
Update the application code
- Utilise and integrate the Azure identity and Azure Key Vault libraries into the app code. This will allow for communication with the Azure key vault.
- Update the
requirements.txtfile to include these new libraries
End-to-end testing in AKS
- test your application by accessing it locally, ensuring that your app has integrated with Azure key vault successfully

- Maya Iuga
- Ismah Hussain
This project is licensed under the MIT License. For more details, refer to the LICENSE file.