Developing Jangaroo 4 Ext AS 6 Applications with IntelliJ IDEA
This page documents how the Jangaroo IDEA plugins support developing JavaScript applications in ActionScript. For information on how Jangaroo 1 and 2 (EXML) development is supported, see Developing Ext AS Applications with IntelliJ IDEA. For general information on Jangaroo and IDEA, see Home.
Since Jangaroo 4 uses ActionScript and MXML in a way that is compatible with Apache Flex, you take advantage of IDEA's excellent Flex-support. All the Jangaroo 4 IDEA Plugin has to do is "convince" IDEA to treat Jangaroo code as Flex code and to integrate the Jangaroo compiler. To do so, "Jangaroo 4" extends IDEA in the following aspects:
- Adapted Maven import: IDEA can import Maven projects, but does not know about Jangaroo's Maven extensions. The Jangaroo plugin makes IDEA treat Jangaroo modules like Flex modules, adds support for dependencies between Jangaroo modules and automatically configures the Jangaroo compiler.
- Incremental compile: while you could just invoke Maven to compile your Jangaroo classes, IDEA offers much more elegant and faster compiler support. The plugin integrates the Jangaroo compiler into IDEA's incremental build process, so that only changed files are recompiled. This results in a much faster turn-around.
- Jangaroo configuration UI: IDEA can be extended by so-called facets to let you edit module settings for new languages or tools. The Jangaroo plugin adds such a facet for the ActionScript-to-JavaScript compiler.
- Jangaroo SDK: supports the configuration of different versions of Jangaroo Tools 4+, extending IDEA by a custom SDK type.
Important: Please uninstall (or deactivate) all outdated "Jangaroo 0.x" and EXML IDEA plugins before installing "Jangaroo 4".
The Jangaroo 4 plugin can be installed as usual using the IDEA plugin manager. Note that you need IDEA 2016.3+ Ultimate Edition, because the Community Edition does not include AS3 nor Flex support. Also, the bundled plugins "Flash/Flex Support", "JavaScript Support", "Maven Integration" and "Java EE Integration" must be activated for the Jangaroo plugin to be enabled.
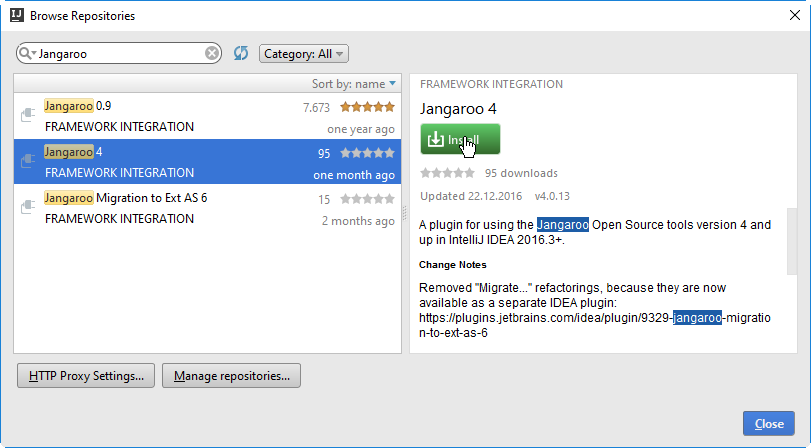
Invoke IDEA's plugin manager, either through the button on the top right of the welcome screen, or through "File | Settings | Plugins". In the plugin manager, click on "Browse repositories..." and search for "Jangaroo 4".
Select "Jangaroo 4" and hit the "Download and Install" button. Restart IDEA for the installation of the plugin.
This process always installs the latest version of the Jangaroo 4 IDEA plugin. IDEA should check for updates regularly, but you can also do so manually by going to IDEA's plugins manager again and checking the state of "Jangaroo 4".
Only after having installed the plugin, Jangaroo Maven projects can be imported into IDEA successfully. Without the plugin, IDEA does not choose the correct module type (Flash/Flex module) and fails to import libraries and dependencies correctly.
To have a project to start with, we use the Jangaroo Ext AS Examples project available on GitHub. For the following steps, you need to have a Git client installed and Git enabled in IDEA. If you have neither, you can also download the project files as a zip, unpack to a local directory and import manually.
You can clone the project directly from IDEA, like follows. Select "VCS | Checkout from Version Control | Git" (not "GitHub", since this only allows to do a local clone of your own GitHub repositories!).
In the opened dialog, enter https://github.com/CoreMedia/jangaroo-ext-as-examples.git for "Git Repository URL", and specify the directory where you store your local projects as "Parent Directory". ("Directory Name" is automatically filled by IDEA.) Press "Clone" and wait for IDEA to download the project.
Next, IDEA asks: "Would you like to create an IntelliJ IDEA project for the sources you have checked out to .../jangaroo-quickstart?" Answer "Yes". Before continuing with section "Importing a Jangaroo Maven Project", switch to branch jangaroo-4 using IDEA's Git branch selector at the very bottom right. Confirm to create a new local branch also called jangaroo-4. After changing the branch, IDEA detects that "Maven projects need to be imported". Accept the suggested action "Import Changes".
Alternatively, download the project sources from GitHub:
- Open https://github.com/CoreMedia/jangaroo-ext-as-examples/tree/jangaroo-4
- Click "Clone or download" button
- Click "Download ZIP" button
- Save the file and unpack into a directory of your choice
For importing a Jangaroo Maven Project, you have two options: either use IDEA's "New Project" wizard, or select "File | Open Project...". While the "New Project" wizard gives you more control over the import settings, the latter option is much faster, as it simply lets you chose the directory containing the pom.xml. After confirming that you want to "Open as project" (not "as file"), IDEA opens the project without further ado.
If you like more control, proceed as follows.
- "File | New | Project from Existing Sources..."
- In the dialog "Select File or Directory to Import", chose to your local project directory and hit "OK".
- Select "Import project from external model", then select "Maven", "Next >"
- Check "Search for projects recursively" and "Import Maven projects automatically". If you have not used Maven from IDEA before, you may have to set "Environment settings...". Then, "Next >"
- Usually, no special Maven profiles need to be selected. "Next >"
- The (only) Maven project
net.jangaroo.extas.examples:jangaroo-ext-as-examples:0.1-SNAPSHOTis already preselected. "Next >" - "Name" and "Project file location" can also be kept as-is. "Finish"
IDEA imports the project and updates its indexes.
Jangaroo's multi-module build process is based on Maven for managing dependencies and downloading the corresponding artifacts. Because IDEA's incremental build process could not easily be extended to support the Jangaroo build process in every detail, you have to build via Maven once before building with IDEA. IDEA plus Jangaroo plugin do not support the full build process, but only what's necessary to update resources and JavaScript code after AS3 and MXML code changes in the project's modules. Thus, you also have to build via Maven if you change code in SNAPSHOT versions of external modules.
IDEA offers excellent Maven support. In a project imported from a Maven POM, you can browse the project, its modules, the Maven plugins and their goals in the "Maven Projects" window. To build the whole example project, select "jangaroo-ext-as-examples > Lifecycle > install", then click the green 'play' button with the tooltip "Run Maven Build".
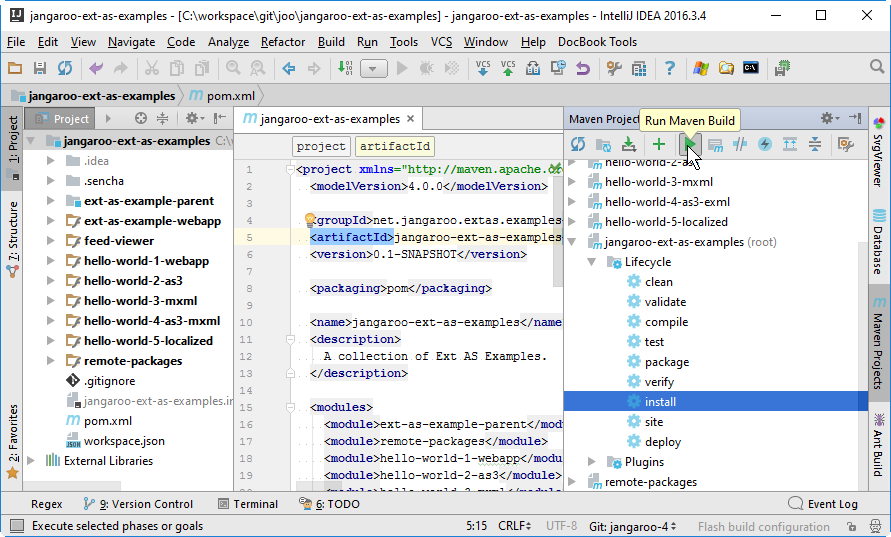
The Maven build process is started and you can watch its progress in the "Run" console window output. The output should end with BUILD SUCCESS.
You can now open the file jangaroo-ext-as-examples/hello-world-1-webapp/target/app/index.html in any browser and it runs the Jangaroo application (click on the button and a dialog pops up). Starting a Jangaroo application from the file system does not work for all applications and in some cases makes debugging harder. Fortunately, IDEA comes with a built-in Web server. In IDEA's Project tool window, select the tool drop-down and check "Show Excluded Files". Then, the target directories appear. Open the one under hello-world-1-webapp and open index.html in sub-folder app. For any HTML file, IDEA offers to open it in any of your installed browsers. Then, instead of the file:/// URL, a URL pointing to IDEA's local Web server (http://localhost:63342/...) is handed over to the browser.
After changing any source file, you can rebuild the whole project via Maven and reload the application in the browser. Of course, this takes too long for frequent turn-around, so we'll present a much faster solution later.
If you run some Maven goal(s) over and over again, it comes in handy that IDEA lets you store this call in a "Run Configuration":
- Just right-click the desired goal and chose "Create ''...".
- In the dialog that appears, you can do all kinds of Maven settings corresponding to command line options of the
mvntool, but for now, just confirm by clicking "OK".
The new Run Configuration appears in the drop down box in the center of the top toolbar. The green arrow next to it re-runs the currently selected Run Configuration, here, your Maven build, and can be invoked with the keyboard shortcut Shift+F10.
The IDEA Web Help contains extensive documentation of the Maven Projects Tool Window, which also covers creating Run Configurations.
Rebuilding the whole project on every change is quite cumbersome and takes too long. This is where IDEA's incremental build process comes in. It is invoked by "Build | Make project" or by the keyboard shortcut Strg+F9. While on first invocation, an IDEA build run may not seem much faster than the Maven one, every following "Make Project" only compiles files that have been changed, resulting in a very fast turn-around!
In detail, the Jangaroo 4 IDEA plugin adds support for two things that happen when you build via IDEA:
- For each changed
*.as,*.mxml, or*.propertiesfile under a source root of a module with a Jangaroo facet, Jangaroo's Flex-to-JavaScript compiler is invoked and creates or updates the corresponding JavaScript files in the module output directory set in the Jangaroo Facet. - For each module in which at least one file has been changed, the concatenated, minified module script file is rebuilt, which is then used by Sencha Cmd.
TODO: Overview of Sencha build process
The Jangaroo Language plugin adds a new facet to IDEA. IDEA uses facets to store module settings for a certain tool, for example there is a Web facet and a Spring facet. In the Jangaroo facet, the Jangaroo compiler settings can be inspected and changed. When importing from Maven (as described in the previous section), you usually do not have to care about facets, since they are created and configured by the Jangaroo IDEA plugin automatically.
However, if you want to check the settings or set up a Jangaroo project without Maven (which is not recommended, because it is much cumbersome work to download and unpack all needed libraries), you can find all facets in the "Project Structure" ("File | Project Structure", corresponding toolbar button, or Strg+Alt+Shift+S).
There are two views on the project's (Jangaroo) facets: One is opened by selecting "Modules" and clicking the + handle (first screen shot), the second by selecting "Facets" and clicking the + handle (second screen shot). Note that the my-joo-app module has a Jangaroo facet in addition to a Web facet, while the my-joo-lib module only has a Jangaroo facet. The IDEA Web Help provides more information on facets.
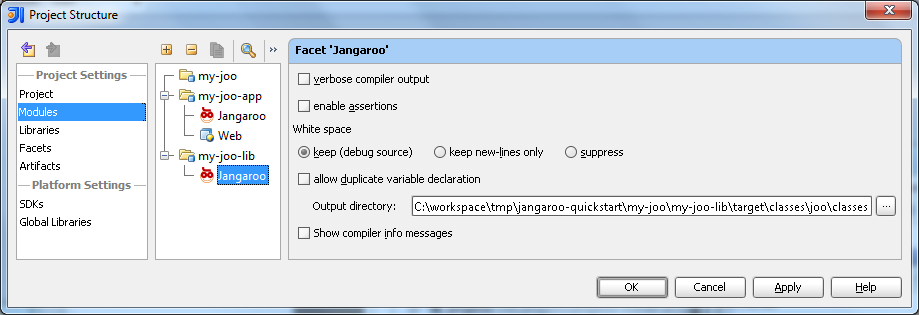
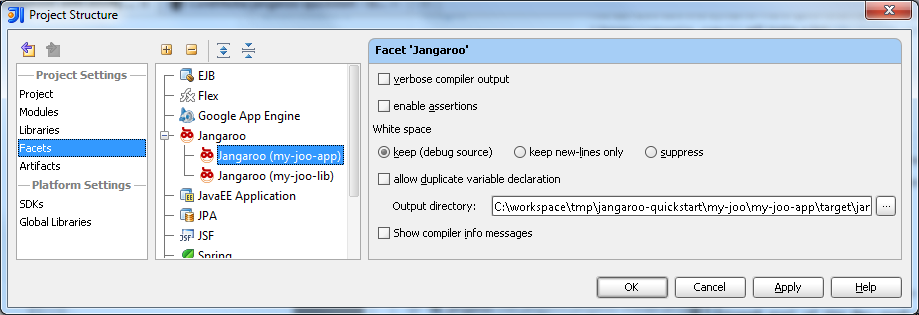
On the right side, you can inspect the Jangaroo compiler settings this facet has stored for the corresponding module. These correspond to the command line switches of the ActionScript-to-JavaScript compiler. Most importantly, the "Output directory" can be checked and modified here.
Note that reimporting the Maven project from which these settings were imported overwrites your changes. Thus, the preferred way to change settings is to edit your pom.xml file. IDEA provides very good assistance for editing a Maven POM, for example:
- Code completion (
Strg-Space) - Documentation lookup (
Strg-Q) - Error detection (red markers)
IDEA will automatically do a Maven reimport when a pom.xml file is changed, unless you did not check "Import Maven projects automatically". In that case, after editing a pom.xml file, a yellow banner will appear, where you can click a link to reimport. Last resort is to click the yellow refresh button in the "Maven Projects" window ("Force Reimport All Maven Projects").