Welcome to the one and only Aspire FY20 "WHO RUN THE WORLD? BOTS BOTS" - Workshop
The following guide will help you developing step by step your own Virtual Assistant Chatbot without the need of any code experience. We will use the Virtual Assistant template along with the Point of Interest Skill. Due to the deployment taking around 10 minutes, we will create them both in parallel to save time - remember, a Skill = a Bot, thus you will deploy two bots in total. Later in the lab, we will then join up the Virtual Assistant to your skill (parent and child relationship). As a result, your bot will be able to perform the following tasks:
- Give you answers to the questions stated in the Microsoft Ready FaQ
- Give you answers to Point of Interest questions
- Is reachable over Teams and via Voice
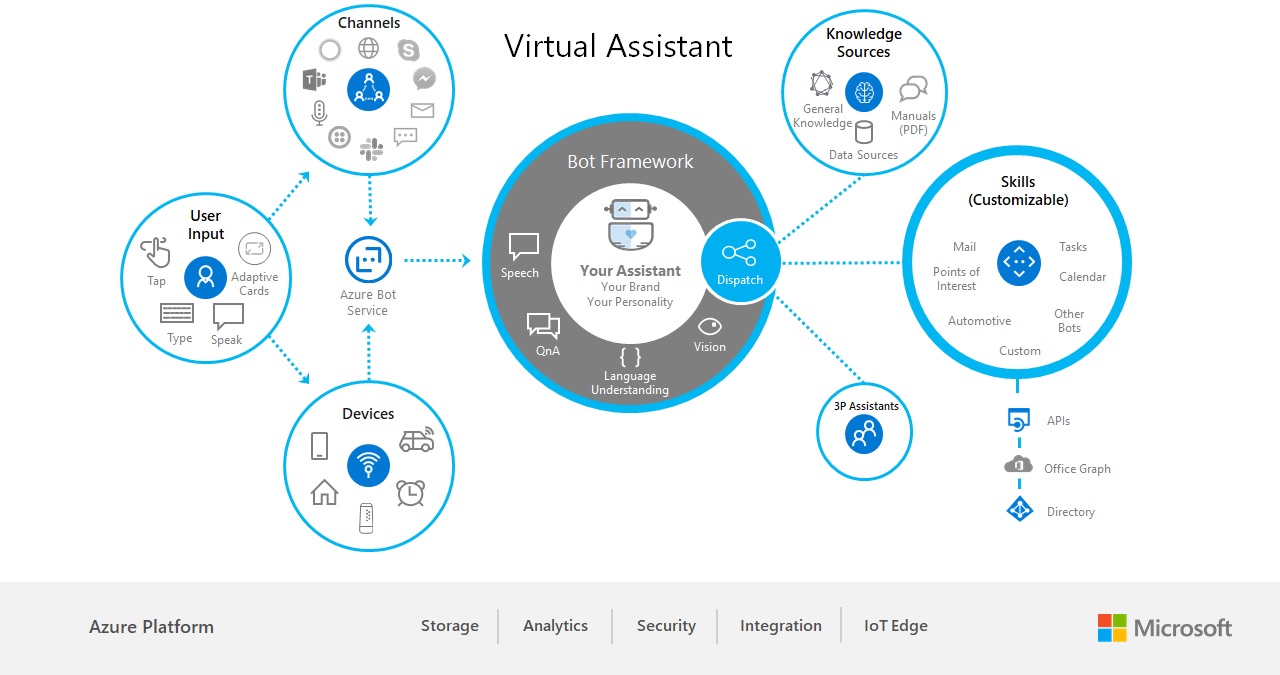
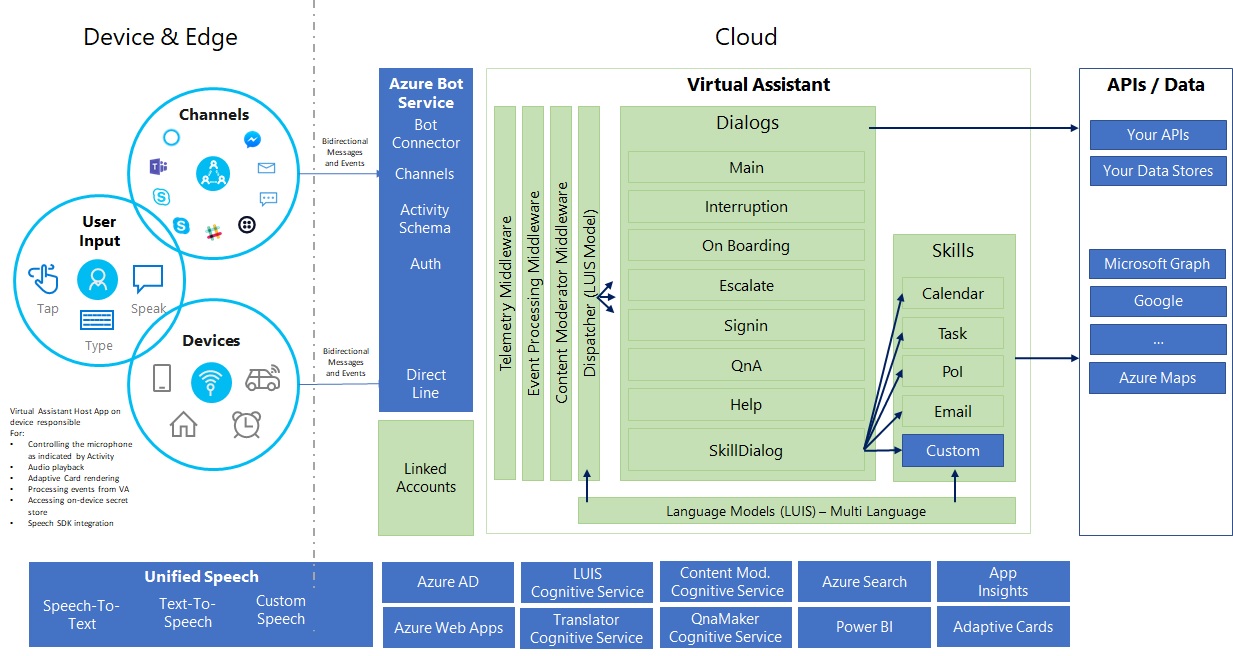
From an architectural perspective, the following Azure services are being used:
- Bot Framework Virtual Assistant Template thats contains the following Azure services:
- Web App
- Cosmos Database
- Storage account
- App Service
- Azure Cognitive Services:
- QnA Maker
- LUIS (Language Understanding Intelligent Service)
- Azure Search Service
- Content Moderator
It's important to ensure all of the following prerequisites are installed on your machine prior to attempting deployment otherwise you may run into deployment issues.
-
An Azure subscription
-
Download and install Visual Studio (2017 or 2019) for PC or Mac
-
Download and install the Virtual Assistant Template. Note that Visual Studio on Mac doesn't support VSIX packages, instead clone the Skill Template sample from our repository.
-
Ensure you have updated .NET Core to the latest version.
-
Download and install Node Package manager.
-
Download and install PowerShell Core version 6 (required for cross platform deployment support):
-
Download and install the Bot Framework (CLI) tool dependencies. It's important to do this even if you have earlier versions as the Virtual Assistant makes use of the latest capabilities:
npm install -g botdispatch ludown luis-apis qnamaker [email protected] -
Install Botskills (CLI) tool:
npm install -g botskills -
Download and install the Azure Command Line Tools (CLI) (Version 2.0.64 minimum required).
-
Download and install the Bot Framework Emulator.
Many customers are looking to deliver conversational assistants tailored to their brand, personalized to their end customers, and made available across multiple devices and apps. The Virtual Assistant template is a solution accelerator that simplifies the creation of your own assistant, enabling you to get started developing in minutes. To increase developer productivity and to enable the reuse of conversational experiences, developers are provided with initial examples of conversational skills. These Skills can be added into a conversational application (like a chatbot) to enhance a specific conversation experience, such as finding a point of interest, interacting with calendar, tasks, email and many other scenarios. Skills are fully customizable and consist of language models for multiple languages, dialogs and code.
In this tutorial we will make use of the Point of Interest Skill.
Here you can find more information about the Virtual Assistant
-
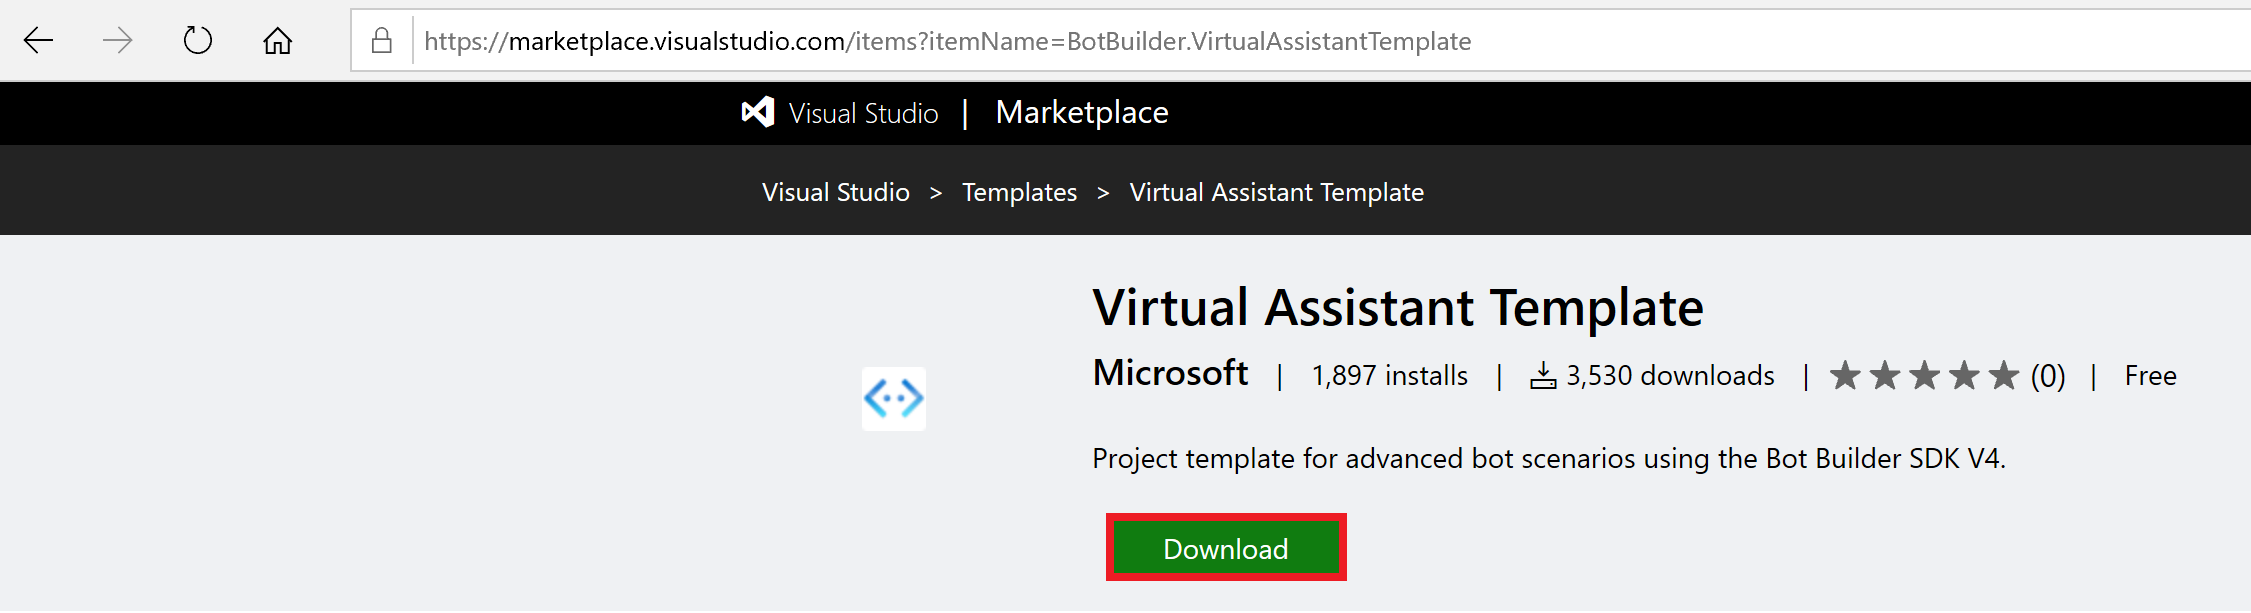
Navigate to https://marketplace.visualstudio.com/items?itemName=BotBuilder.VirtualAssistantTemplate and download the VS Virtual Assistant Template to your desktop (save it).
Once downloaded, go to the solution and double-click on the file and proceed with the installation guide.
-
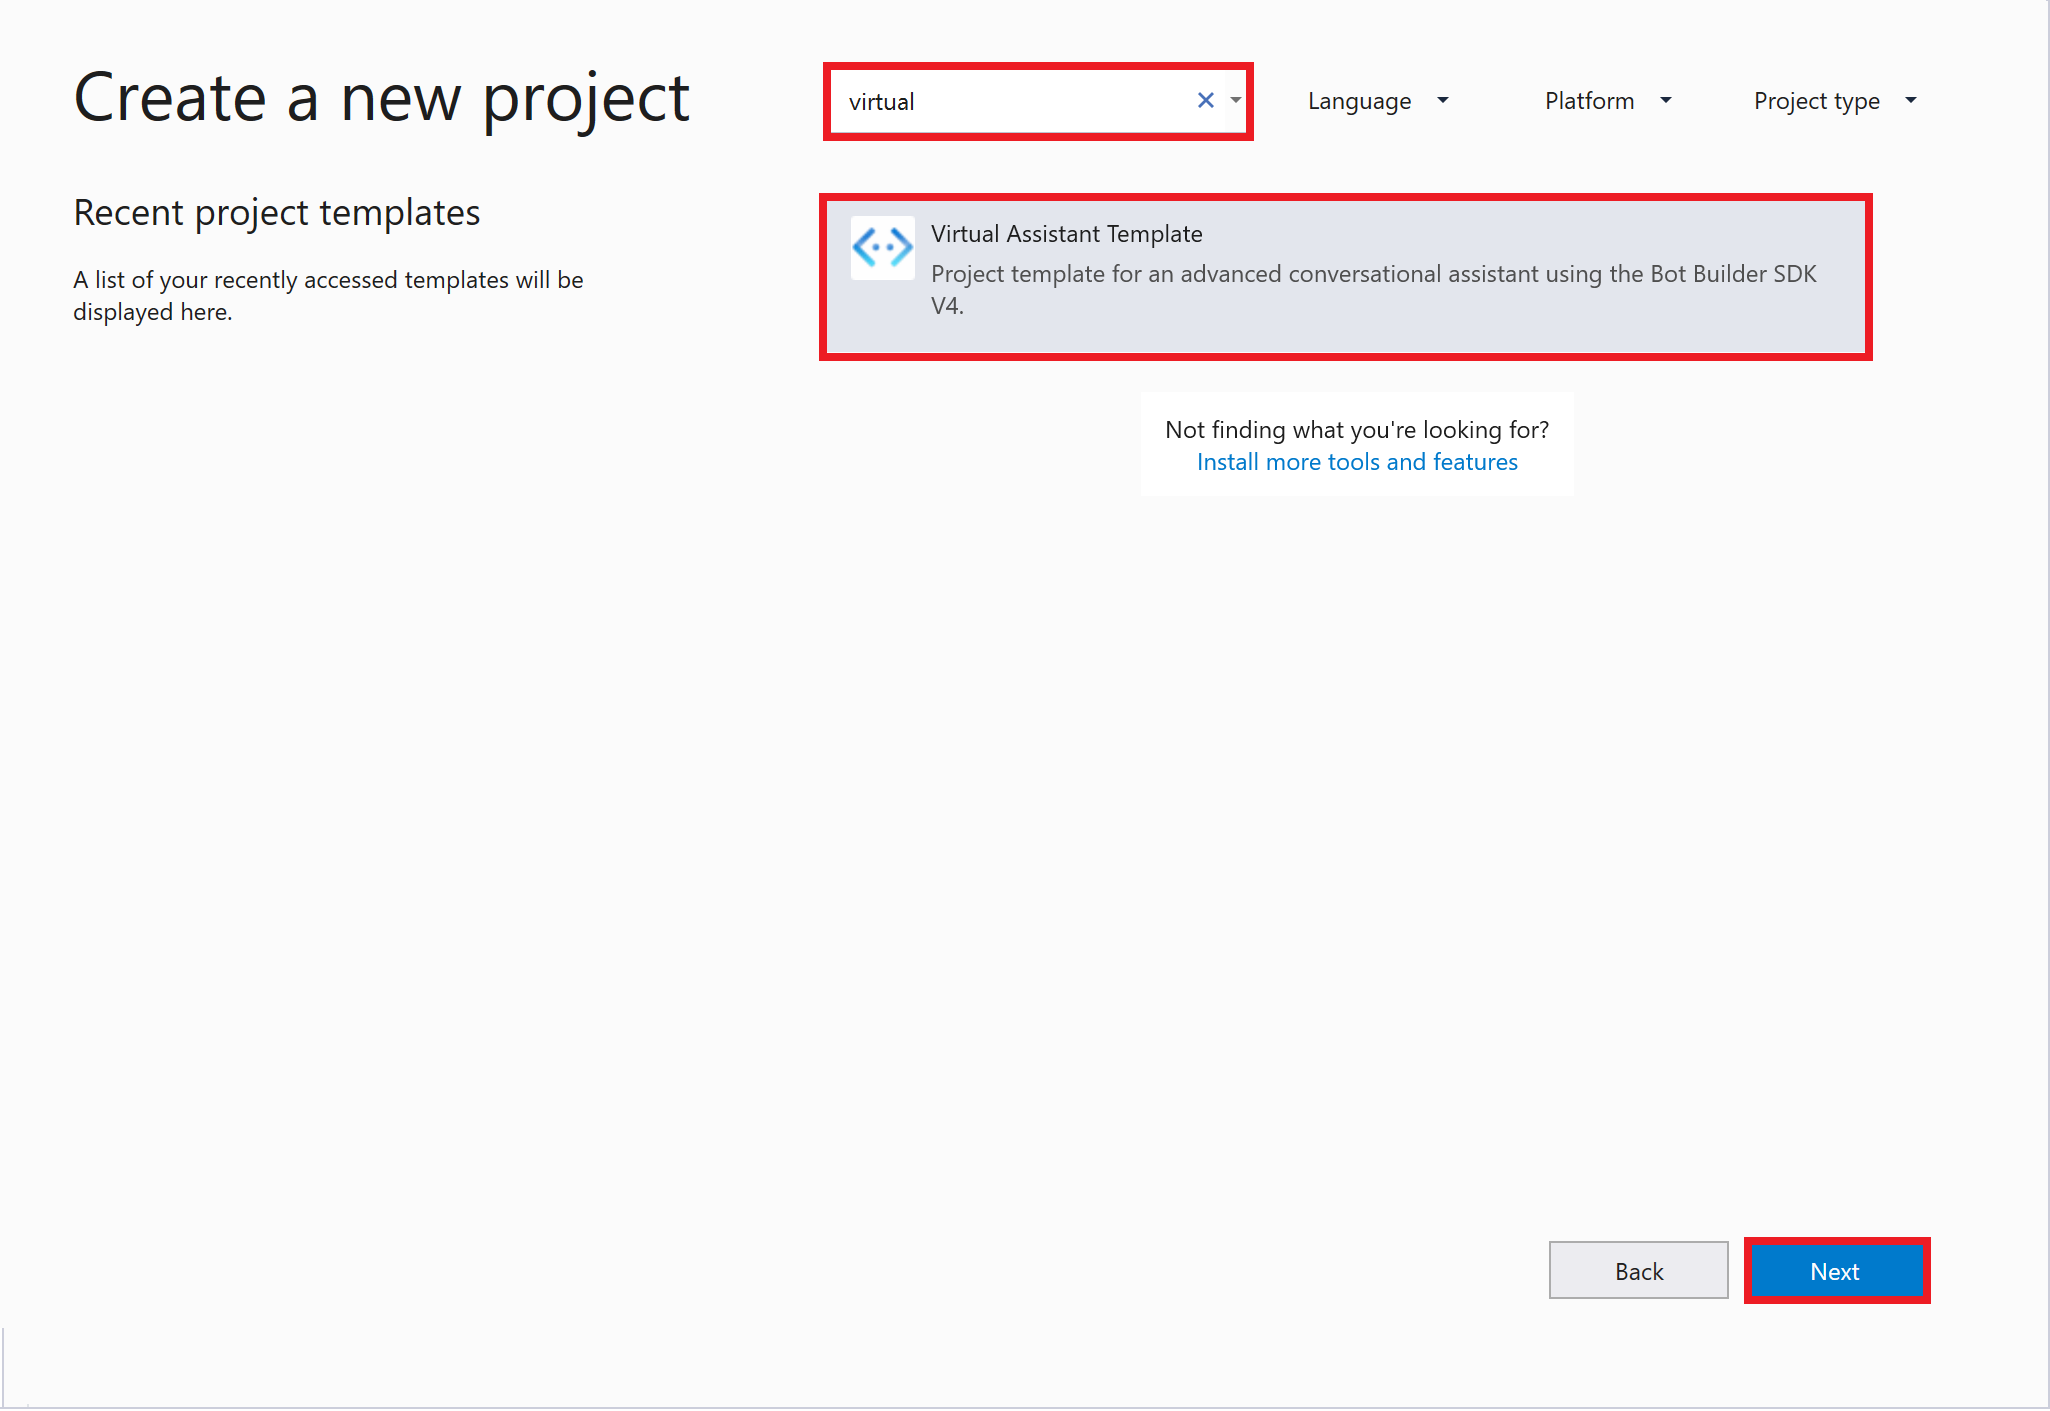
Click on the Start menu, search for Visual Studio 2019 and open it. You will be asked to sign in, sign in using your lab credentials and leave settings as "general". Click on "Create a new project", in the search field, type Virtual Assistant Template. (If it does not show up in the field, you might have forgot in the previous step to install the downloaded solution.)
-
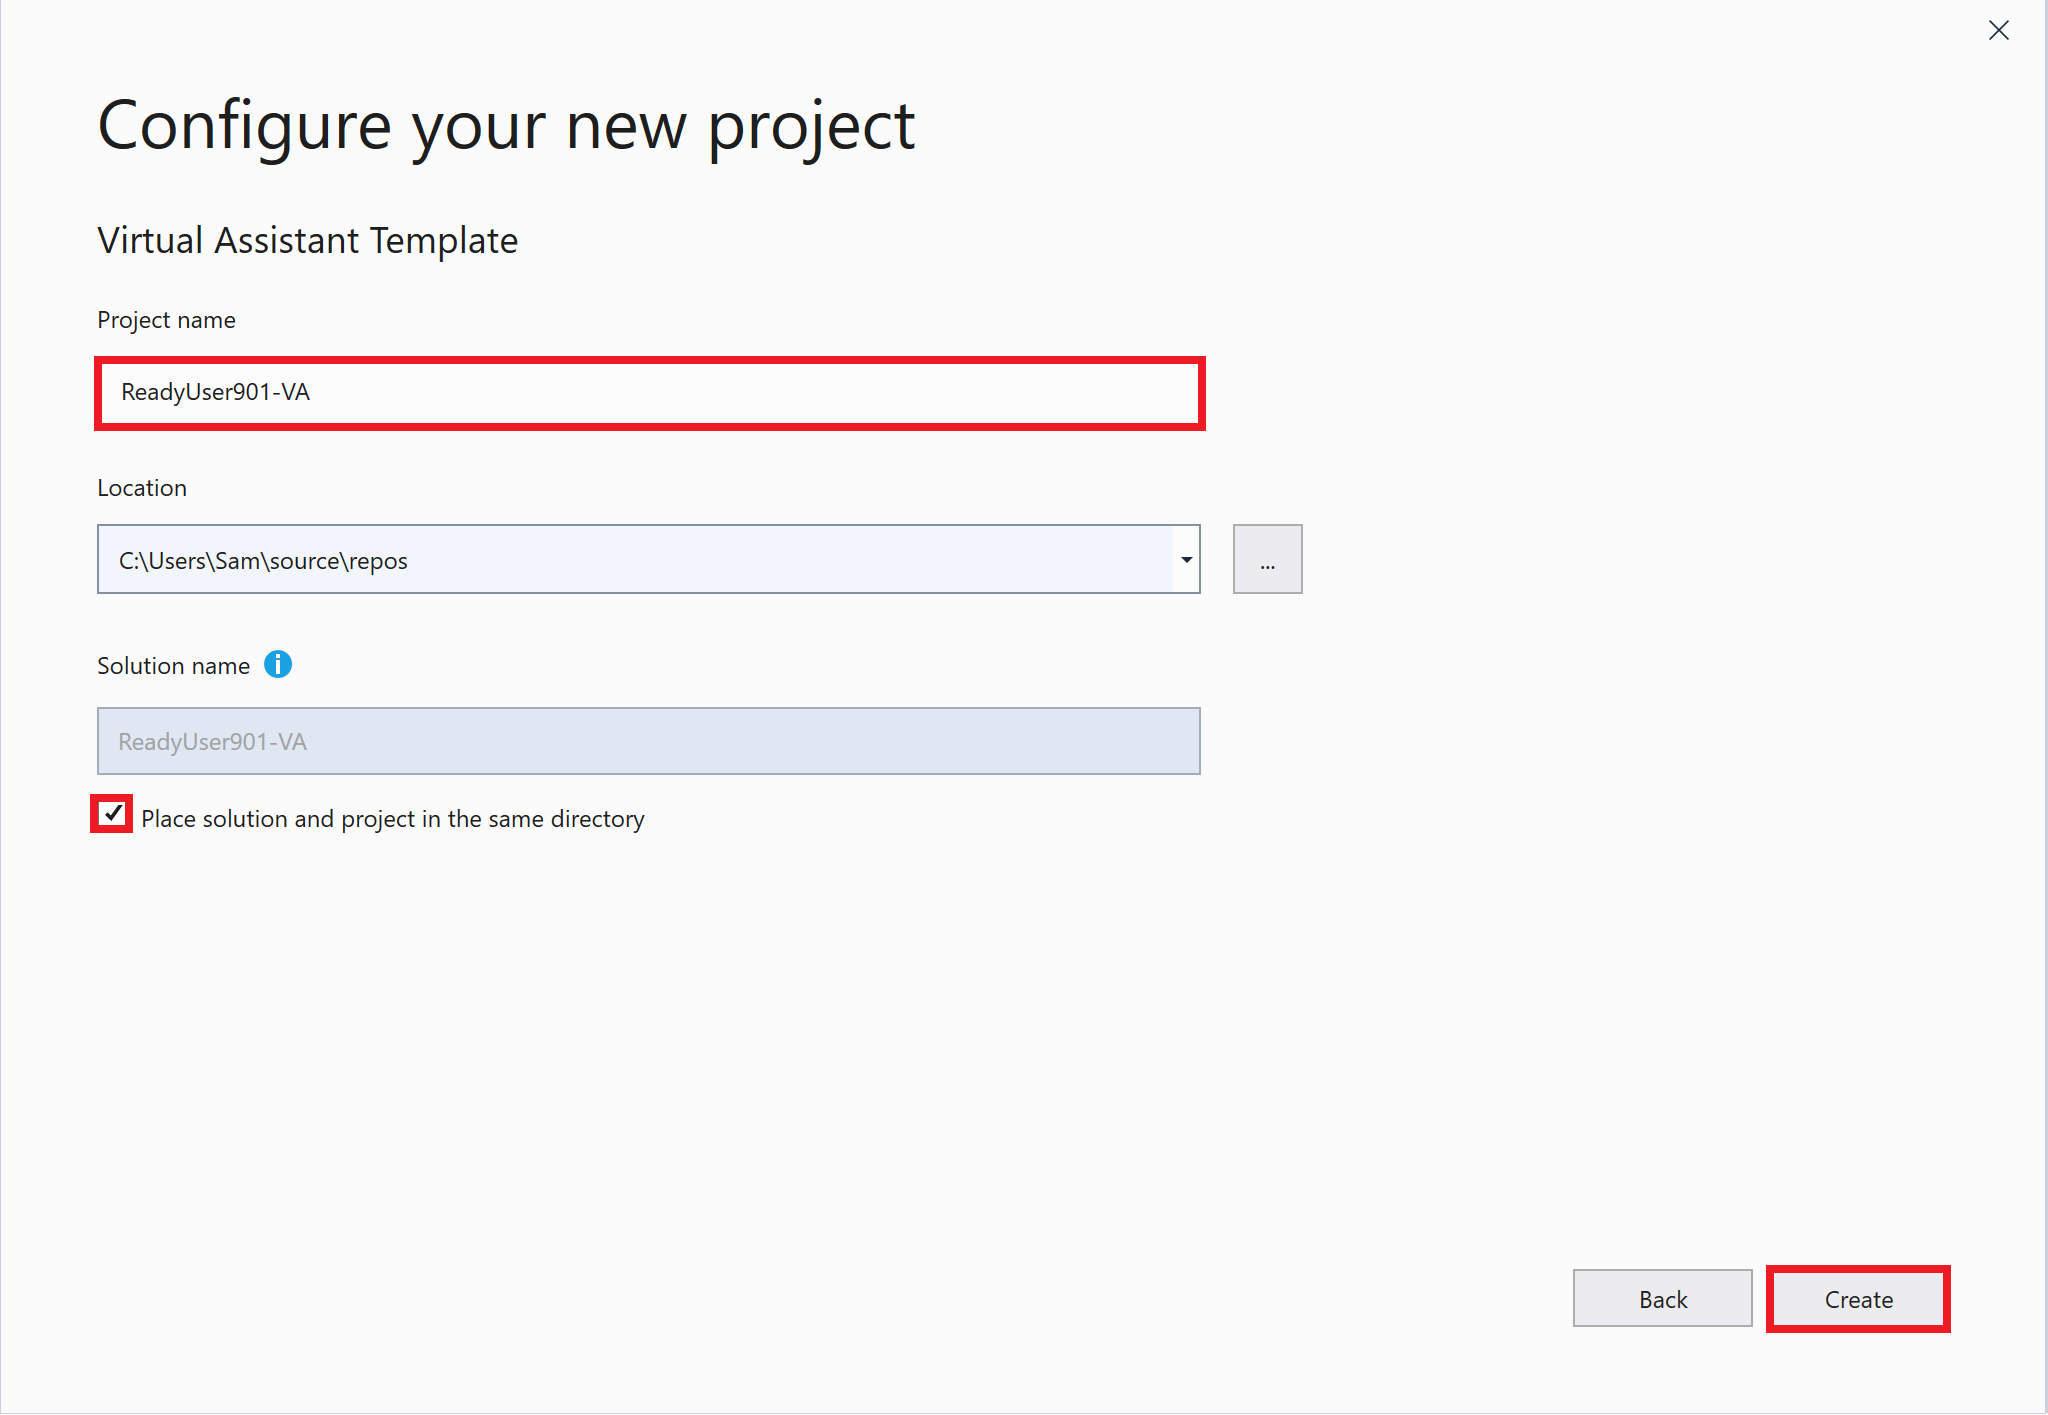
Under project name, input your unice Lab User name {LABUSERNAME}-VA - --> replace {LABUSERNAME} with your actual Lab User alias and make sure to include "-VA".
Leave "Location" and "Solution Name" as is. Tick the checkbox "Place solution and project in the same directory". Click "Create".
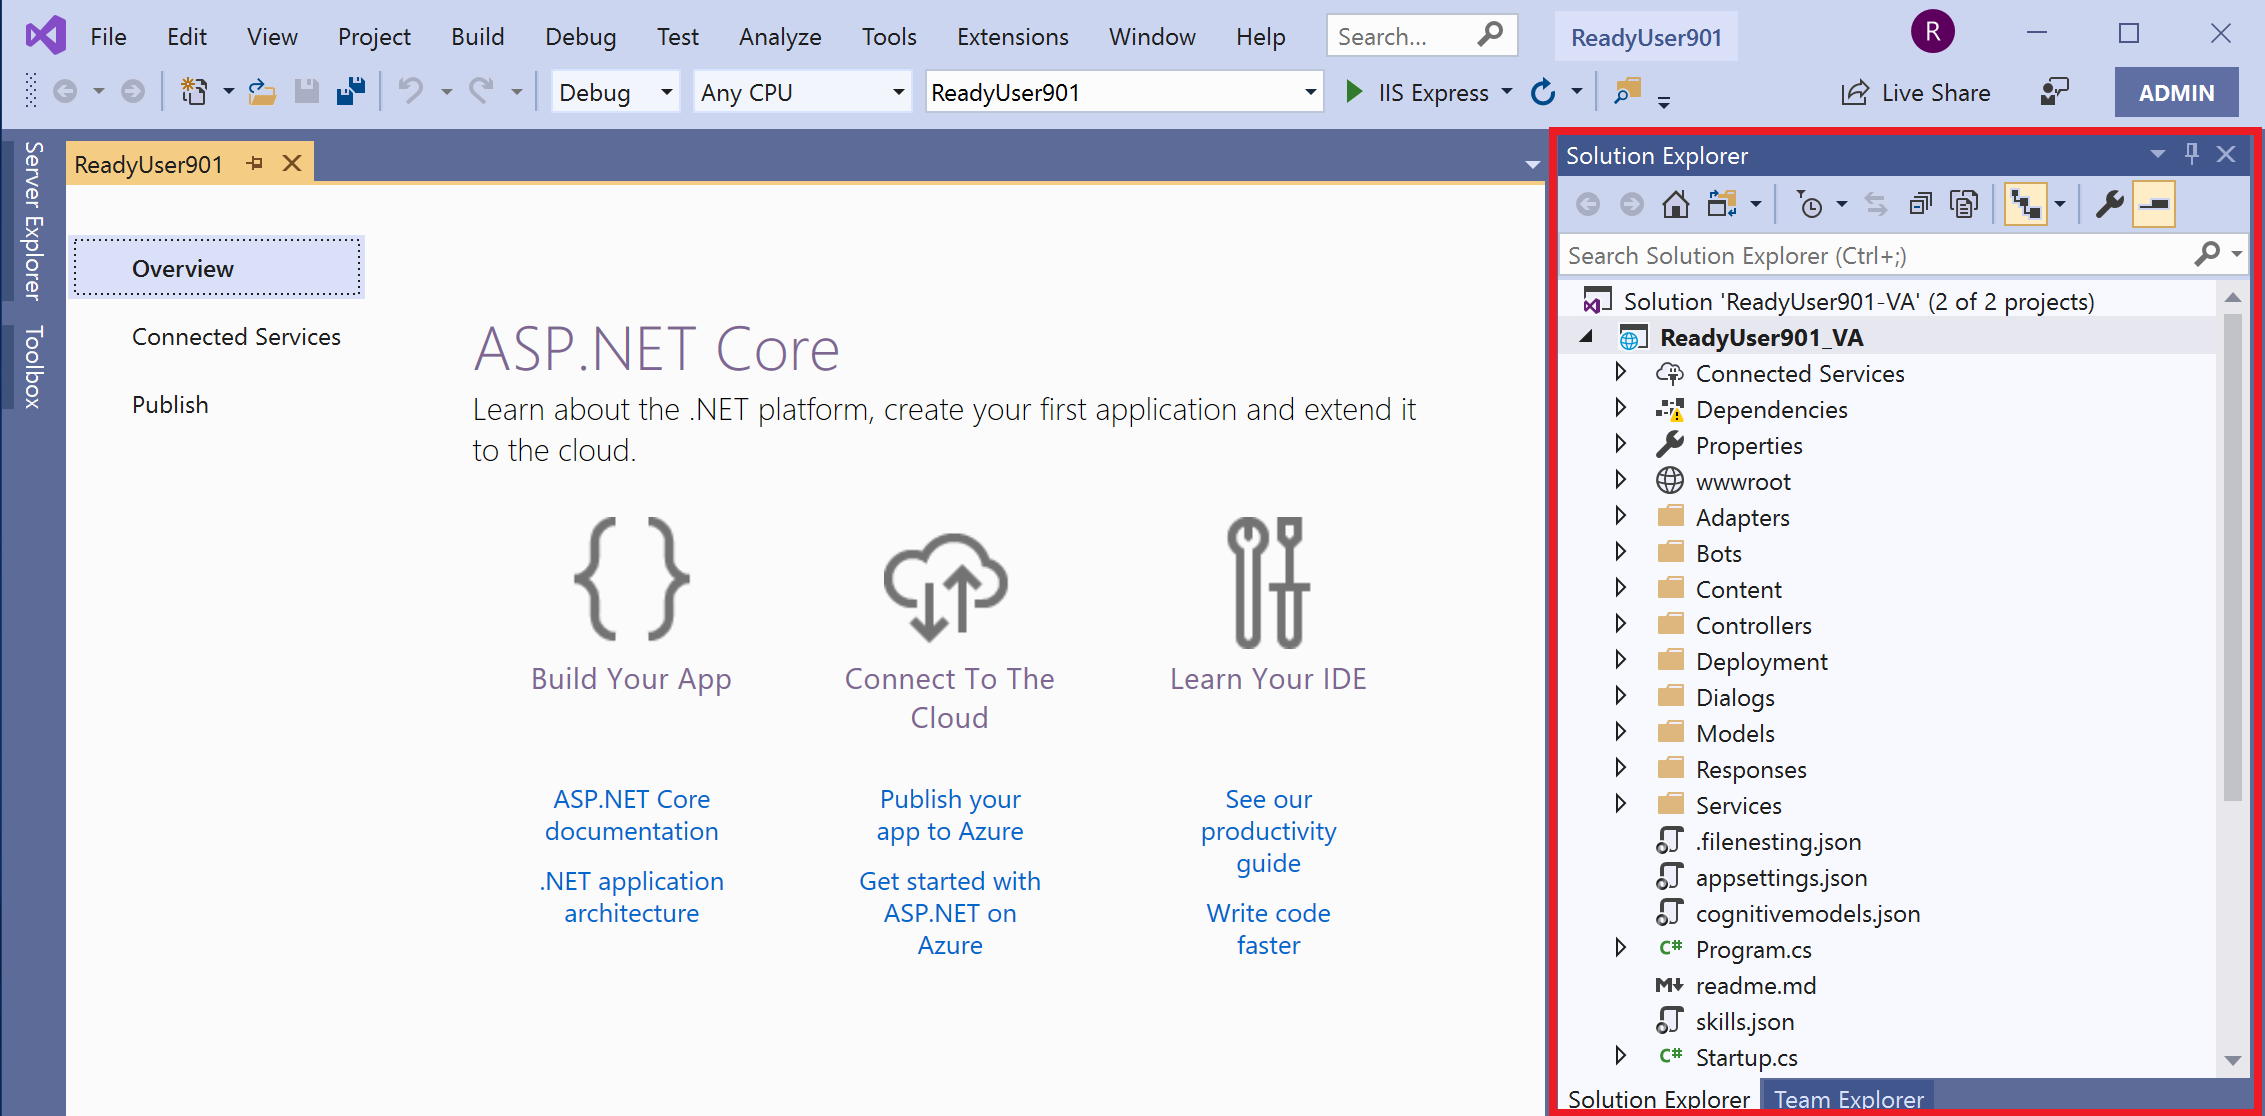
You should now see all the files and folders required for the Virtual Assistant as shown below:
-
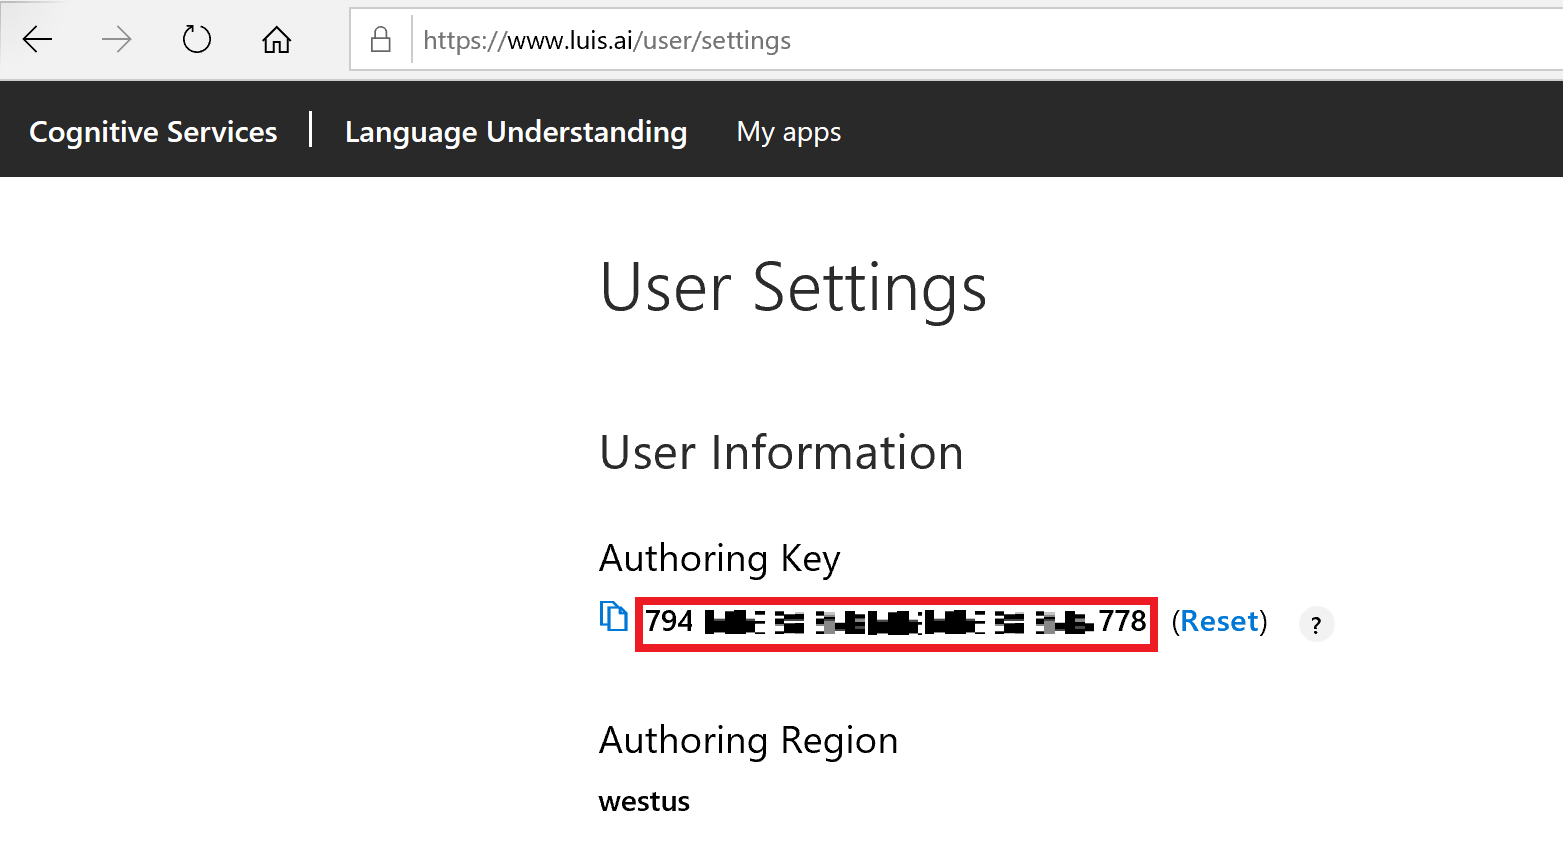
Before we can make use of and the Bot deployment script, we will need to know LUIS' authoring key in order to integrate it into the Virtual Assistant script.
This way, it will automatically create the required LUIS Apps in Azure. We need to note this key down for the later steps.
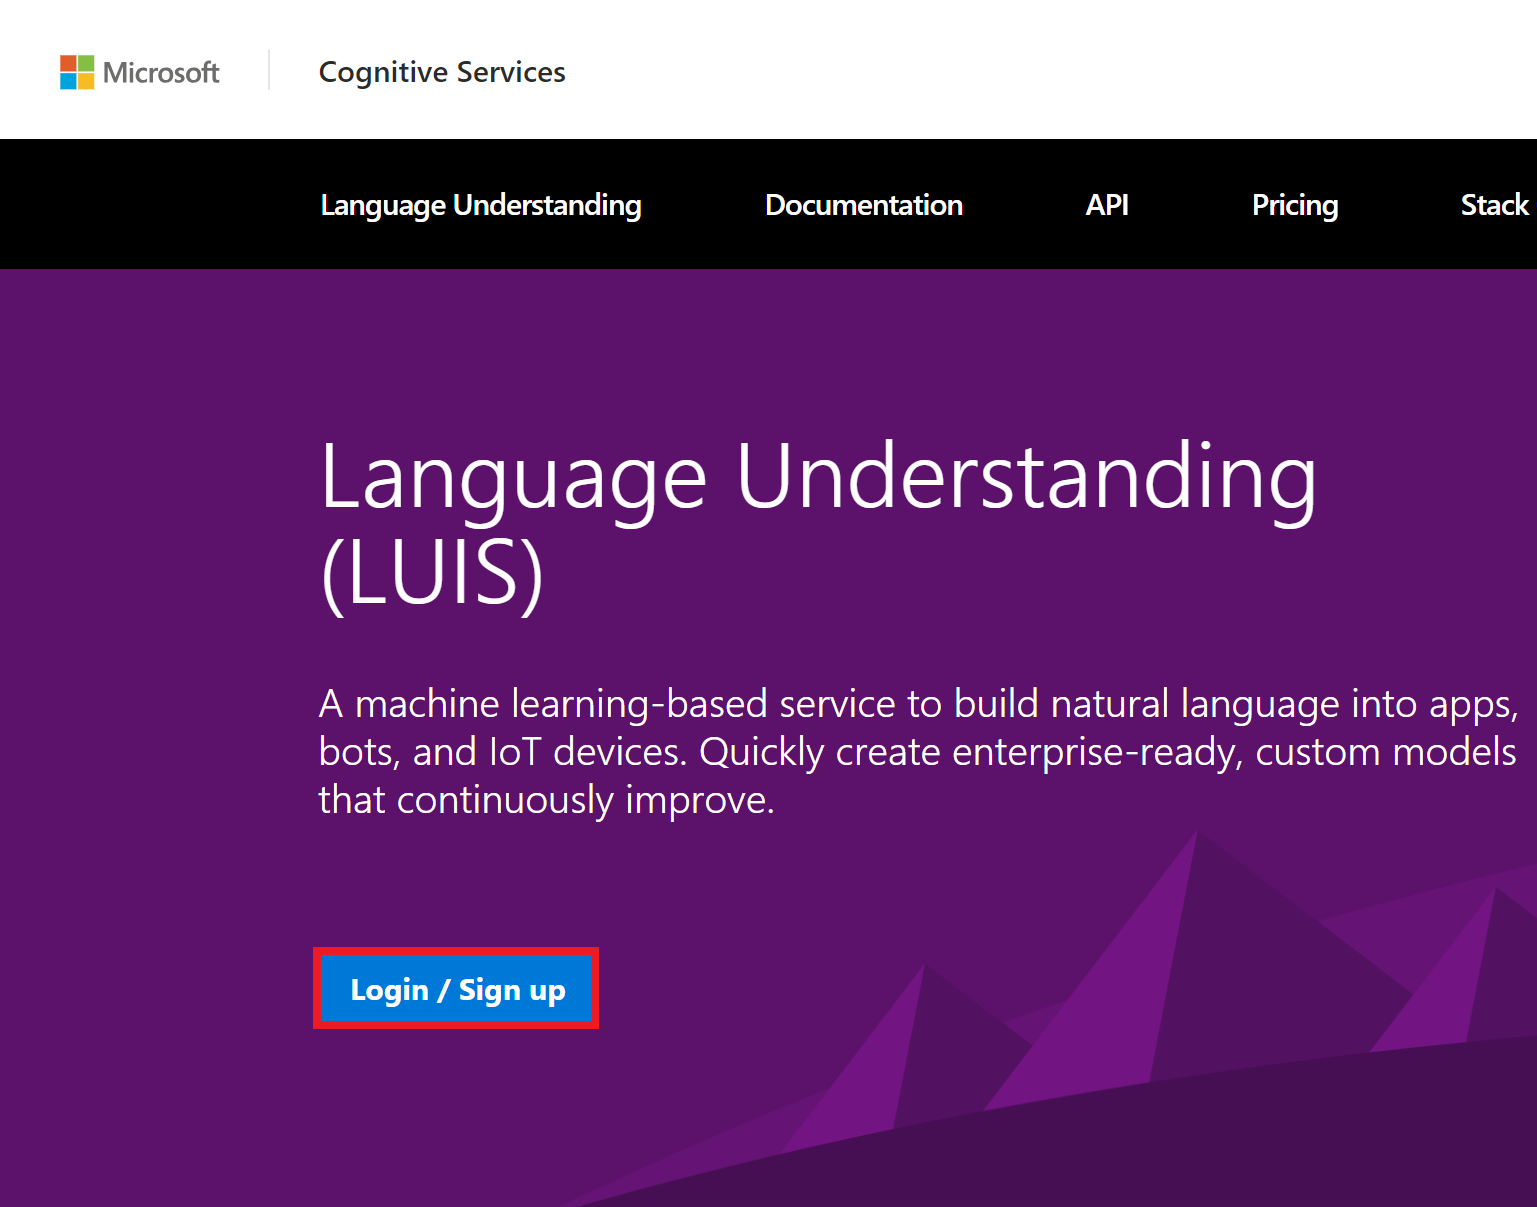
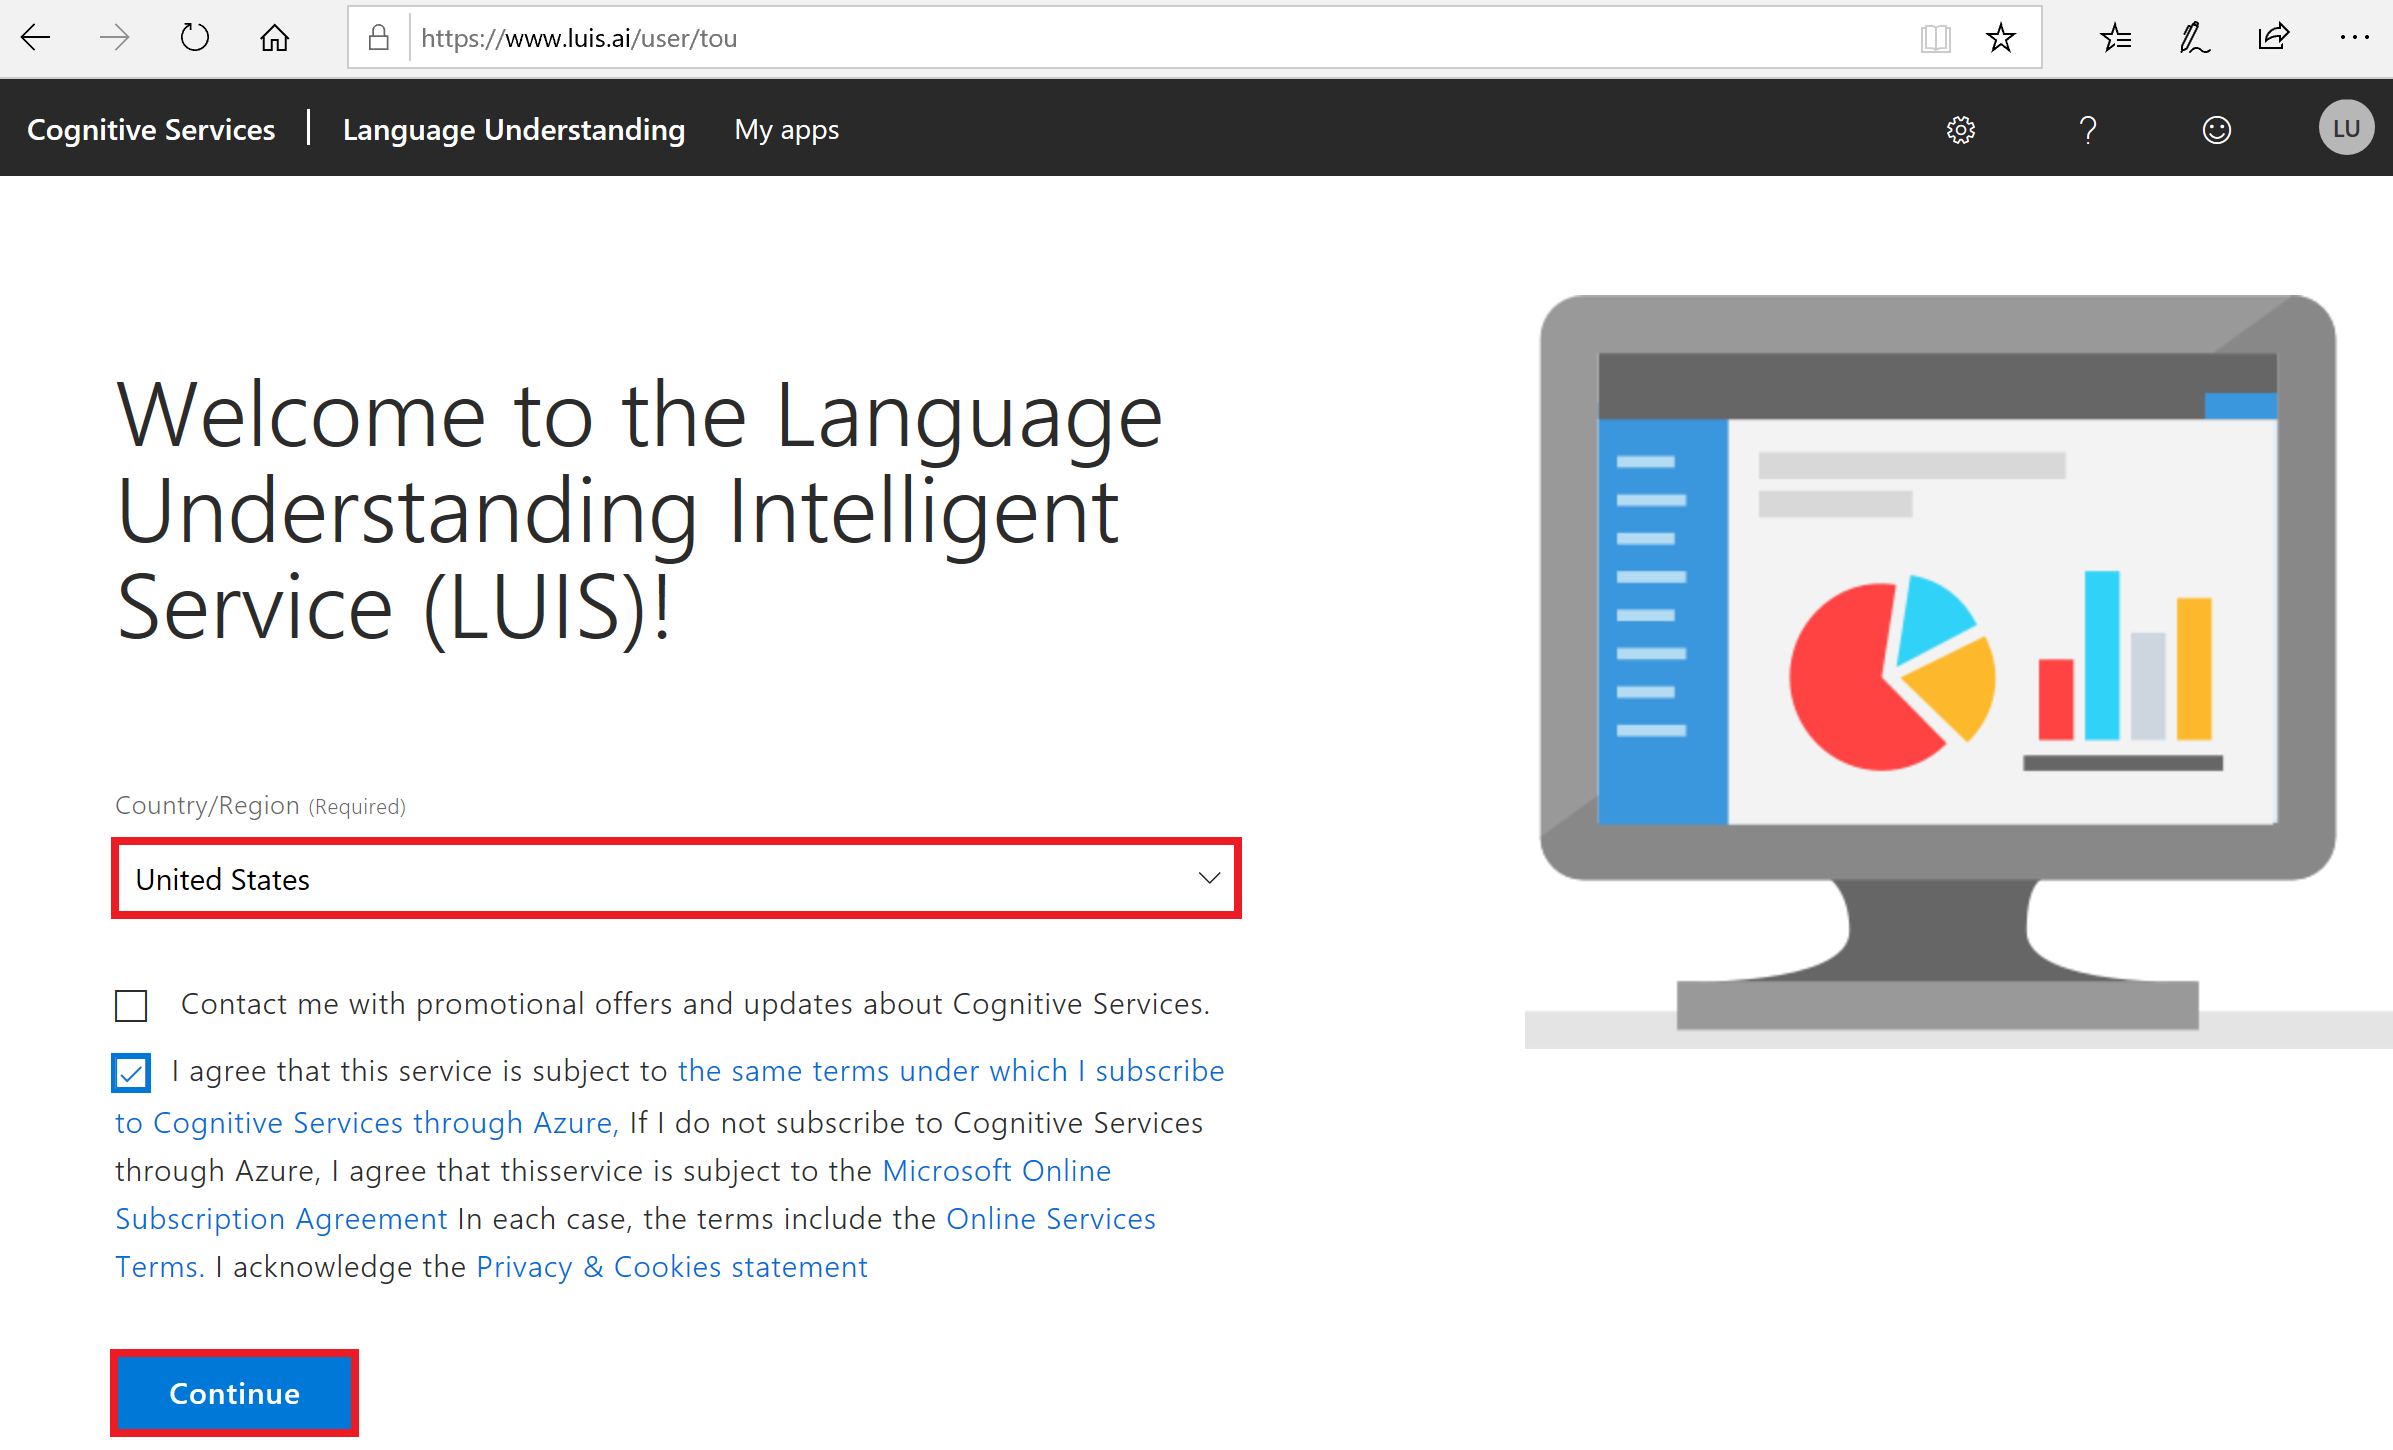
Open Microsoft Edge and navigate to https://www.luis.ai. If you are stuck on the "Loading" page for more than 10 seconds, refresh the page by clicking on F5 or the refresh button in the web browser
+ Why do we do this? The Virtual Assistant Template helps developers to make use of pre-written code samples to include specific functionalities that are common for chatbot scenarios. On the motto "Why reinventing the wheel?". The commands you will type in the next steps will run the script that automatically deploys different Azure services for specific funtionalities. In order that these various funtionalities can relate to each other and are well connected, we need to use Visual Studio, go into the code and insert information. -
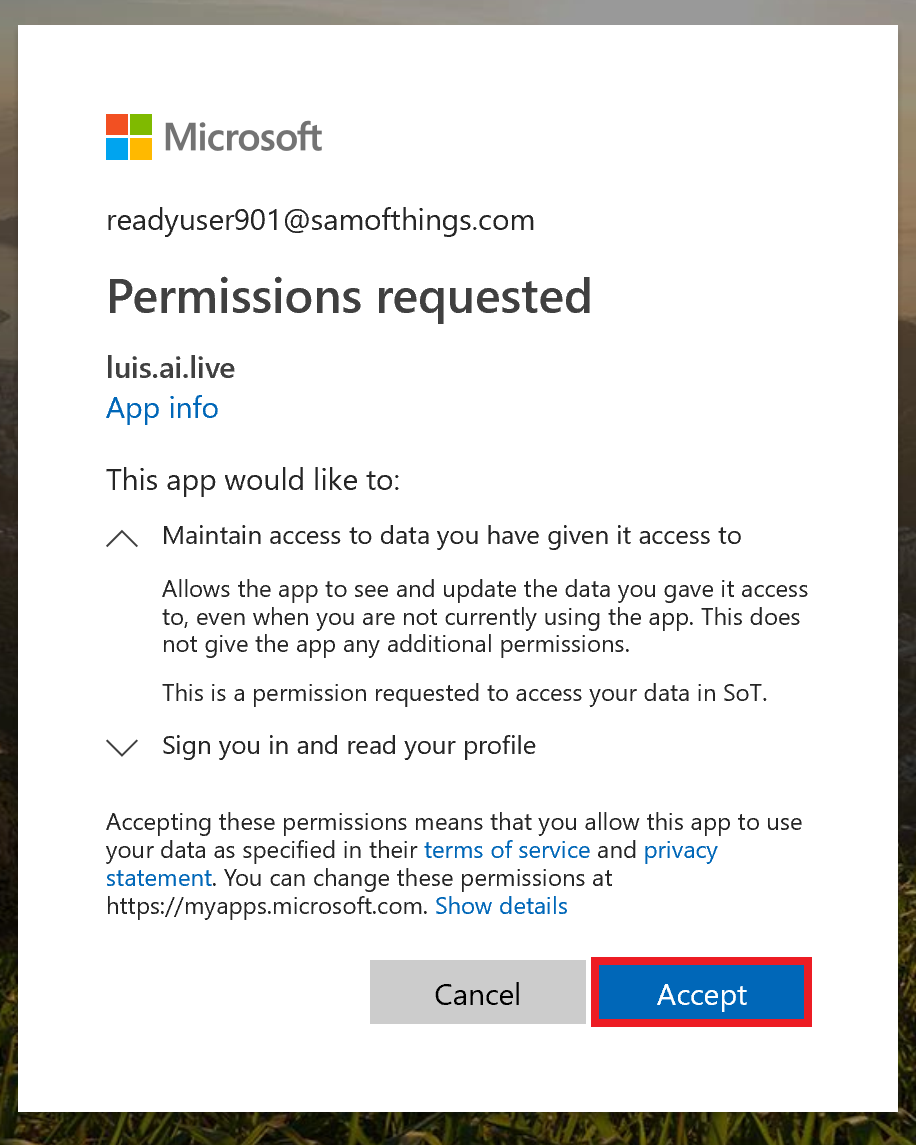
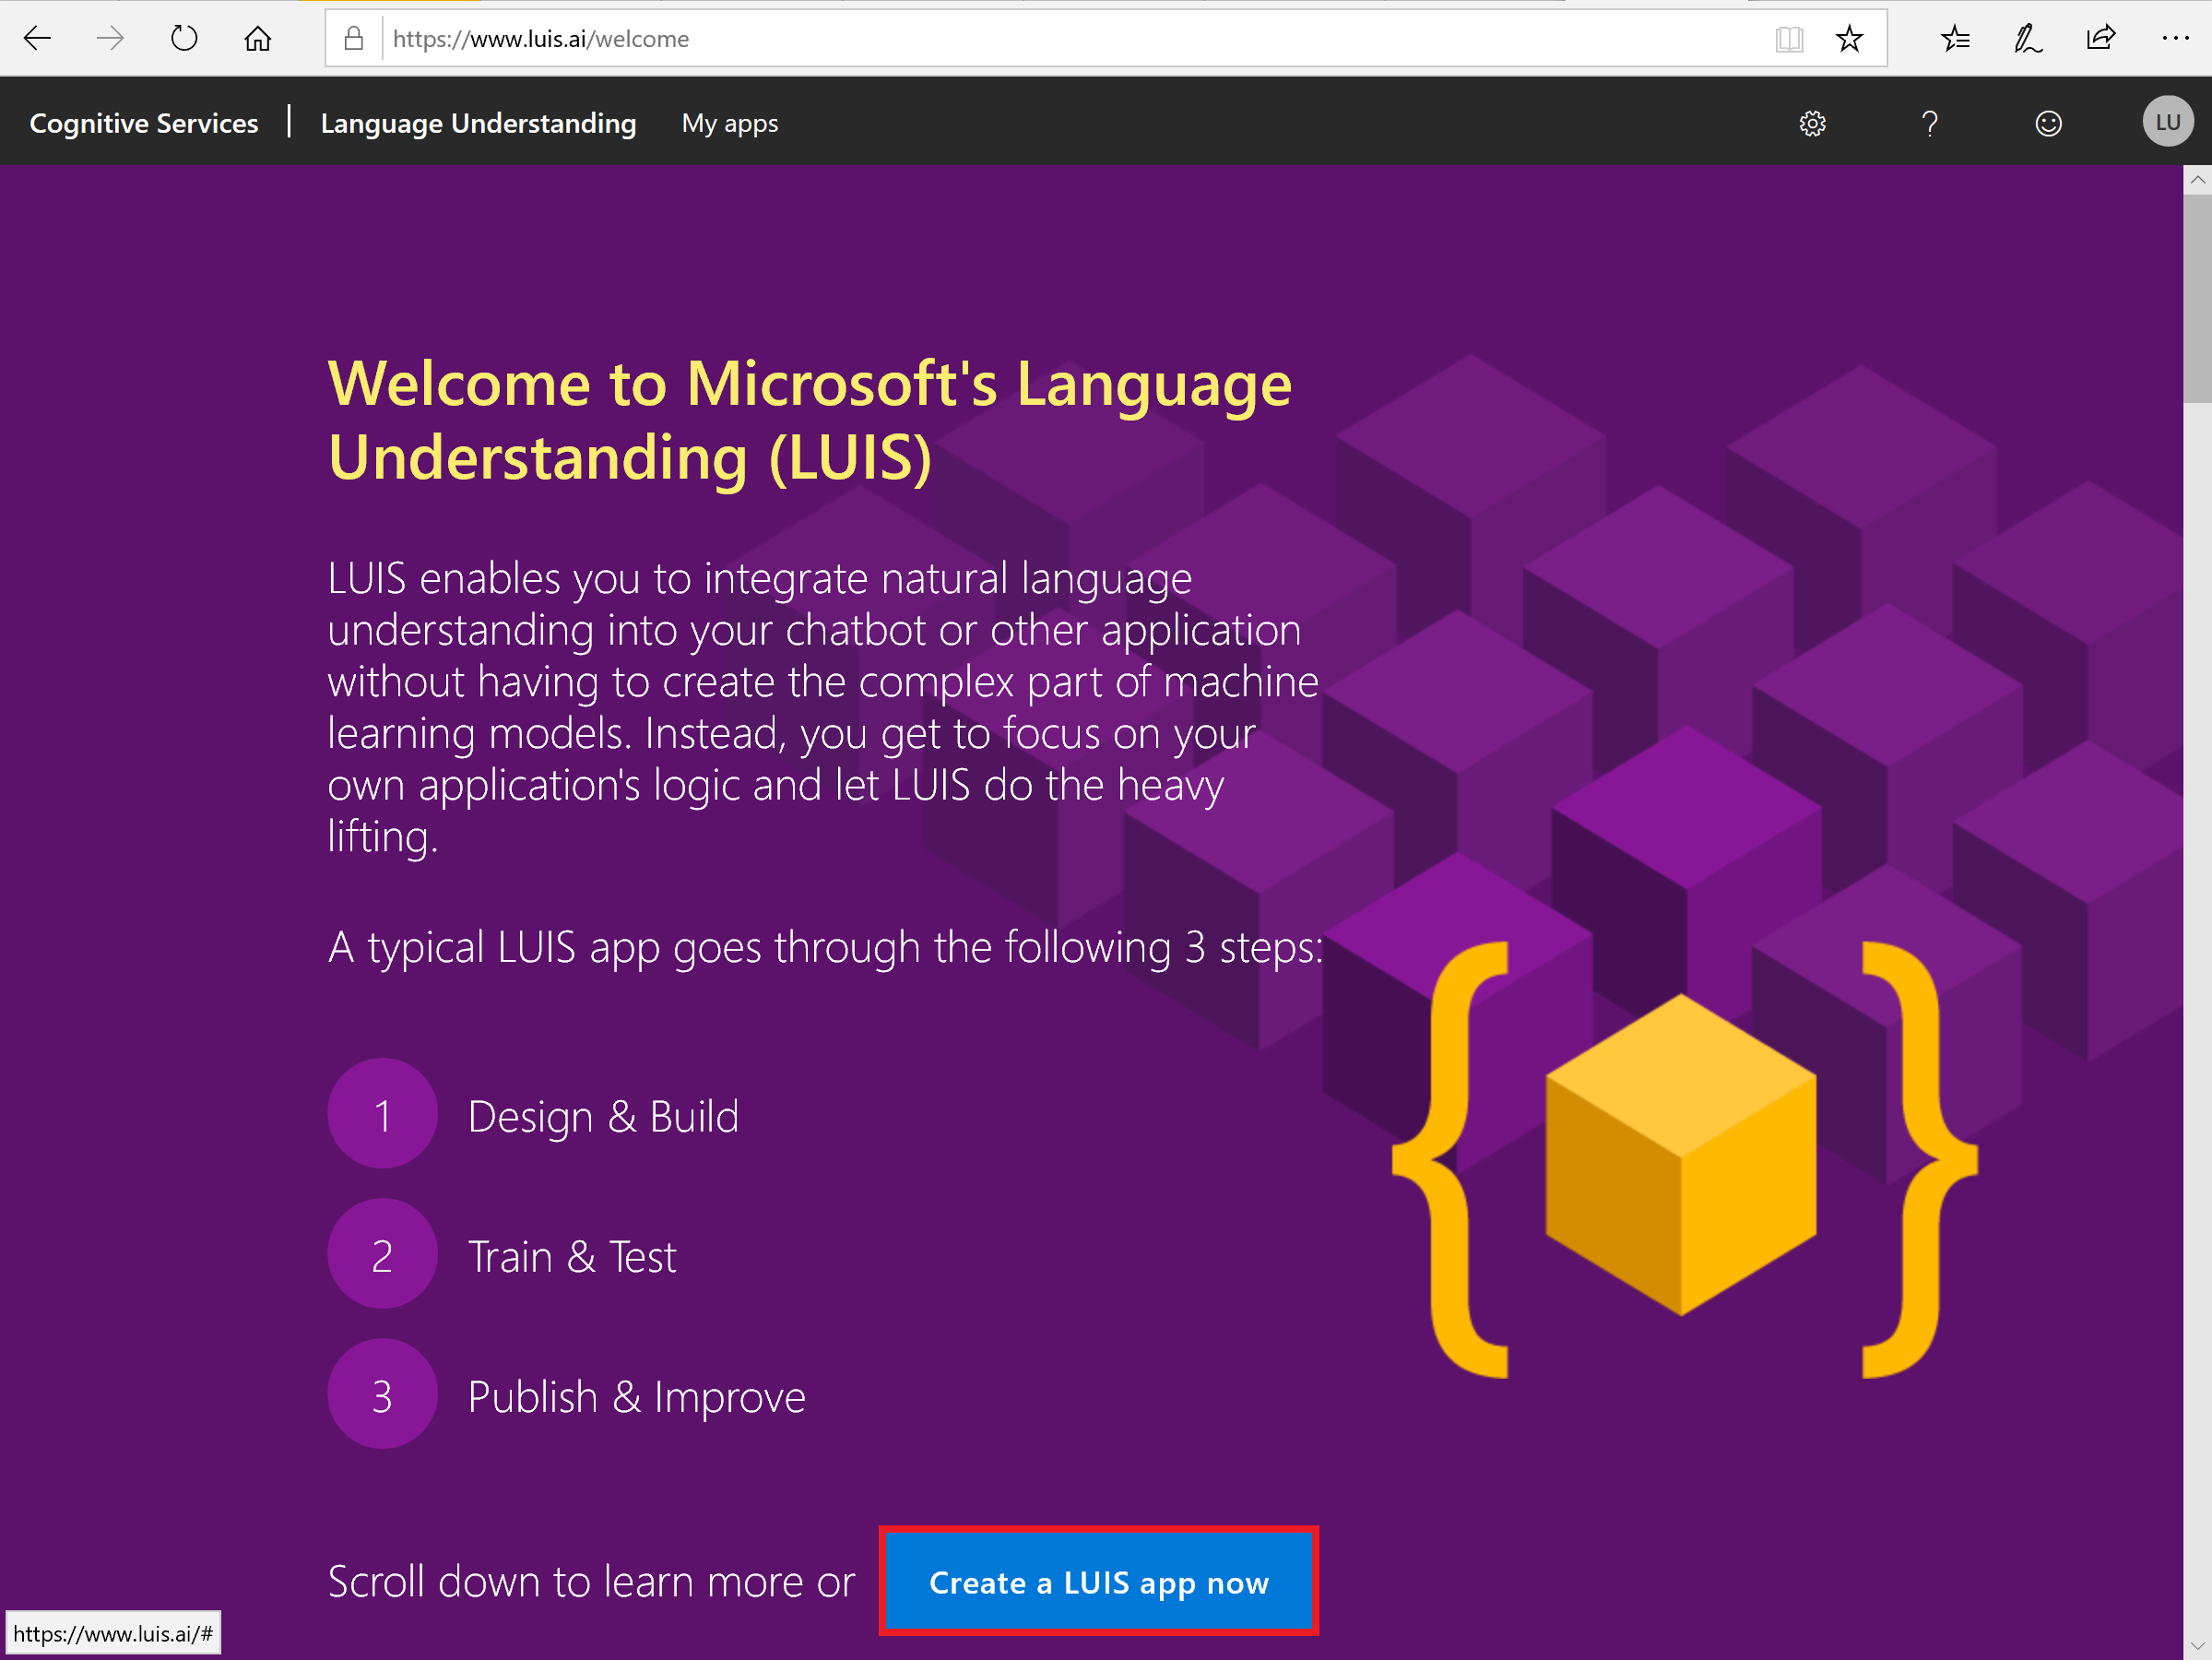
Sign in in with your lab credentials and follow the setup wizard. You will be promted to acceppt permissions and be directed to the home screen of LUIS. See the screenshots for your reference.
-
Click on top right corner, click on your username's initials and click on Settings. Finally, note down the authoring key to your sticky notes/notepad.

-
We will now use PowerShell 6 to log into Azure and create the Virtual Assistant resource.
On your computer, click on the Start menu (Windows Sign), search for PowerShell 6 and open it.
Before we can deploy the bot into Azure, we need to first login to Azure. Run the command below and login.
This will open a new window. Once the authentication is complete, switch back to the PowerShell window to continue with further commands.
az login
-
Copy the following command and paste it to your sticky notes or a notepad.
Replace {LABUSERNAME} with your lab's username (e.g. ReadyUser901).
Replace {WINDOWSUSERNAME} with your Window's login username.
Replace {YOURLUISAUTHORINGKEY} with your LUIS authoring key obtained from step 6.
Copy the new command from your notes and paste it into the PowerShell 6 window. This will trigger the deployment of the Virtual Assistant solution into Azure.
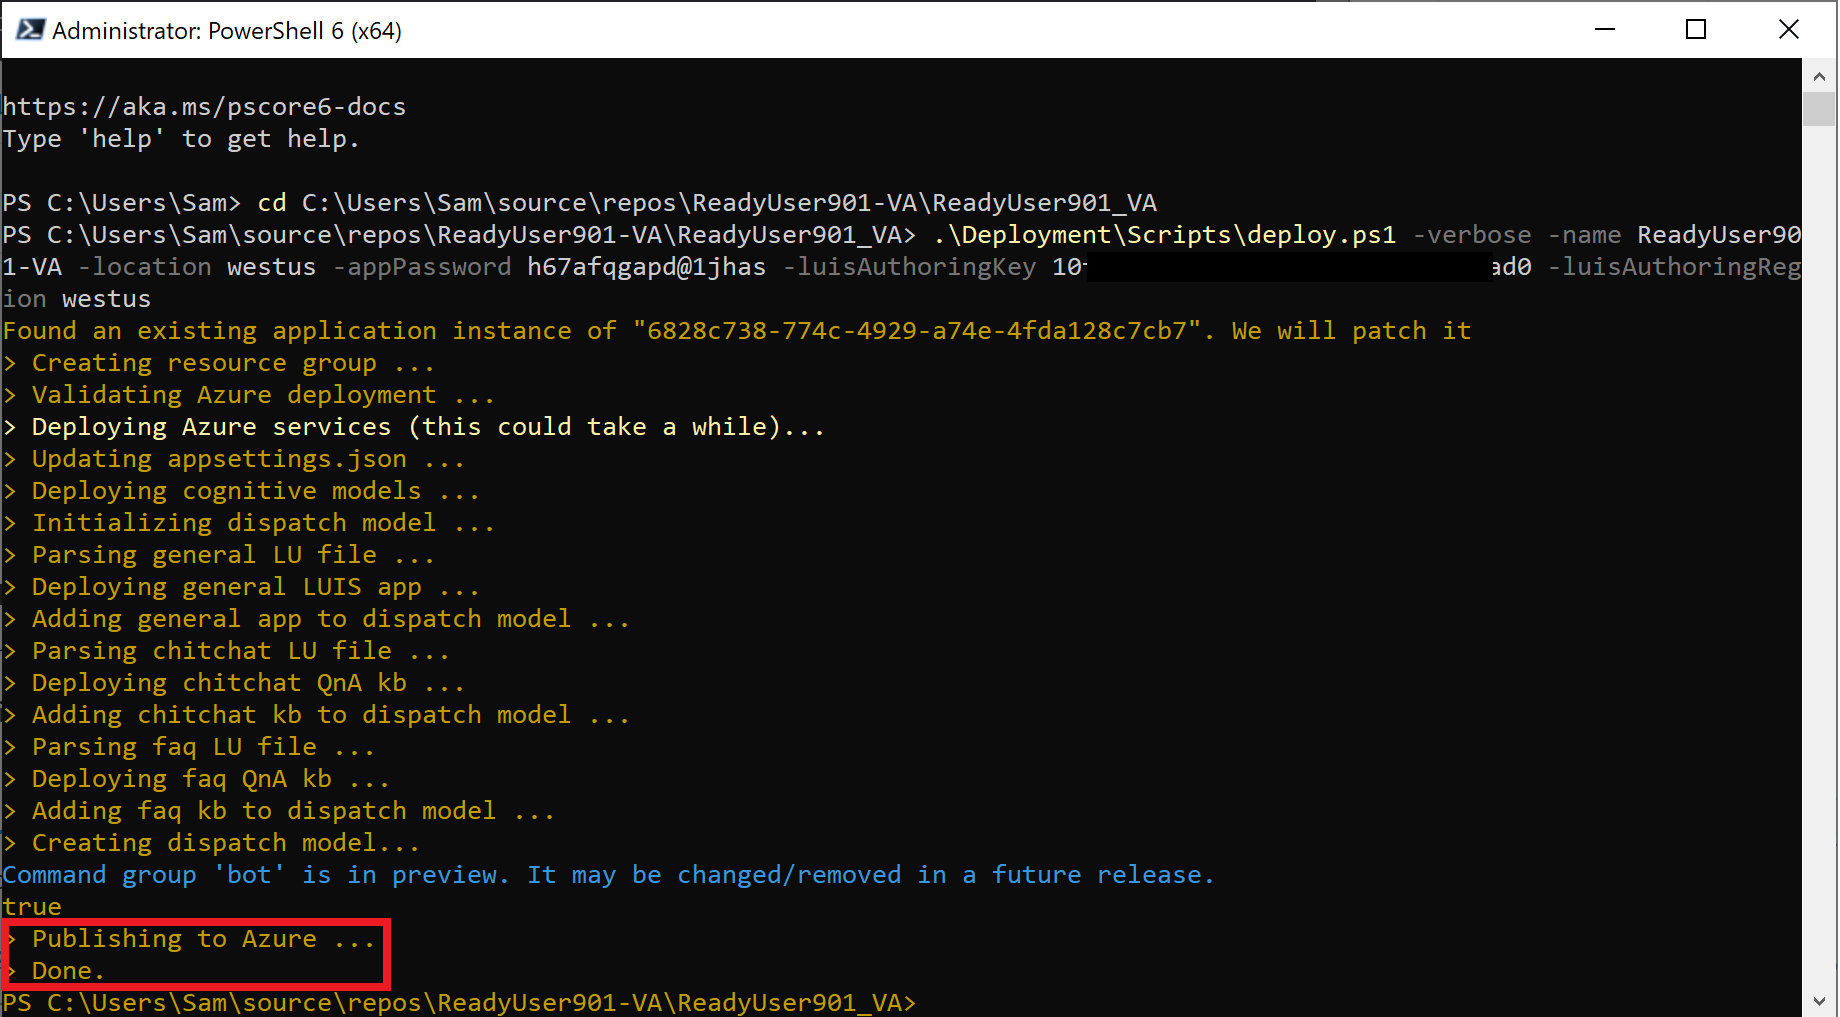
cd C:\Users\{WINDOWSUSERNAME}\source\repos\{LABUSERNAME}-VA\{LABUSERNAME}_VA .\Deployment\Scripts\deploy.ps1 -verbose -name {LABUSERNAME}-VA -location westus -appPassword h67afqgapd@1jhas -luisAuthoringKey {YOURLUISAUTHORINGKEY} -luisAuthoringRegion westusParameter Description Required nameUnique name for your bot. By default this name will be used as the base name for all your Azure Resources and must be unique across Azure. Yes locationThe region for your Azure Resources. By default, this will be the location for all your Azure Resources Yes appPasswordThe password for the Azure Active Directory App that will be used by your bot. It must be at least 16 characters long, contain at least 1 special character, and contain at least 1 numeric character. If using an existing app, this must be the existing password. Yes luisAuthoringKeyThe authoring key for your LUIS account, which is the one you took note in step 6. Yes luisAuthoringRegionThe authoring region of your LUIS account. Yes 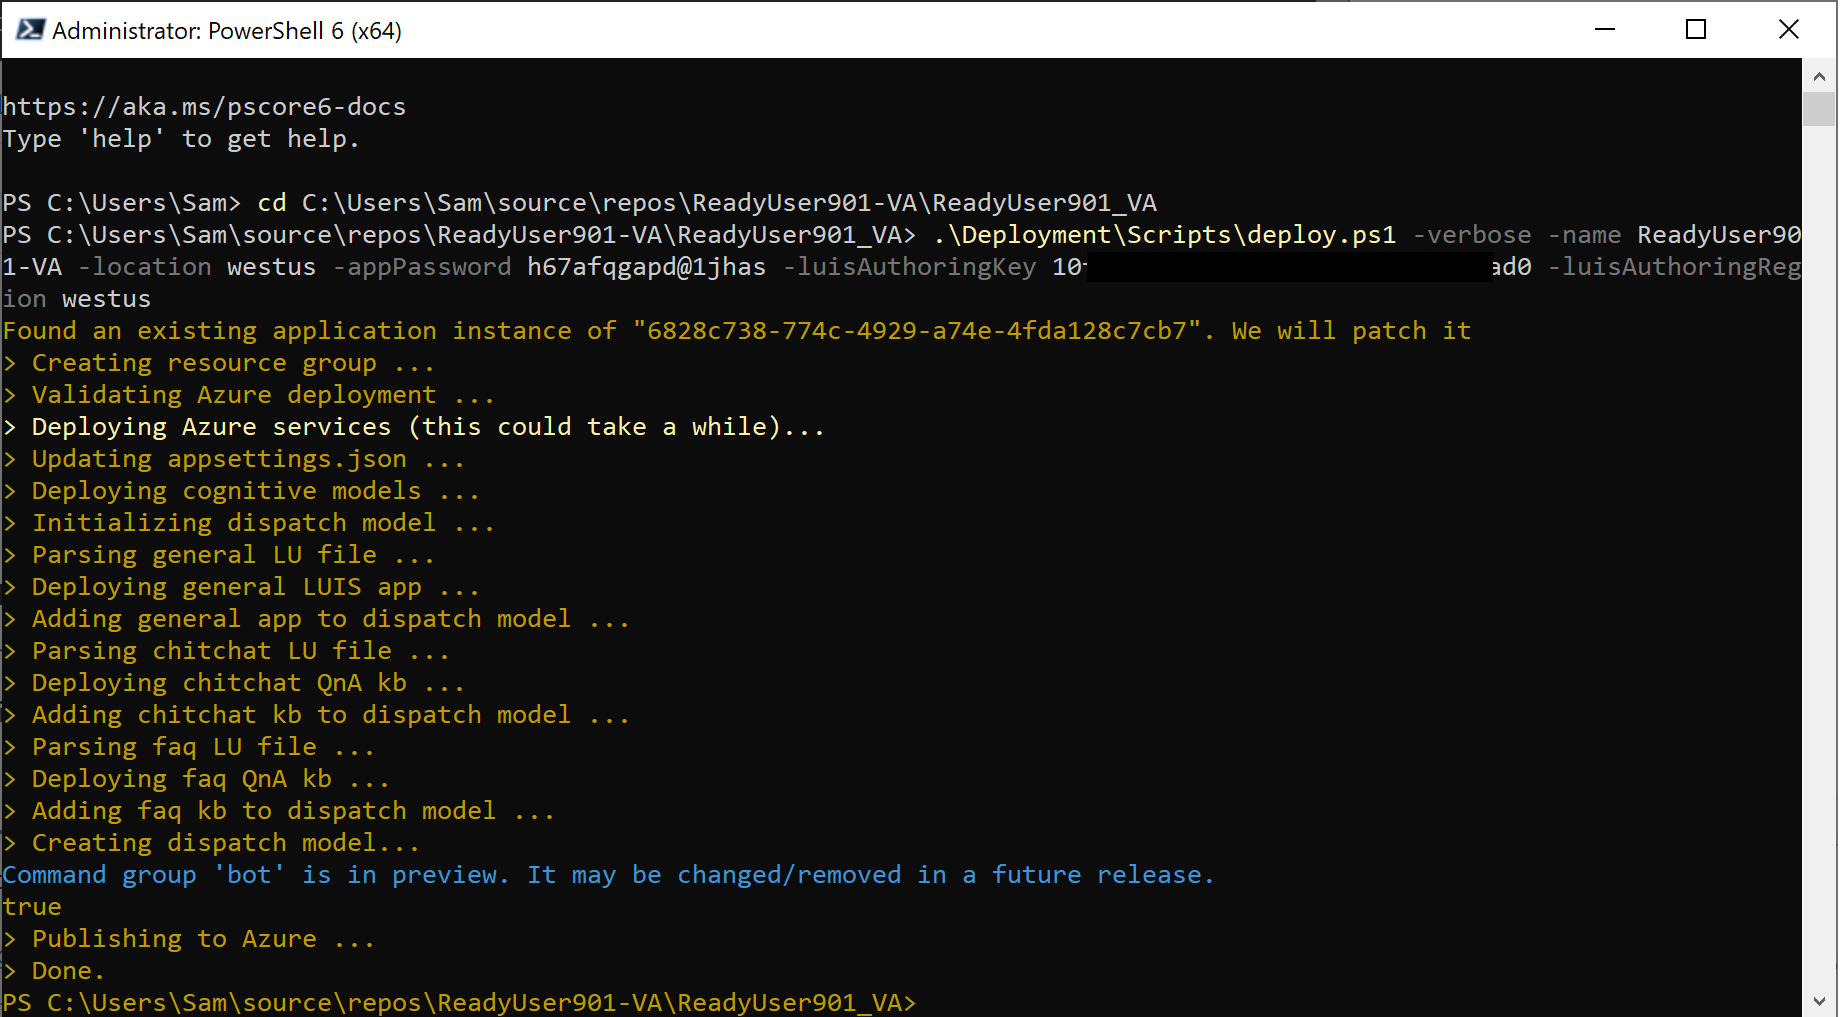
-
While the Virtual Assistant resource is being created, we will deploy in parallel the Point of Interest resource. In the end we have 2 bots/skills (VM and POI).
Therefore we are going to clone the botframework solutions repository that contains of the ready-made Point of Interest skill template. The Point of Interest (POI) Skill adds the funtionality to the bot to find points of interest and directions, powered by Azure Maps and FourSquare.
-
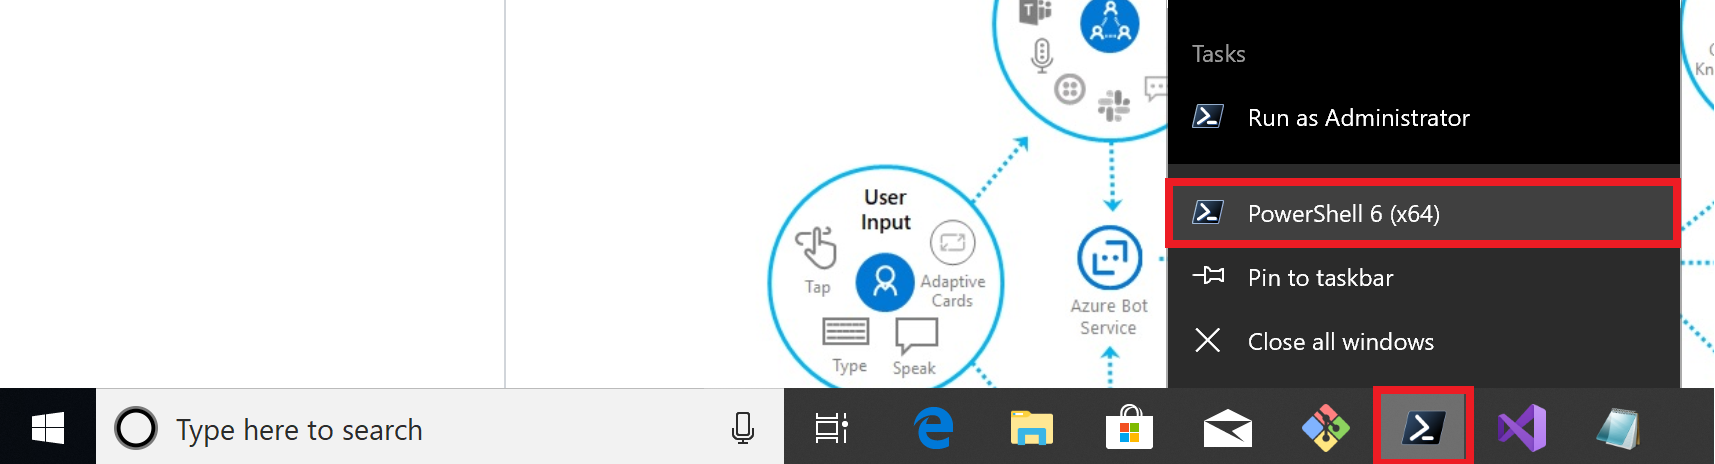
Open a new PowerShell 6 window by right clicking on the PowerShell icon in the taskbar and clicking on PowerShell 64 (x64).
-
We are going to clone the botframework solutions repository that contains the ready-made Point of Interest skill.
-
Copy the following command and paste it to your sticky notes or a notepad.
Replace {LABUSERNAME} with your lab's username (e.g. ReadyUser901).
Replace {WINDOWSUSERNAME} with your Window's login username.
Replace {YOURLUISAUTHORINGKEY} with your LUIS authoring key obtained from step 6.
Copy the new command from your notes and paste it into the PowerShell 6 window. The following commands will clone the botframework solutions repository, navigate to the Point of Interest skill and run the bot deployment script:
cd source\repos
git clone https://github.com/samaea/botframework-solutions
cd C:\Users\{WINDOWSUSERNAME}\source\repos\botframework-solutions\skills\src\csharp\pointofinterestskill\pointofinterestskill
.\Deployment\Scripts\deploy.ps1 -verbose -name {LABUSERNAME}-PointofInterestSkill -location westus -appPassword h67afqgapd@1jhas -luisAuthoringKey {YOURLUISAUTHORINGKEY} -luisAuthoringRegion westus
Parameter Description Required nameUnique name for your bot. By default this name will be used as the base name for all your Azure Resources and must be unique across Azure. Yes locationThe region for your Azure Resources. By default, this will be the location for all your Azure Resources Yes appPasswordThe password for the Azure Active Directory App that will be used by your bot. It must be at least 16 characters long, contain at least 1 special character, and contain at least 1 numeric character. If using an existing app, this must be the existing password. Yes luisAuthoringKeyThe authoring key for your LUIS account, which is the one you took note in step 6. Yes luisAuthoringRegionThe authoring region of your LUIS account. Yes + Note Note: The official Microsoft repository for the Virtual Assistant/Skills template is https://github.com/microsoft/botframework-solutions. To ensure updates will not affect this lab, we have copied an own version.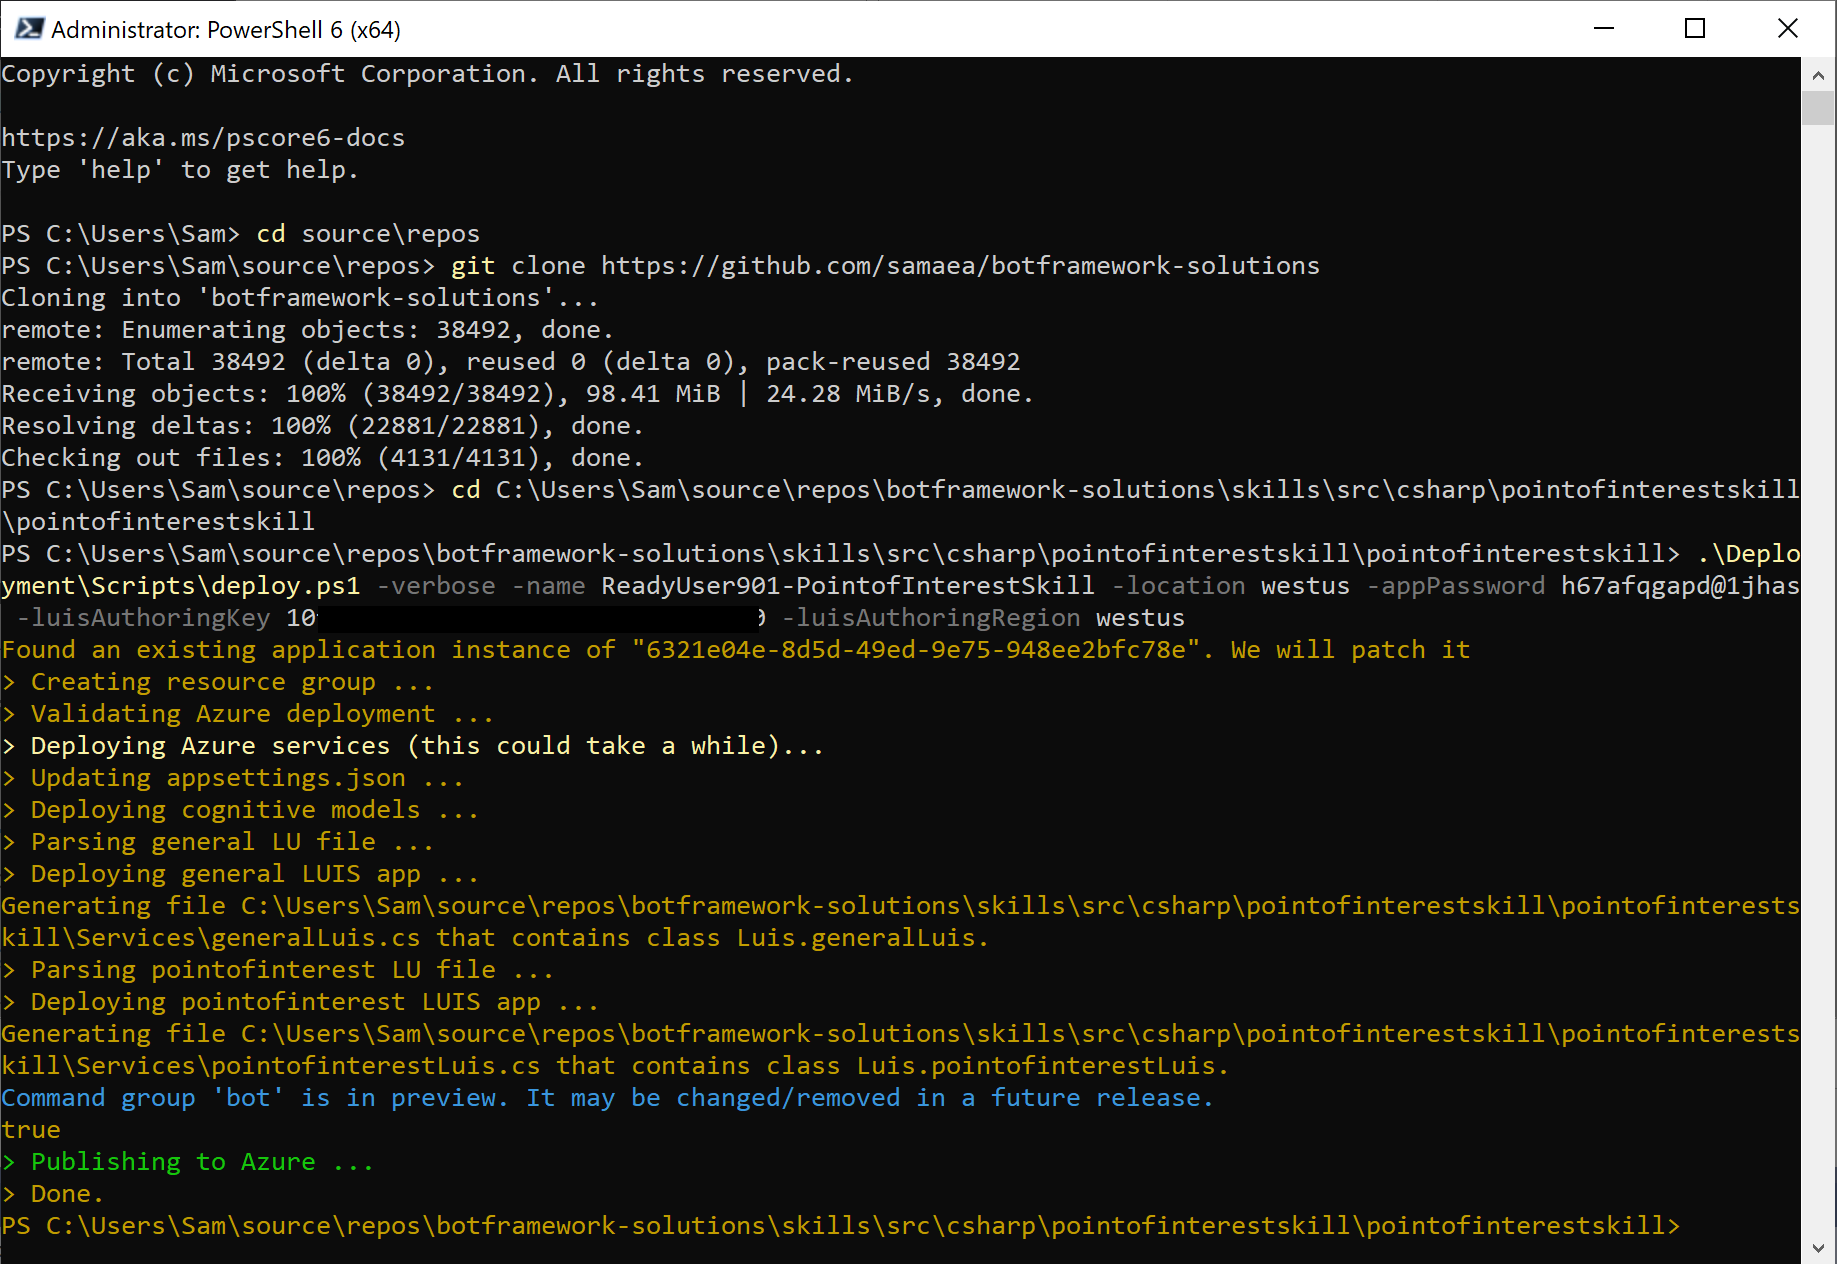
-
Please wait until both PowerShell deployment windows are finished (the Virtual Agent and the Point of Interest deployment) before proceeding. Otherwise you may face unexpected errors.
You will know it is finished when you see an identical output from both deployments:
-
The template automates the deployment of the POI skill, however we need to insert the Azure Maps API key manually:
Navigate to www.portal.azure.com and log in with your Lab credentials.
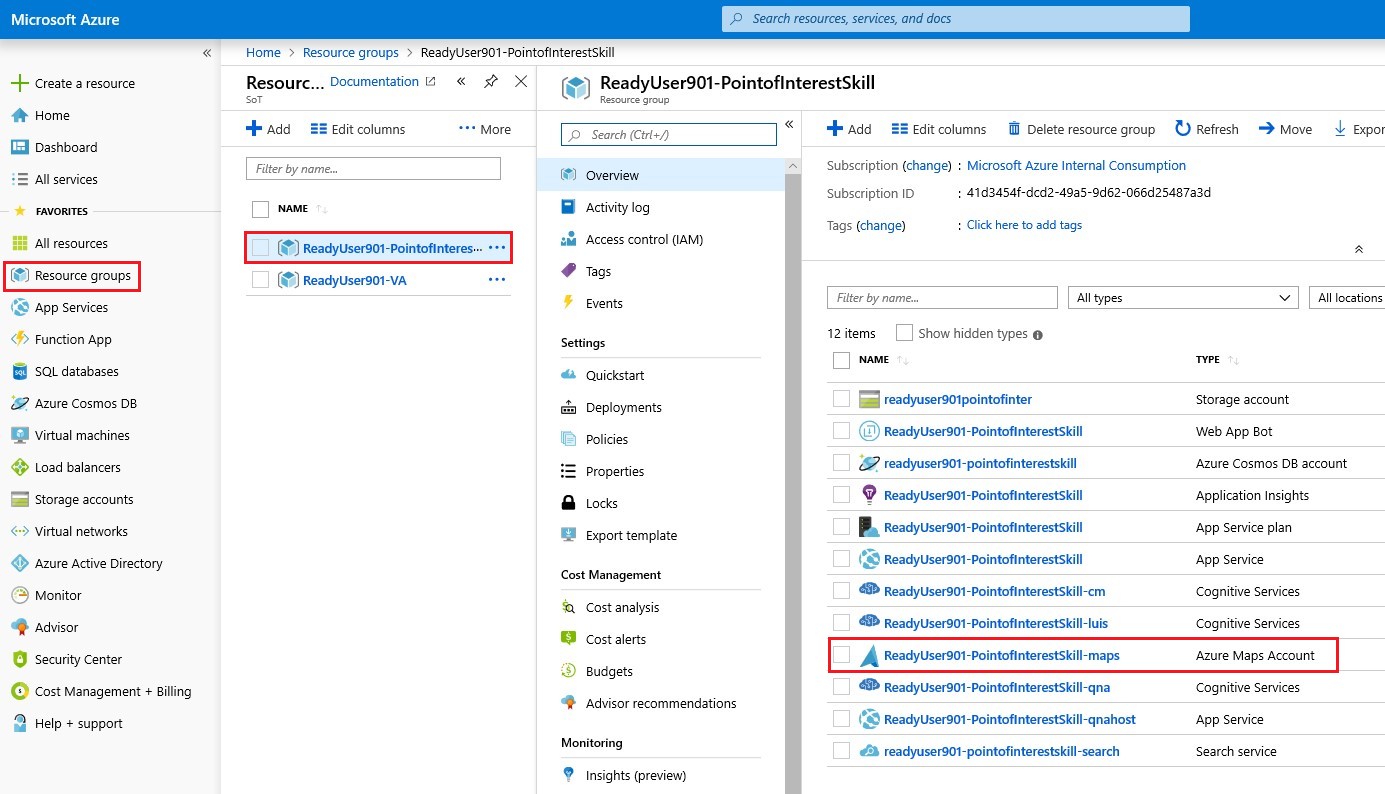
On the left, click on Resource Groups and find your {LABUSERNAME}-Pointofinterest Resource Group.
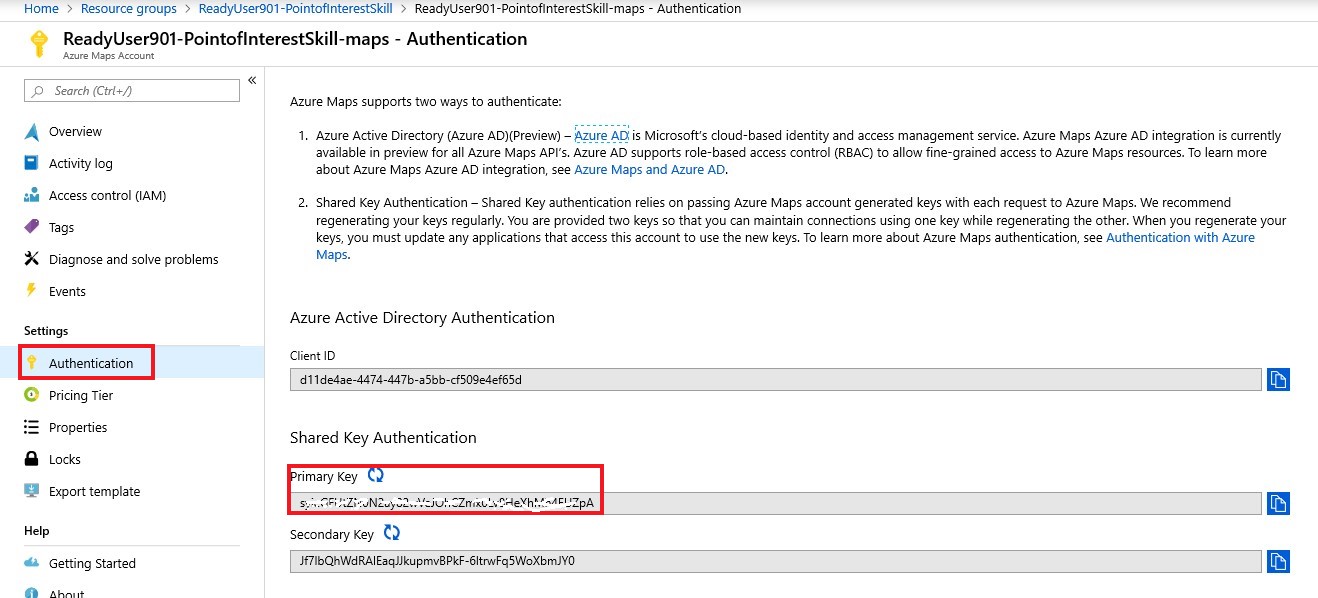
If you click on it, you will find the Azure services that were deployed with the previous steps we performed. Search for the Azure service "Azure Maps Account". Click on it and find in the left pane Authentication. Open and copy the Primary Key to your sticky notes/notepad.
-
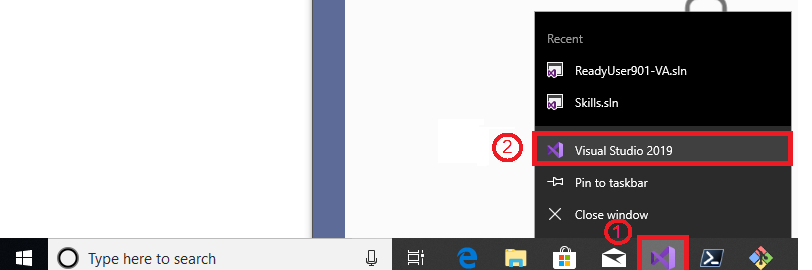
Now open a new Visual Studio 2019 window by right clicking on the Visual Studio icon in the taskbar and clicking on Visual Studio 2019. A new window should open.
-
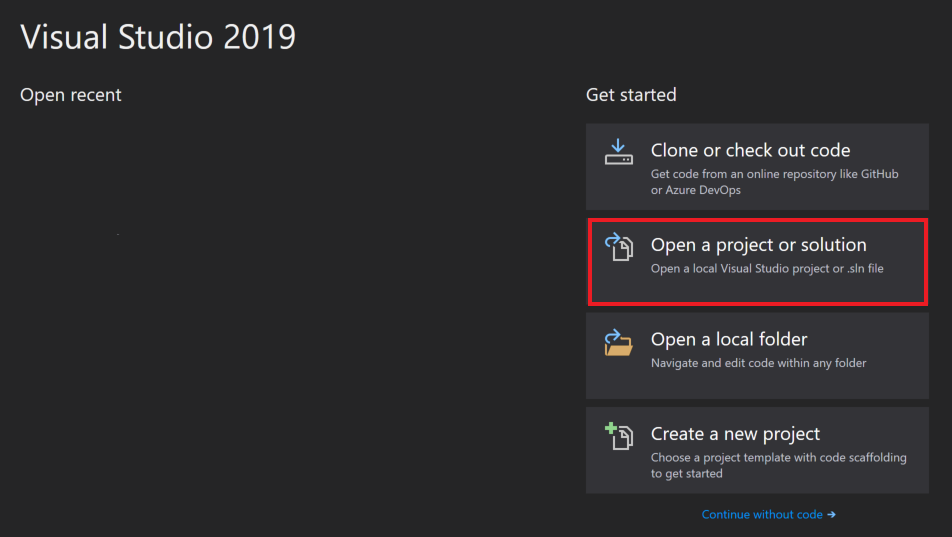
Click on open a new project.
-
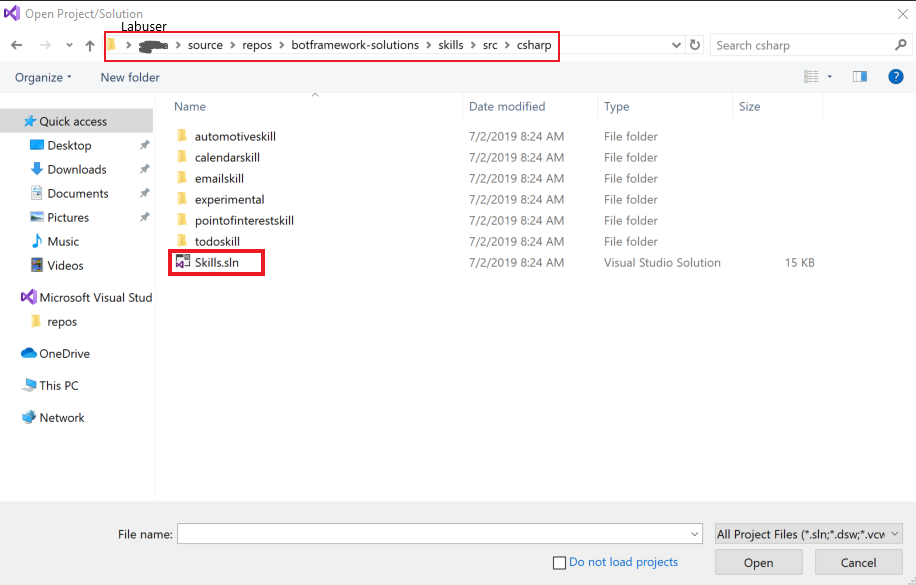
Navigate trough the following path (in the screenshot circled in red) to find the Visual Studio solution Skills.sln : labuser > source > repos > botframework-solutions > skills > src > csharp > "open skills.sln"
-
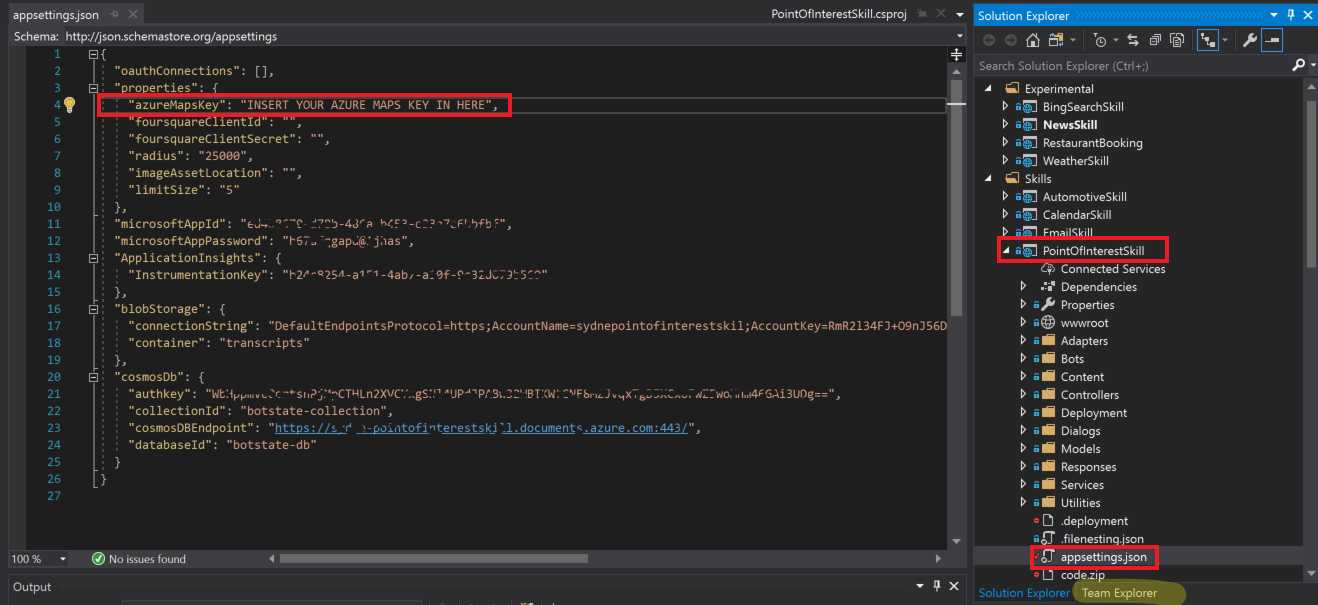
On the right tab, scroll down until you find the PointOfInterestSkill tab. Open appsettings.json and insert your Azure Maps Key in the code to your left under "azureMapsKey" with the "". It should be in line 4.
-
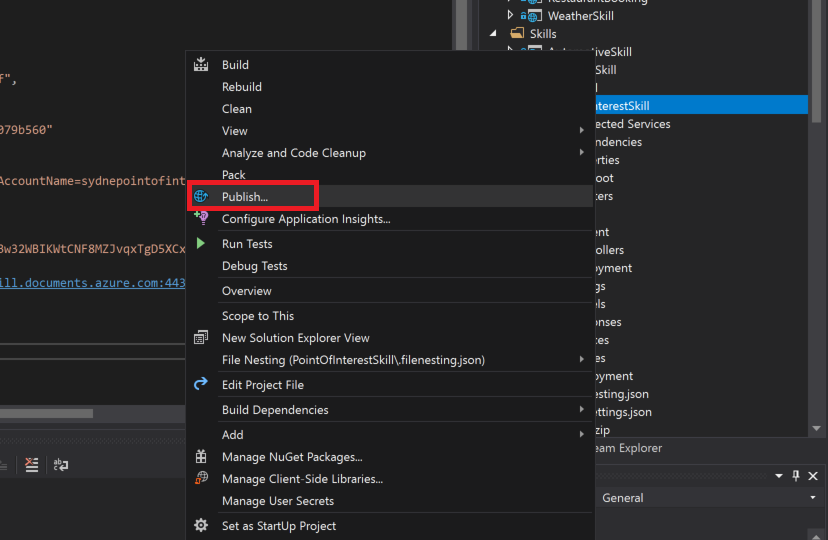
Now we need to update the changes. In the same window, again on your right, right-click on the PointOfInterestSkill tab and click "Publish".
-
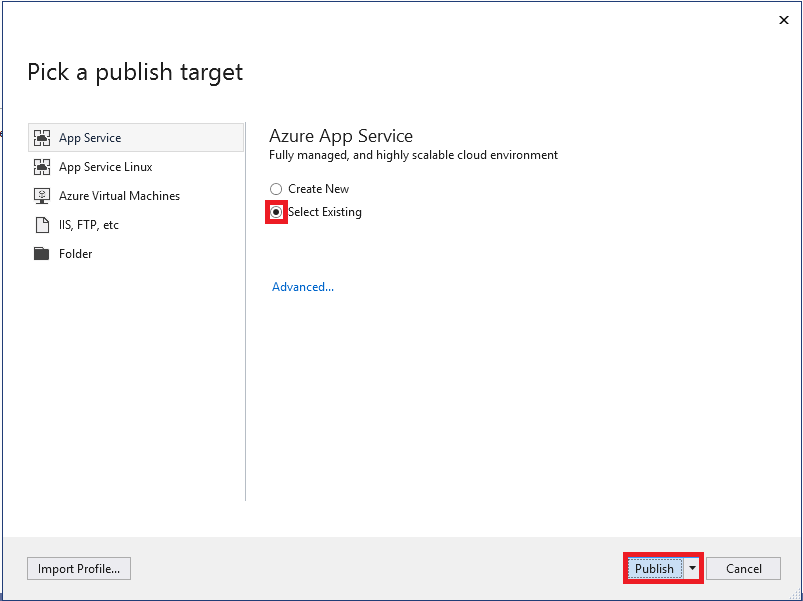
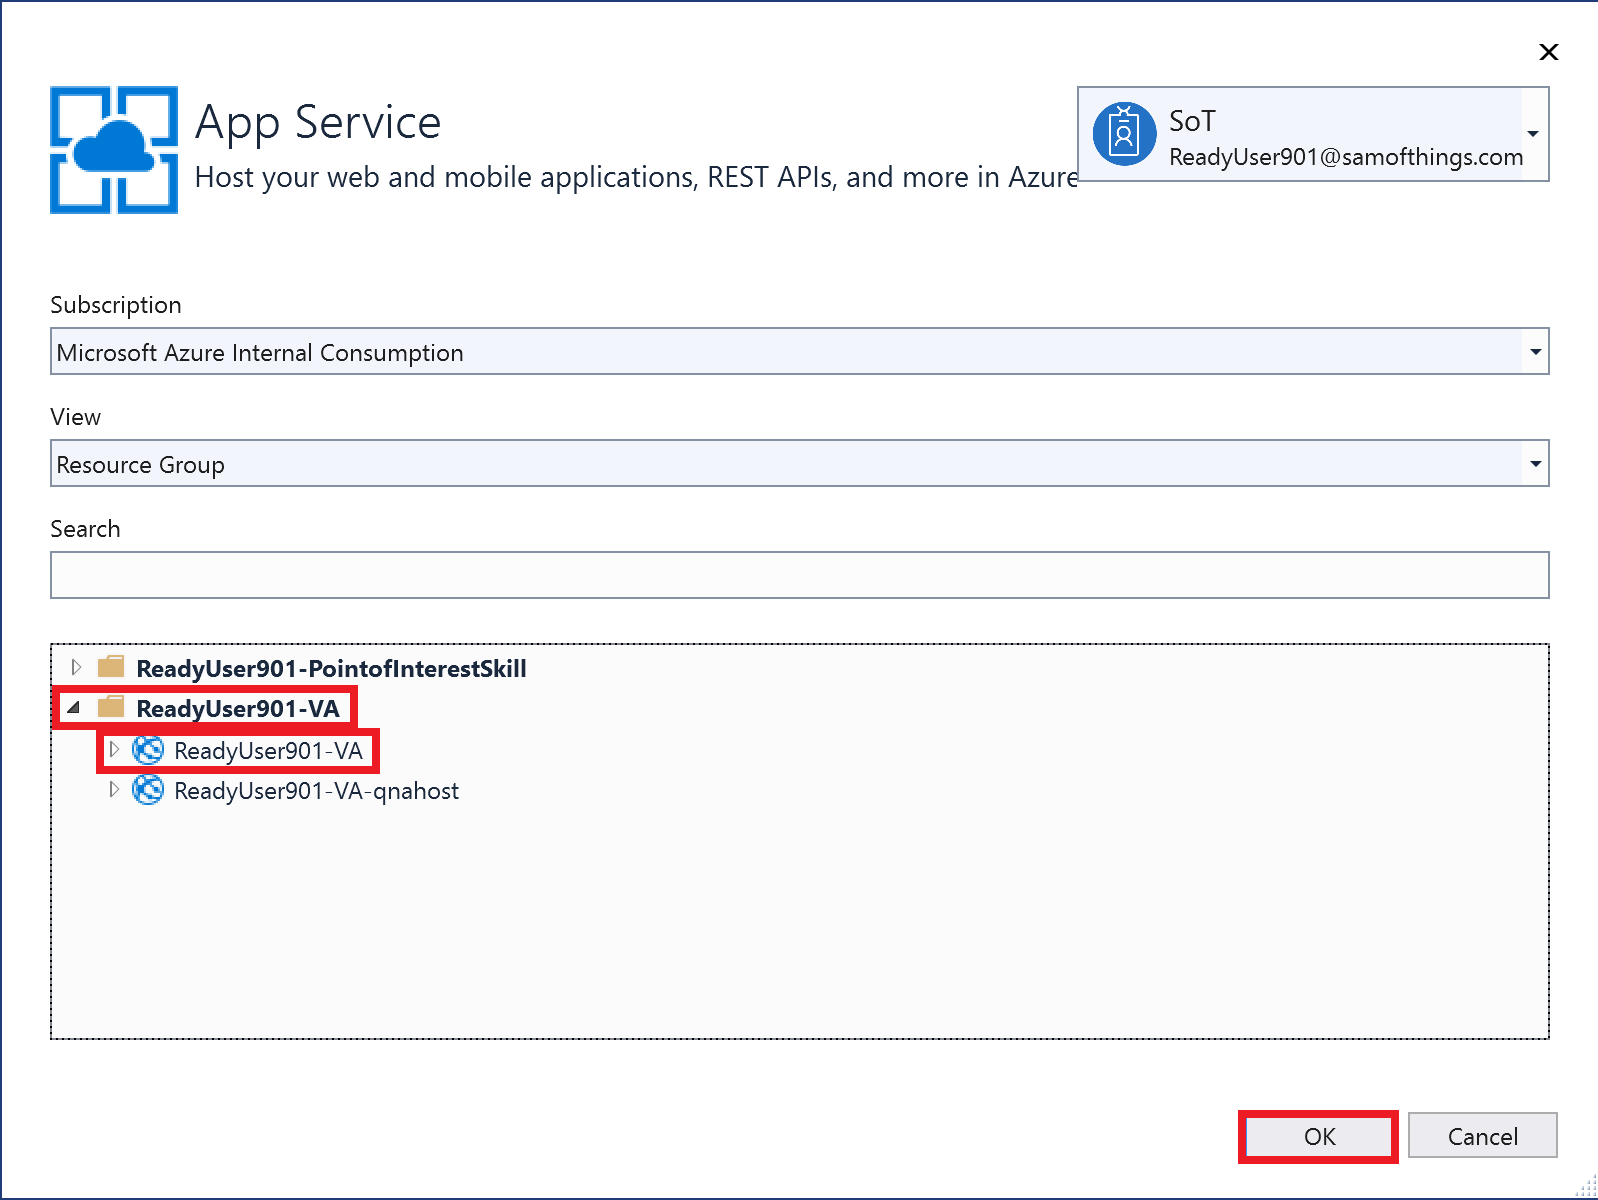
A wizard should open up. Click on "Select Existing" and then Publish.
-
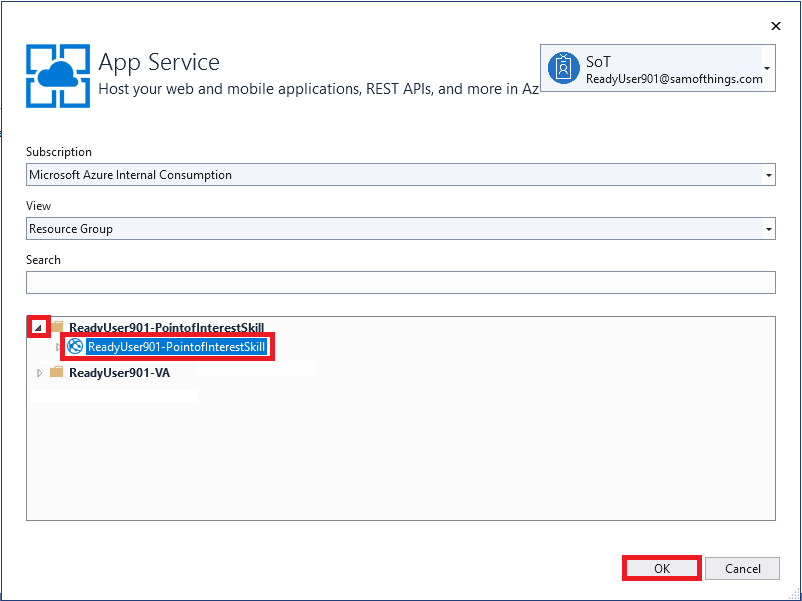
Expand the menu by clicking on the "ReadyUser{LABUSERNAME}-PointofInterestSkill" folder and selecting the "ReadyUser{LABUSERNAME}-PointofInterestSkill" app service. Finally, click on Publish.
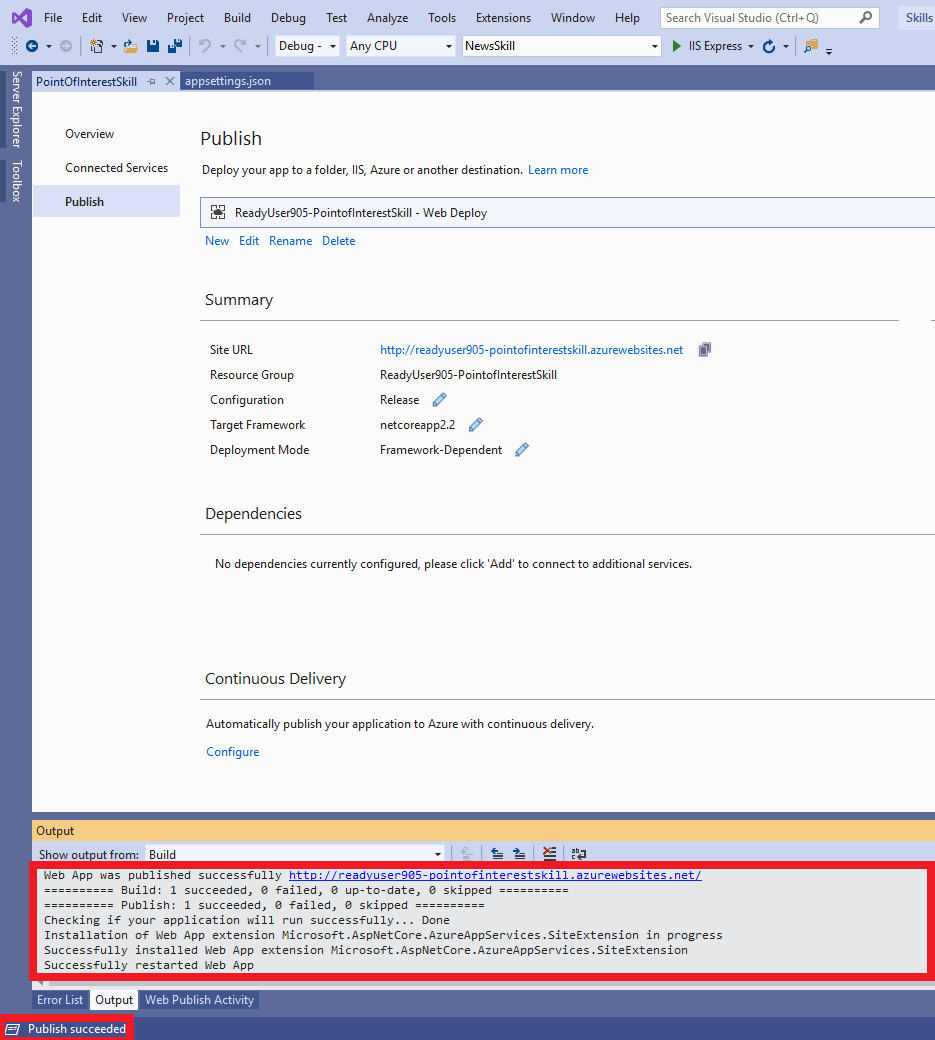
+ Why do we do this? You successfully updated the integration of the Azure Maps Key into the Point of Interest Skill for your Bot to be able to use Bing Maps to search for locations. -
Up to now, we created two different bots: The Virtual Assistant and the Point of Interest Skill Bot. Since the Virtual Assistant should be able to use the POI skill, we will now link them:
Navigate to the Virtual Assistant PowerShell 6 window and then run the botskills command (below) to join the Virtual Assistant bot with the Point of Interest Skill/Bot:
Copy the command to your sticky notes/notepad and replace {LABUSERNAME} with your Lab credentials. Copy again and insert the command into the PowerShell 6 window (use one that is already open or open a new window). Run the command by hitting "Enter".
cd C:\Users\{WINDOWSUSERNAME}\source\repos\{LABUSERNAME}-VA\{LABUSERNAME}_VA\
botskills connect --botName {LABUSERNAME}-PointofInterestSkill --remoteManifest "http://{LABUSERNAME}-PointofInterestSkill.azurewebsites.net/api/skill/manifest" --luisFolder "C:/Users/labuser/source/repos/botframework-solutions/skills/src/csharp/pointofinterestskill/pointofinterestskill/Deployment/Resources/LU/en/" --cs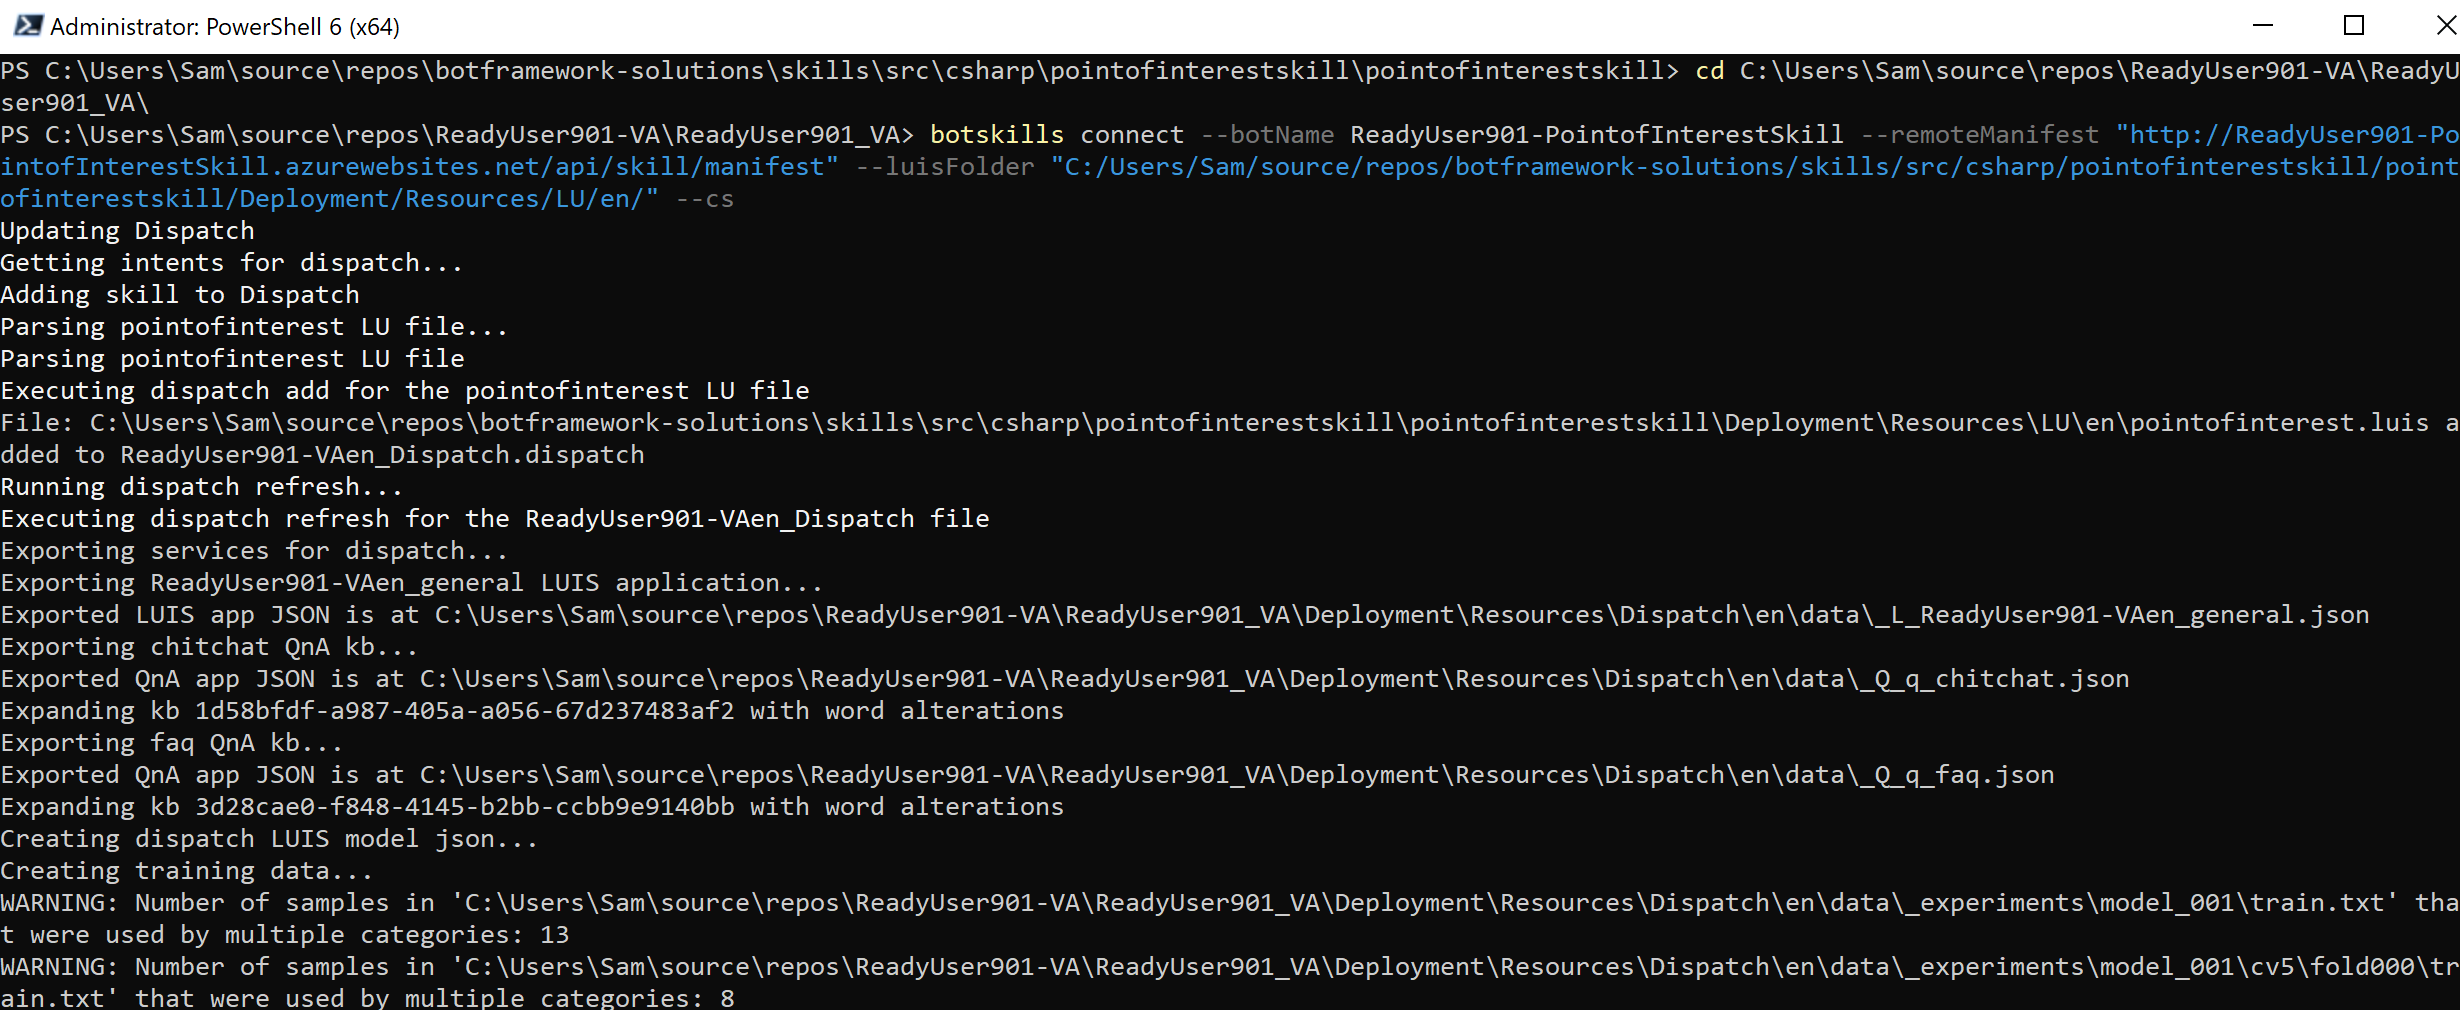
-
The above command made some changes to the code. To reflect these changes for the Virtual Assistant in the cloud, we need to push these updates back to Azure.
Similarly what we did with the PointOfInterest Skill solution, we will do the same for the Virtual Assistant solution by using Visual Studio. Switch to the Visual Studio window that has your ReadyUser{LABUSERNAME}-VA solution opened and follow the Publish process (i.e identical to what you did in steps 15-17, but this time with the Virtual Assistant solution instead and selecting ReadyUser{LABUSERNAME}-VA instead of ReadyUser{LABUSERNAME}-PointofInterestSkill.
The template created an Azure service called QnA-Maker that helps to easily insert "Frequently Asked Questions" websites or files for the bot to make use of and be able to give appropriate answers to questions that are stated in these documents. The FaQ files are populated into the QnA-Maker so-called knowledge base. We will now update the QnA Maker with our Microsoft Ready FaQs in a word document.
-
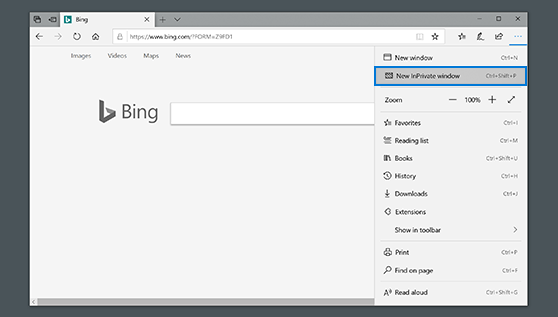
Open an In-Private browsing in Microsoft Edge. Download the Microsoft Ready FaQ document by navigating to: https://aka.ms/msreadyfaq and input your Microsoft credentials when requested. Save it to the VM desktop.
-
Navigate in a web browser to www.qnamaker.ai, click on My Knowledge bases and sign in with your lab credentials. You will find 2 knowledgebases: "faq" and "chitchat" already created by the template. The template comes with some example faq as you can see when clicking on the knowledge base.
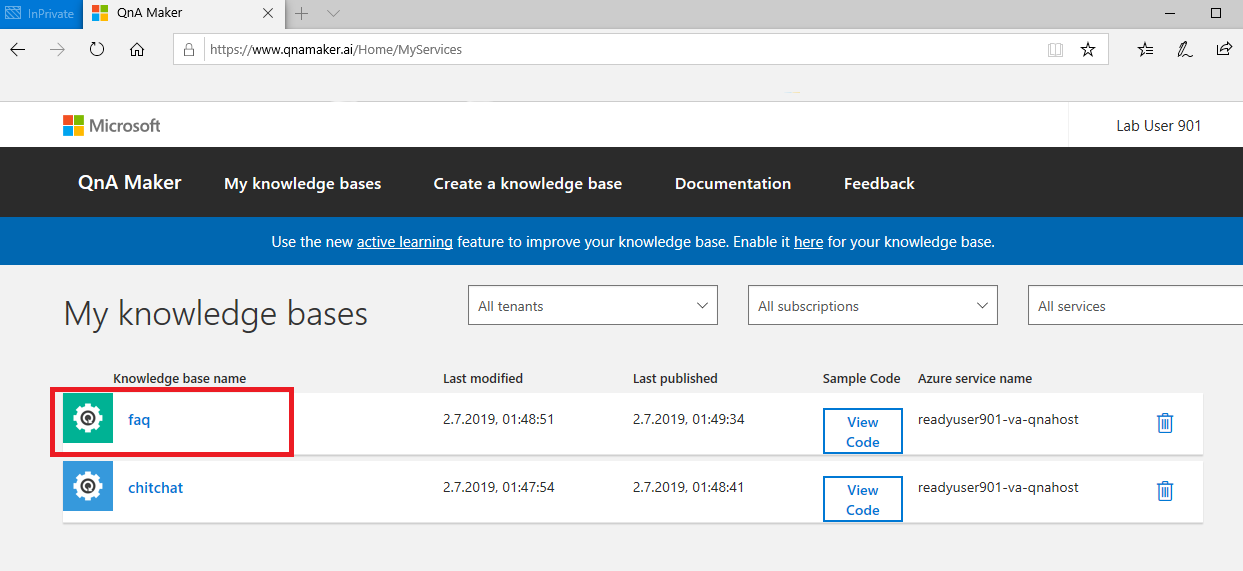
-
Open the faq and navigate to "settings" on the top right pane.
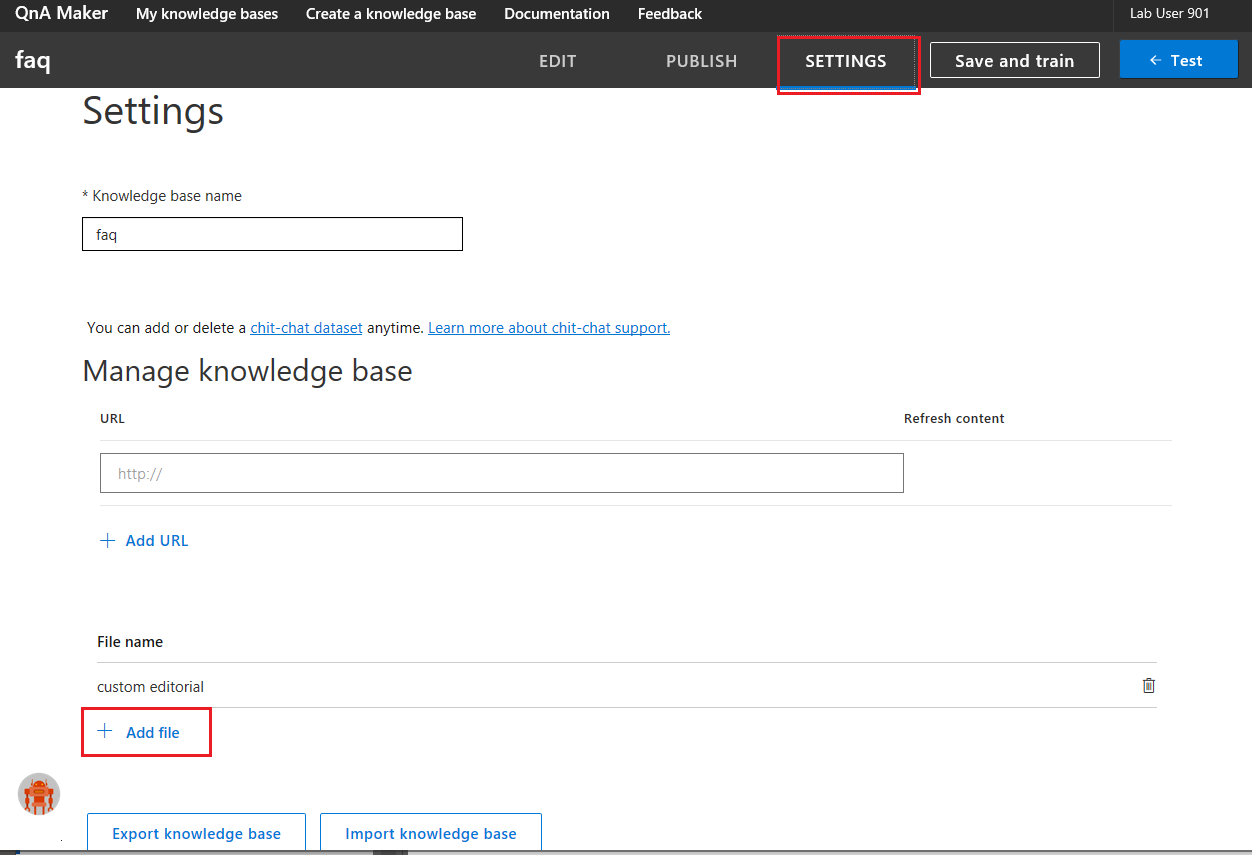
-
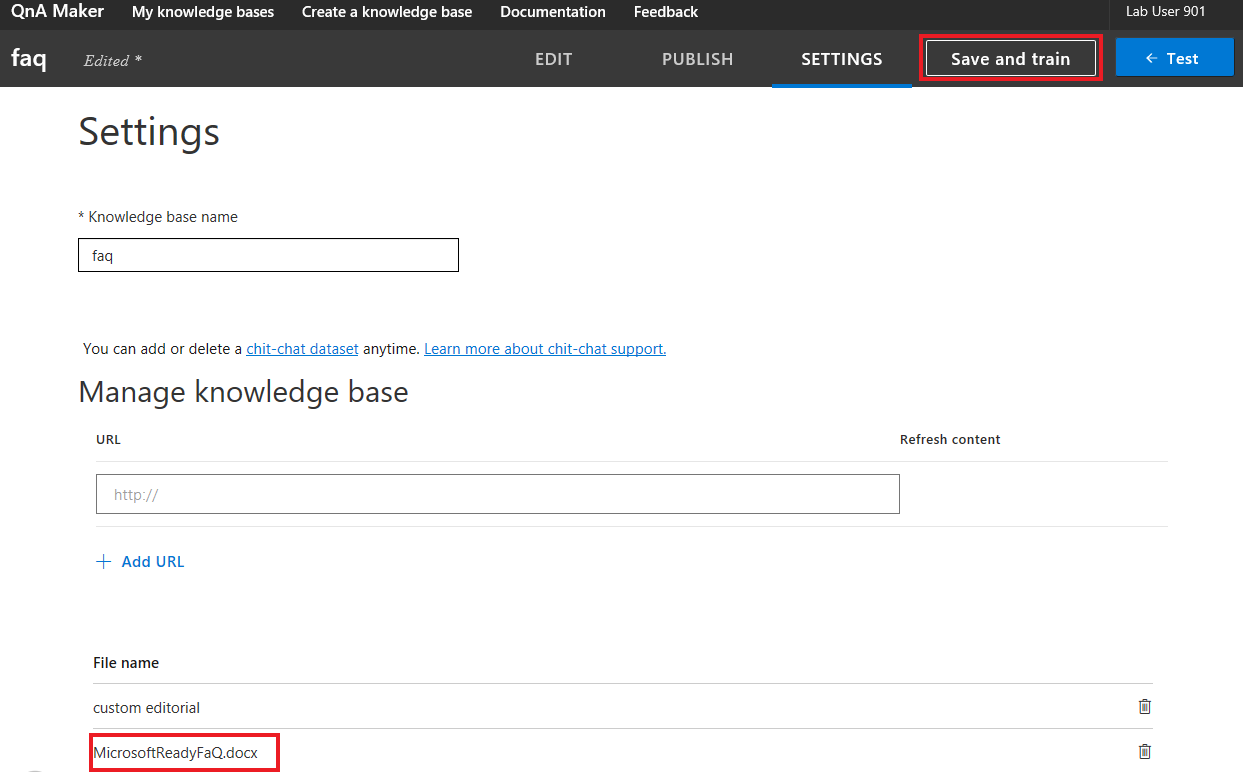
Now add the just saved "MicrosoftReady-FaQ" word file via the " + Add file" - Button. You should find the file where you have saved it - probably on the deskop. Click Save and train on the top right.
-
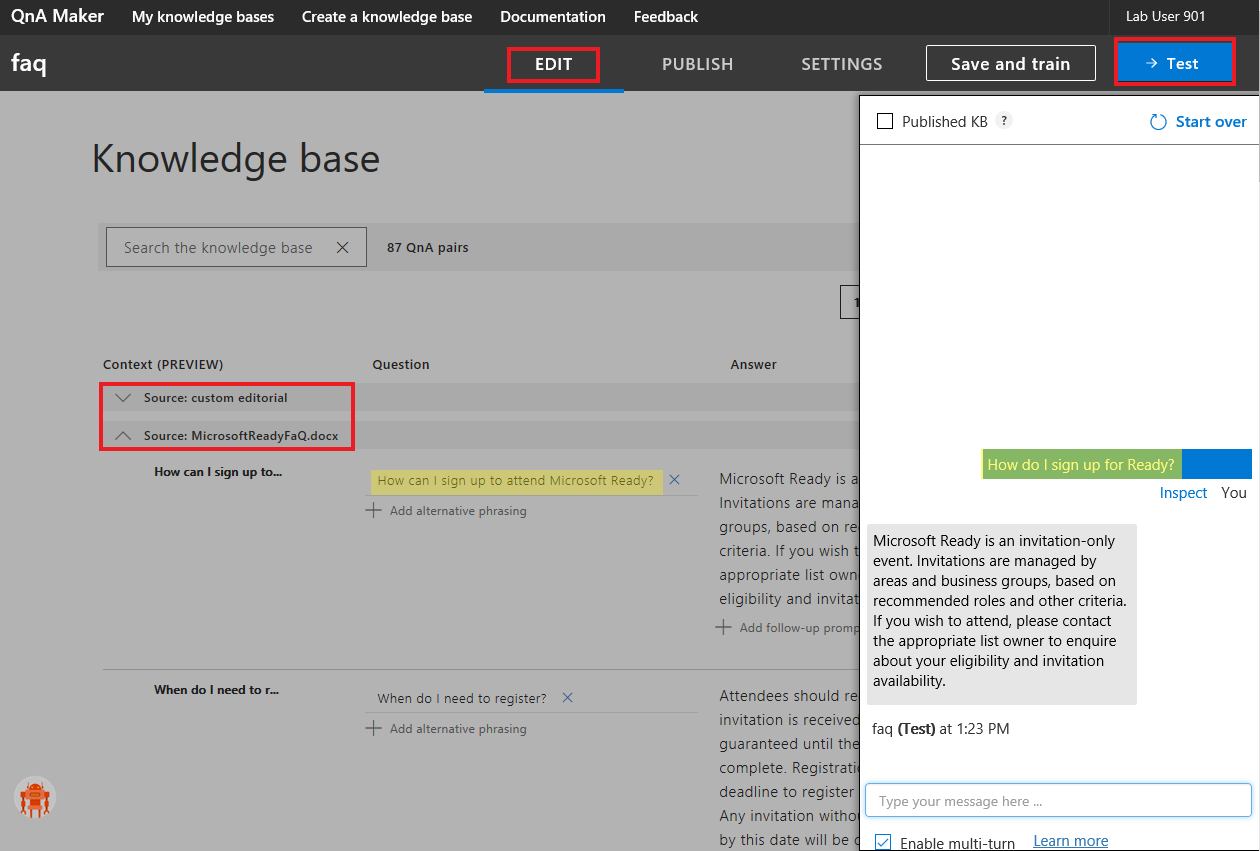
If you click on the top pane on Edit and collapse the Source: custom editorial, you will find the newly added Source MicrosoftReadyFaQ with the questions and answers listed on the right.
+ Good to know Under each stated question is the option " + Add alternative phrasing". QnA-Maker is not fully intelligent by itself and out of the box. As soon as a user types in a question, QnA-Maker searches through its knowledge base and based on a probability value it will give back the answer with the highest score. However, user phrase their questions not always 1:1 as stated in the knowledge base. If relevant keywords are included, chances are high the right anwers will be responded. To add more intelligence and understand the user's real intent behind a question, LUIS is a good service to work with. -
You can now test your FaQ by clicking on Test in the top right pane. Play a bit with rephrasing the questions as seen in the screenshot example
-
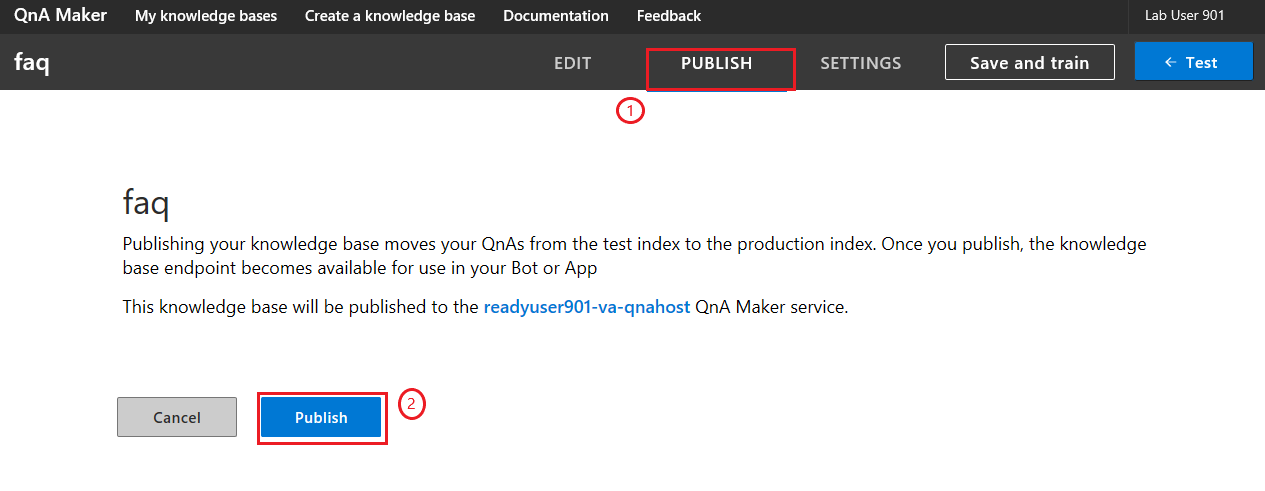
In order to make these changes to the knowledge base effective, we need to publish it as shown in the screenshot, click on the top pane on publish and then on the publish-button:
-
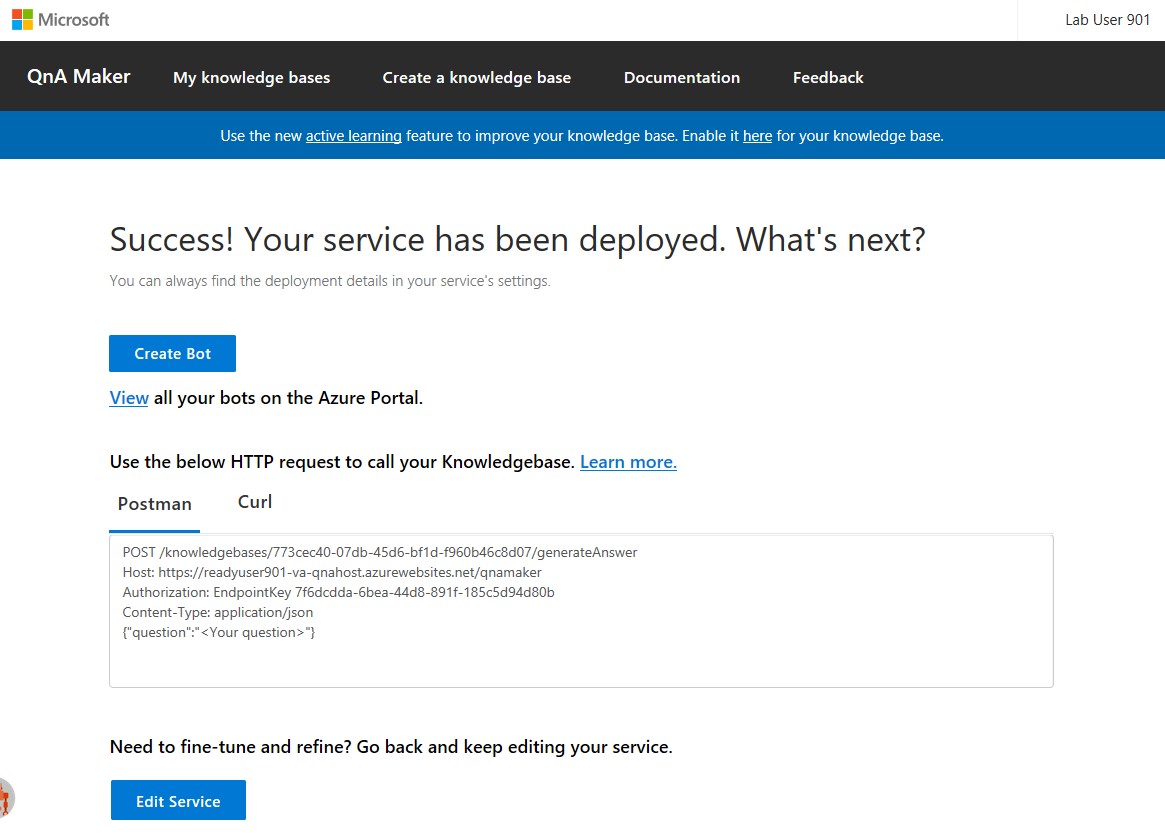
You will receive a success message:
-
As a final step, we need to update your Virtual Assistant's Dispatch to recognise the new QnAMaker FAQ changes. In PowerShell, navigate to the still opened Virtual Assistant window (there must be stated: C:\Users{WINDOWSUSERNAME}\source\repos\ReadyUser908\ReadyUser908> to be in the right window!) and run the botskills refresh command. Copy & paste the command and replace the LABUSERNAME with your credentials again:
cd C:\Users\{WINDOWSUSERNAME}\source\repos\{LABUSERNAME}-VA\{LABUSERNAME}_VA
botskills refresh --cs --verbose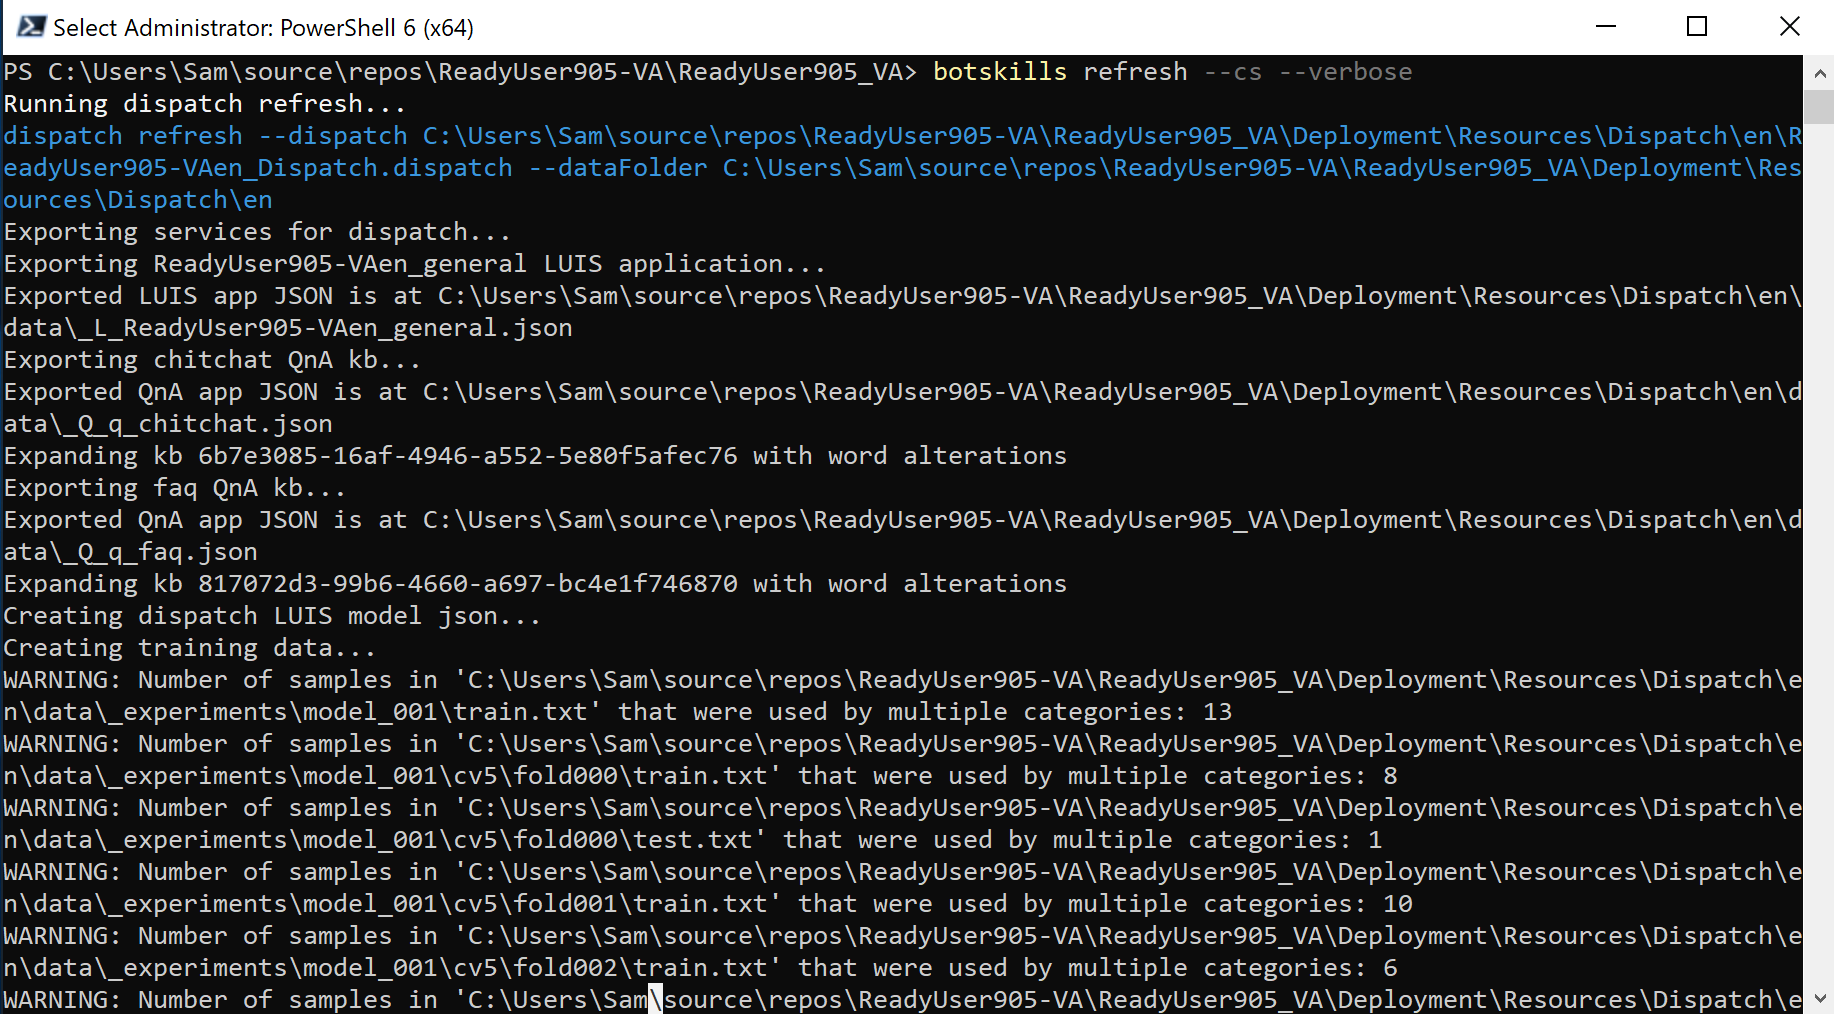
We will now activate the Teams Channel so that you can communicate via text messaging with your Virtual Assistant Chabot via Teams.
-
Open the web browser and navigate to www.portal.azure.com and if you are not still logged in, log in again with your Lab User Credentials.
-
On your left, click on Resource Groups and find your {LABUSERNAME-VA}-Resource Group to see the related Azure Services.
-
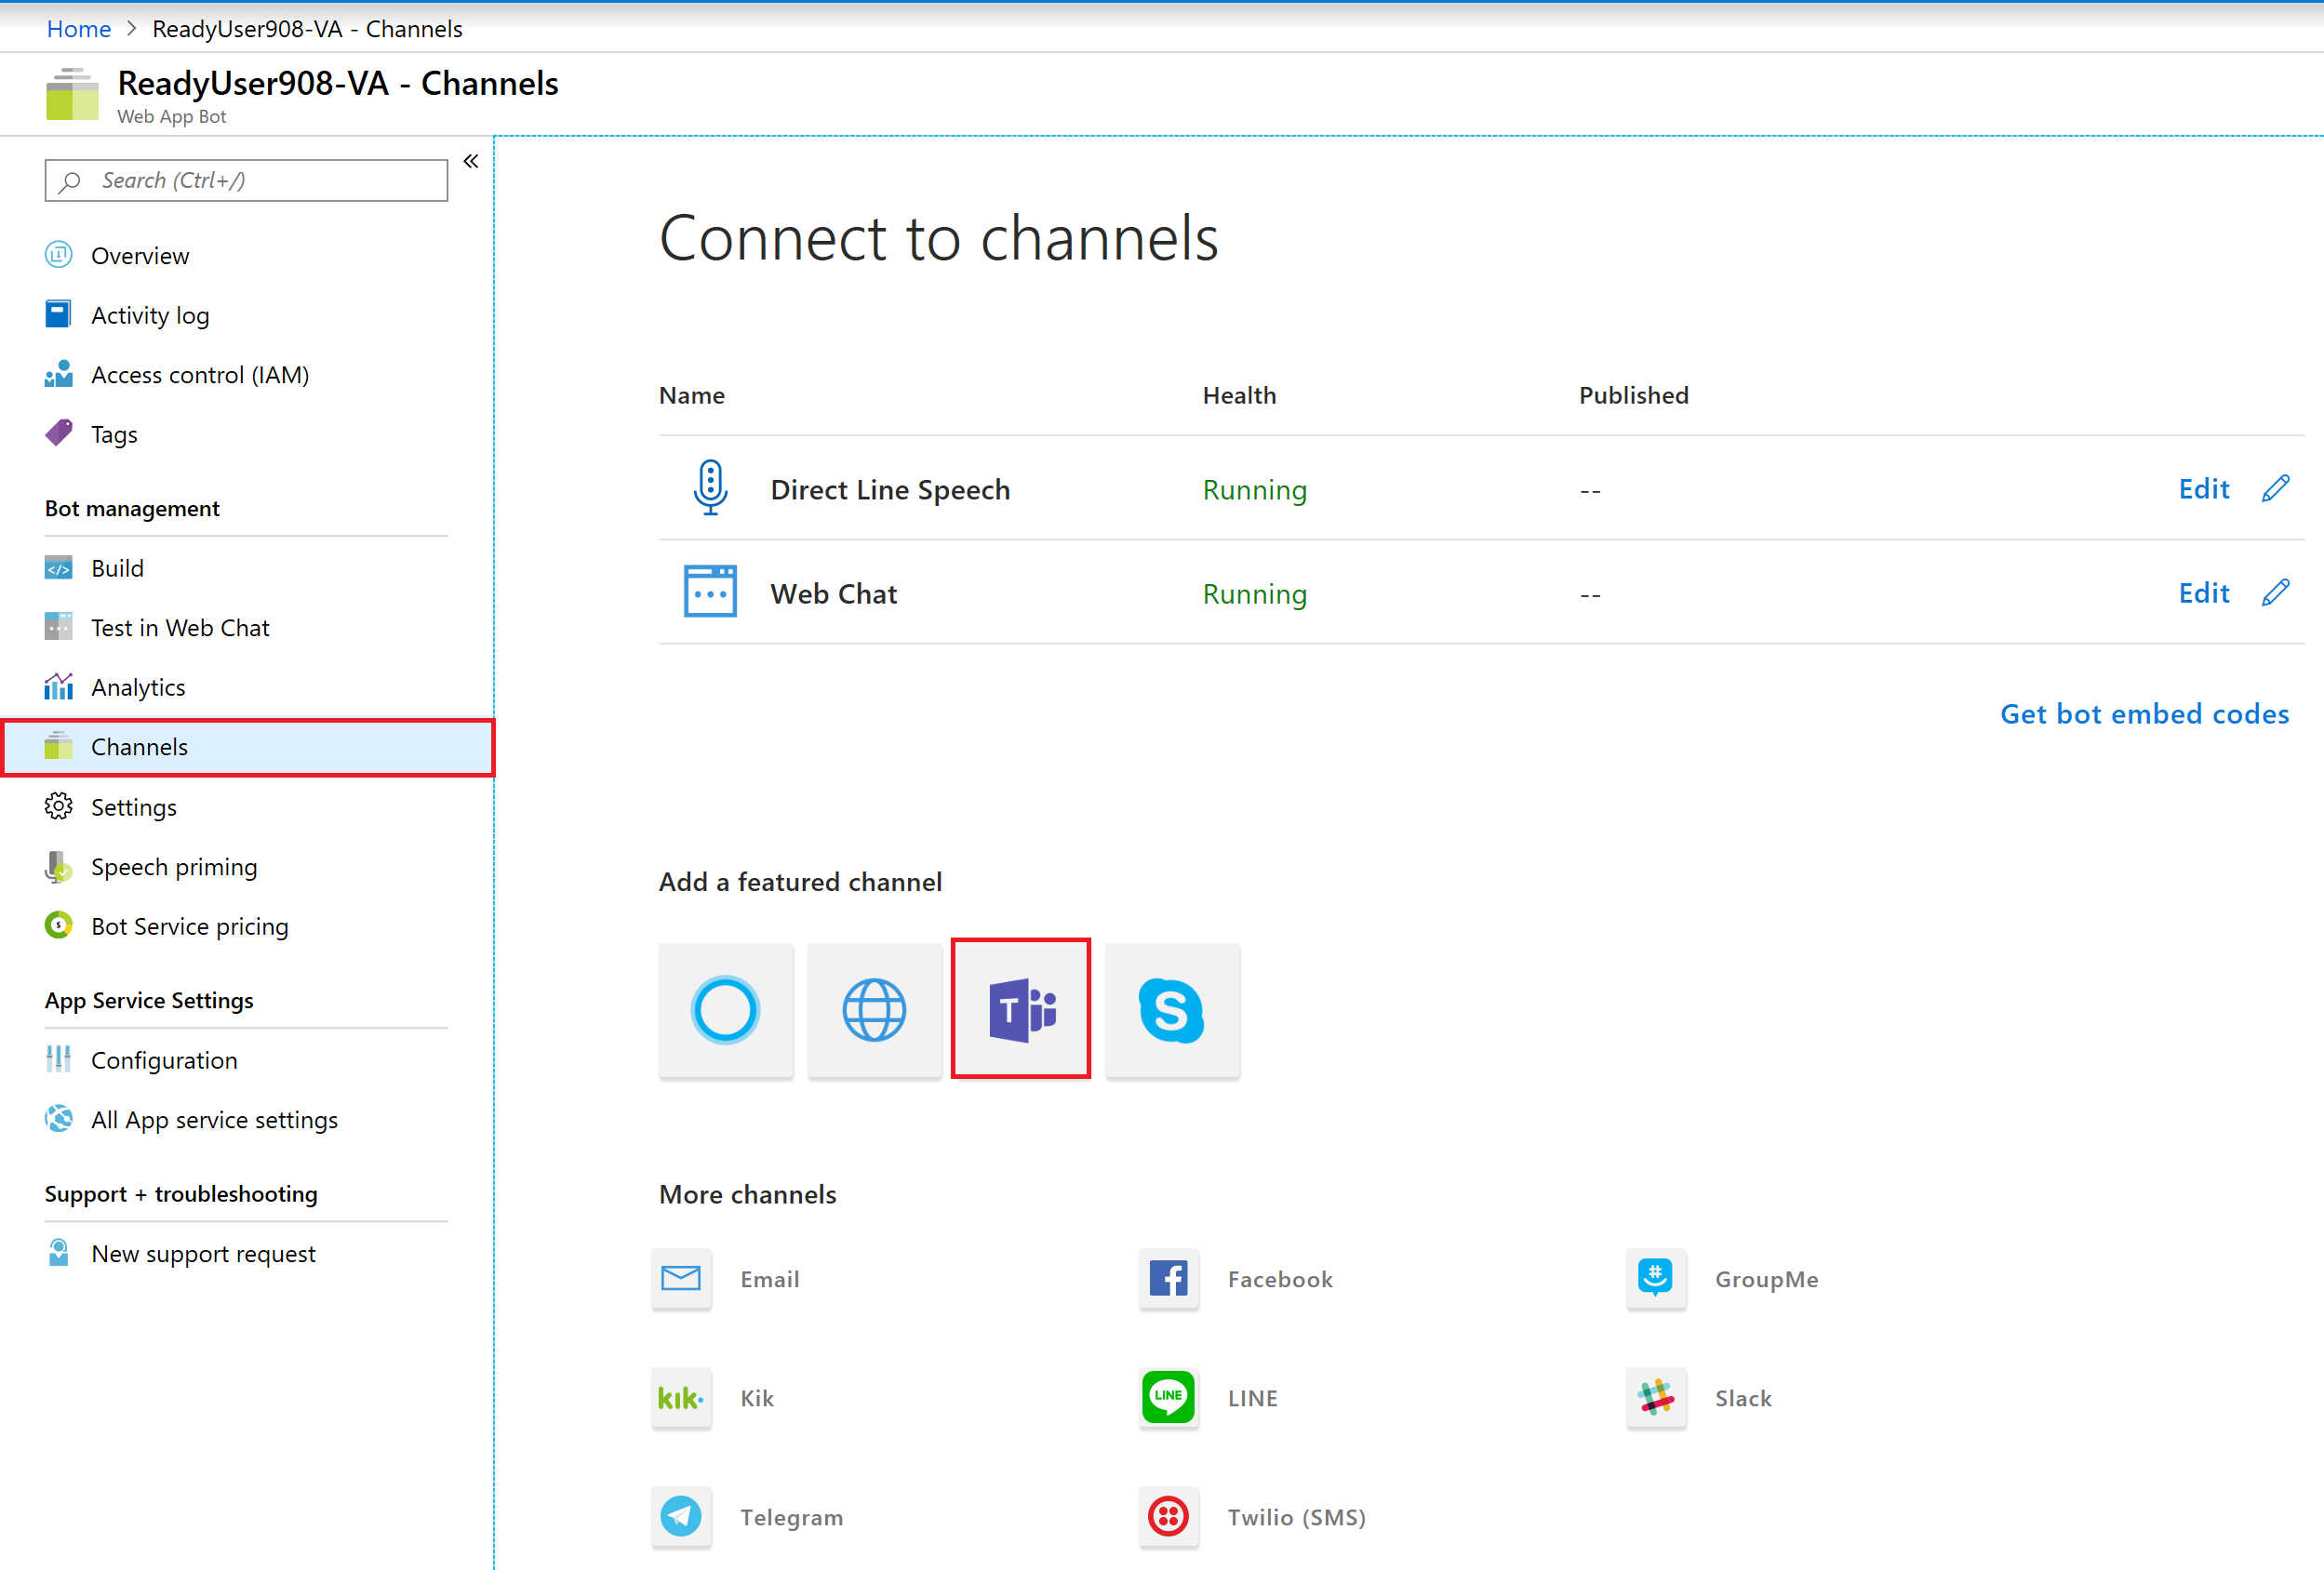
Open the Web App resource and select Channels on the left tab bar.
-
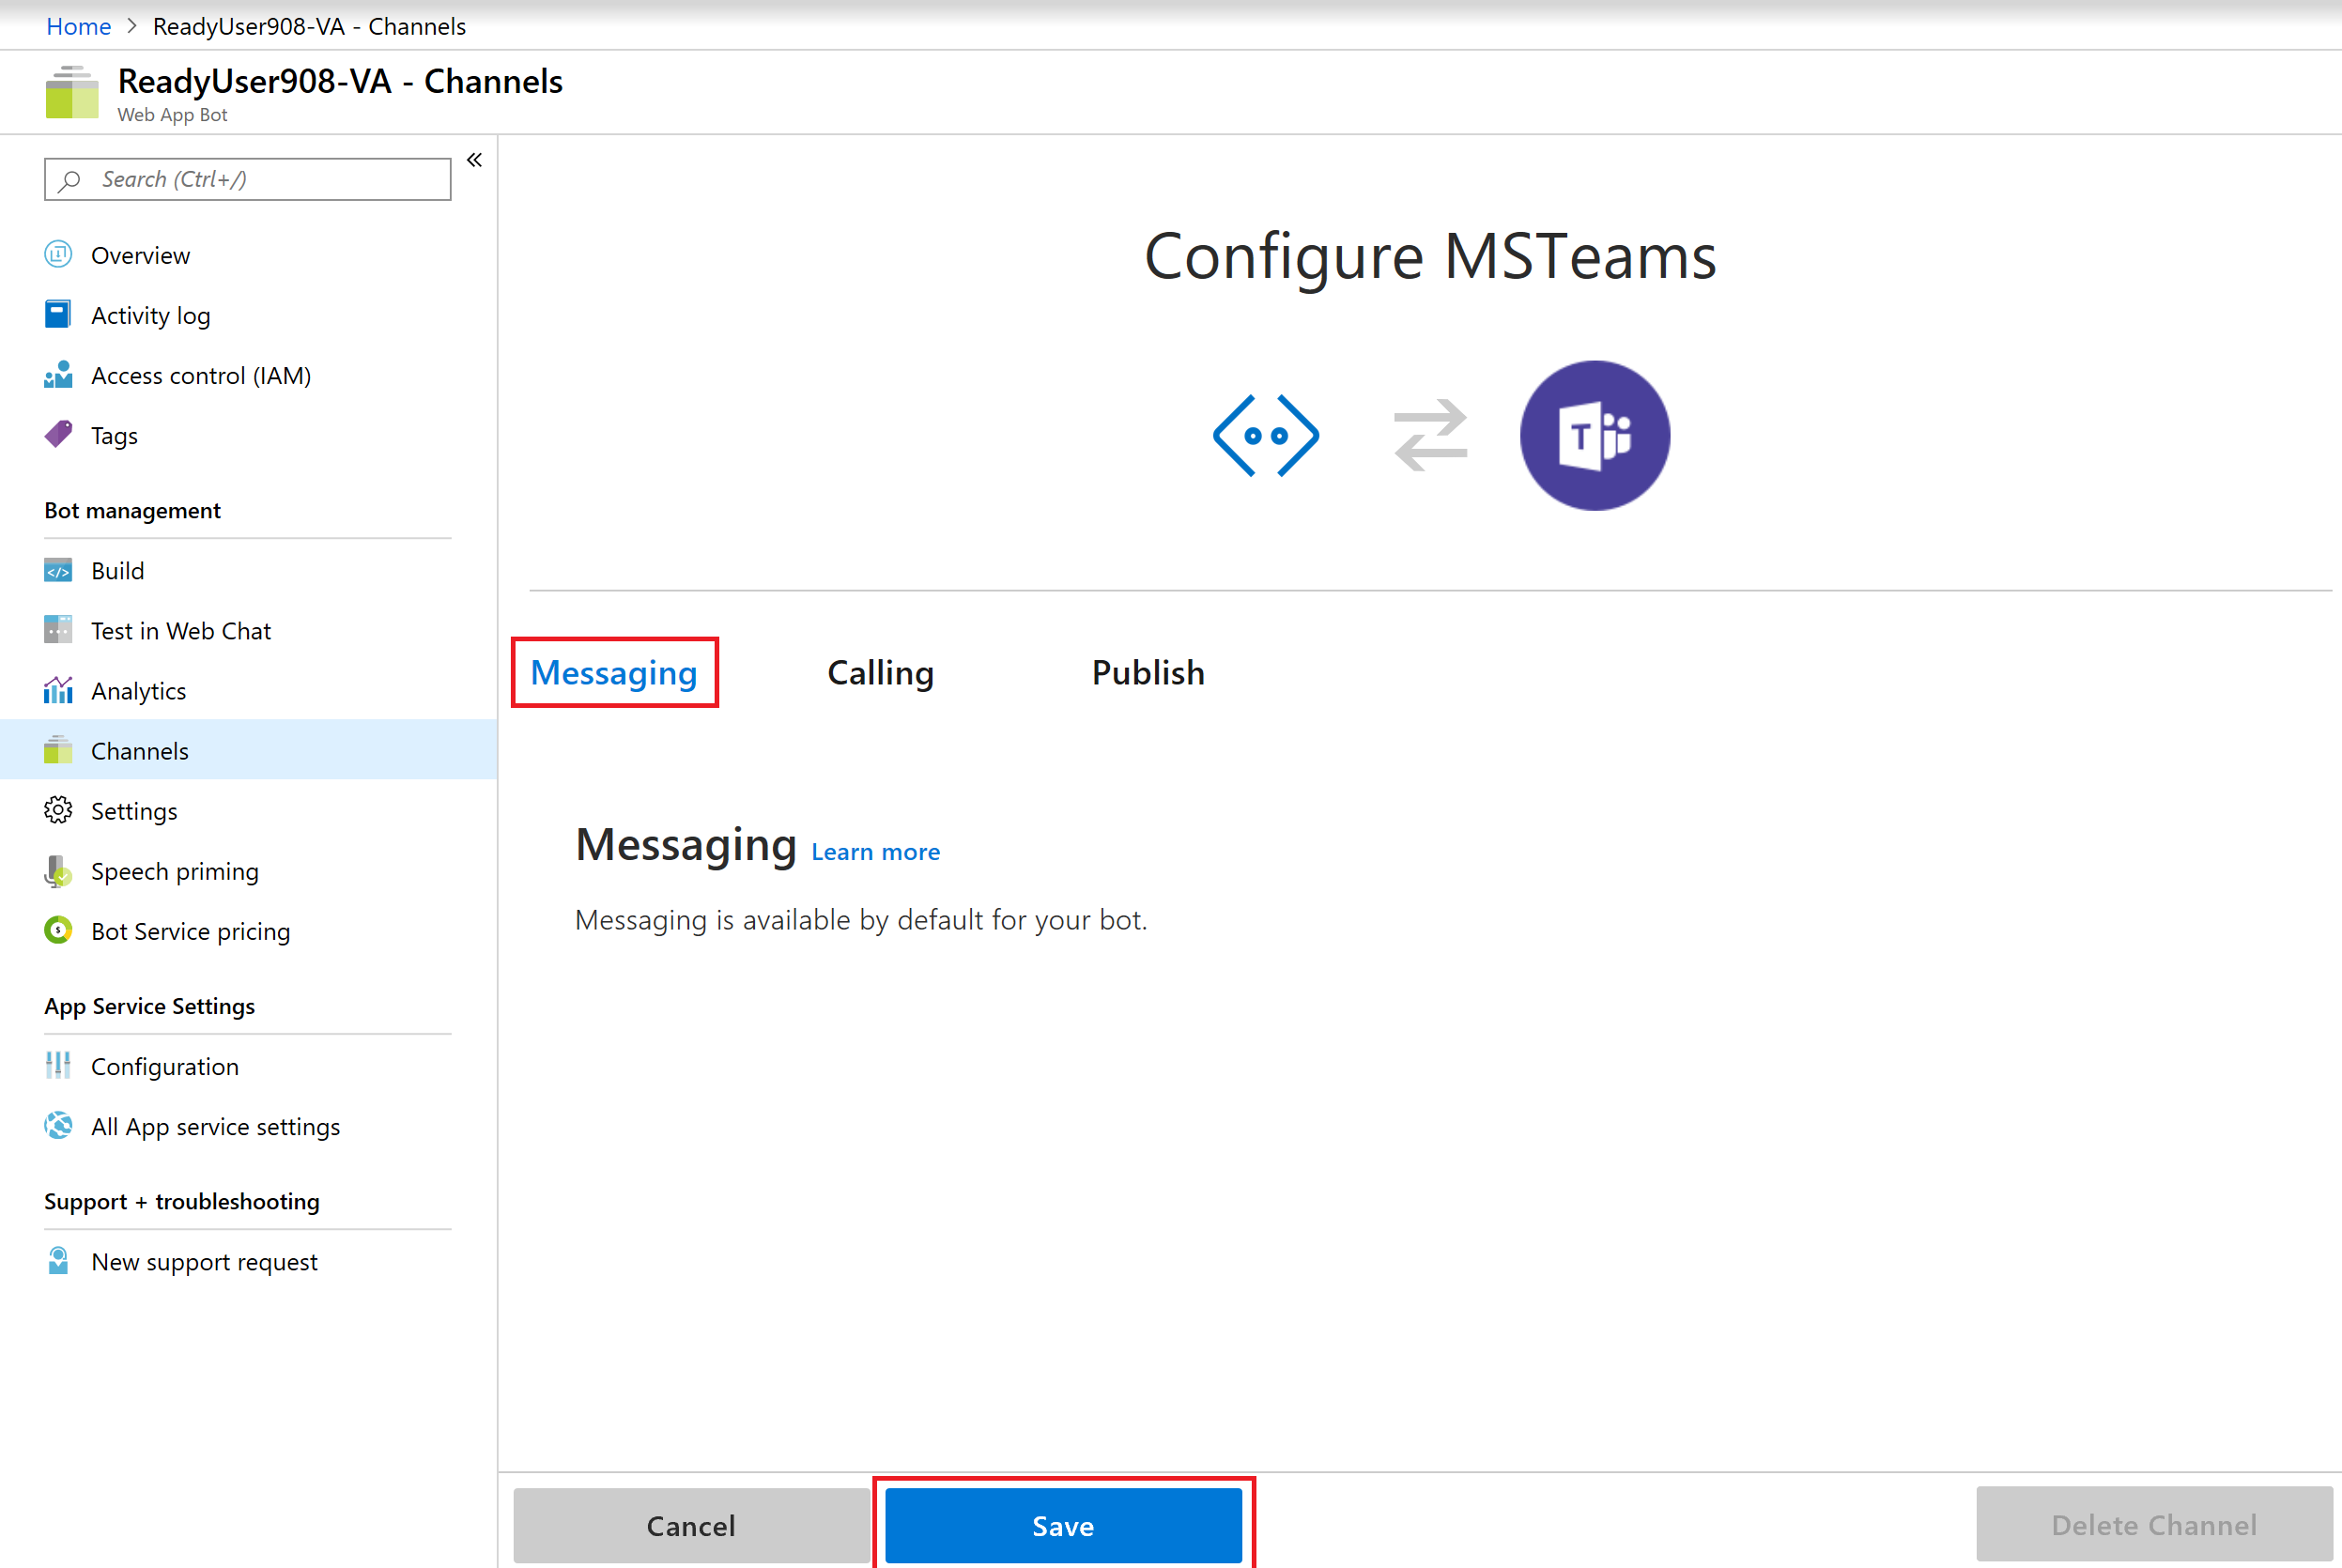
Click ont he Teams icon and the activation site will open.
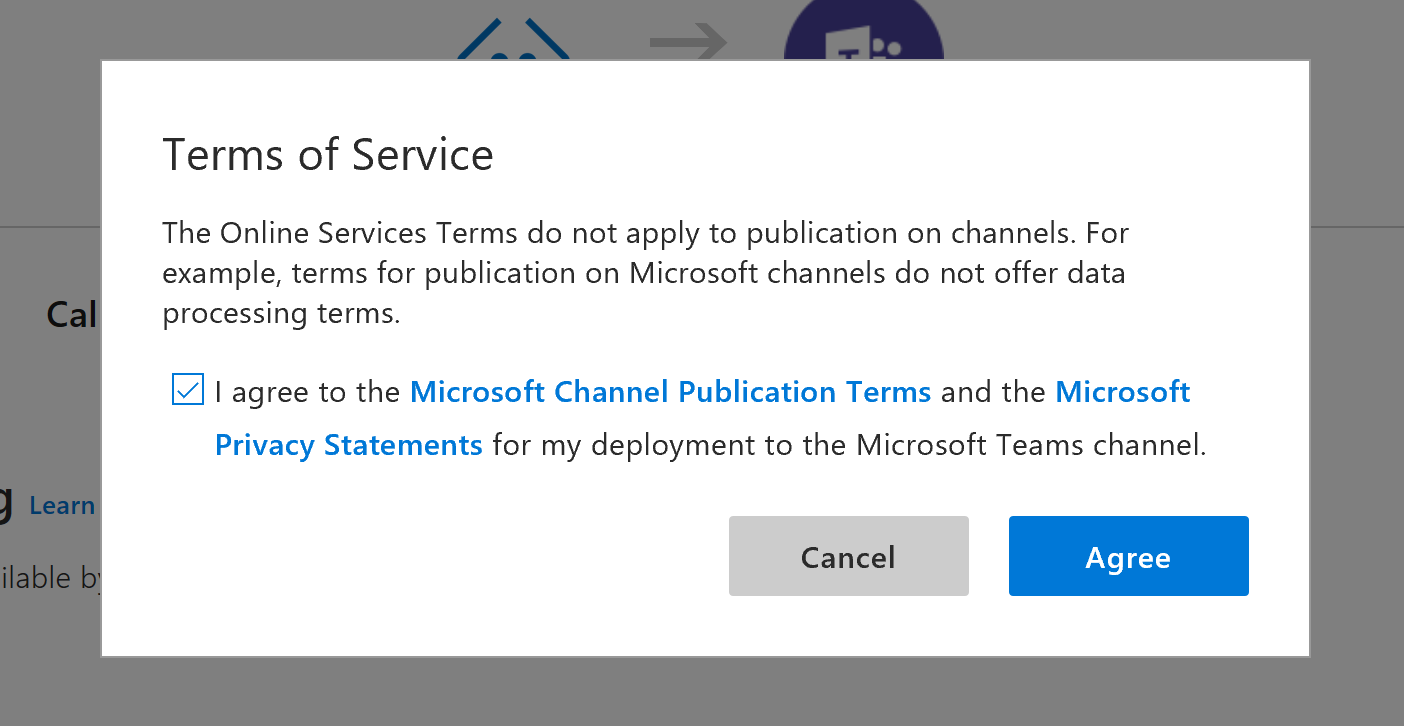
- Make sure you are on the "Messaging" window and click save. A "Terms of Service" window will open. Check the box and click ok.
-
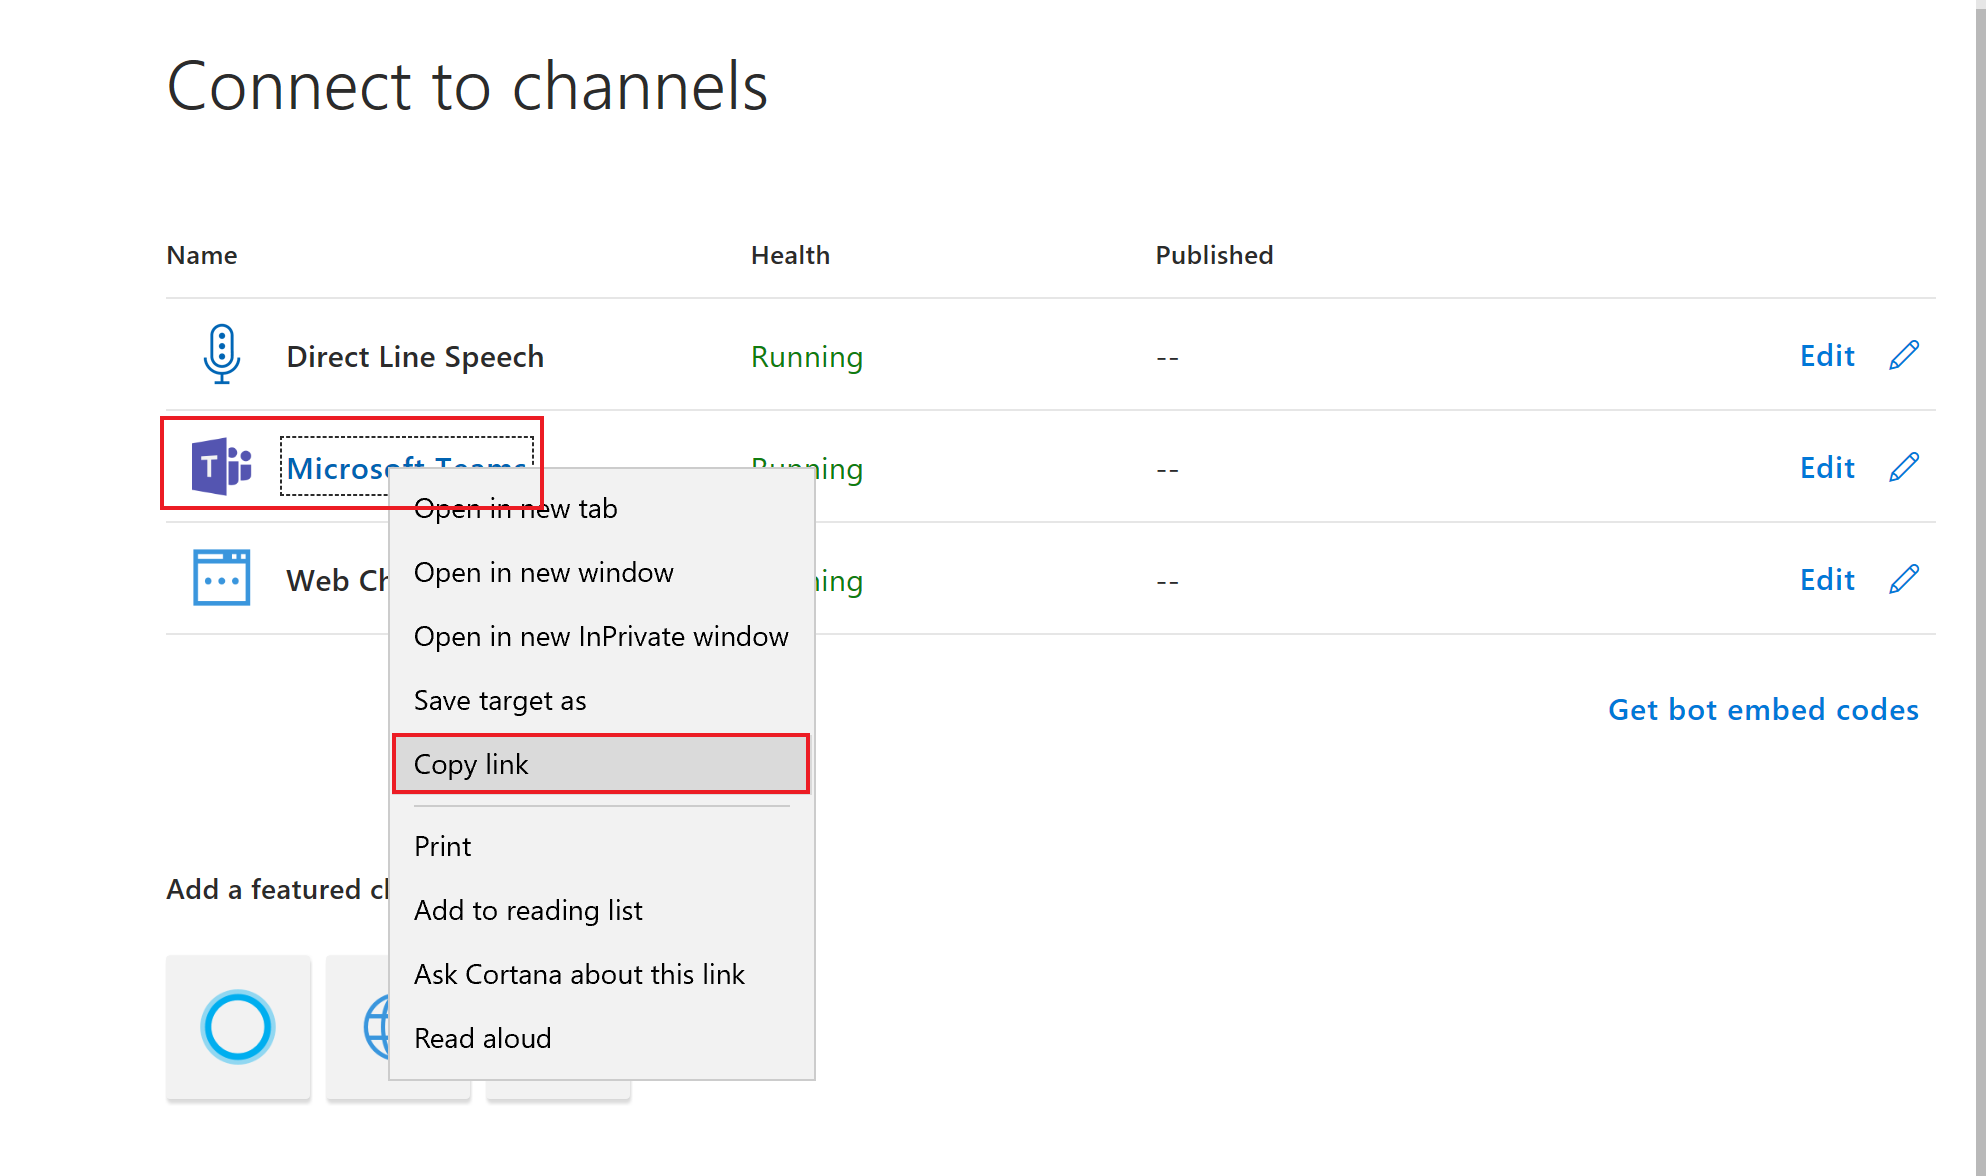
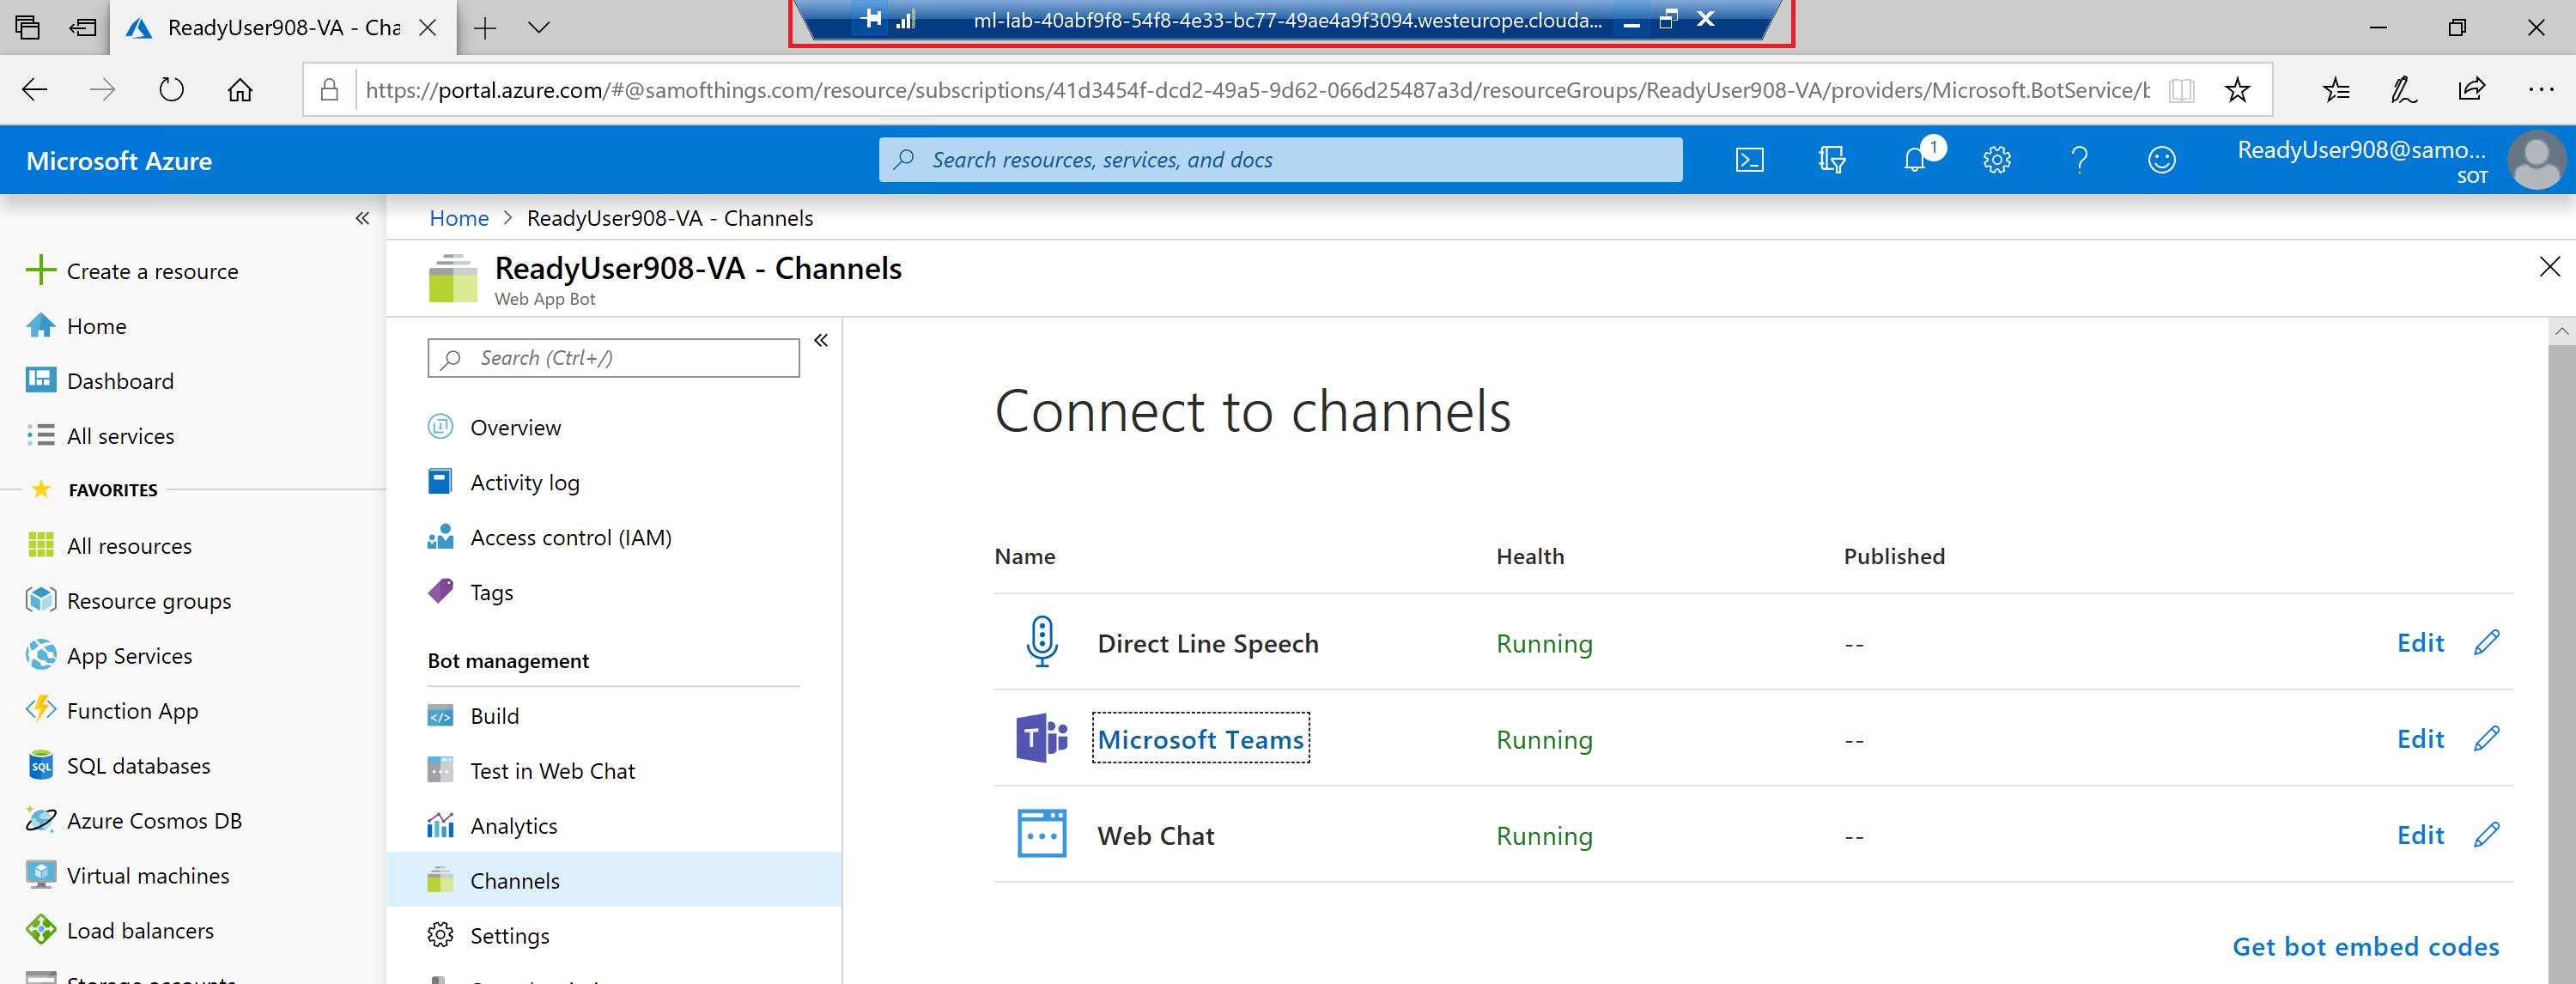
Now you have successfully activated the Teams Channel. Click on Cancel to close the activation panel and see the Teams Channel with status "Running" in the overview.
-
Rick-click on the name "Teams Channel" and copy the link.
-
You can now chat with your Bot via Teams. For this, you have to swtich to your local desktop:
-
On your computer, open a web browser and paste the just copied Teams Channel Link. If you have the Teams App installed, it will open up with you Microsoft alias logged in, and you will enter the conversation with your Virtual Assistant Bot. You can now start the conversation with Hi and ask a question from the MS Ready FaQ for instance.
The Virtual Assistant template creates and deploys an Assistant with all speech enablement steps provided out of the box. However, we will need to enable the Direct Line Speech channel to provide coordinated access to speech-to-text and text-to-speech functionalities from Azure Speech Services. These allow bots to bring full voice in, voice out conversational experiences. We will also need to deploy Azure Speech Services into our Azure resource group, enable the streaming endpoint on the Bot Service resource and enable WebSockets on our App Service Web App as these are prerequisites of this channel.
-
In the Azure Portal, navigate to your {LABUSERNAME}-VA resource group, click on the {LABUSERNAME}-VA Web App Bot Resource.
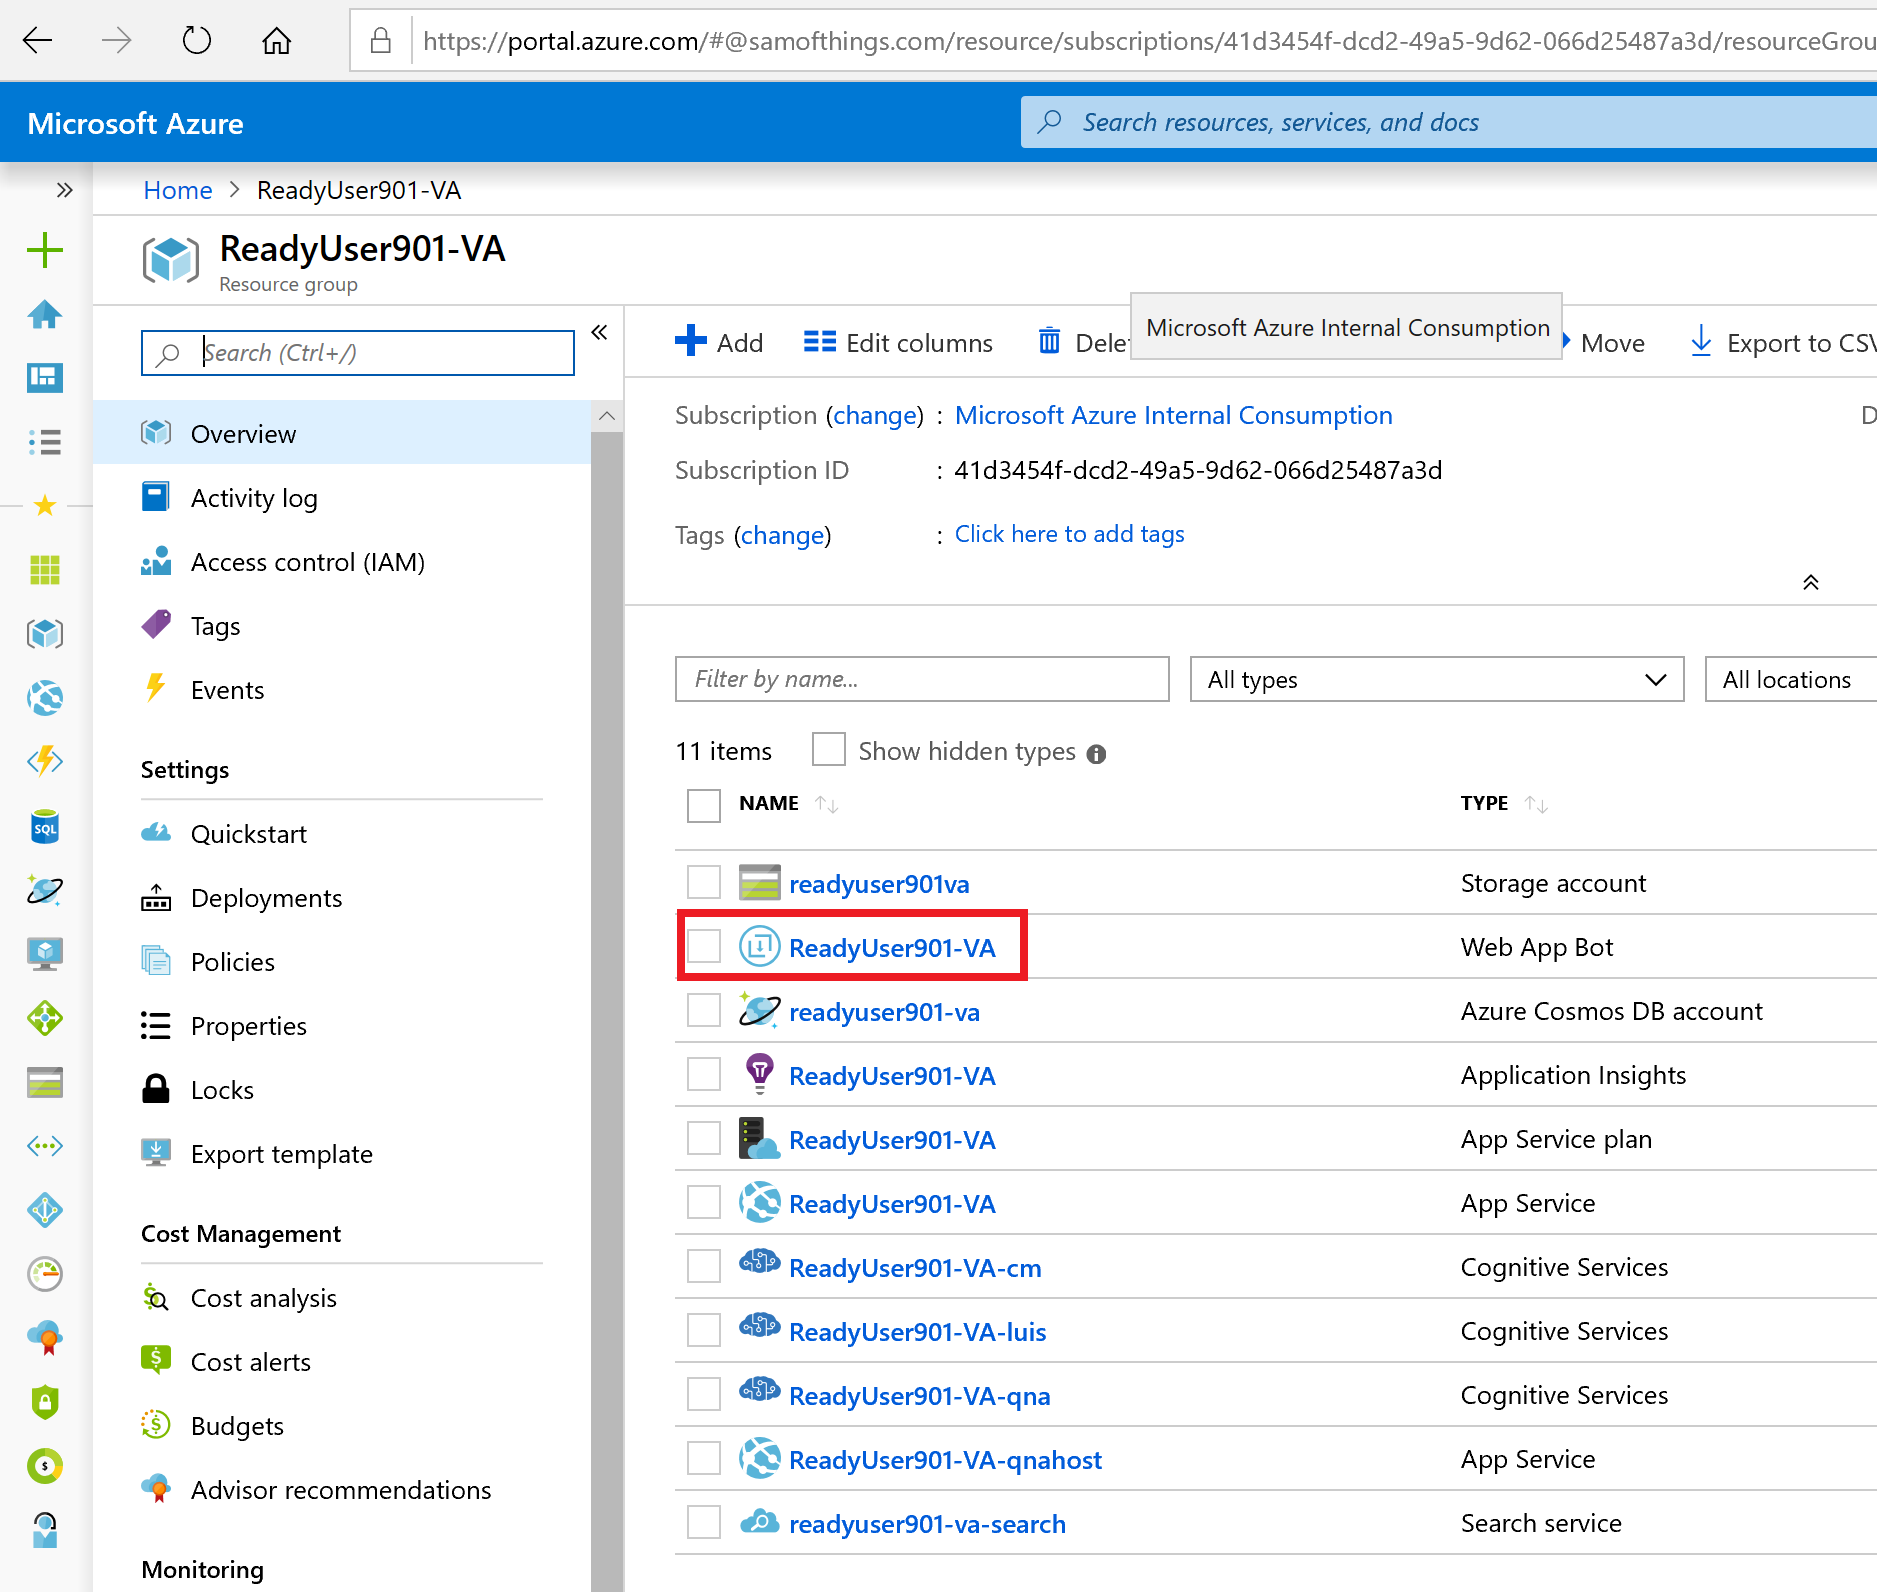
-
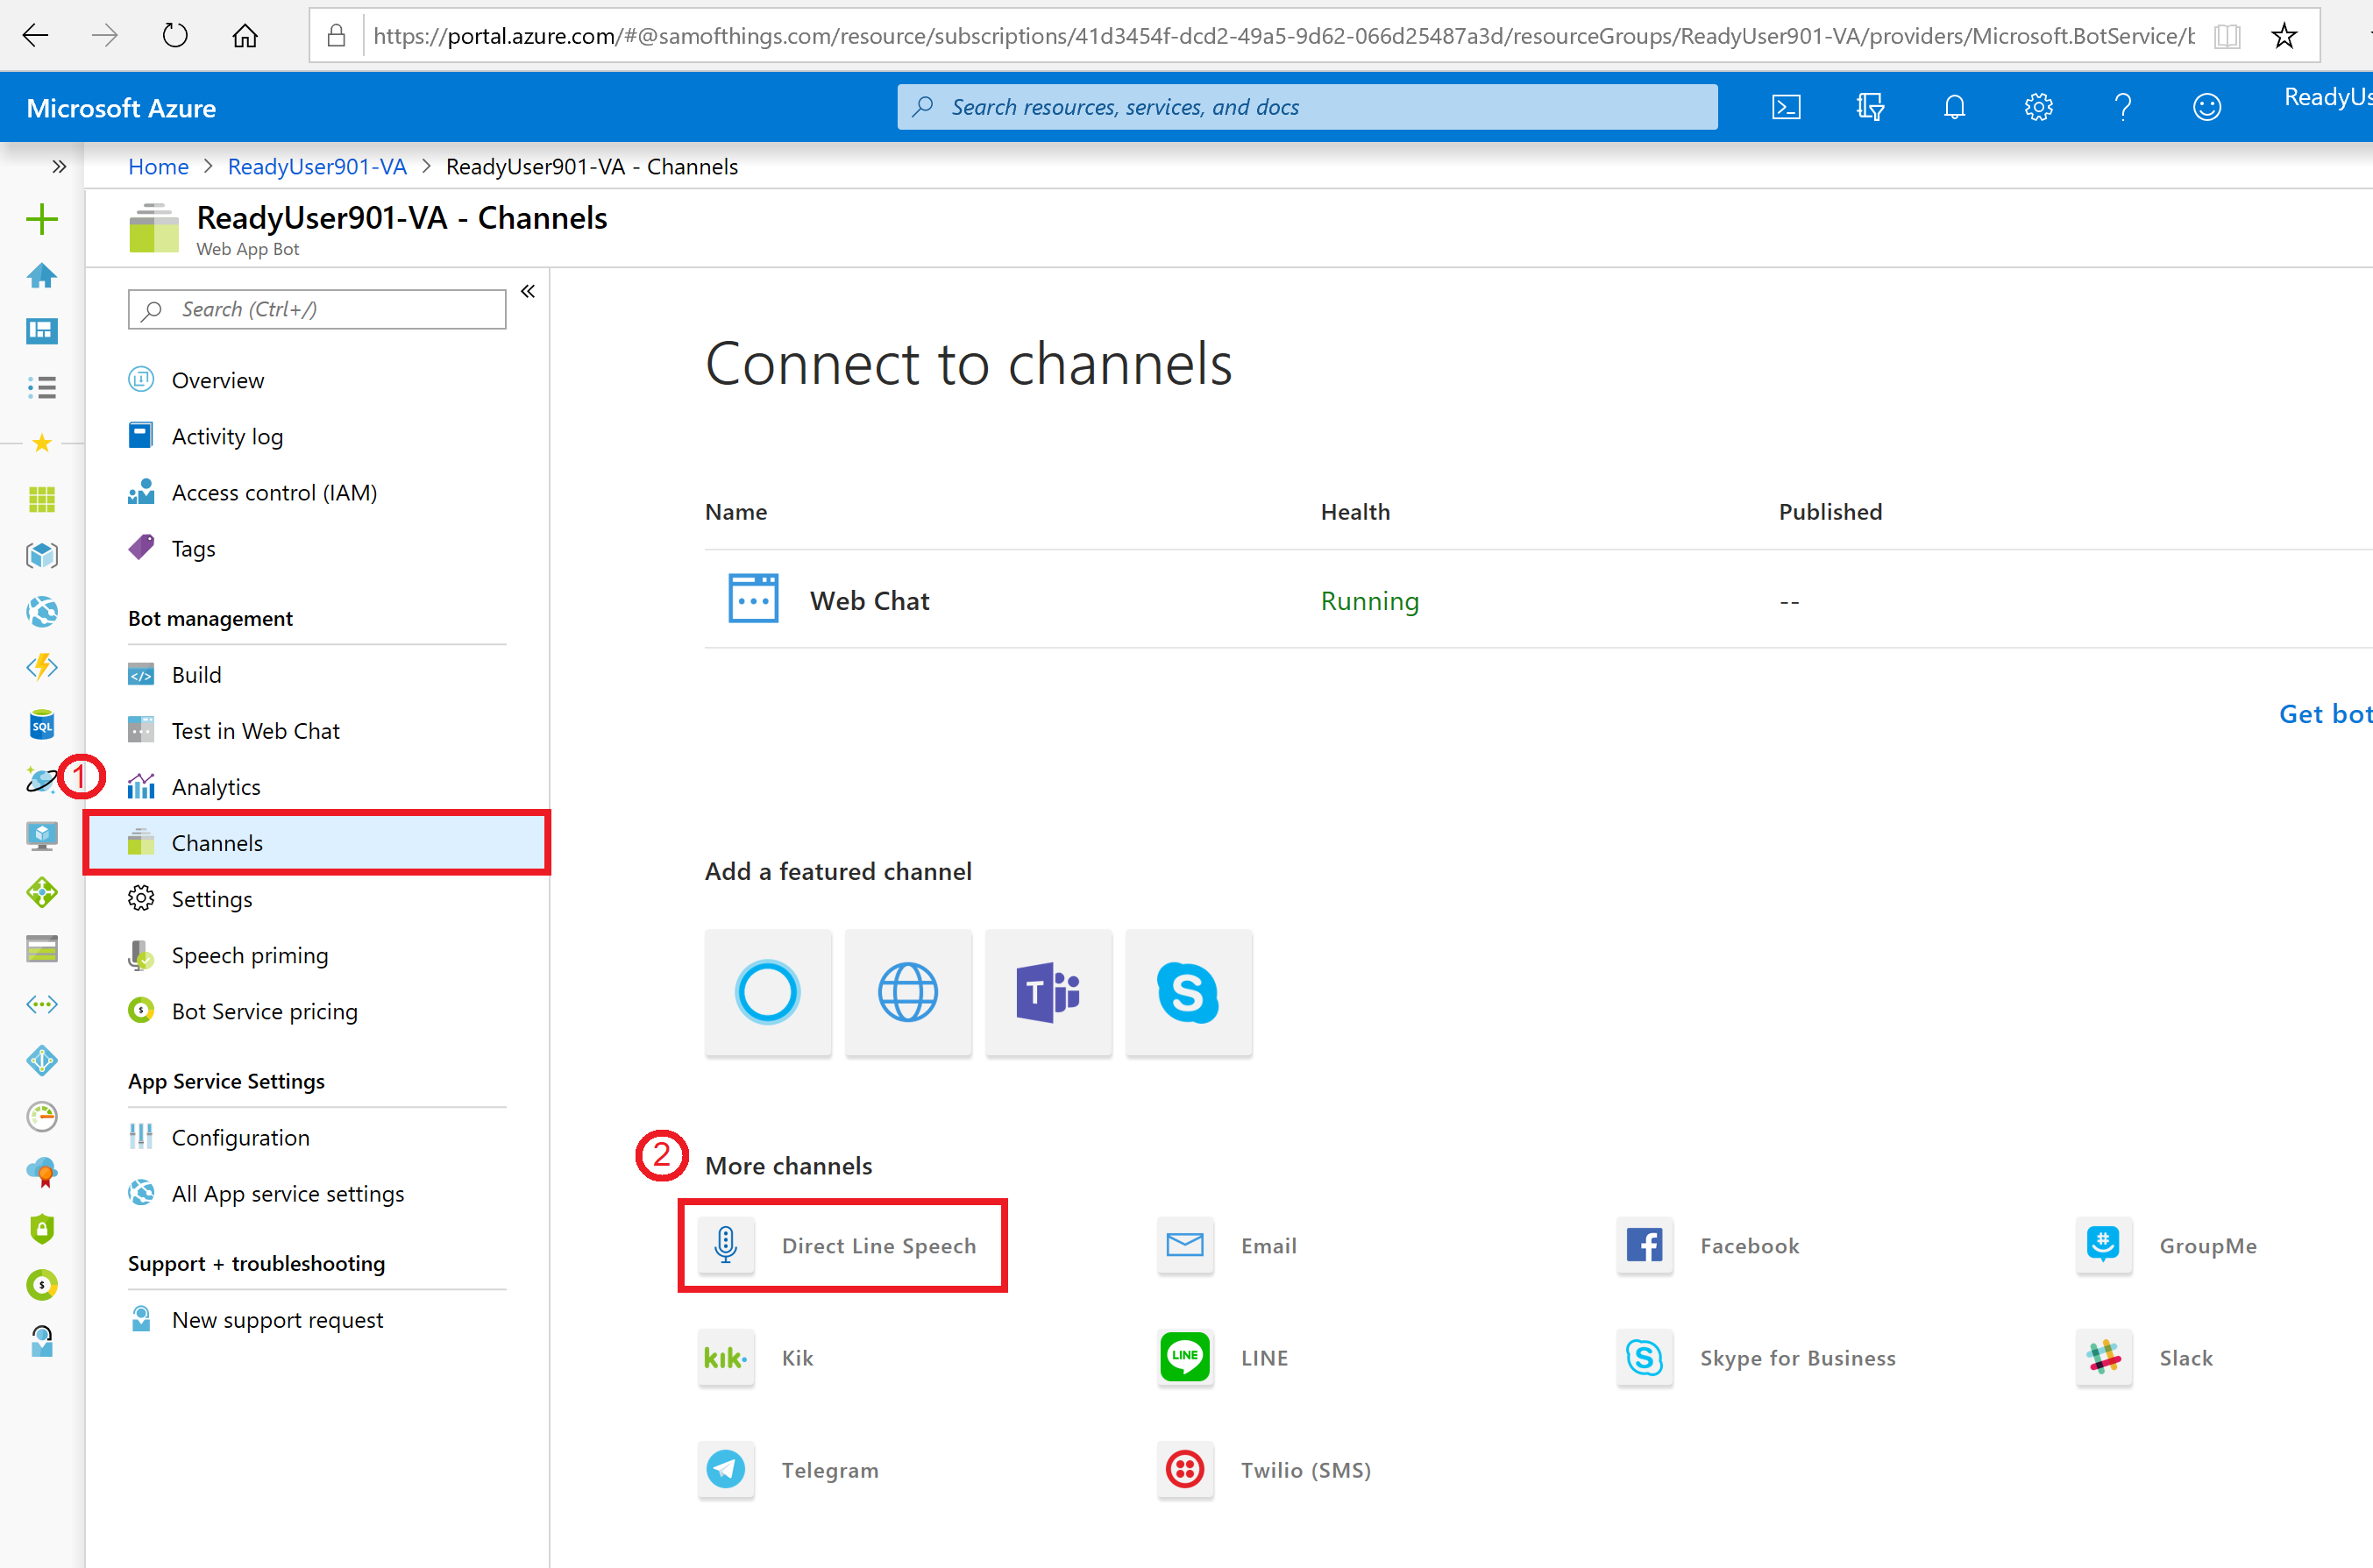
Click on Channels and select the DirectLine Speech channel.
-
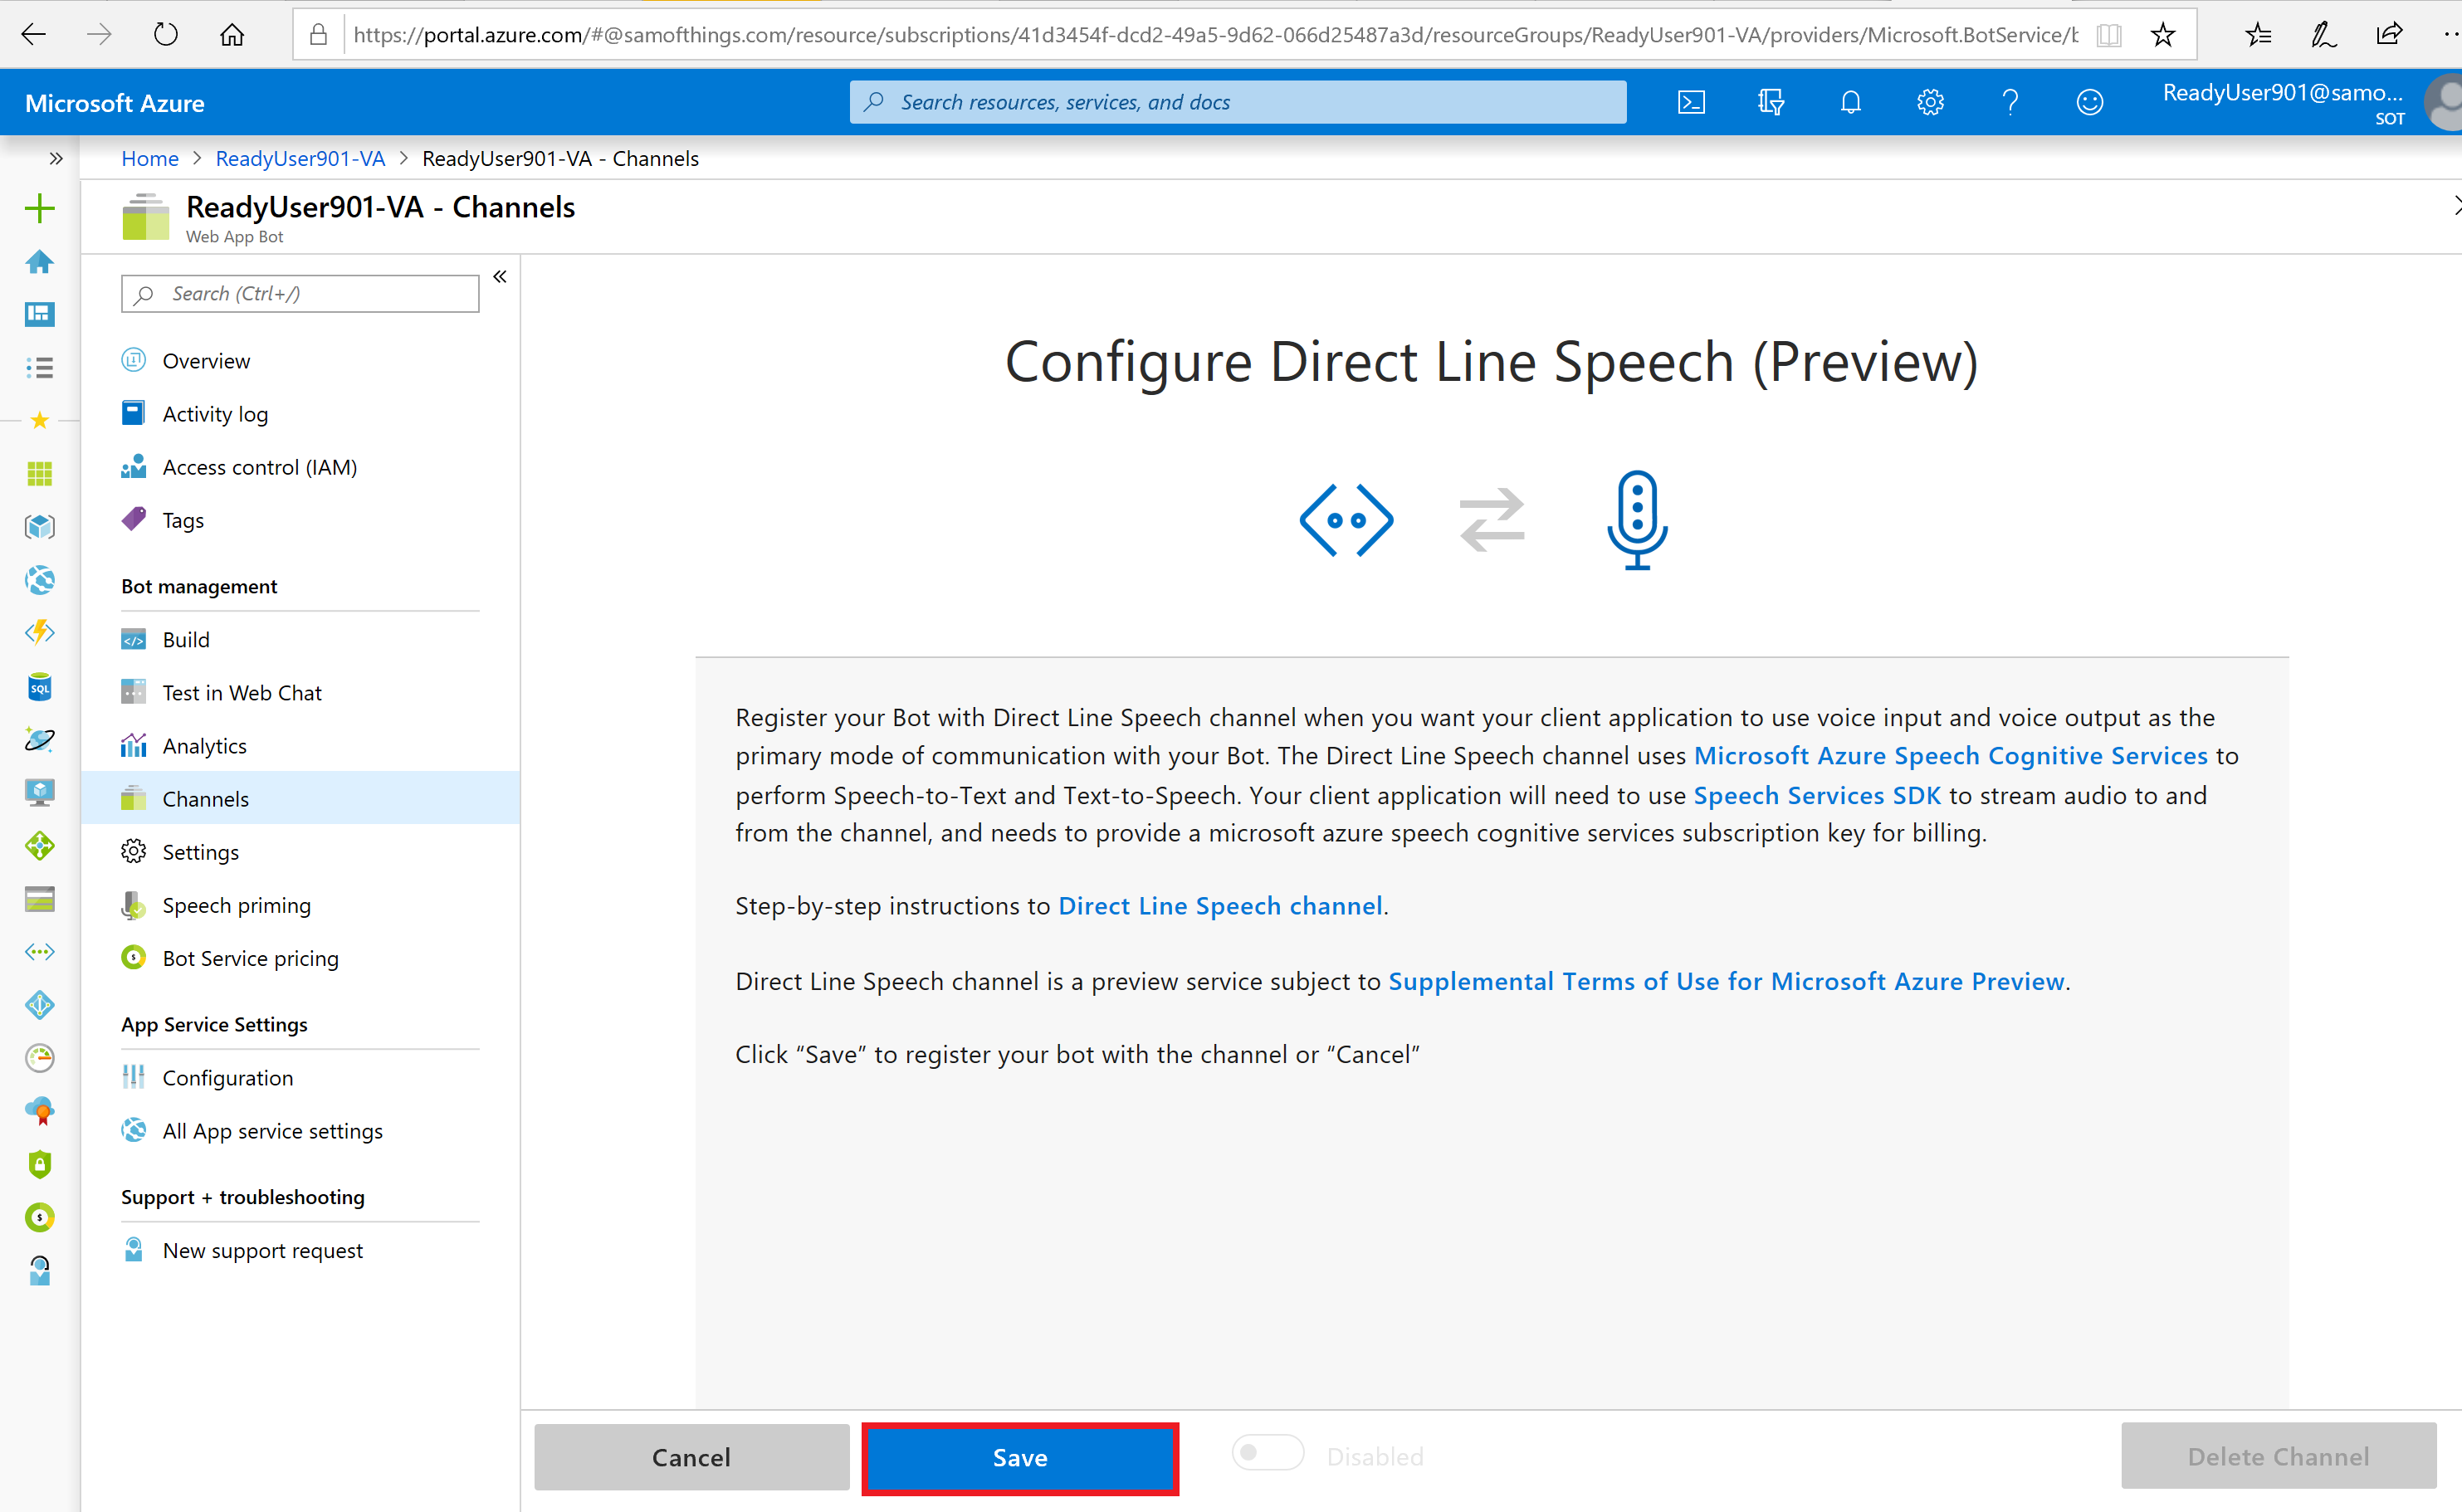
Click on Save.
-
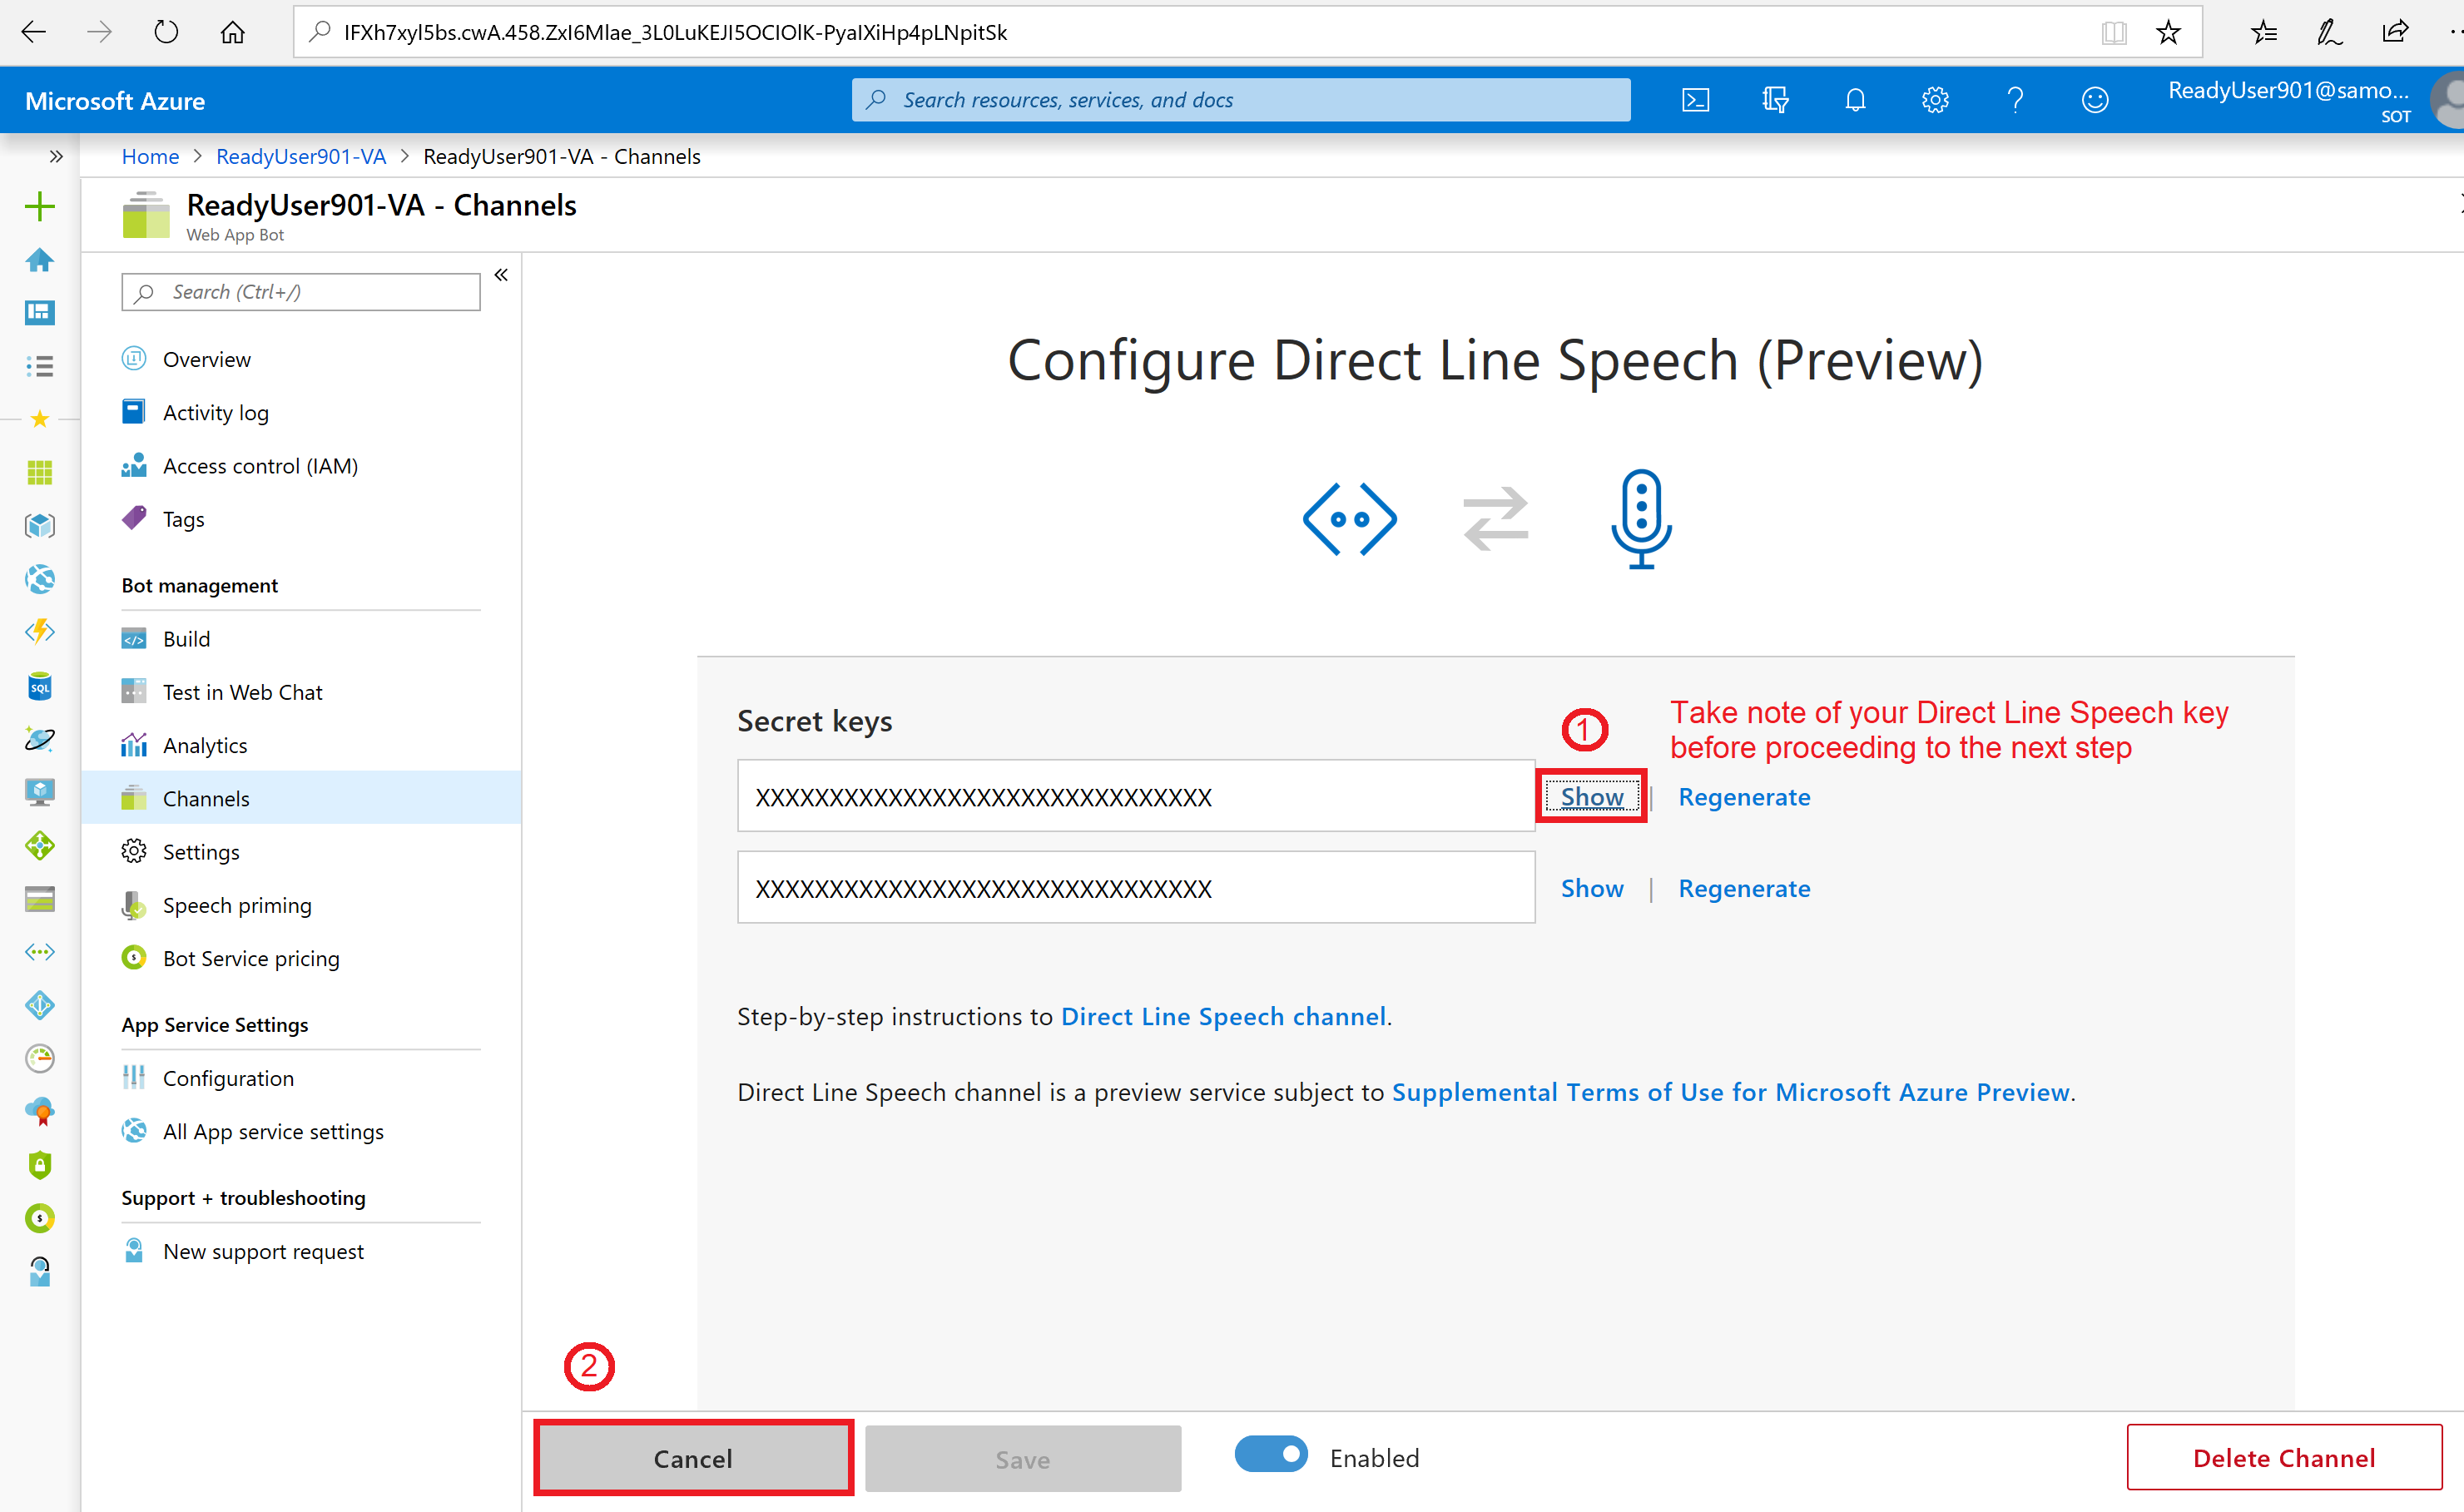
Note down your Direct Line Speech key in your sticky notes/notepad as you will need this later on. You can view this by clicking on "View" next to the secret key. Once you have taken note of the key, click on "Cancel".
+ Good to know You have now successfully enabled the Direct Line Speech Channel with only a few clicks. This is one of the benefits of the Microsoft Bot Framewok: Developers can easily integrate several functionalities with a few clicks instead of time-consuming coding. -
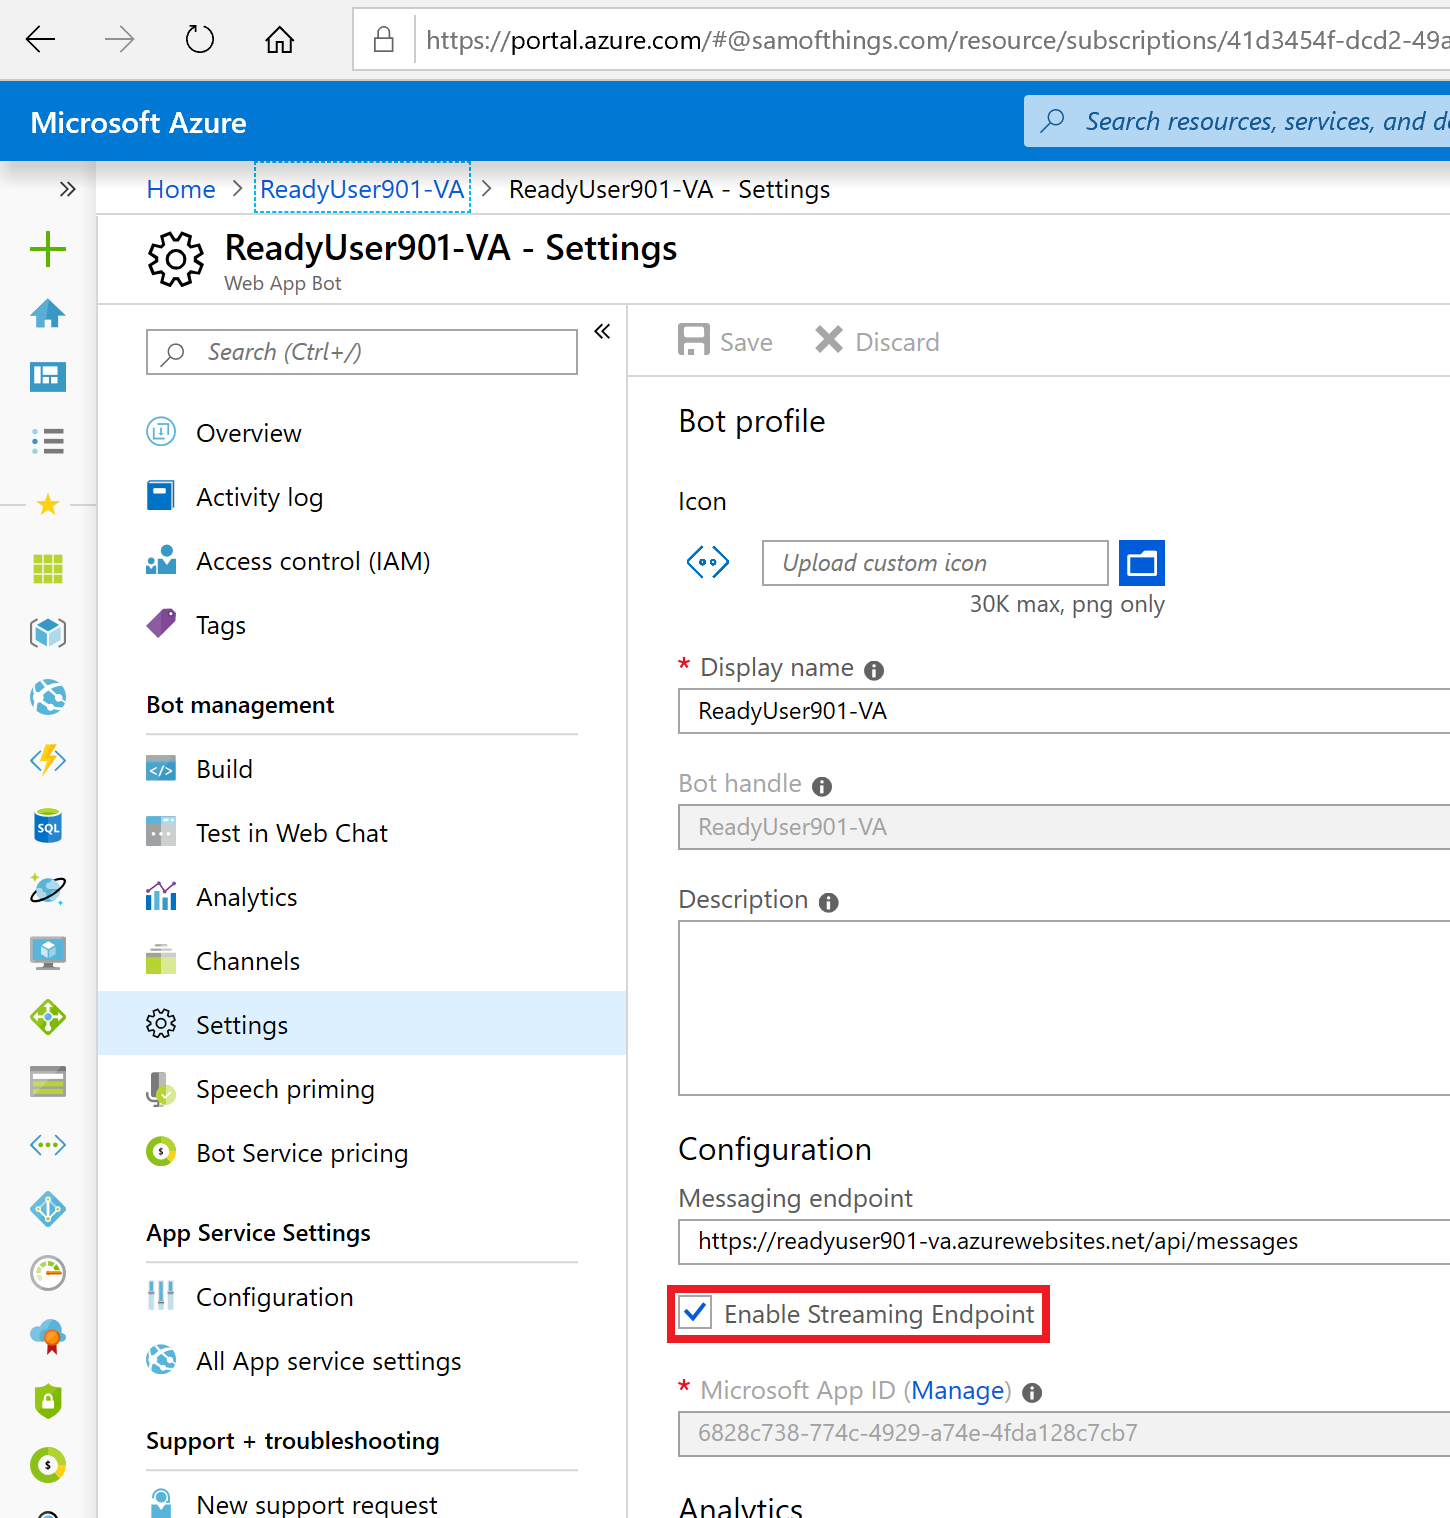
We will now enable the Bot Framework Protocol Streaming Extensions support for optimal, low-latency speech interaction. In portal.azure.com where you enabled the Speech Channel, right below "Channels" click on Settings on the left and tick the checkbox "Enable Streaming Endpoint" and click Saven on the top.
-
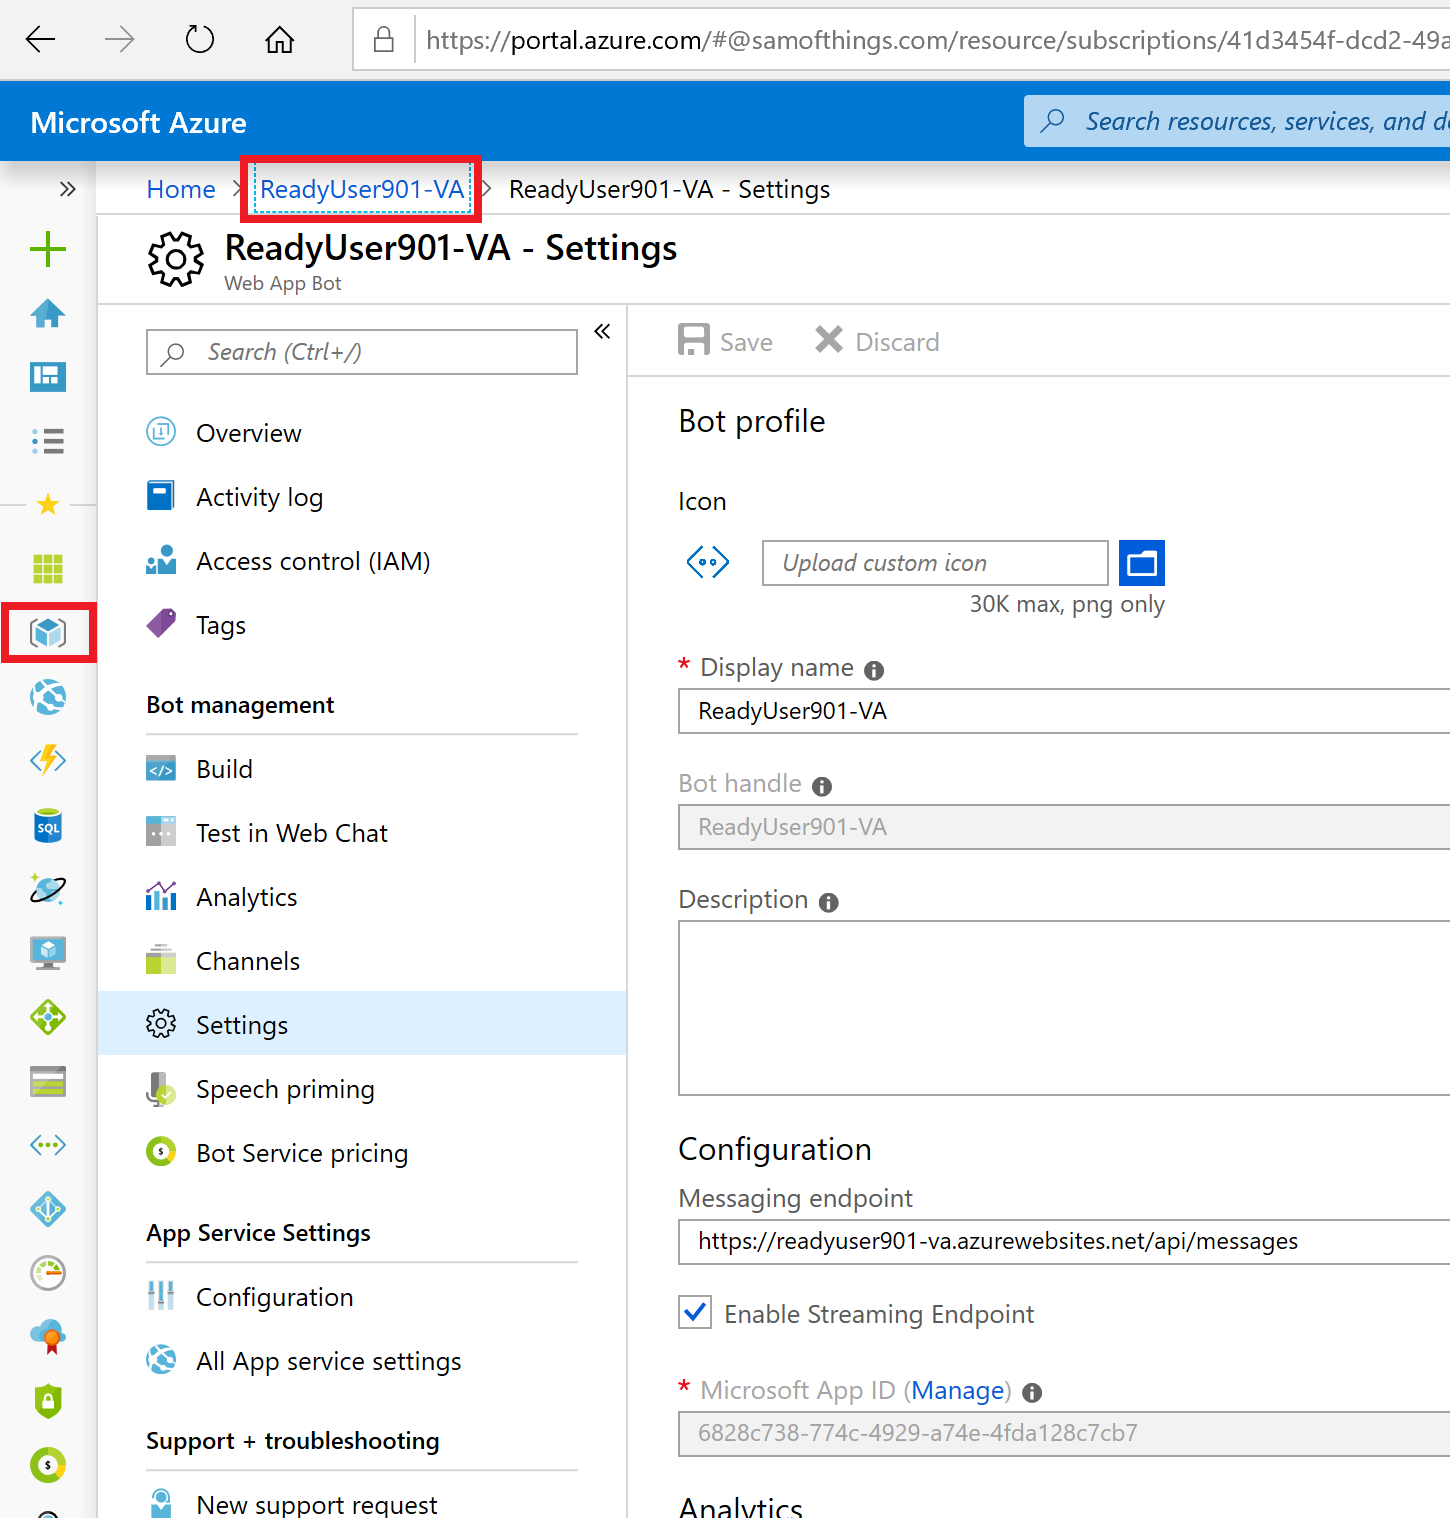
Navigate back to the resource group by either clicking on the {LABUSERNAME}-VA link at the top or by clicking on the resource groups icon located to the left of the screen.
-
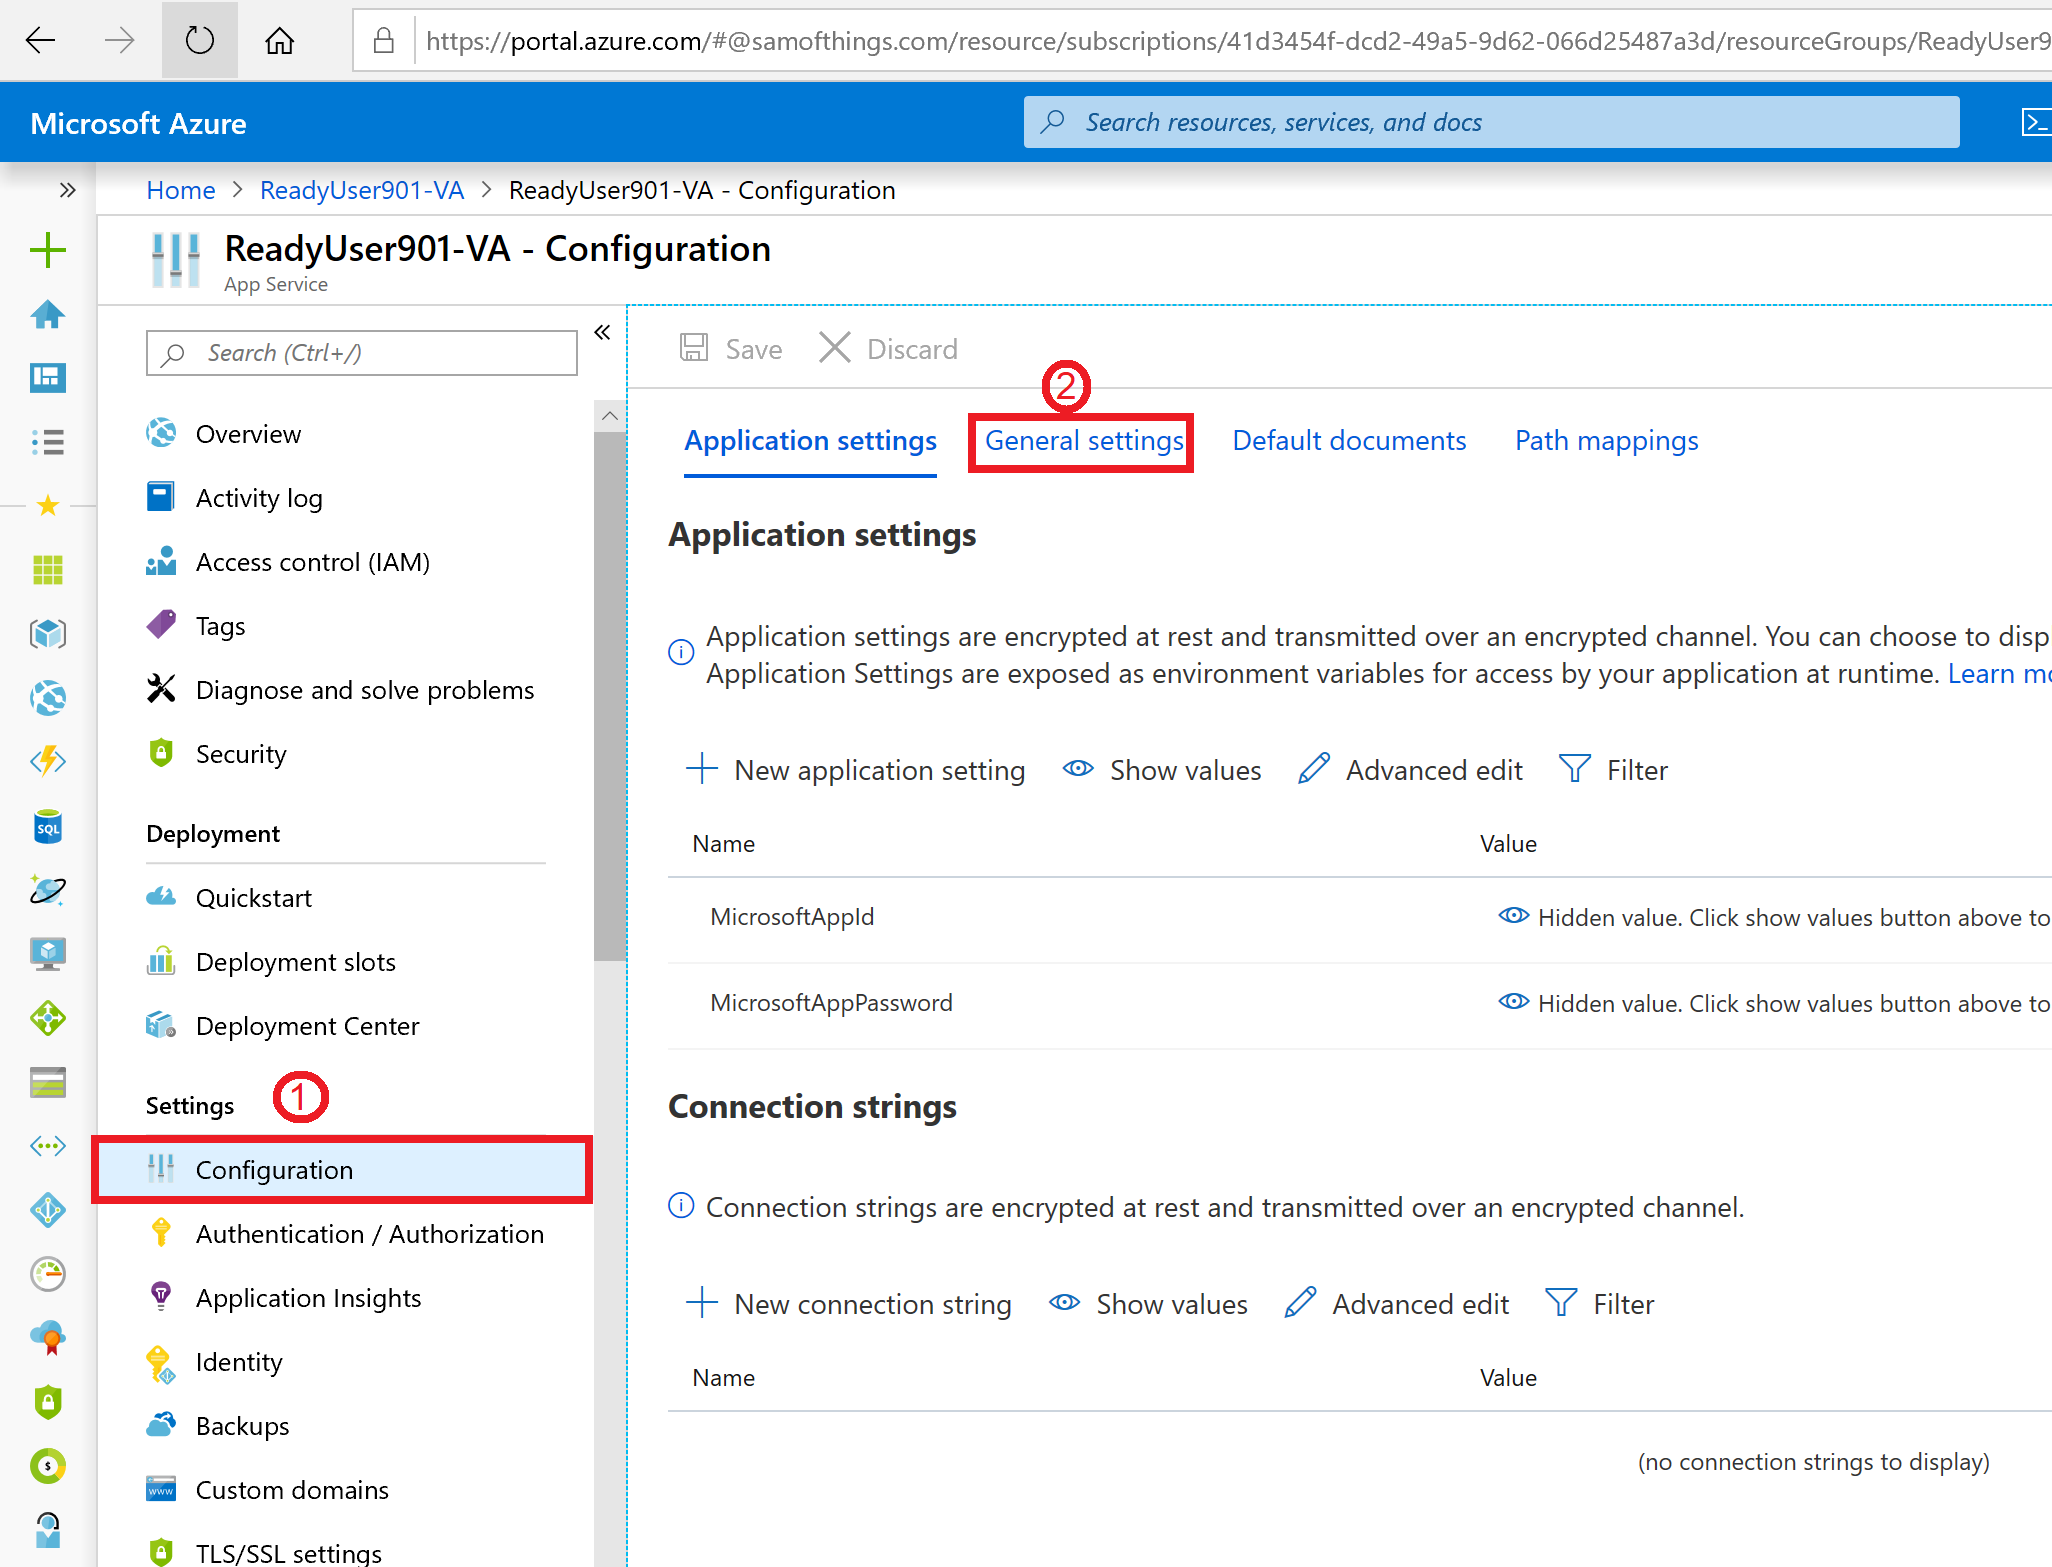
Click on the {LABUSERNAME}-VA App Service resource

-
Click on Configuration and then on General Settings.
-
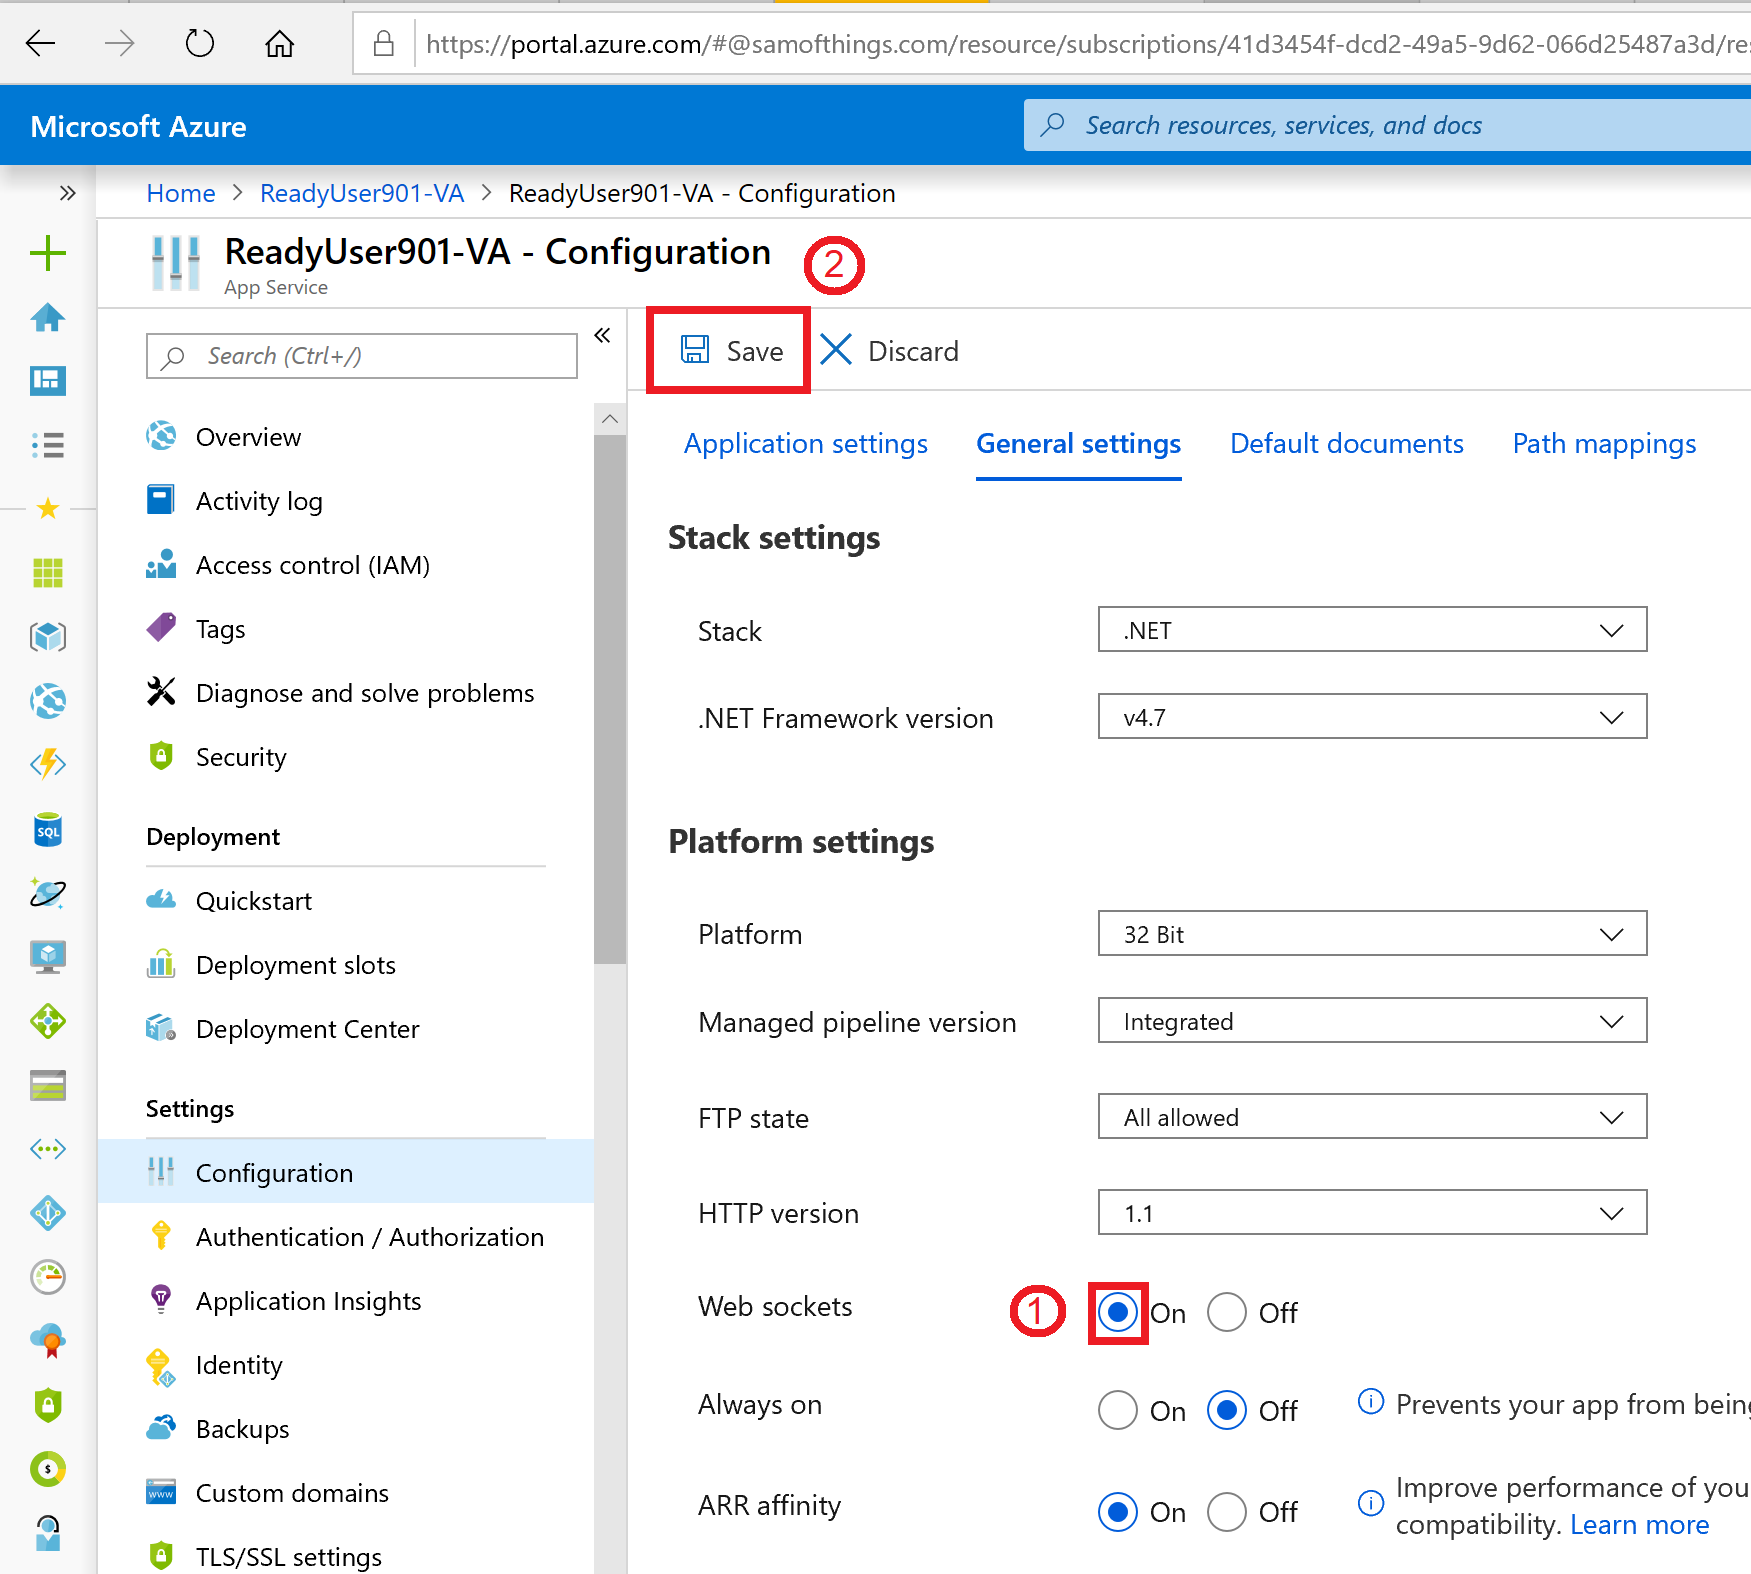
Tick the "On" checkbox next to WebSockets. Afterwards, click on Save.
+ Good to know You have now enabled all the extensions and set the necessary settings in the bot resourcec to activate speech functionalities. -
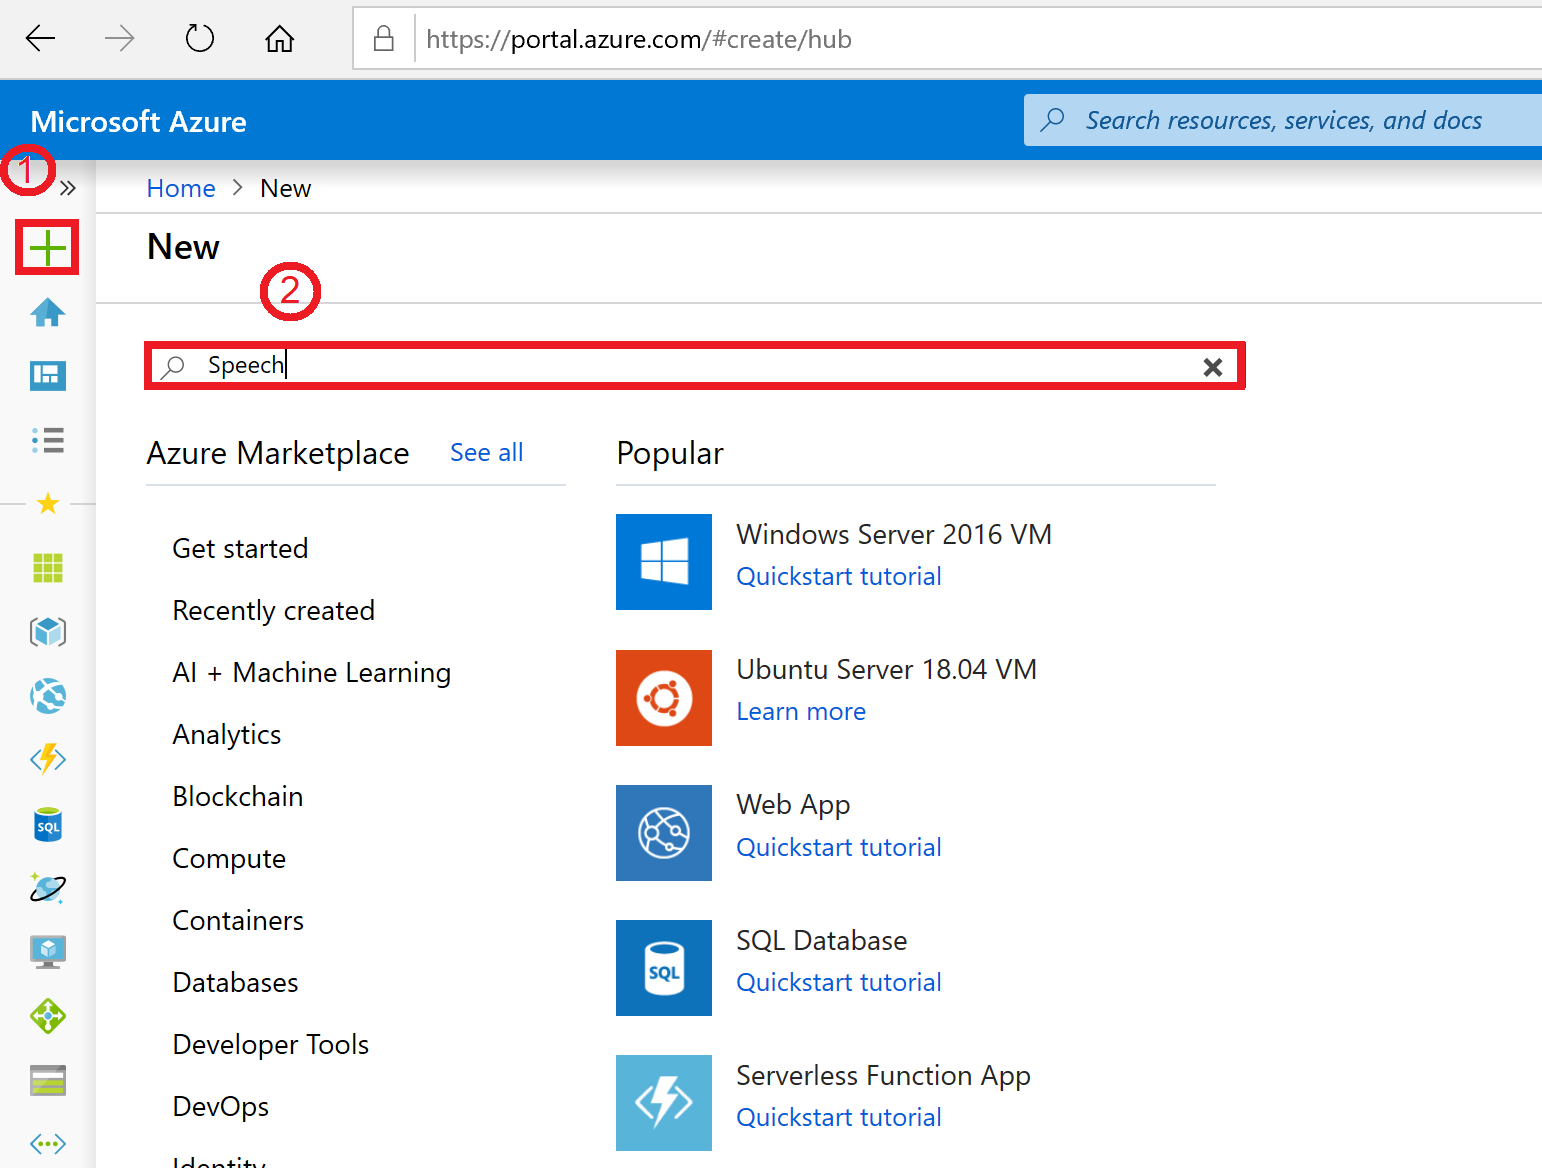
Now we need to deploy Azure Speech Services within our resource group. This is the Azure resource that will finally give the bot speech functionality. To read more about the Speech Service, find the documentation here
Click on the "+" symbol located at the top left of the screen and then search for "Speech".
-
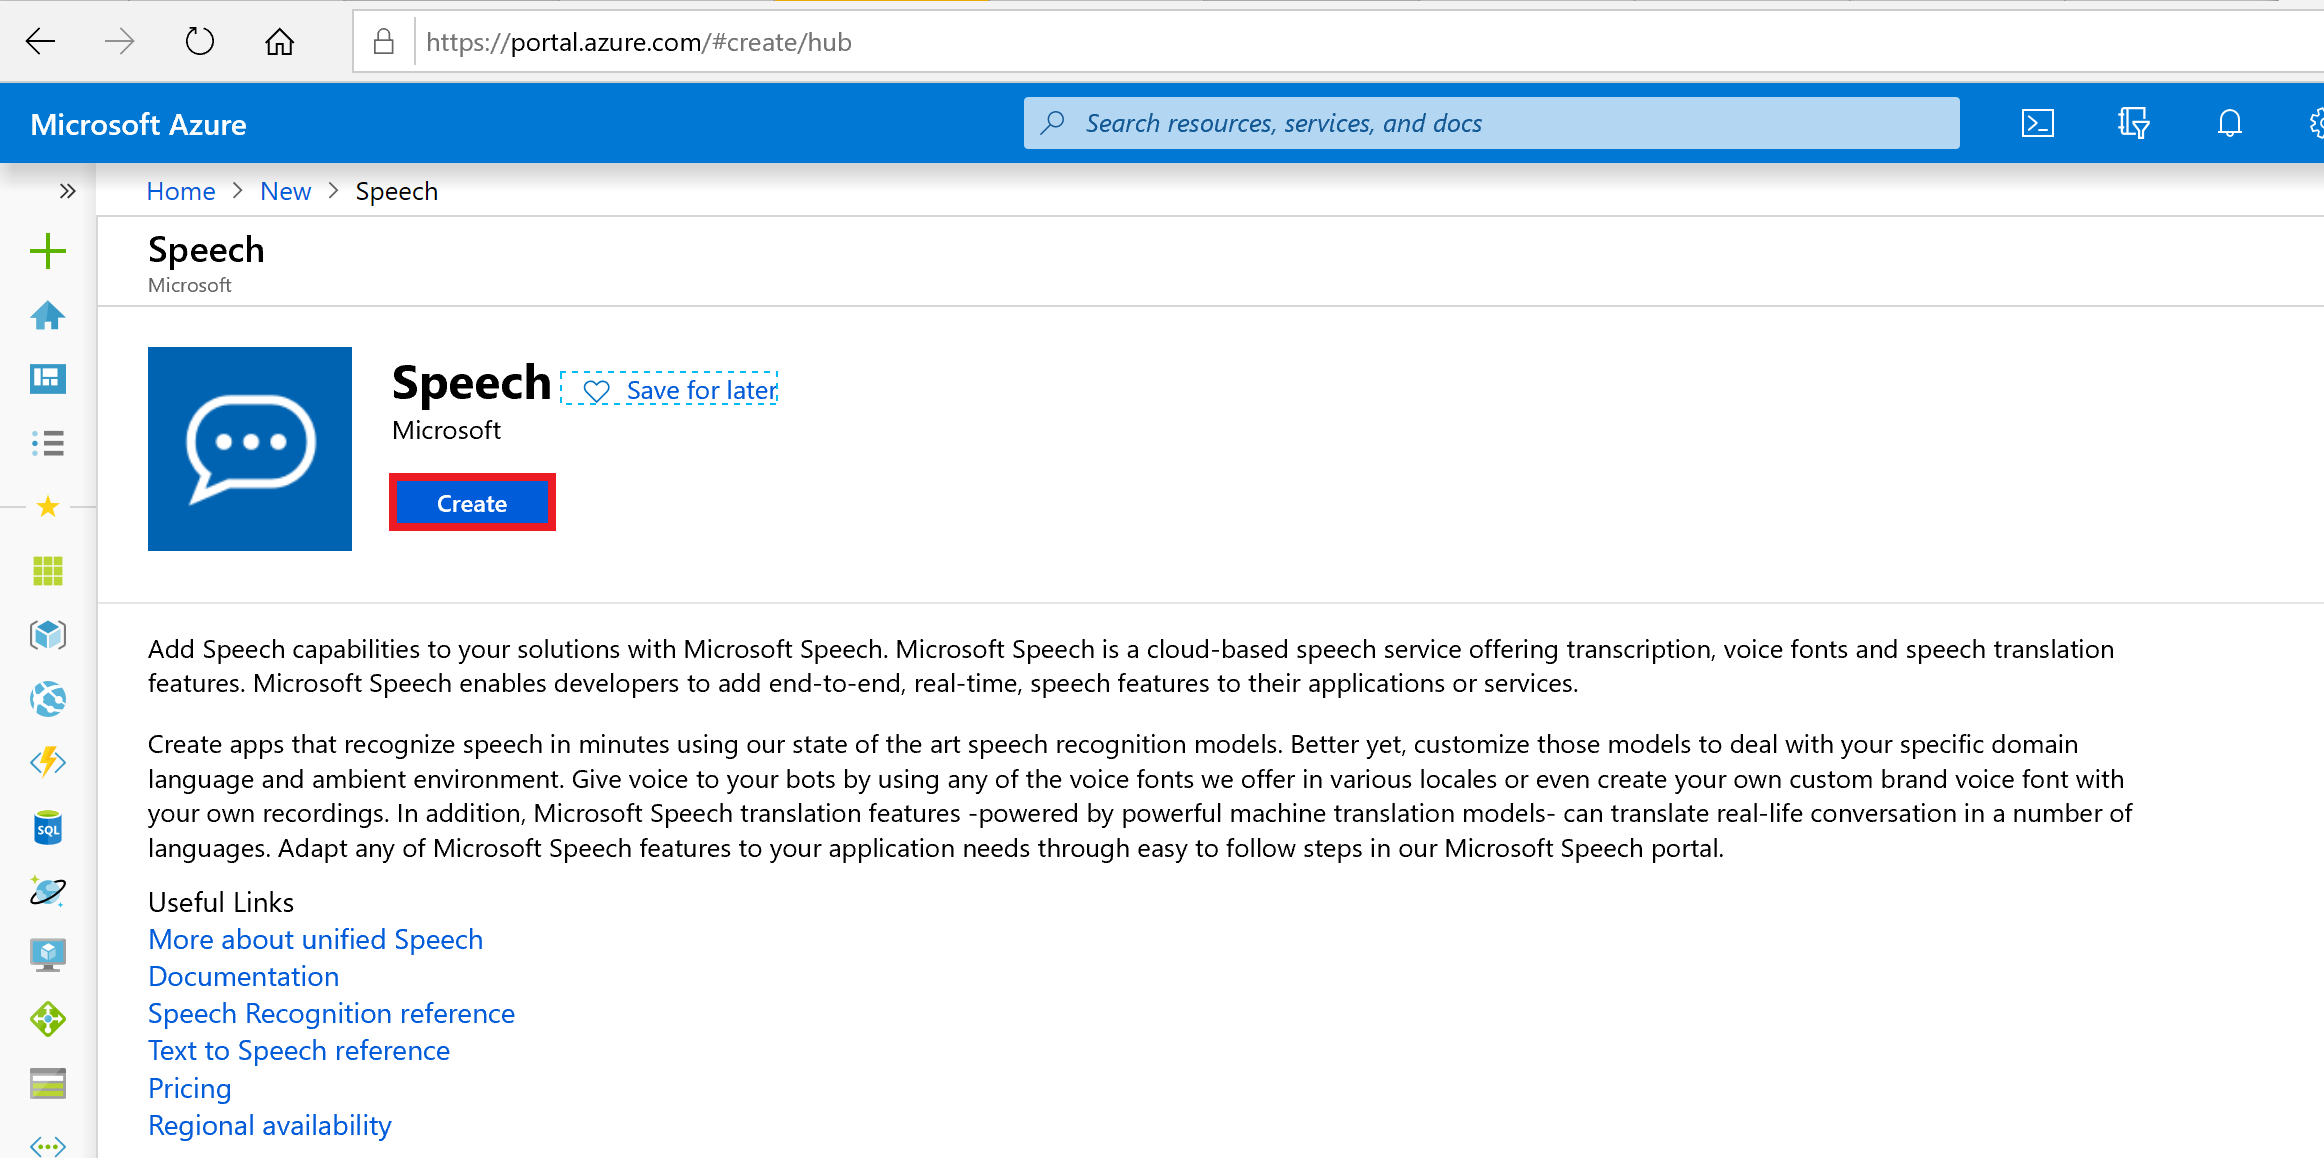
Click on "Create".
-
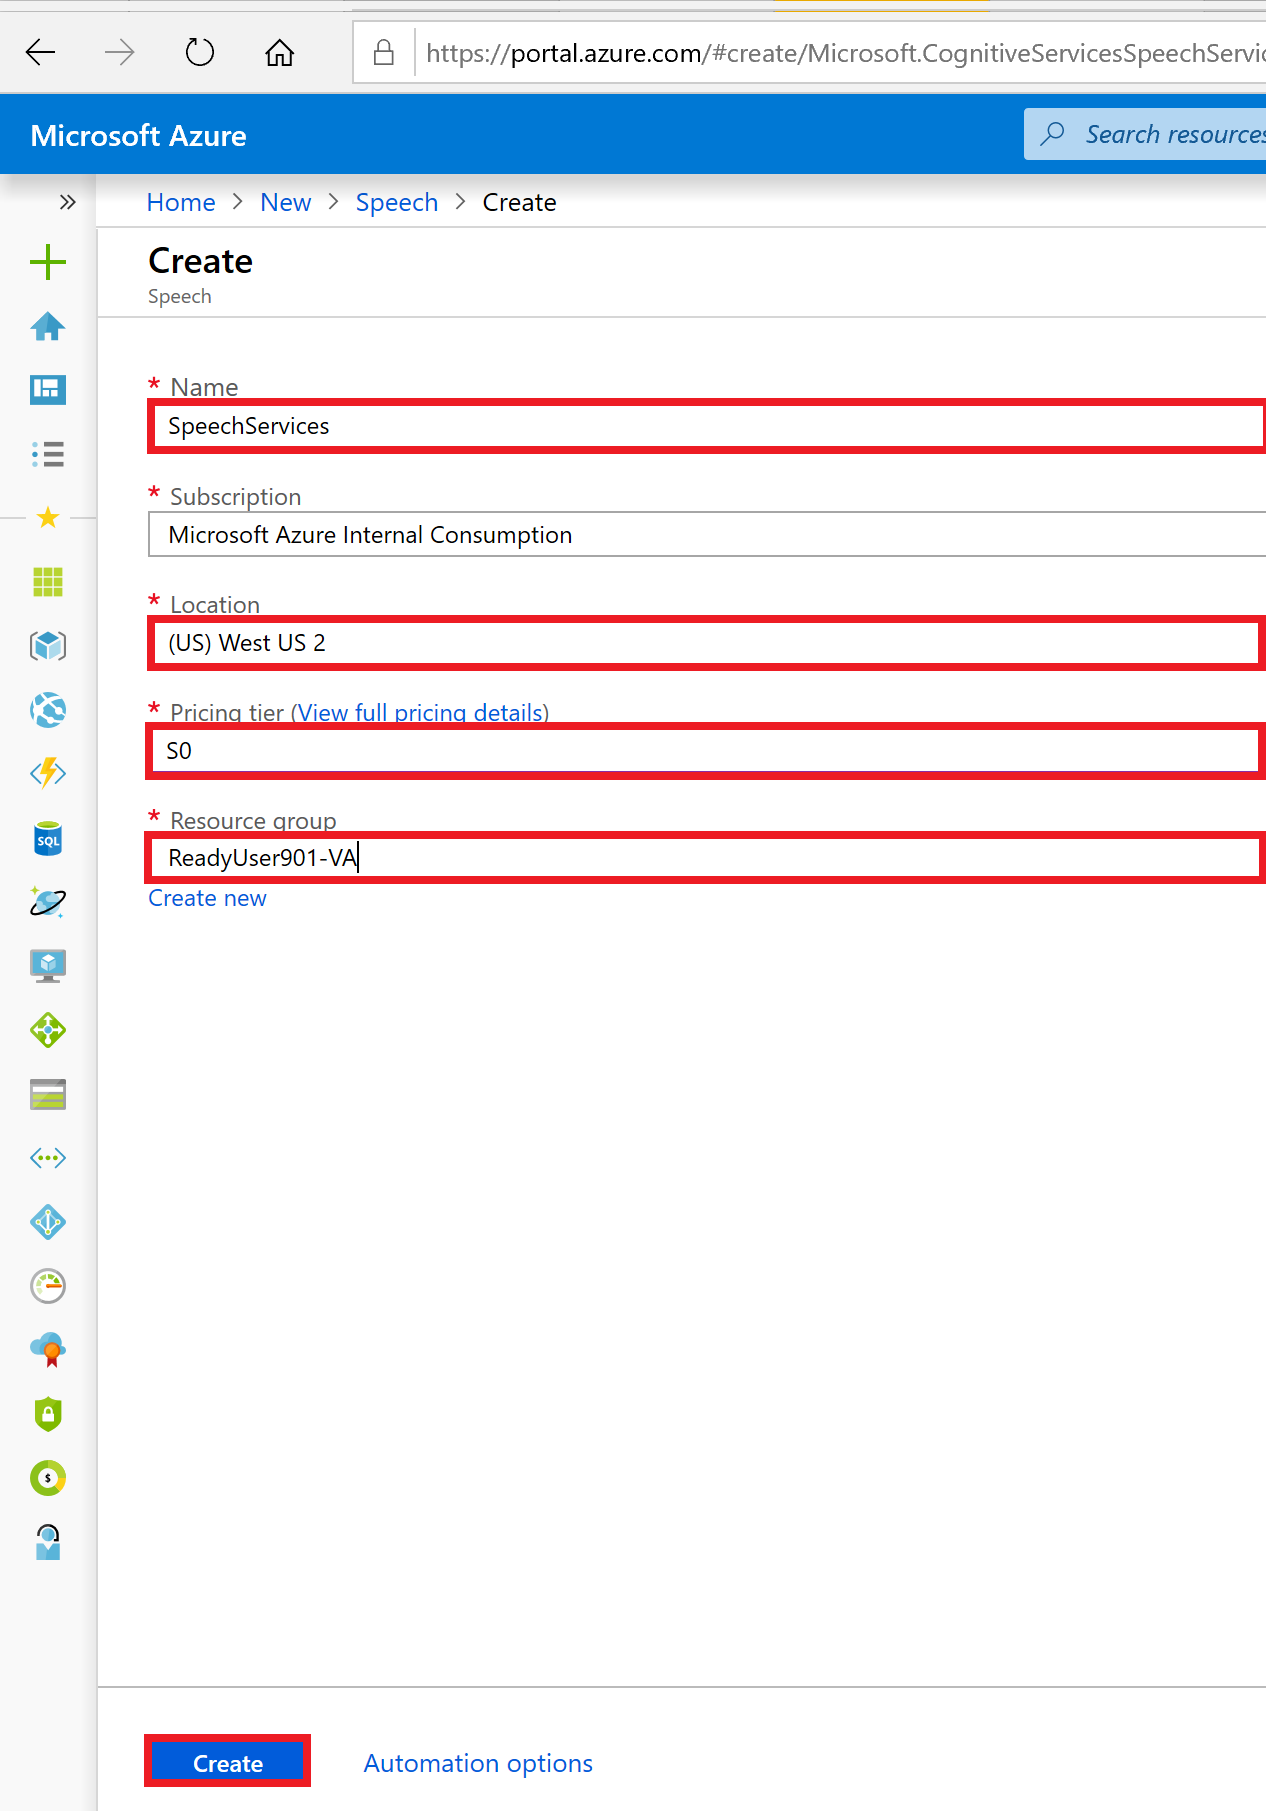
Fill in the following information and then click on "Save":
-
Name: SpeechServices-{LABUSERNAME}
-
Subscription: Leave as default.
-
Location : westus2
- NOTE: It is important you select westus2 as this is currently the only supported region that supports DirectLine Speech.
-
Pricing: S0
-
Resource Group: {LABUSERNAME}-VA
-
-
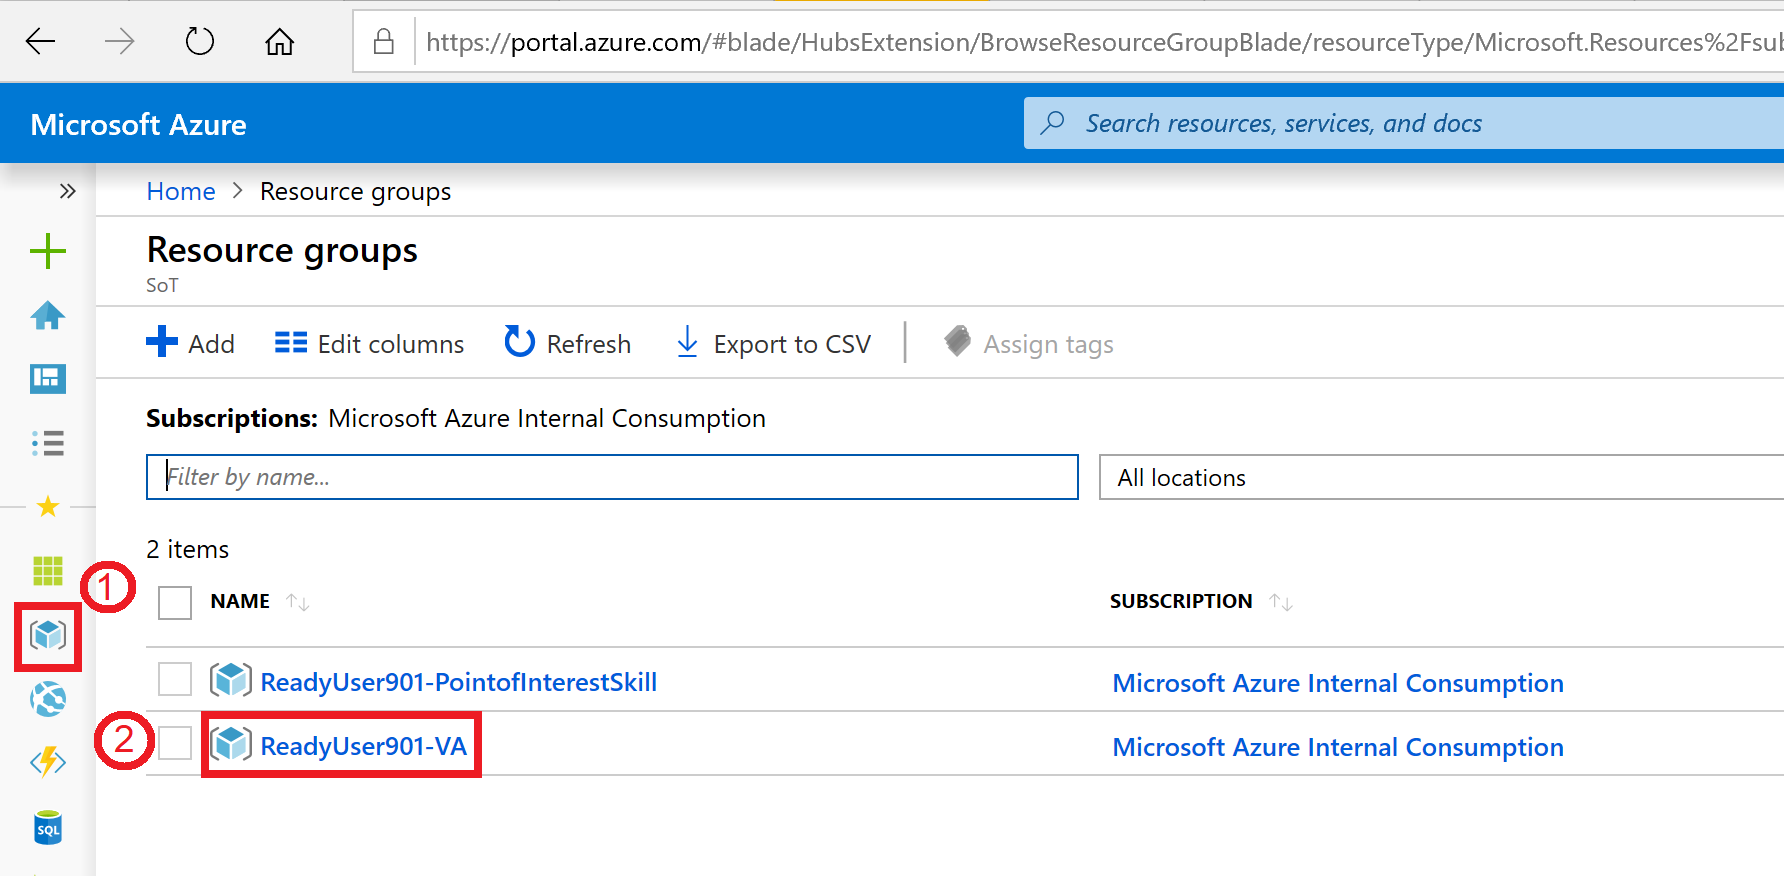
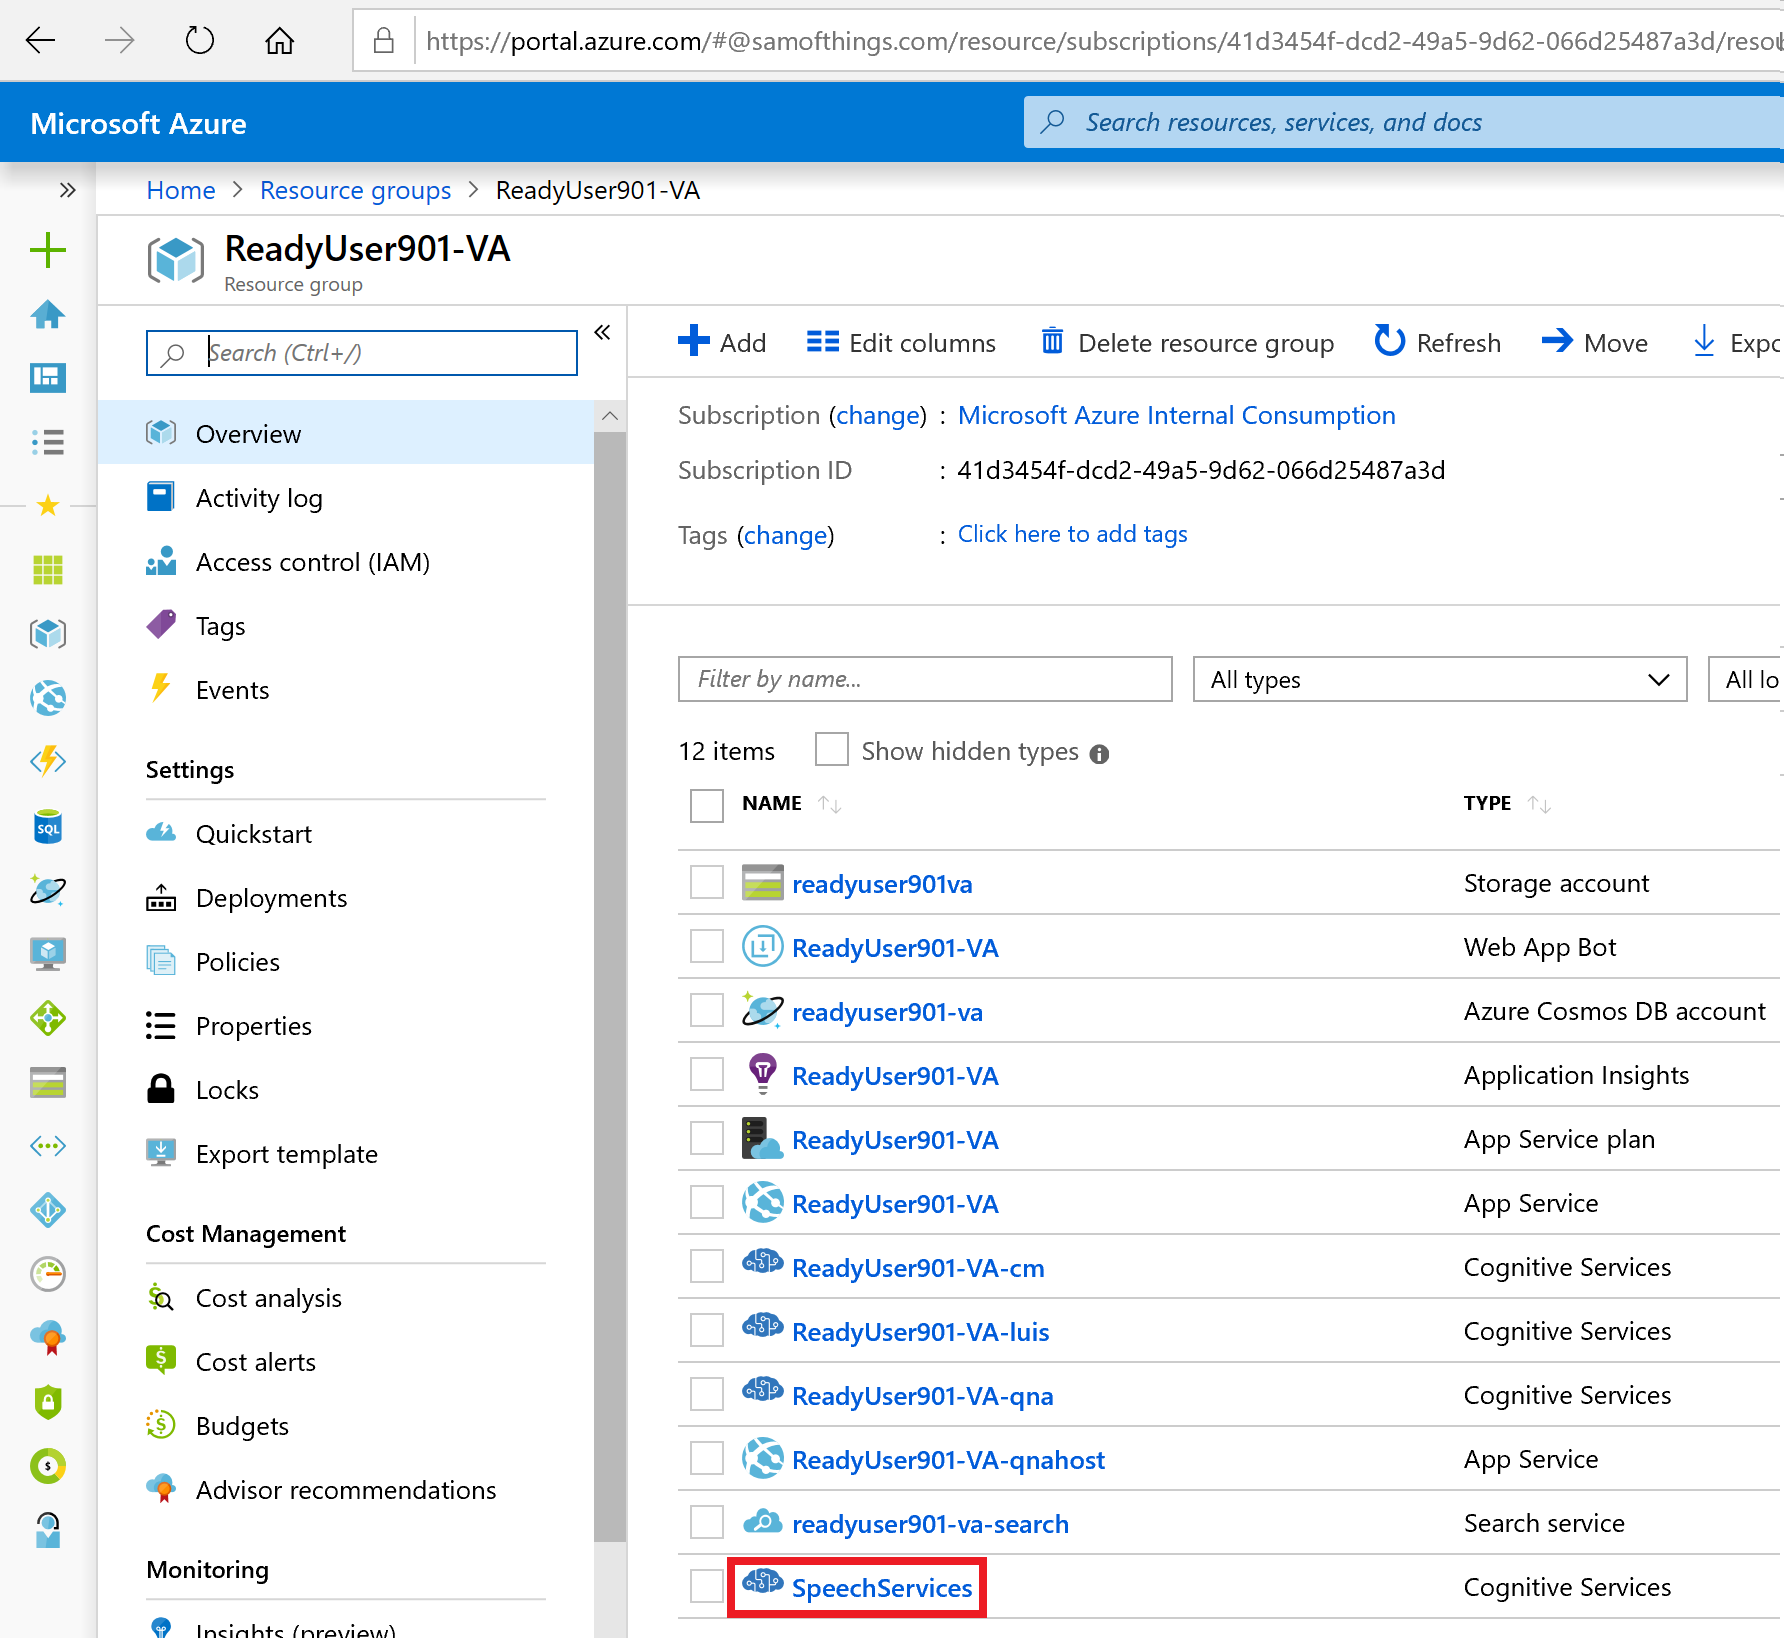
Navigate back to the {{LABUSERNAME}-VA resource group where all the Azure resources we deployed in the steps earlier are listed
-
Click on the "SpeechServices" Cognitive Service resource.
-
Click on Keys and note down KEY 1 on your sticky notes/notepad. You will need this later on along with the Direct Line Speech key you noted down earlier.
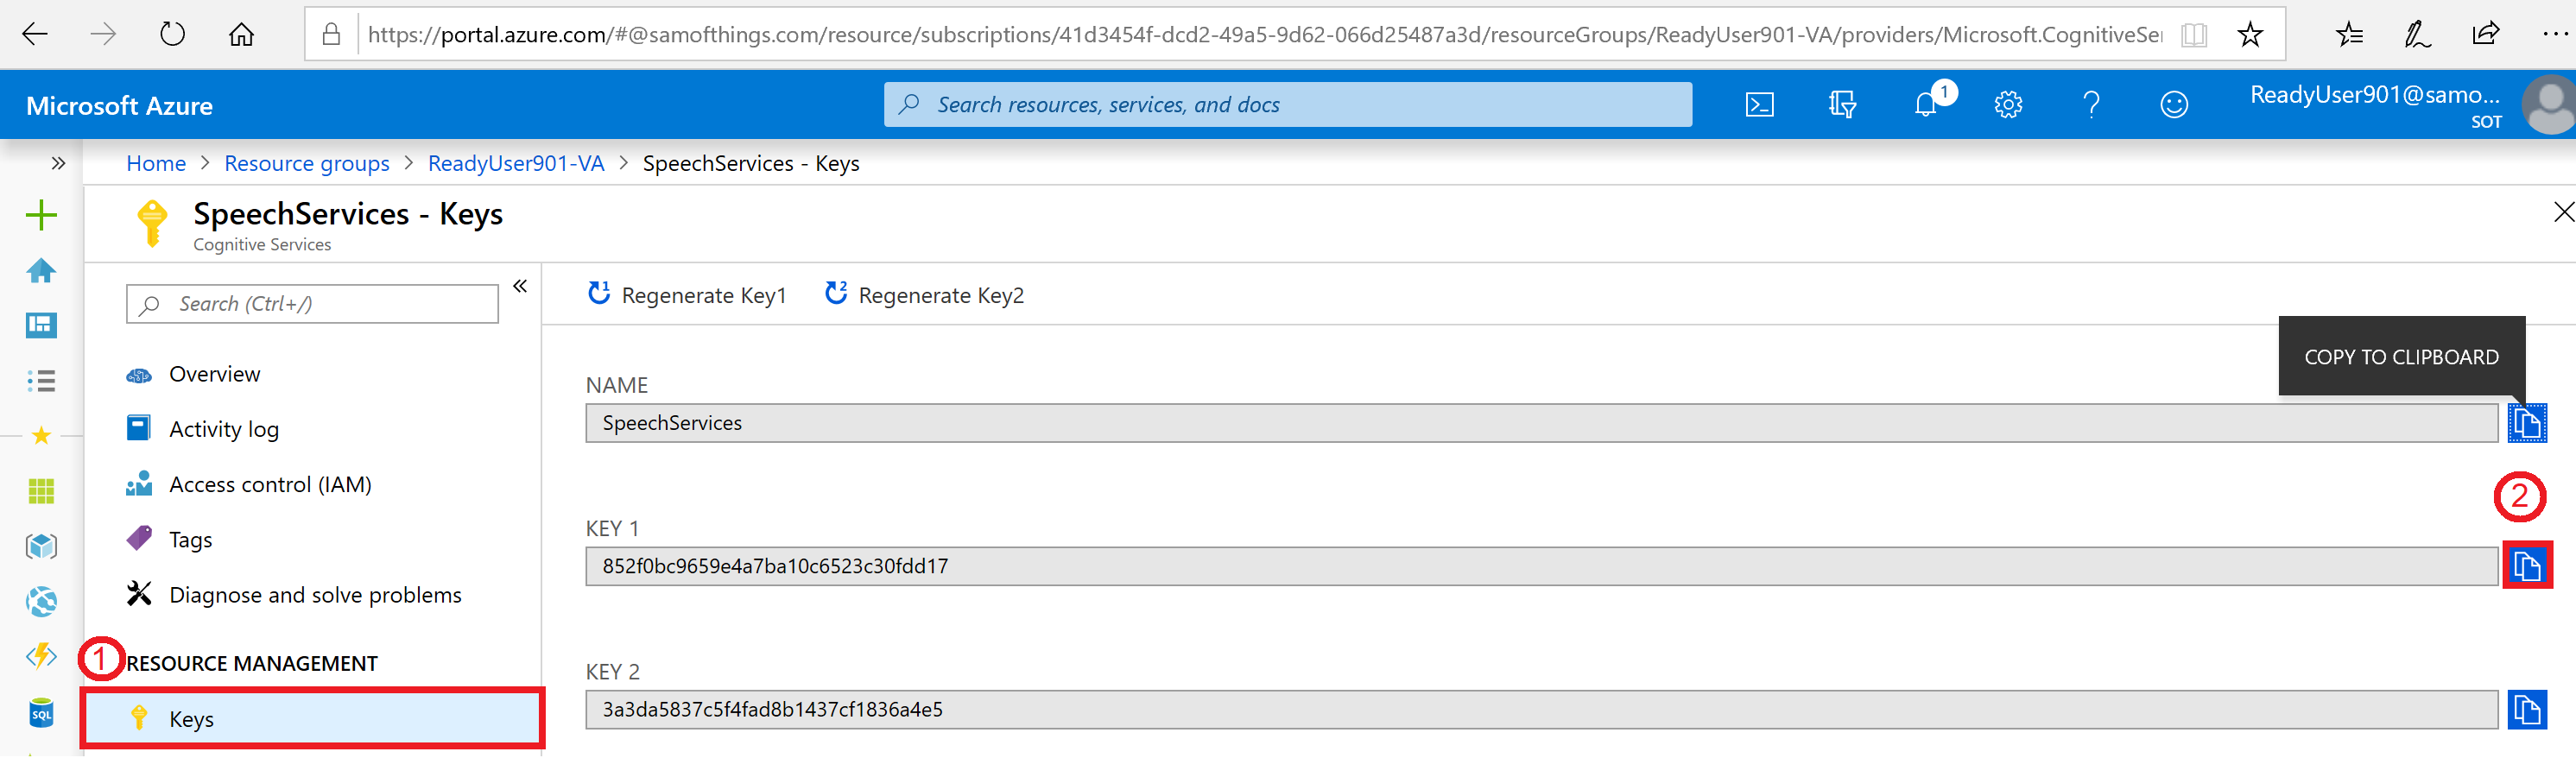
+ Good to know Well done - your bot is now be capable of speaking over voice. This could be performed over various different means, such as a mobile/desktop app or website for example. For this tutorial, we will be using a desktop application called "DL Speech Client" to allow us to communicate with your bot over speech. -
Open a new web browser window, Download & Save to your local desktop the DL Speech Client by using this link: https://github.com/samaea/virtual-assistant-workshop/raw/master/downloads/DLSpeechClient.zip.
-
Note for future reference: You can find the source code for DL Speech Client here. This link can be used for your customers and includes all updates made to the Client.
-
-
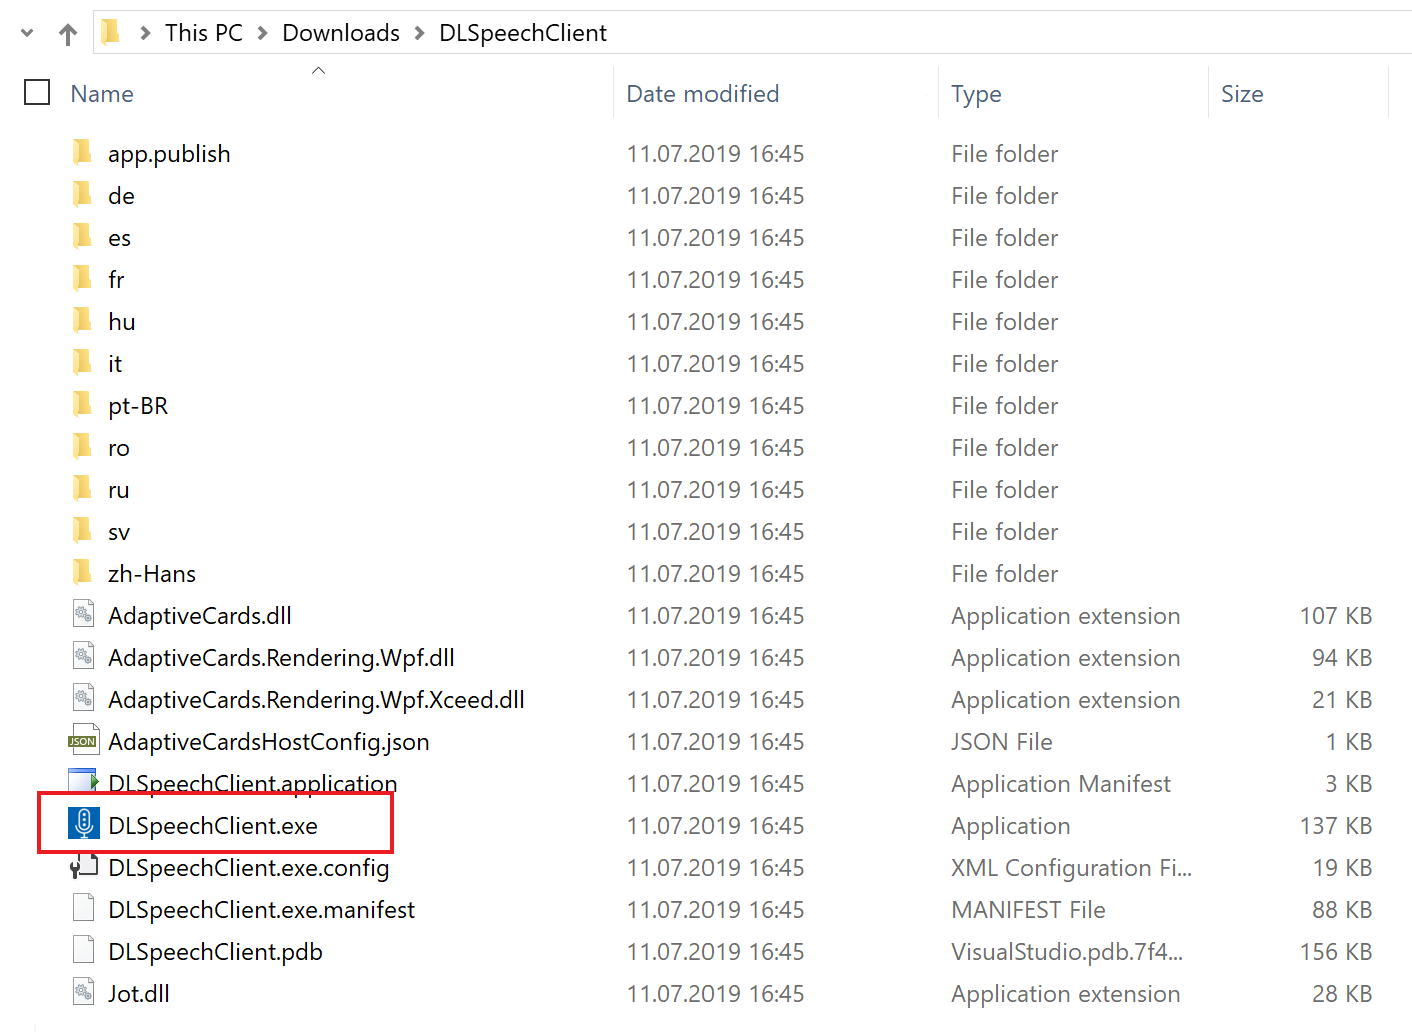
Upon successful download of the file, open the File Explorer and click on the "Downloads" folder to find the just downloaded zip file. Right click on the DLSpeechClient.zip file and from the dropdown menu, select Extract All.
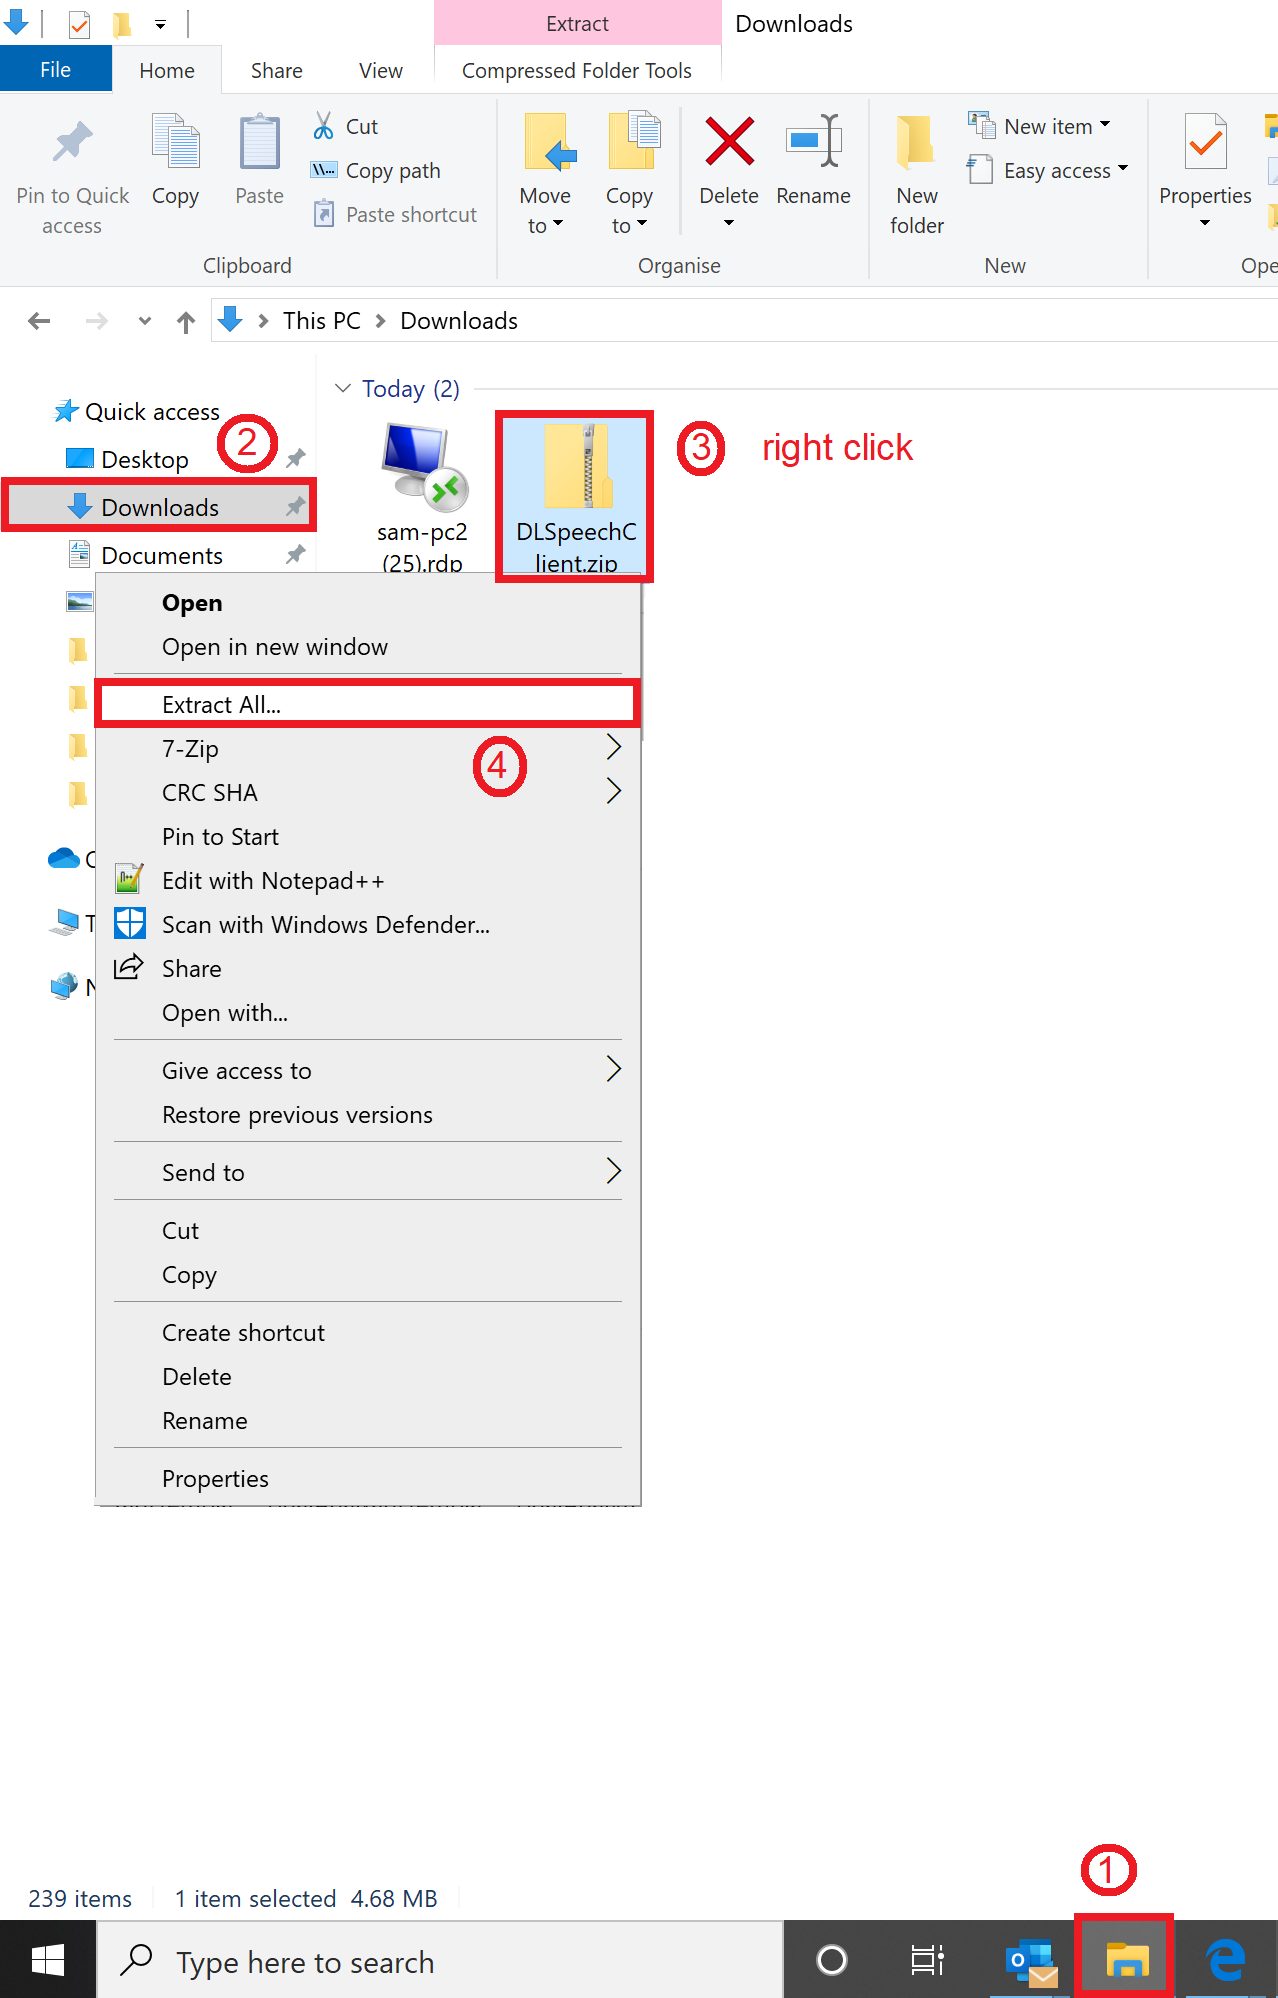
-
Click on Extract and ensure "Show extracted files when complete" is selected.
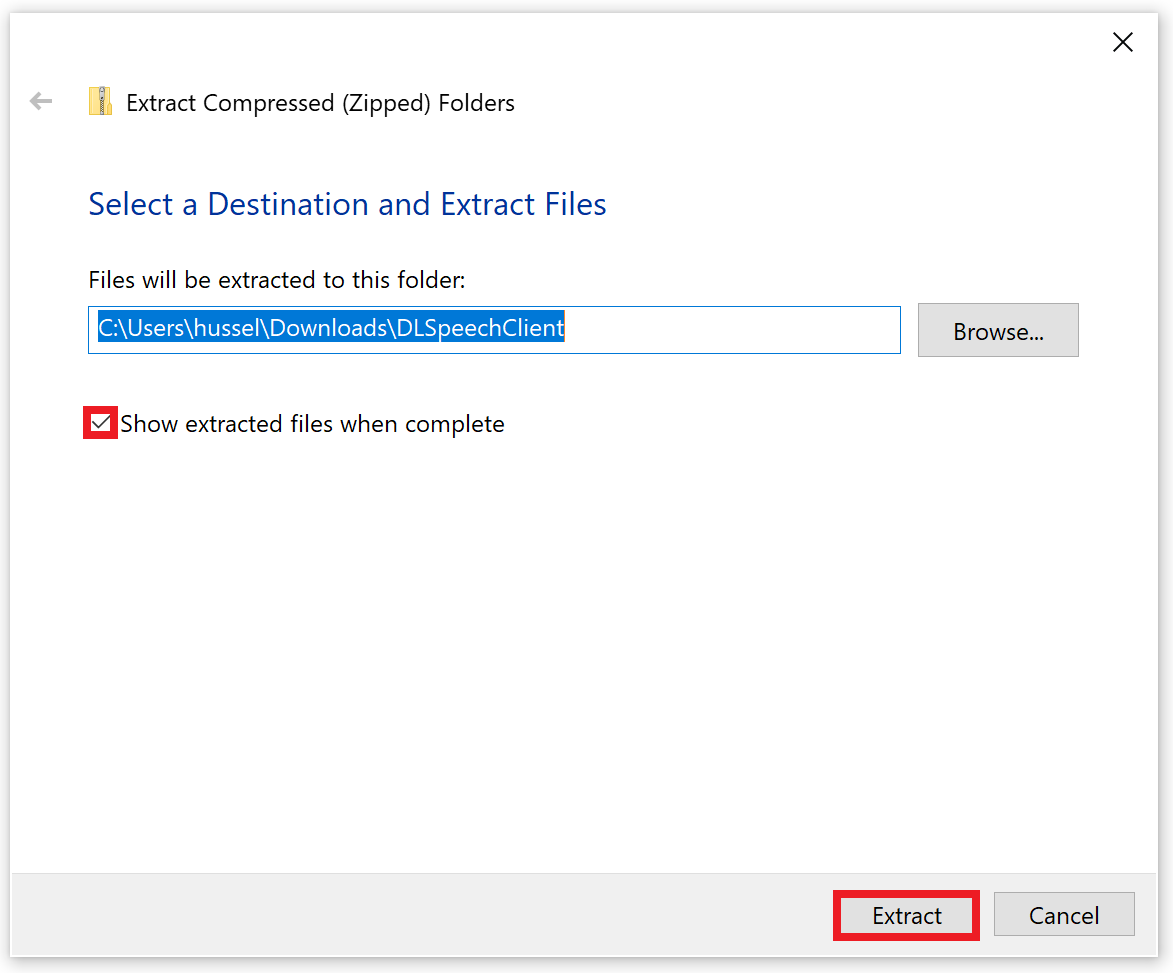
-
Another window will open with the extracted files upon completion. Open the DLSpeechClient.exe file.
-
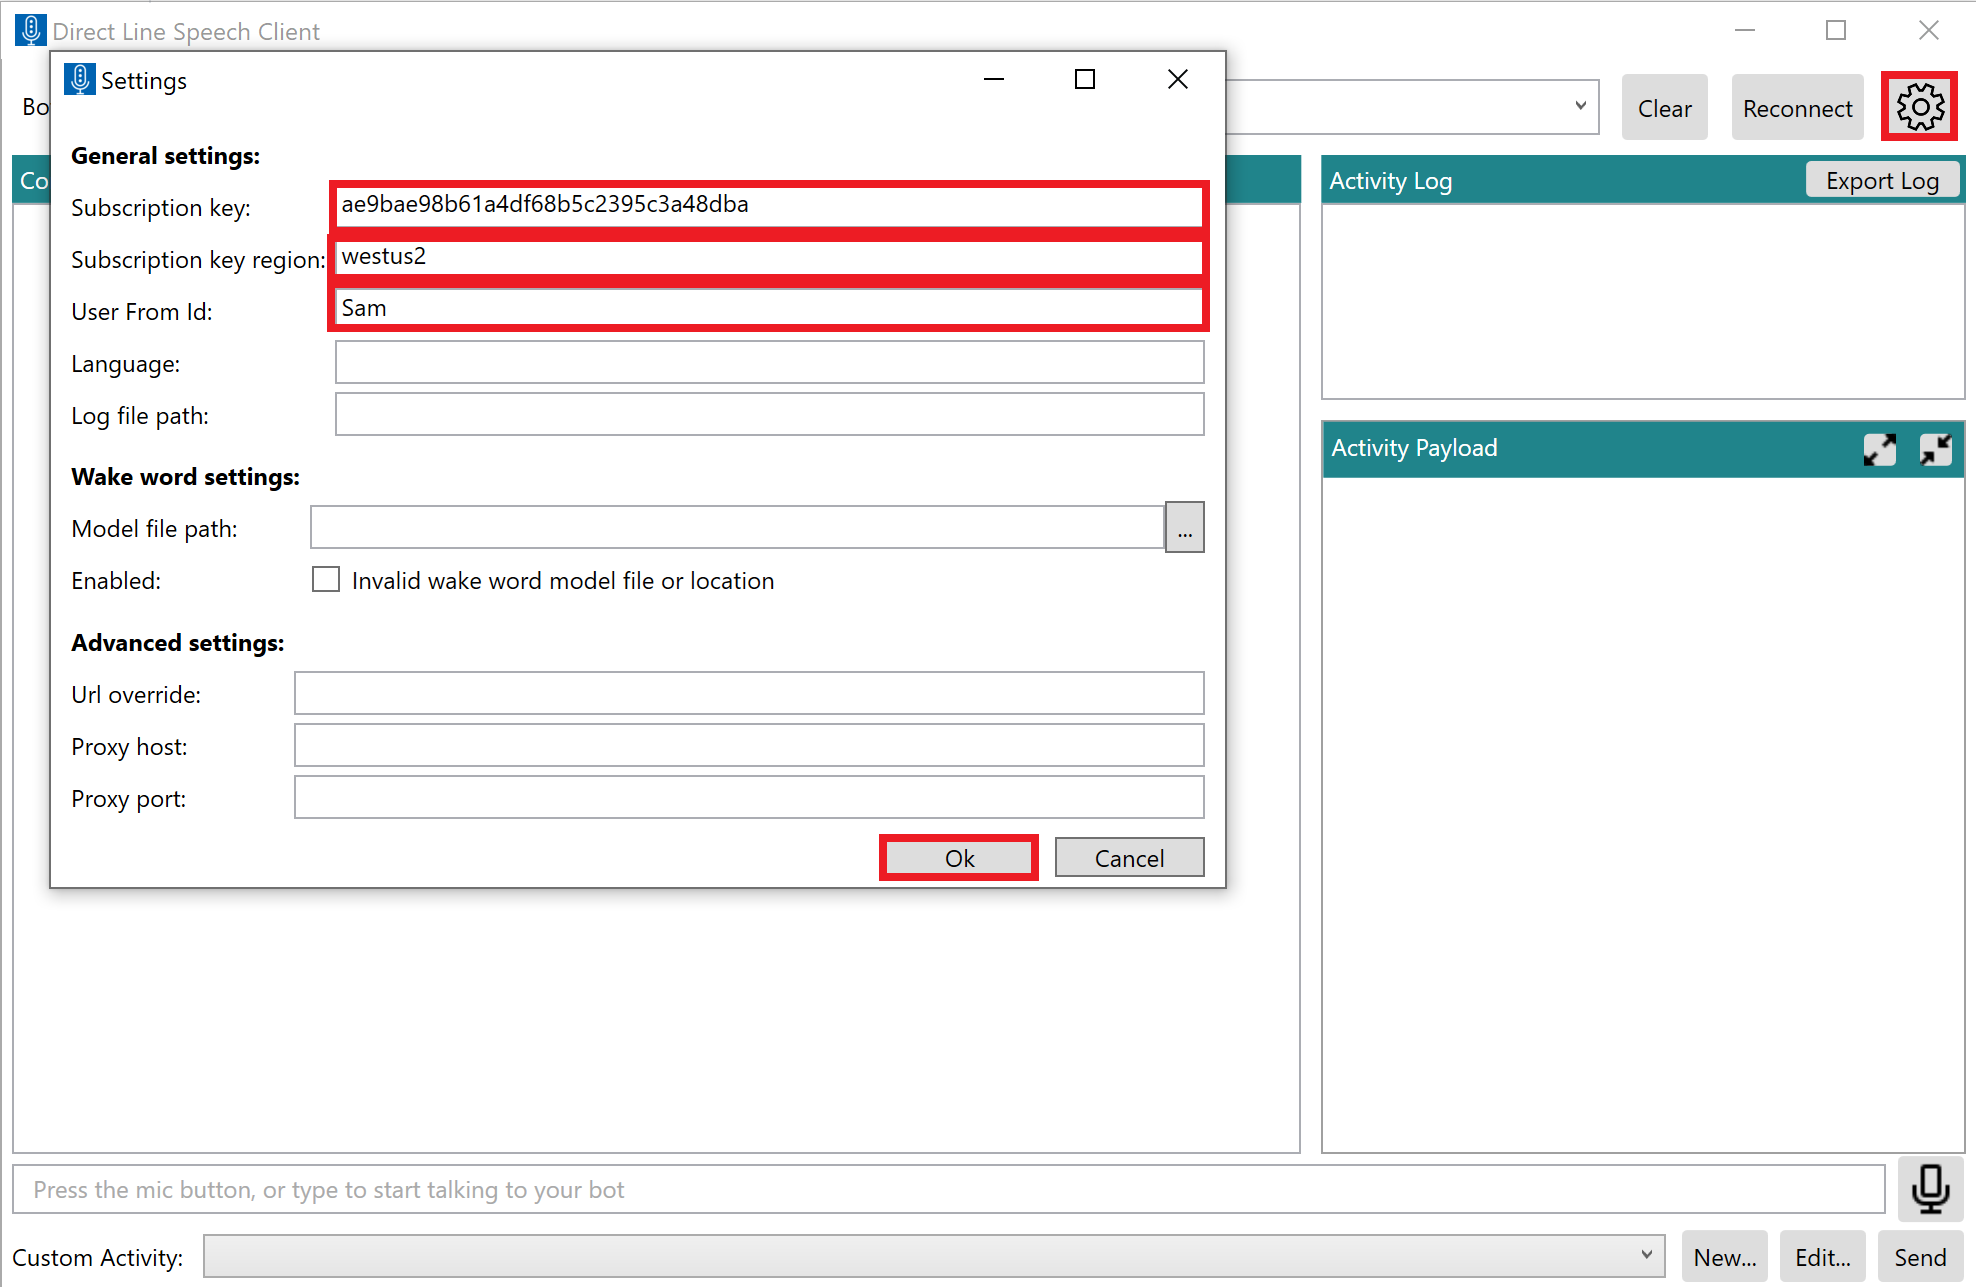
Click on the settings gear icon and Fill in the following information. Then click on "Ok":
-
Subscription key: use the key obtained from step 15 (Speech Service KEY 1)
-
Subscription key region: westus2
-
User from Id: Input your name
-
-
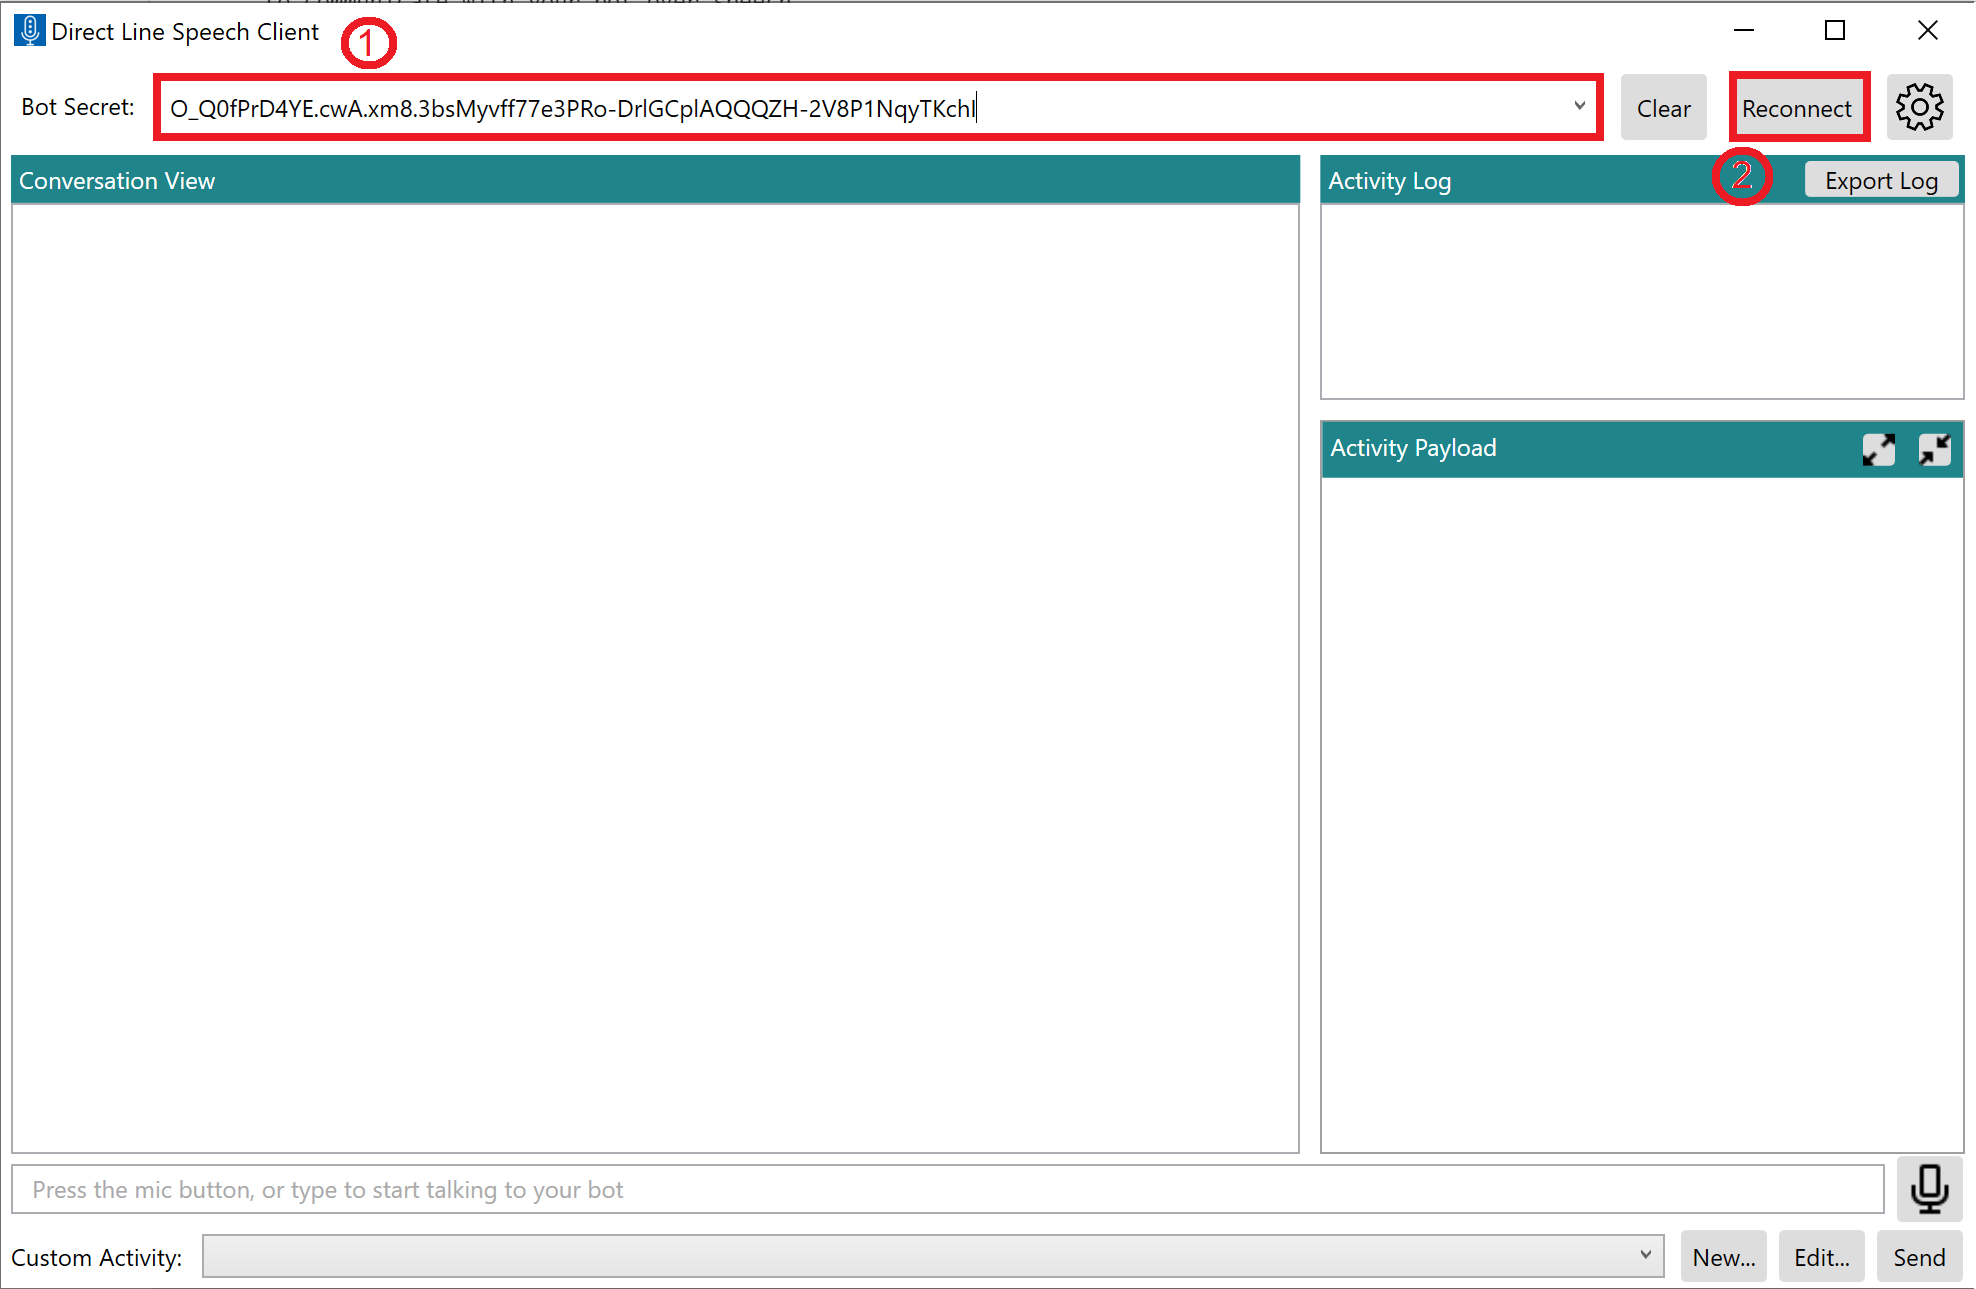
For the bot secret, input the key obtained from step 4 (Direct Line Speech Service key) and then click on Reconnect.
-
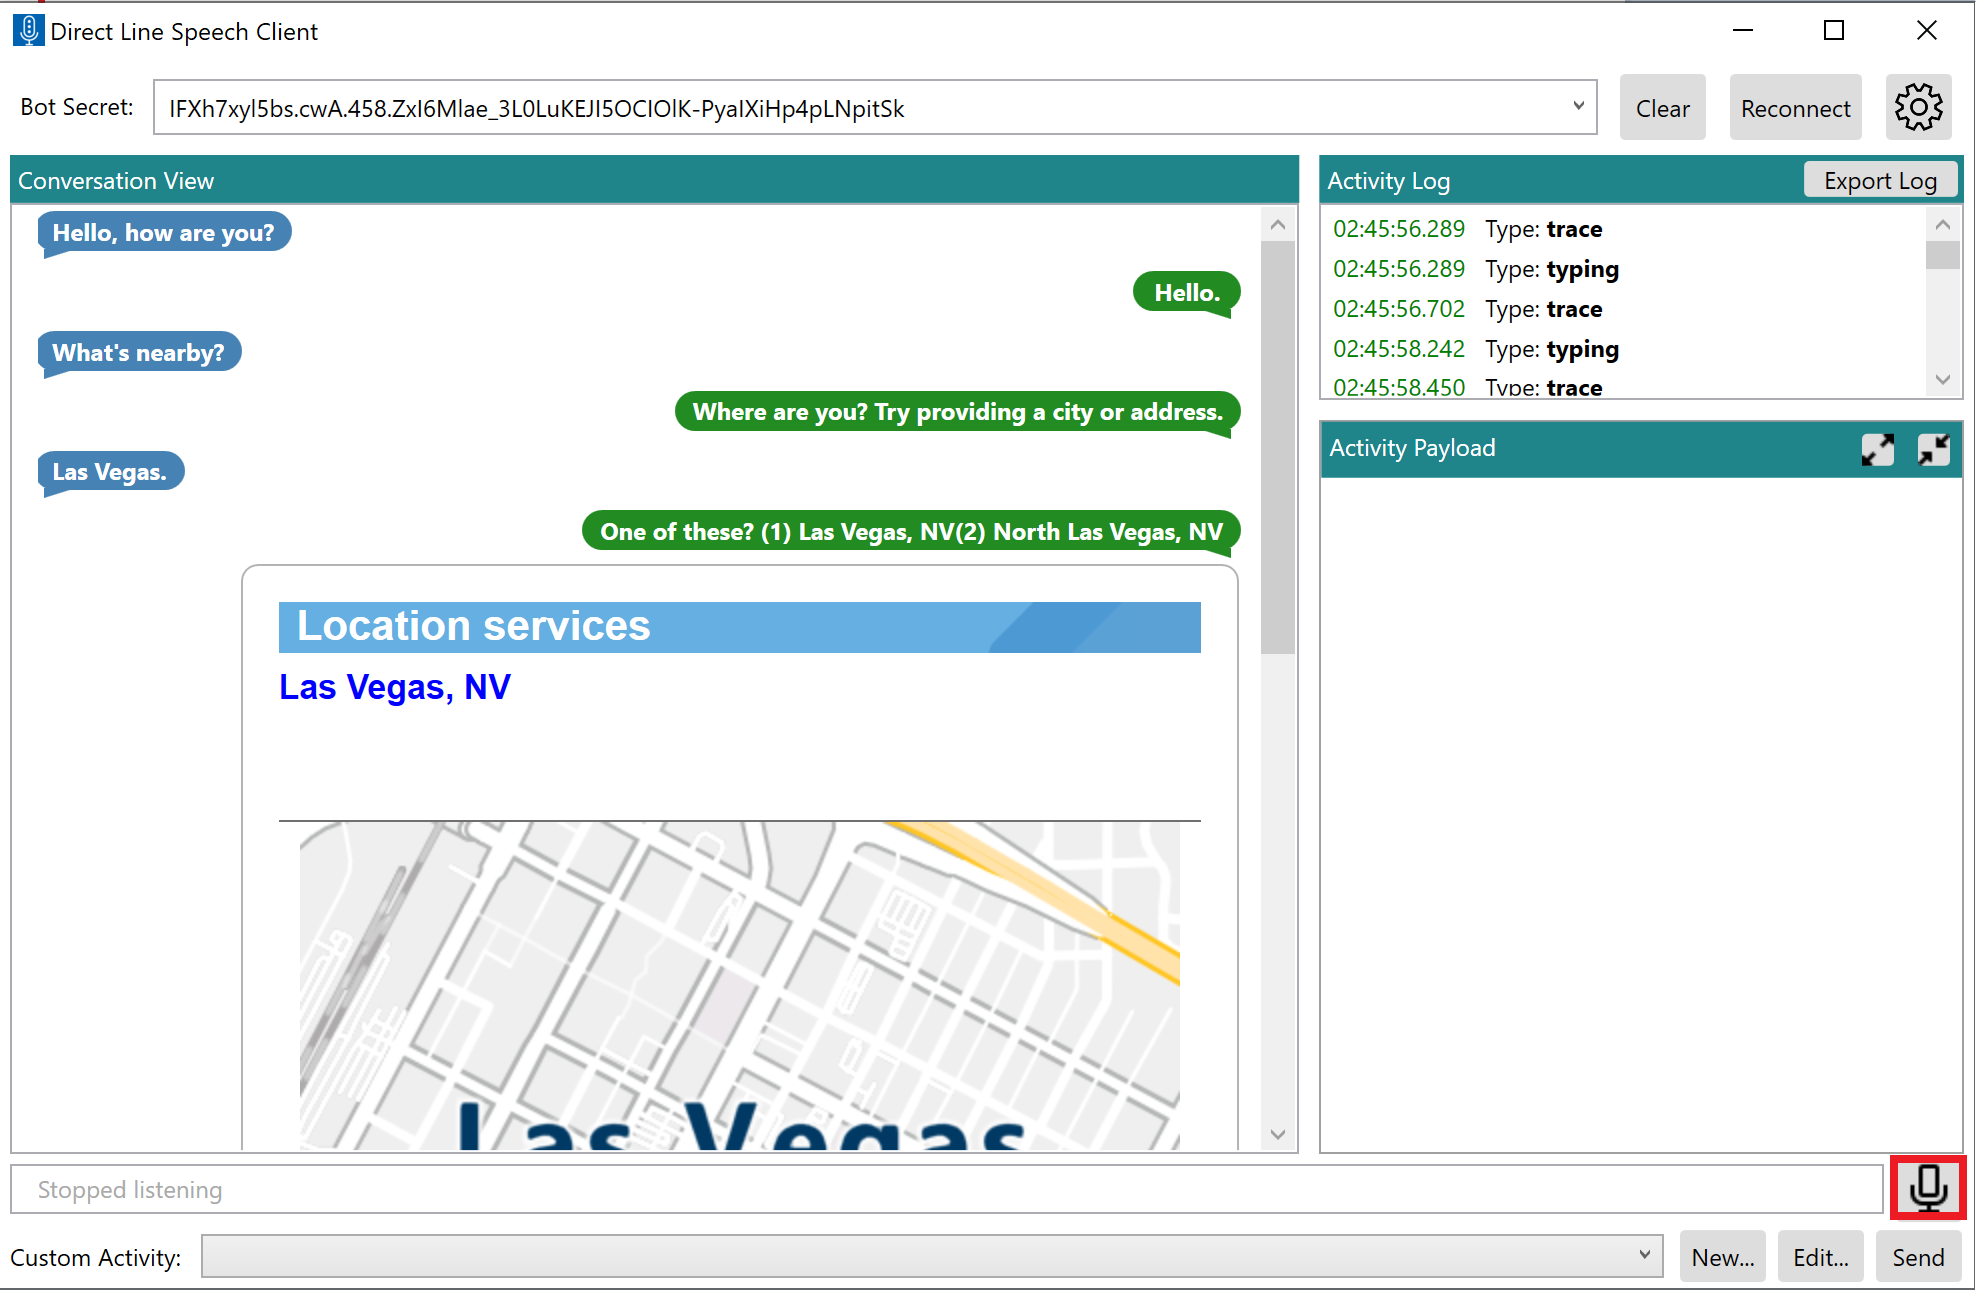
Now you can talk to the bot by clicking on the microphone symbol. You can try out with the questions from MS Ready FaQ or the following examples regarding Point of Interest:
- Get Directions to a Point of Interest:
- What's the fastest way to get to the T-Mobile Arena in Las Vegas?
- I need directions to a restaurant
- Find a Point of Interest
- What's nearby?
- Are there any pharmacies in town?
- Can you recommend an affordable restaurant in Las Vegas
- Cancel an Active Route
-
I don't want to go to the shop anymore
-
Would you cancel my route??
-
You have successfully created your own Virtual Assistant Bot!! WOW! Congrats! This guide will stay publicly available, so if you wish to create a demo for your customer/partner meetings, you can do so by performing the steps within your Microsoft Internal Subscription since the Lab Service will be shut down after MS Ready to avoide costs.
Worth mentioning: developing a chatbot like you just did within 2 hours, would not be possible with the Azure PaaS Services and templates we were using. This is a huge benefit for the application development teams and accelerate pilots and new projects.