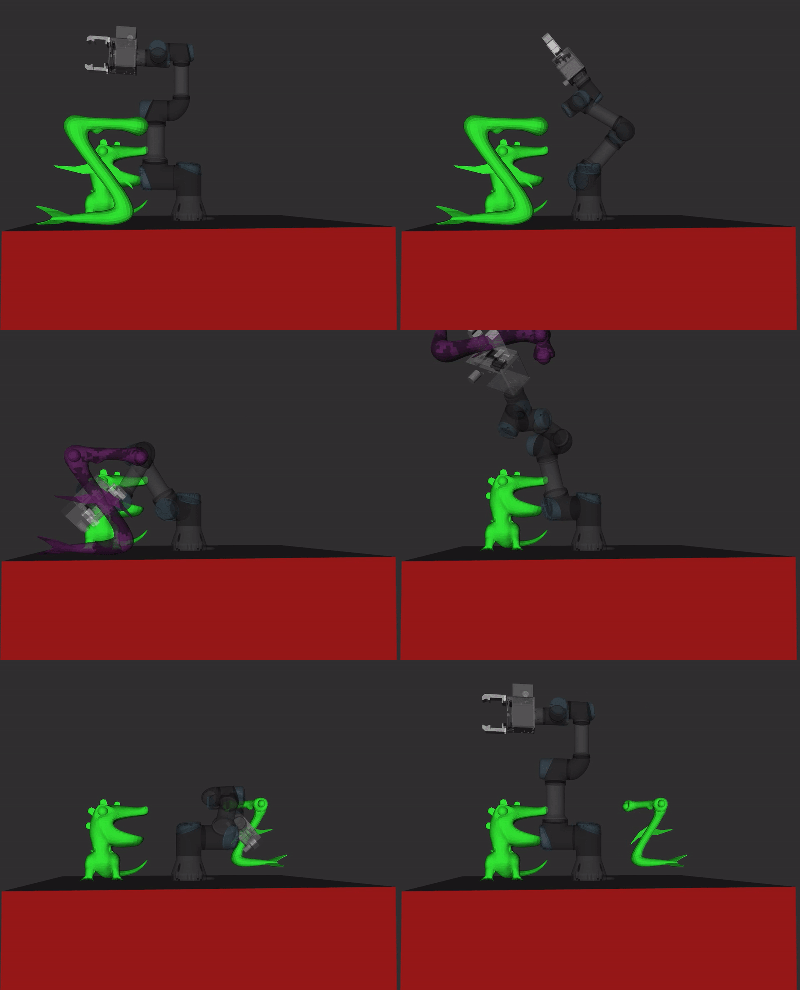
ez_pick_and_place allows you to pick and place any* object, without the hassle of having to generate grasp poses. Just set up your planning scene, and then name an object and a target position!
* given that you have a 3D model of it
What you need to run:
-
Your arm and gripper hardware drivers or simulation. For our UR3 arm and Schunk PG70 gripper combo, the command for the simulated robot is:
roslaunch manos_gazebo manos_gazebo.launch limited:=true -
Your arm and gripper MoveIt planning execution. For our UR3 arm and Schunk PG70 gripper combo, the command for the simulated robot is:
roslaunch manos_moveit_config manos_planning_execution.launch sim:=true limited:=true -
A GraspIt planning service. For our setup the command is:
roslaunch manos_graspit_config graspit_planning_service_opt.launch -
ez_pick_and_place. A simple
rosrun ez_pick_and_place ez_pnp2.pyis enough. -
(Optionally) rviz for MoveIt scene visualization. For our setup the command is:
roslaunch manos_moveit_config moveit_rviz.launch config:=true
With everything up and running ez_pick_and_place provides two services:
-
EzSceneSetupis used to setup the MoveIt and GraspIt planning scenes. Populating the EzSceneSetup request:-
EzModel[] objects/EzModel[] obstacles: Based on theEzModelmessage, you specify the name of your objects and obstacles, and where the model files for MoveIt and GraspIt can be found. The model files are different for MoveIt and GraspIt. We discuss this matter later in this doc. Finally, you have to specify the pose for each of your objects and obstacles. -
EzModel gripper: Based again on theEzModelmessage, you specify the gripper's name and the GraspIt file that accompanies it. Themoveit_filefield has no effect here. -
string[] finger_joint_names: Provide a string array containing the names of the gripper's finger joints. -
string gripper_frame: Provide the gripper's base_link. -
float64 pose_factor: Provide the factor difference between MoveIt and GraspIt. This should not be used under normal circumstances, but in case you are using an exotic version of GraspIt, it is here to adapt to it.
-
-
EzStartPlanningis used to request a plan. Populating the EzStartPlanning request:-
string graspit_target_object: Provide the name of the object you previously added in the planning scene. -
geometry_msgs/PoseStamped target_place: The pose of the place location. Keep in mind that in v1.0.0 only the x and y of the position are taken into account. The algorithm assumes that the place surface is at the same height as the pick one, and completely disregards the orientation (for now). We discuss later in this doc, how exactly ez_pick_and_place works. -
string arm_move_group: Provide the name of the arm move group. -
string gripper_move_group: Provide the name of the gripper move group. -
int32 max_replanning: Provide the number of maximum planning retries. This means that withmax_replanning=0you will only get 1 try. GraspIt fails quite often, so it is advised to allow for a maximum of two or more retries.
-
For further info on how to use the package, you can refer to the test2_ez_pnp2.py script under the test directory of this repository, which was used to create the the first animation of this doc.
ez_pick_and_place is a package that integrates MoveIt and GraspIt, to provide a much easier experience for the end user. When you set up your planning scene with all the obstacles and objects present, you can then request for an object to be picked and placed on a specific location.
When you make such request, the algorithm first makes a service call to the GraspIt planning service. After (quite) a while, GraspIt will return a series of candidate grasp poses.
The ez_pick_and_place algorithm first makes the necessary translations between the MoveIt and GraspIt worlds and then evaluates the translated candidate poses. As soon as a possible solution is found based on the inverse kinematics of a candidate grasp pose, ez_pick_and_place runs the pick() function, which sends a series of commands to the robot that enables it to pick the requested object.
With the object picked by the robot, the algorithm starts computing the place pose, based on the location provided by the user. This step ensures that, regardless of the arm's joints, the picked object's pitch and roll rotation is preserved. The algorithm generates arm poses that preserve the pitch and roll rotation of the object but not the yaw rotation, assuming that placing the object with the same way as it was picked will result in the object not falling over, since it will rest on its base. Apart from the gyration (modification of the object's yaw), the algorithm experiments with a series of place heights too. Starting from the same height as the pick location and going as high as 5cm from the start one, the algorithm tries to find a place pose that has an inverse kinematics solution for both that height and gyration state. As soon as a solution is found, ez_pick_and_place runs the place() function, which sends a series of commands to the robot that enables it to place the object to the specified location.
For more geeky stuff, refer directly to the source code and especially the (lightly) documented ez_tools.py inside the src directory.
This section is here to redirect you to already awesome documentation regarding MoveIt and GraspIt robot setup.
Setup your robot for MoveIt integration.
Setup your robot (just the gripper) for GraspIt integration.
Blender is a fairly easy to use 3D modeling software. I am by no means an expert, but I can create basic 3D shapes and transform 3D models based on our needs.
Using Blender you can create and modify 3D models in order to make them useable both in MoveIt and GraspIt. Here is a list of steps to create or modify models in Blender (and beyond) for MoveIt and GraspIt integration:
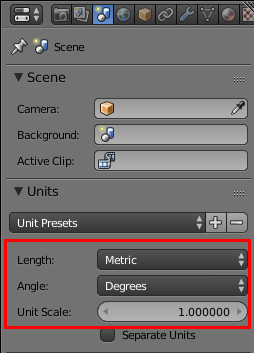
- In order for your models to stay true to real-life objects in terms of size, it is recommended to enable Blender's length and angle unit systems. Also, make sure that the unit scale is set to 1.0, to make sure that the size you use in Blender will be the same as the one in the real world.
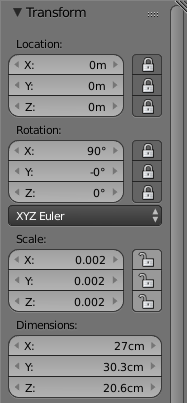
- The best way to resize your model is to use the
Nshortcut, which opens up the object transform sidebar. From there, you can specify the dimensions of your model in the units you selected earlier.
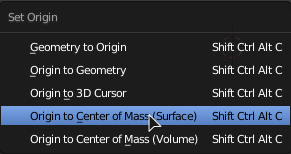
- Make sure the origin of your model is logically placed inside your model. It can be anywhere you like, but keep in mind that this will be the reference point of the object's pose later in your planning scene. In order to modify the origin of your model, press the (very convenient!)
Shift+Ctrl+Alt+Cshortcut. This shortcut will bring up a small menu from which theOrigin to Center of Mass (Surface)option will, most of the times, be sufficient. Feel free to experiment though.
-
rViz and Gazebo requires .stl and .dae formats for your 3D models. I have had better luck with .stl files, if you don't require too complex colour schemes and textures for your models.
-
In order for your models to be exactly the same in MoveIt and GraspIt, create a copy of your model, and make it 1000 times bigger for GraspIt integration. You can do this again from the transform sidebar (
Nshortcut) by either changing the scaling or the dimensions. -
GraspIt is compatible only with the .vi format. Blender cannot export .iv files, so export the larger copy of your model as .stl, and then convert it with the ivcon tool, by running
rosrun ivcon ivcon [input_filename].stl [output_filename].iv.
-
In order for GraspIt to provide the algorithm with enough candidate grasp poses, we are using this configuration file, when
max_planningis set to 0. Normally, we setmax_planningto 5, so we use this configuration file You can experiment with your own configuration based on your needs, but always refer to the ones provided. -
Under normal conditions, do not use the
pose_factorfield of theEzSceneSetupservice. -
ALWAYS check the robot you have set up for GraspIt using the
graspit_simulatorcommands, and then loading a default world with your robot. -
The best way I found to create the contact points was to manually edit my robot's description file, and not a method based on GUI since all of them seemed to crash on me. Depending on your gripper's complexity, this might be from fairly easy to pretty difficult...
-
ALWAYS check your MoveIt objects using
rVizto ensure that their size is the expected one. -
ALWAYS check your GraspIt objects using
graspit_simulatorto ensure that their size is the expected one. -
Keep in mind the 0.001 factor difference between MoveIt and GraspIt during model creation.
-
Also, keep in mind that this factor is taken into account by ez_pick_and_place, so you don't have to worry about it while using it.
-
Submit issues, pull requests and have fun!
Awesome projects that without them, ez_pick_and_place would not be possible:
- MoveIt: The ultimate ROS-friendly arm (and not only) planning software.
- GraspIt: The feature-rich grasp pose generator and simulator.
- graspit-pkgs: The ultimate package for GraspIt/ROS integration.
- ivcon: The small-but-effective tool to convert your 3D models to all the required formats for MoveIt, GraspIt and beyond.
- Blender: The all-in-one (and open source) 3D modeling software.


