Navigation: home
The old way to send data from your SDR software to Jaero was to use virtual audio cables (VAC). This was very fragile, CPU intensive, expensive (a licensed copy of VAC was required) and each SDR 'receiver' software package had its up and down's. Issues ranged from unpredictable lockups/crashes, PC hangs, high CPU use, memory leaks, convoluted graphical interfaces and a lot of unneeded features (bloat) for our specific use case. It also made the option of running on Linux just about impossible. With satcom you just need the aircraft data to be sent to each Jaero the most efficient way possible with out needing constant monitoring and restarts. Most systems even run headless and you never need to look at the actual SDR software for months at at time.
In August 2021, a new SDR receiver and version of Jaero was released that solved all these issues.
SDRReceiver uses an ini file to set its frequencies. It is not visual point-and-click software so will take some patience to get used to and get it dialed for your system. You put the center frequency in the text file, then sub VFO frequencies and name them, Jaero then picks up the data from the ZMQ data stream identified by the VFO names.
This is critical and really important. All other SDR software requires an audio pipe from it to Jaero, SDRR uses a data pipe. The latter is a LOT more robust, light weight and far more accurate way to move data from the SDR dongle to Jaero.
There are two main parts to getting the whole system working, SDRReceiver and its ini file and starting Jaero with a batch file, setting up each Jaero with the correct port number and VFO name. Note, you only have to configure everything once. Once its all setup, its a simple double click to start everything up as needed.
(For running SDRReceiver on Linux, check out DragonOS the program is prebuilt and ready to go on a Pi or x86).
Visit the github page and download the Windows zip file.
https://github.com/jeroenbeijer/SDRReceiver
The download is on the right, click on the 'Releases', then on that page, at the bottom, click on 'Assets' and select the file with win_x86 in it.
This will download it on your PC, once there, extract it into a directory of your liking. You don't have to install it, so it will be run from the directory you extract it. I simply left it in my downloads folder.
Once you have downloaded and unzipped the receiver software, the next thing is to get your satellite ini file and copy or create it in the same directory as SDRReceiver.
At the start of August, there are only a few ini files for the satellites. I hope that the community will share their files and we can have them all on this website to download.
For now, there are a few here: https://github.com/jeroenbeijer/SDRReceiver/tree/master/sample_ini
While you are there, be sure and check out the comments in the 98W ini file, the software author includes many helpful remarks about the required structure of the .ini file:
https://github.com/jeroenbeijer/SDRReceiver/blob/master/sample_ini/sdr_98W.ini
The main missing one is L-Band for 143E. If you have it, please let me know.
Lets now break down the ini file line by line and try and get you up and running.
sample_rate=1536000
This sets the bandwidth of the SDR dongle. In short, there is no need to change it. It will cover all Inmarsat L-Band and (more on this to come) each C-Band data type. So like the author states, don't change this.
Ok, Ok, you want to change it because reasons... fine....Here is some more details...There are only three options for this setting, 1536000 (1.5megs bandwidth), 1920000, this is 1.9mhz bandwidth and needlessly burns CPU covering more spectrum span than L and C require and lastly 288000. This is the least CPU intensive and covers only .2 mhz bandwidth, it allows you to zoom right in on a single signal.
center_frequency=1545600000
This value will need to be set as per your satellite and if you are looking at C or L-Band.
The way to set this is to look at the upper and lower frequencies of your channels and then pick a center value (regardless of if it is on a data channel or not). This center value is what you put in this setting.
zmq_address=tcp://*:6003
Most people run both SDRR and Jaero on the same computer, but I know some of you want /like to complicate things (grin) If so, this setting is for you. SDRR can publish the raw data to another PC over your network and you can run your Jaero on that other PC. So leave this setting as it is and in the Jaeros on the other PC put the IP address of the PC that is running SDRR.
Note if you are running more than 1 instance of SDRR on the one PC (which you can if you have more than one SDR dongle plugged in, ie, C and L Band for example) then the port number needs to be unique for each SDRR ini file and your Jaeros much match the port number.
correct_dc_bias=1
Some SDRs have a big bump in the middle of their spectrum. You will know it when you see it. Turn it off by setting this value to 1, otherwise set it to 0.
tuner_gain=496
You will need to experiment a little with this gain value. Just setting it to max (496) is not always the solution. But, in general, you want to run this gain value high and the VFO gain values (totally different range - more in a sec) lower.
Valid gain values are:
#valid tuner gains r82xx_gains[] = { 0, 9, 14, 27, 37, 77, 87, 125, 144, 157, 166, 197, 207, 229, 254, 280, 297, 328, 338, 364, 372, 386, 402, 421, 434, 439, 445, 480, 496 };
mix_offset=0
This allows some fine tuning of the main VFOs.
Honestly, after helping a bunch of people, its best to leave this at 0 and spend a moment getting the main VFO settings right.
Speaking of which, they are up next....
[Main VFOs]
size=2
1\frequency=1545116000
1\out_rate=384000
2\frequency=1546096000
2\out_rate=192000
You can have as many main vfos as you like there, but they must fit inside the main VFO range we set from the start.
In short whats happening here is that by break the master (for want of a better work - the big range we first worked out the center of) vfo into sub main vfos we can save CPU (always a good thing).
Always remember to never cut the upper/lower too fine, there is roll off at each end, so allow some overlap.
So for L-band for example, you would do well to have two main vfos here, one lower to cover the lower speed channels and one upper main vfo for the top 10500 channels.
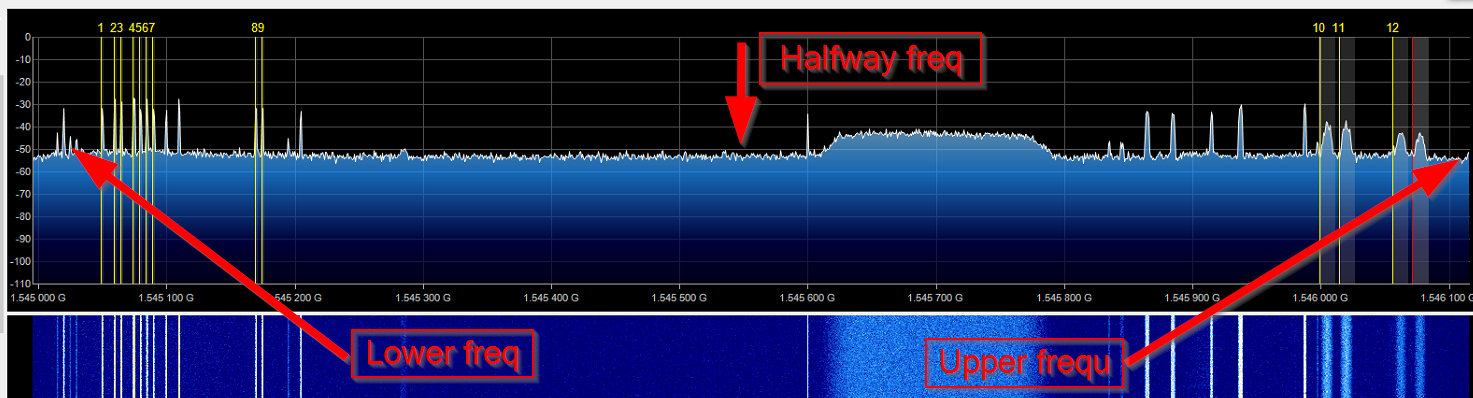
Here is an image of how you might work out the main vfo for the lower speed channels.
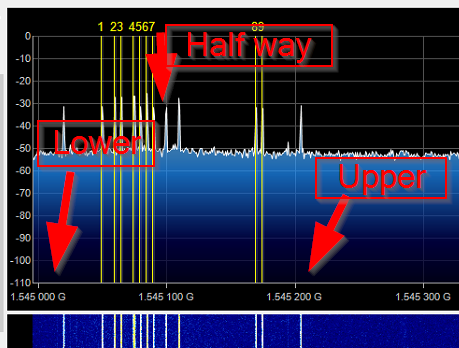
That 'Half way' frequency is what you would put into the first vfo. It does not matter if that half way point is on a data channel or not, its just setting the mid point of the range the vfo needs to cover.
The 'out_rate' is going to bandwidth you want to cover, wide bing 384000 and narrow being 192000. They are pretty much the only two values you want to use for the main vfos rate.
You can put as many vfos (up next) inside the main vfos, but again they must fit inside that range.
In short, if you have a super powerful computer, you can just have one main vfo set at the same range as the master vfo and then all your vfos inside that, but most of us are going to want to break that master vfo into main vfos and then have our vfos inside each of their ranges.
Take a look at the top total span, see the big gap in the middle (with the nasty wide signal), there is zero point in listening to this big chunk of spectrum, its a total waste of CPU, so we have the master pick up the whole band, then one main vfo for the data on the left and anther main vfo for the 10500's on the right and totally ignore the middle bit... its pretty genius and powerful once you see it like this (I hope you agree).
Ok, lastly, the vfos themselves.
[vfos]
size=27
1\frequency=1545101000
1\gain=5
1\data_rate=600
1\filter_bandwidth=0
1\topic=VFO01
2\frequency=1545051000
2\gain=5
2\data_rate=600
2\filter_bandwidth=0
2\topic=VFO02
Just a small sample here.
The size must match the number you have configured (if you don't the program will barf).
Then each vfo has a few settings.
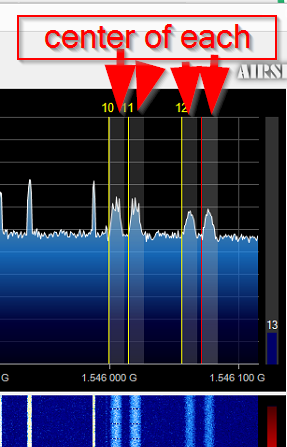
The frequency must be the center (or close to the center) of the data channel you want. NOTE it needs to be the center! SDR# in USB mode lists the frequency on the left. When in raw, its the center frequency. SDR-Console does something else again. My point is, be aware of this and measure the top and bottom of your signal and then put the center into the ini file.
Do note that just like the main vfos these vfos must go from lowest to highest frequency. Nothing must be out of order!
gain can be a value from 0 to 30ish. (there is no hard limit, but beyond about 10-20 is enough). C-band will require gains around .1 to .5 for example. L-Band seems to like 1 to 10 best. These vfo gain values will interact with the master vfo gain value. You will need to go back and forth a little bit here.
How to set the gain value? A word about the Jaero 'volume' LED.
While we are not using VAC any more, the volume LED is still 'valid' as it is showing data clipping. RED is a ton of clipping and the data is not going to be decoded correctly in Jaero so lower the gain in that VFO. Grey is too little gain and it should be raised for that VFO in the ini file. You really want to see a green volume LED. If you cant get a green LED (ie, its grey) then lift the master gain for the SDR in the master vfo gain setting.
data_rate is the channel data you are looking to decode. For L-Band you have 3 values used in the data channels, 600, 1200 and 10500 so these are the only values that should be used.
filter_bandwidth is simply an audio low pass filter. 0 means no filter. Try and match the filter to the data. More on this to come. But in short look at the blue waveform in Jaero and set the filter value in the ini file to give a good shape to it.
topic this is the name you are going to put into Jaero to pick up the data from the vfo. See my Jaero settings screenshot at the bottom of this page for more on this.
Set the master vfo at the center frequency of the whole band.
Set the main vfo at the center frequency of each group of data channels.
Set the vfos for the center frequency of each data channel. Set the gain to get a green volume LED in Jaero. Set the rate for the channel data rate and filter to suit as per the blue waveform in Jaero.
Download the .ini file into the same directory as your SDRReceiver unzipped into.
Now, from Windows Explorer, hold down the right shift key on your keyboard and right mouse click on an empty part of the page to pull up the menu. From that pop up menu select either Open Command Prompt, or Open PowerShell Window Here. (depending on your version of Windows).
That will open a back or blue box window, now start typing the command SDR and hit the tab key, this will auto complete the command to the .exe and then you just add -s and then name of your ini file.
The full command is .\SDRReceiver.exe -s 54w.ini (Of course use your named .ini file).
If your computer throws an error that it cant find the ini, then Windows might have saved it with a hidden .txt extension, so type this: .\SDRReceiver.exe -s 54w.ini.txt (Of course use the name of your .ini file)
It should work. If not, then you most likely did not put the .ini file in the same directory as the SDRReceiver software.
Tip. Once you have your .ini file sorted and everything working the way you want you can simply type 'exit' in the PowerShell to close it. Once SDRRx is running you don't need that box open any more.
Second tip. If you know how, you can simply make a Windows bat file with the same command it in and then run that bat file to start SDRRx.
You should now see a small spectrum window appear, click on the 'Start SDR' button and slowly the waveform will show up. If your SDR dongle requires bias-T to power an LNA, you can (if you are using an RTLSDRv3 silver dongle - hint, you should be) click the Bias-T button to turn it on.
You should see something similar to what you are used to. Thin spikes from the 600/1200 channels on the left and fat spikes from the 10500 channels on the right.
Do note that I have had issues using SDRReceiver with a NooElec SmarTee dongle (the ones with the bias-t always on), I use and recommend the flat silver RTLSDR v3 dongles.
Once you have that running, the next thing is to setup Jaero to connect to the VFOs.
To download Jaero: https://github.com/jontio/JAERO/releases
Just at the bottom of the top list of bullet points, there is a section called 'Assets 4'.
Click to download the win_x86 file.
Here is where things change a little bit and for the better honestly....
Unzip it somewhere on your drive, like in the downloads is a good place.
It will make a directory with a longish name, and then under that directory, a nice clean 'jaero' directory.
I would leave it there as we no longer need to install Jaero and we can run where it is.
(This will also leave your current Jaero install untouched and so you can always go back if you miss the old ways).
Now, the real key seems to be how to start Jaero.
I don't know what satellite you are looking at, so I don't know how many VFO's you will need in your ini file. Just keep in mind you need to start as many Jaeros as you have VFOs in your SDRR .ini file. (You don't have to, but it would be nice to get all the data right?).
IN THE SAME folder as Jaero, create a new text file, I called mine startJaero.bat
The .bat is the important bit. Your Windows Explorer might call it .bat.txt but hide the .txt so watch out for that. Unlike the .ini file where it did not matter if Windows called it .ini.txt, in the case of a batch file (dot bat), it matters a lot.
Right click the new file and select Edit.
Paste in the following:
@ECHO OFF
start "VFO01" "JAERO.exe" "-s VFO01"
start "VFO02" "JAERO.exe" "-s VFO02"
start "VFO03" "JAERO.exe" "-s VFO03"
start "VFO04" "JAERO.exe" "-s VFO04"
start "VFO05" "JAERO.exe" "-s VFO05"
start "VFO06" "JAERO.exe" "-s VFO06"
start "VFO07" "JAERO.exe" "-s VFO07"
start "VFO08" "JAERO.exe" "-s VFO08"
start "VFO09" "JAERO.exe" "-s VFO09"
start "VFO10" "JAERO.exe" "-s VFO10"
start "VFO11" "JAERO.exe" "-s VFO11"
start "VFO12" "JAERO.exe" "-s VFO12"
start "VFO13" "JAERO.exe" "-s VFO13"
start "VFO14" "JAERO.exe" "-s VFO14"
start "VFO15" "JAERO.exe" "-s VFO15"
start "VFO16" "JAERO.exe" "-s VFO16"
start "VFO17" "JAERO.exe" "-s VFO17"
start "VFO18" "JAERO.exe" "-s VFO18"
Now save it.
What we are doing is running Jaero from the same directory as the .bat file is in.
This saves a whole lot of pathing issues.
Also, we are starting the 18 of them that are probably in your .ini file (adjust the length to match your ini file).
Ok, with SDRReceiver running, double click on the startJaero.bat file and wait till all 18 start up.
Don't worry, they don't have a waveform yet, that's next.
Now, click on the first Jareo and then click on the gear icon.
Adjust things to your liking from top to bottom.
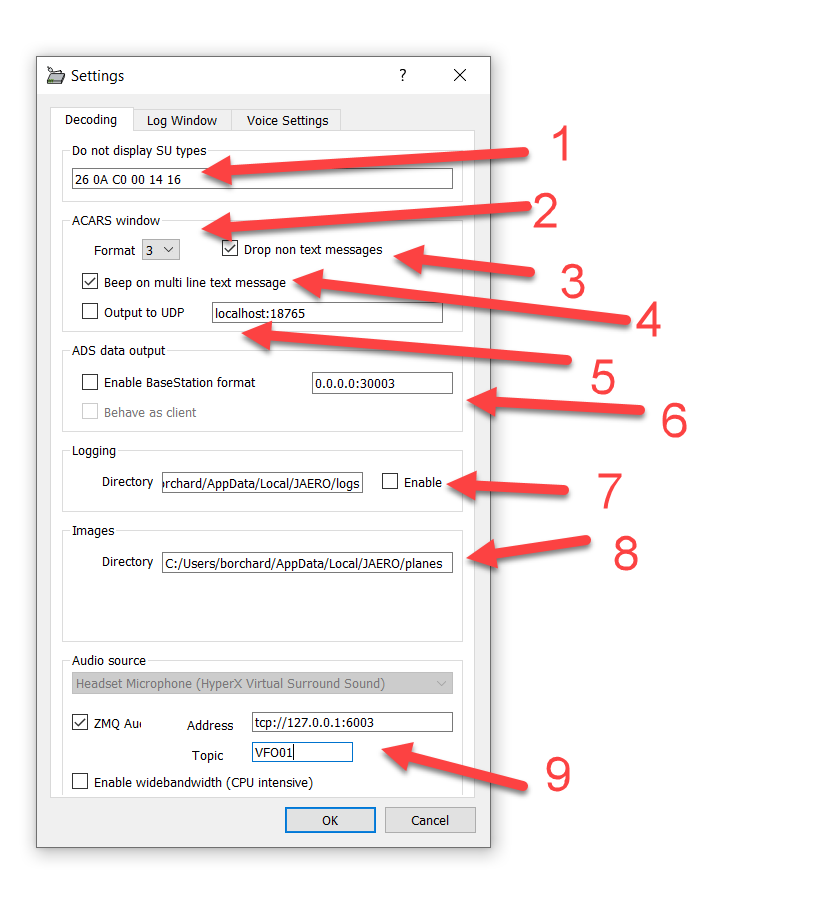
Looking at the settings top to bottom - a quick overview. More details on the jaero page.
- This just hides these message types from the live display window. Most people leave it as those listed messages can be hard to read or understand their purpose.
- This changes the format of the message in the main window and the UDP data output to any other programs using it (ie, Node-RED), play around when you get it running, most people like format 3. If you are a software programmer, you might like the JSON option from this list - note, you can only select one message format type.
- Most people leave this checked. It seems the non text messages are link Pings or ACKs for L/C-Band messages and other system stuff that is not of interest to (most) humans.
- Beeps are annoying when you get 18 Jaeros running - uncheck it for sanity.
- This sends the ACARS messages to another computer using UDP. Note that Jaero can not use host names here, it must be an IP address and port number. Leave a space, then put in the next IP:port if you want to feed more than one server the ACARS messages.
- Is for when you have a satellite dish and are using Jaero on C-Band. This is the IP and port for your VRS or tar1090 to plot the aircraft positions on a map. (Not used on L-Band since there is no position data).
- Check it if you must log, it will slow down the starting of Jaero the longer it runs. It will also drive you nuts trying to view the logs of 18 different Jaeros, review the Node-RED page and see that there is a much much better way to build custom logs and view the live data from all the Jaeros at once.
- If you have a VRS with images, you can pick them up here if you are logging.
- Never thought we would get here did you....
Leave your ini file as it shows: zmq_address=tcp://*:6003 (Note, some of the .ini files have different port numbers, thats fine, just be sure to match port for port. The port in your .ini must match the port you use in your Jaeros).
The port is important. So in each jaero Check the ZMQ box and just put your home IP oftcp://127.0.0.1:6003and again, make sure the port matches your ini file. If you are running SDRR on another PC on your network, put its IP address in here.
Lastly, the topic. In your .ini file each VFO has a name, you must make sure that the name in JAERO matches the names in the ini. If you have used the .ini file and the startJaero batch file I have here, they should be very close.
Also WATCH OUT! Jaero likes to put a space at the start of the word VFO!! So make sure that the V is tucked up against the edge of his box!!!! (Ask me how I know this!!!!!!!!!! - No don't)
For the tabs on the top, I like turn off logging and turn off voice decoding. You may do otherwise, but if you just want the data, logging and voice use up CPU that you don't need to waste for just getting data.
Click Ok. Last few things to do here... make sure you select the right data rate in Jaero that matches the VFO in the ini file for that VFO.
Click the blue bump to move the pale green box over it so it will start to decode.
Lastly, click the black CPU square to turn it green and save some computer power (It just slows down the blue wave form update - but is well worth it) and if you want to save even more, select "None' from the drop down list under the constellation to turn that off. Make sure AFC is on.

Now, minimize that Jaero, and do that all over again on the next 17. Making sure you get the next VFO number and its matching decode rate.
Each one will save its settings when you close it, so next time, just double click the start batch file and you will be up and running in a few seconds.