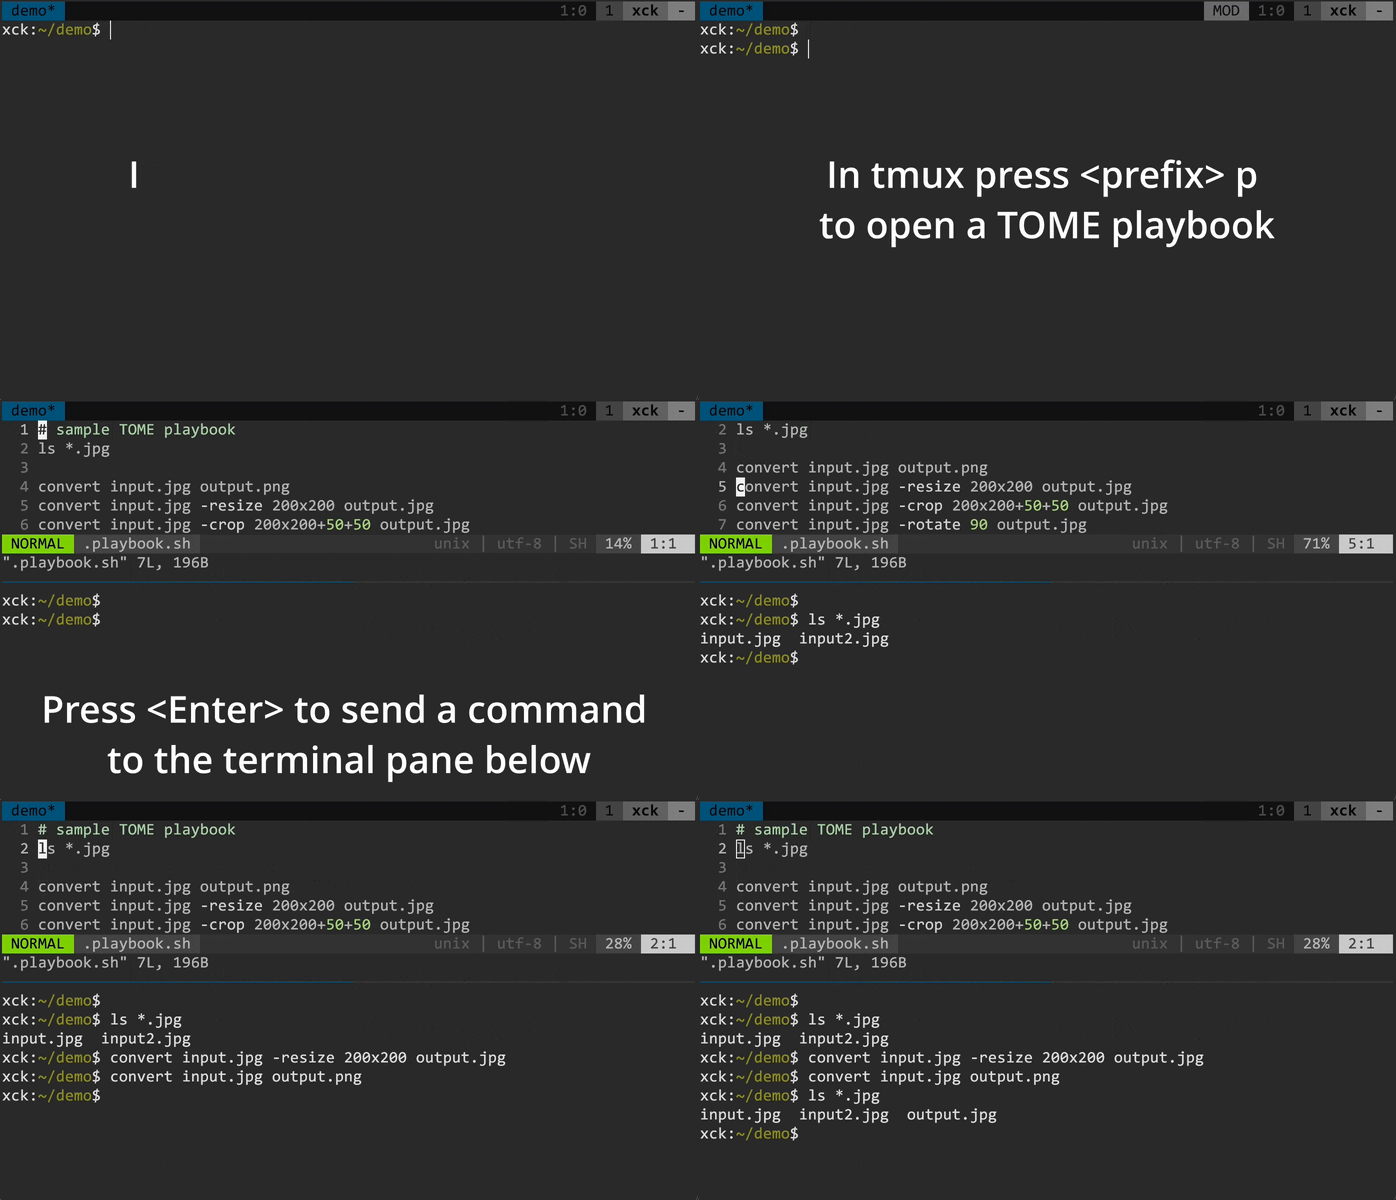
Playbooks are a simple but powerful tool to manage recurring (shell) commands.
Instead of using the built-in history you write your commands in VIM.
Pro:
- your commands live in a text file and you don't have to search the history
- you can have a playbook per project or manage them however you like
- playbooks are not just for the shell, they can also send commands into a ssh session, into a docker container, a sql client, etc.
Con:
- you need to change your habits - fortunately TOME makes this very easy
- Provide a list of commands to execute (a "playbook").
- Easily execute these commands in any REPL (a system shell, ssh, a database client, etc.)
- Manage these playbooks per project.
- Bonus: completely replace the shell command history.
After installing the tmux and vim plugins, press <tmux-prefix> p (default binding), this will split the current pane vertically and create or open a playbook in vim.
A playbook is a mixture of command history and script. It contains a list of commands that you can execute interactively in any order for any terminal application.
ls *.jpg
convert input.jpg output.png
convert input.jpg -resize 200x200 output.jpg
convert input.jpg -crop 200x200+50+50 output.jpg
convert input.jpg -rotate 90 output.jpg
You can send (execute) the commands to the target, which is a tmux pane following the playbook. Usually you use <Enter> to execute one line. It's also possible to execute a selection or paragraph (<Leader>p and <Leader>P).
Treat your playbook like notes for a project. Unlike your shell history you can start a docker container, open a database client or even ssh to a remote system and then proceed to send commands to the executing application.
# connect remote
ssh myserver

# run psql
psql "host=localhost port=5432 dbname=postgres user=pg password=pg sslmode=disable"
psql "host=dbserver port=5432 dbname=postgres user=pg password=pg"

# run a query
select * from foo where bar='red';

# insert data etc.
insert into foo(bar, result) values('blue', 42);
While playbooks are organized by projects in folders, the target's location can be anywhere.
You can also make any document (like this README) into a temporary playbook by using the <Leader>p key bindings or enabling <Enter> with the :TomePlayBook command.
Your shell already has variables so typically you would not need them in Tome.
# this Bash example defines BASE with a constant
export BASE=http://localhost:8080
# and TOKEN using a shell script
export TOKEN=$(token-request)
# "call" can be another script or defined directly in Tome:
call() { http -A bearer -a $TOKEN "$@"; }

# use everything together
id=$(call $BASE/car name==foostang | jq .[0].id)
call $BASE/car/$id
call PUT $BASE/car/$id color=blue
If you prefer, or if the target has no variables, you can use Tome variables (string replacement only).
-
Variables are enclosed in
$<and>, like$<foo>. -
Variables are defined with
$<NAME>=VALUE, like$<foo>=some text. -
Any variable is replaced with its defined value, no other operations are performed.
-
If a variable is undefined Tome will open a scratchpad with the missing variables. Don't forget to send the values with
<Enter>! -
To escape the text
$<text>use$<<text>echo $
echo $
echo "$<"
If you want a temporary scratch pad press <tmux-prefix> P. It is also a good idea to paste commands here instead of directly into the terminal.
When you want multiple playbooks in a project just prefix them with .playbook-, e.g. .playbook-db.sql with the correct extension to get syntax highlighting.
- tmux
- vim or neovim
- any REPL, e.g. bash, a database client, etc.
Add laktak/tome to your favorite plugin manager.
E.g. for vim-plug place this in your .vimrc:
Plug 'laktak/tome'
then run the following in Vim:
:source %
:PlugInstall
To install Tome with the Tmux Plugin Manager simply add the plugin to the list of TPM plugins in .tmux.conf:
set -g @plugin 'laktak/tome'
then and hit <tmux-prefix> I to fetch the plugin and source it.
To install it manually, first clone the repo:
$ git clone https://github.com/laktak/tome ~/.tmux/tome
Add this line to the bottom of .tmux.conf:
run-shell ~/.tmux/tome/tome.tmux
Reload the tmux environment:
# type this in terminal
$ tmux source-file ~/.tmux.conf
If you want to open a playbook from a script you can use the tome-open-playbook command. It can be found where you installed the tmux plugin.
Usage: tome-open-playbook [-s] [-l height]
-swill open a scratchpad-lallows you to specify a height
By default Tome has the following mappings:
nmap <Leader>p <Plug>(TomePlayLine)
nmap <Leader>P <Plug>(TomePlayParagraph)
xmap <Leader>p <Plug>(TomePlaySelection)
If you prefer to create them yourself set
let g:tome_no_mappings = 1
Tome has a no send list to avoid accidentially sending input to a tui application. By default this includes lf (the file manager) and vim. Set your own list with
let g:tome_no_send = ['vim', 'lf', 'gitui']
If you do not want to automatically open .playbook* files as playbooks you can set
let g:tome_no_auto = 1
Tome variable support can be disabled with
let g:tome_vars = 0
You can set any of these options by adding them to your ~/.tmux.conf file:
set -g <option> "<value>"
Where <option> and <value> correspond to one of the options specified below
| Option | Default | Description |
|---|---|---|
@tome_key |
p |
The key binding to open a Tome playbook. |
@tome_scratch_key |
P |
The key binding to open a Tome scratchpad. |
@tome_height |
8 |
Height of the playbook vertial split. |
@tome_playbook |
.playbook.sh |
Name of the playbook to open. |
