Getting started
Some directions for Chameleon Mini RevE Rebooted beginners, so that they can quickly start to use it.
Do Windows before anything else if your goal is to get RevE working fast. It is the easiest way. On Linux and OSX, the GUI might not work depending on the firmware version you have, flashing may be a pain, and tempted to build firmwares or play with serial terminal, you might burn too much time on some traditional compilation and environment issues. This is for Windows 10, but might work on 7 and 8. Working on a Windows VM is possible, it worked perfectly for me.
Your can simply test and use (A and B), or learn the basics (1 to 5) by just reading the whole page:
- Step 1 or A : Plug & play start check with GUI
- Step 2 : Get or compile a firmware
- Step 3 : Get ready to flash: "bootloader" mode
- Step 4 : Flash your firmware
- Step 5 or B : Chameleon Mini RevE Rebooted Usage 101
- Bonus step : No more light - go back to stock.
Just check your device can be talked with on Windows. This should be plug & play. Plug your device in USB port (USB 2 and 3 have been working for me, either within hub or directly plugged to a USB port), and fire a GUI tool up:
- the one from this repo creator, Chameleon Mini Rebooted GUI
- this one from Lab401, based on Chameleon Mini Rebooted GUI. This will be a simplest choice, as it is portable, and comes with executables that would be needed later in "Extras" folder
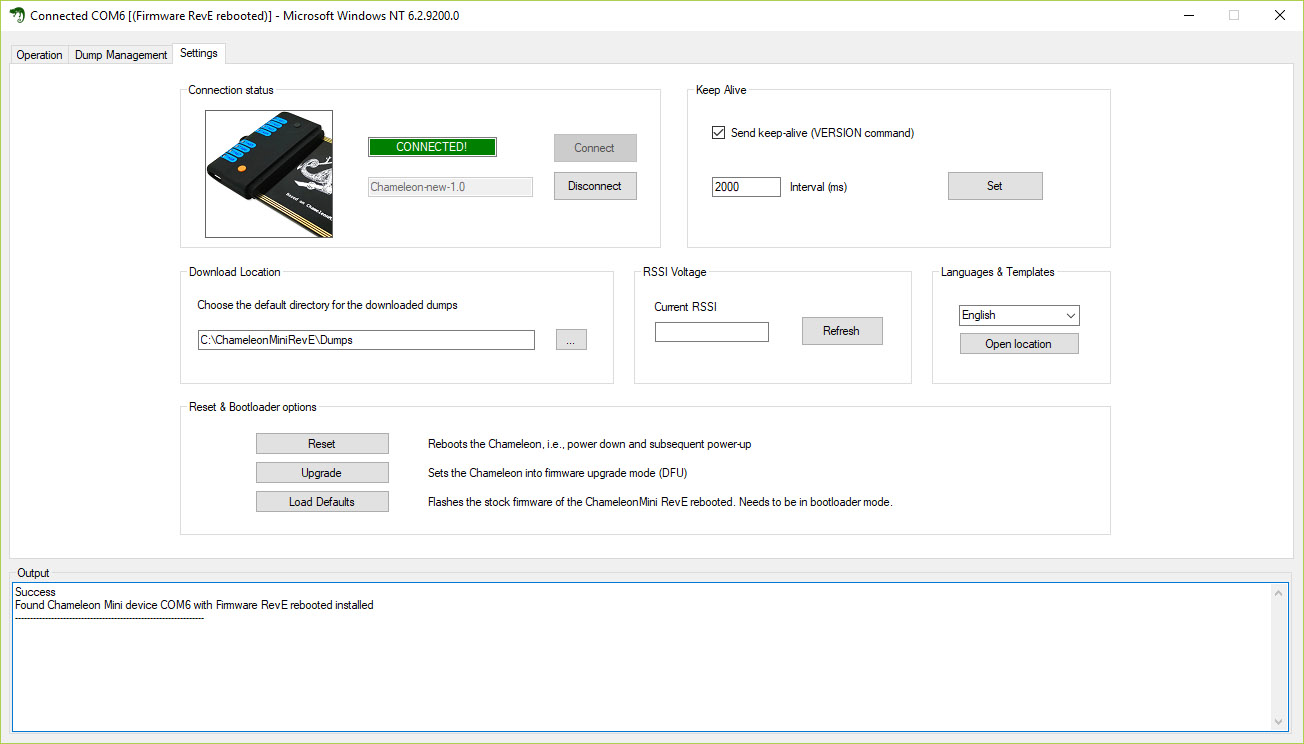
A red LED should be lighted on on the RevE. The output console of GUI tool should say Success, found Chameleon Mini device on 'COMX' with Firmware RevE rebooted installed, and the "Settings" tab of GUI should show "CONNECTED" green strap. If not, try to click "Connect", plug/unplug device, change USB cable and other basic USB devices trial & error kungfu.
From now on, you can learn how to flash a firmware in next steps, or jump straight into usage.
Get existing firmware, or build a new one from this repo sources:
- existing one:
- original manufacturer one (the one probably built-in when you purchase)
- a latest manufacturer compiled one (could be newer)
- build your one from this repo:
- I do not advise to compile a firmware for a quick startup. Managed to do it on a Debian-based Linux, as described in this wiki, and on OSX, with some tuning I described in issue #89. I advise NOT to attempt any flashing with Linux or OSX for now, or you may have a bad time
- If you choose to compile anyway, and succeeded to do so, just get the ".hex" and ".eep" files built by successful compilation and consider it firmware
The RevE need to be put in so called "bootloader" mode, where it will loose functionality, but be ready to get written on, so that we can set internal program. If you put a CR2032 battery button in your device already, well remove it (flashing with battery might be dangerous).
Put your RevE in boot loader mode, directly from the GUI ("Settings" tab, then "Upgrade" button). Your RevE should be connected back as a new unknown USB device, and LED should stop lighting. Close the GUI.
If need be, you can also put in bootloader mode by unplugging USB, pressing the black button, and plugging the USB while still pressing the button.
Setup the Atmel DFU drivers for your "bootloader" mode plugged RevE, so that device is correctly recognized and can be flashed. To do so in Windows:
- get the "Drivers" files from this repo. The better choice would be to get all files from this repo by choosing "Clone or Download", and then "Download ZIP", on the main repo page), as other files will be needed later
- in Windows, open "Devices manager". Open Windows start menu and type "Devices manager", or right click on computer icon in desktop, select "Properties", then "Device manager" in the left pane
- right click on unknown USB device within "Devices manager" devices tress, and choose "Update driver". Then points the driver setup assistant to the "Drivers" directory you downloader from this repo, and DFU driver it will be setup. You can also right-click the ".inf" file in Drivers / DFU Driver, then select "Install", but the "Devices manager" graphical way will give you immediate and visual results on driver setup success
- you should then see your previously unknown USB device marked as Atmel USB Devices / ATxmega32A4U on the "Devices manager" devices tree
Setup Windows C++ Redistributable for Visual Studio 2013 (VC 12.0). These will be needed for the flasher utility to work in Windows. If you use a 64bits Windows, you ALSO have to setup the x86 ones (I had a hard time on that, the flash utility does not start if you do not have the x86 VC 12.0 redistributable on a 64bits system). Both (x64 and x86) can be downloaded from Microsoft here.
Flash your firmware with "BOOT_LOADER_EXE.exe":
- you will find this tool in the "Extras" folder of the GUI tool I recommended in this page first step. If you do not have it (because you choose another tool), get it from this repo (Software / Win32)
- for an existing downloaded firmware: put the "myfile.bin" and "myfilee.bin" files (that you downloaded in ZIP files during previous step in the same folder than "BOOT_LOADER_EXE.exe" (this should be "Extras"), and double click the "BOOT_LOADER_EXE.exe". Done.
- for a compiled firmware: get other needed tools from Software / FlashTools in this repo, and put it in the same folder than "BOOT_LOADER_EXE.exe". Put the ".hex" and ".eep" files you got from compiling in previous step in the same folder, and fire "flash.bat" up. The script will fire up "BOOT_LOADER_EXE.exe" by itself at the end
A successful firmware flash will show this:
old_driver_bootloader
Erasing flash...  Success
Checking memory from 0x0 to 0x6FFF...  Empty.
0%                            100%  Programming 0x20 bytes...
[>>>>>>>>>>>>>>>>>>>>>>>>>>>>>>>>]  Success
0%                            100%  Reading 0x400 bytes...
0%                            100%  Programming 0x5B00 bytes...
[>>>>>>>>>>>>>>>>>>>>>>>>>>>>>>>>]  Success
0%                            100%  Reading 0x7000 bytes...
load_success!
More detailed instructions on flashing, including case where you compiled your firmware can be found on this wiki. You will find useful screenshots of the process starting page 6 of this German PDF walkthrough.
Close GUI, disconnect USB RevE, connect it back and fire the GUI (you got from first step) up once again. Now you should be all set.
For now (?) RevE can only help getting a first key from a dialogue with a reader, randomize/set UIDs to simulate on readers, and simulate various copied cards, on MIFARE setups only.
RevE can be used "stand-alone", while not plugged, if you put a CR2032 button battery in it. You have to open the device (with help of a plastic card or plectrum, but no metallic tool, to avoid damage). The battery should always be removed before any flashing operation.

RevE has 1 usage button (the black one), with a "short press" (referred as BUTTON in commands and GUI), "long press" (BUTTON_LONG), and "long press while plugging USB" usage (bootloader mode).
The red button is used to power-on the device when used stand-alone on battery. You have to keep the red button pressed to use the black one when using RevE stand-alone on battery.
Once set and plugged, a RevE is seen as a USB modem, and can be talked with using a "serial" terminal, with AT compliant commands, or with a GUI, like the one you got from the first step.
Some GUI also have a terminal functionality, in case you want to play with commands instead of clicking, or use commands that are not implemented in GUI (like "READONLY"). Just note that for any linked firmware in this page, you must add "MY" at the end of each command. (i.e. commands names all end with "MY"). If you compiled the firmware by yourself from this repo recently, you should not have the "my" suffix.
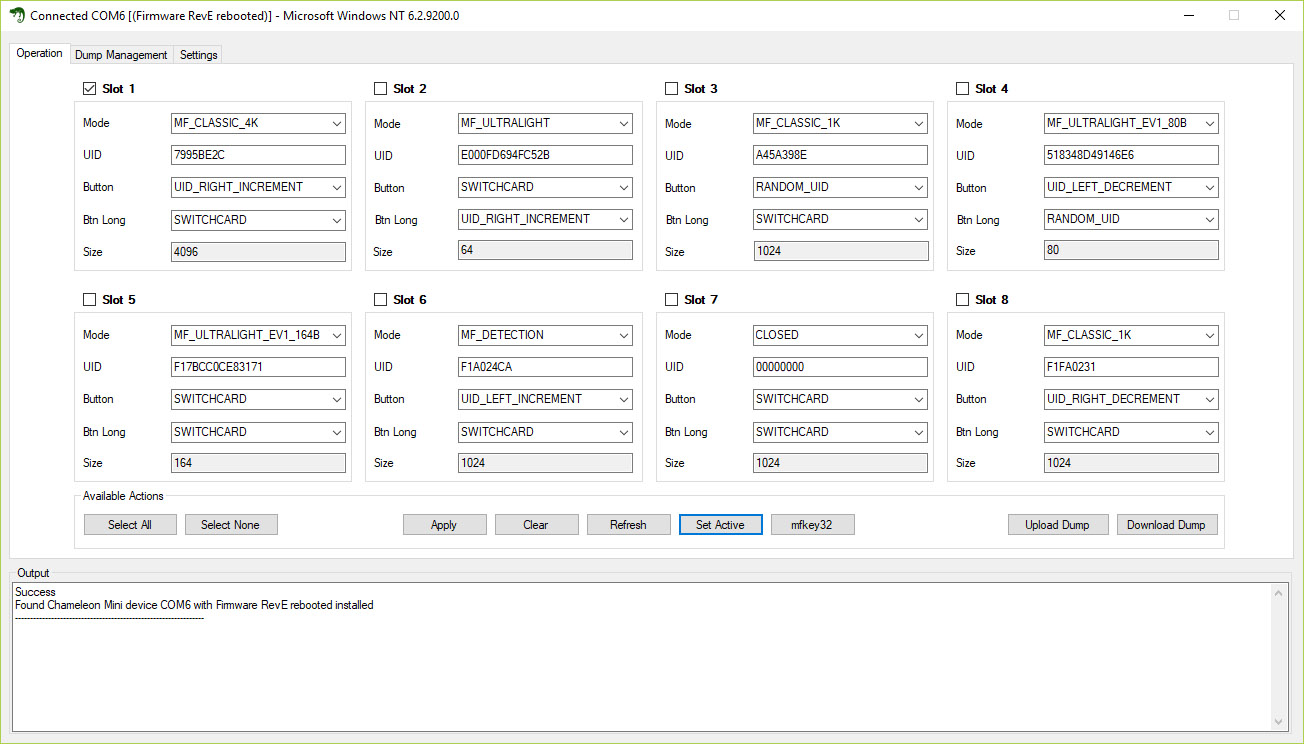
RevE has 8 cards "slots" you can use to simulate cards/UIDs and :
- each slot can be setup with its own configuration (reader sniff, card copy emulation, or UID player), called "Mode" in GUI, and "CONFIG" in command line. You have to select the slots you want to set in the GUI by ticking the slot check, tuning settings, then clicking "Apply"
- to simulate a card, you have to "Upload Dump" on current "active" slot, that you can choose with "Set Active" on GUI
- RevE does not copy cards. You can copy/dump cards with another reader device like proxmark3, and cheapest SLC3711 or ACR122 readers
- slots are numbered from 1 to 8 in GUI, but from 0 to 7 in command line
- you can only do MIFARE 4k stuff on 1st slot. Others can do MIFARE 1k and Ultralight
- button function can be set for short ("Button" in GUI, "BUTTON" in command line) and long press ("Btn Long" in GUI, "BUTTON_LONG" in command line), and can be set to "SWITCHCARD" (go to next slot), "CLOSED" (no operation), or various UID change functions (increment, decrement, random)
- in command line terminal, you set an active slot with
SETTING(MY)=X(where X is a slot number, from 0 to 7). Then you can set "CONFIG" ("Mode" in GUI), "BUTTON", "BUTTON_LONG" and so. Uploading a dump if done with XMODEM and will most probably be painful to achieve.
"MF_DETECTION" configuration (or "Mode" in GUI) is set to implement the "reader attack", which will try to infer a MIFARE key from data sent by reader. Once this scenario played out in stand-alone, you have to get back to GUI, select the "MF_DETECTION" set slot, and use the "mfkey32" button to try and get a MIFARE key that would fit a MIFARE card. You can then proceed with other attacks on card using this key. This is briefly explained in a video from Lab401.
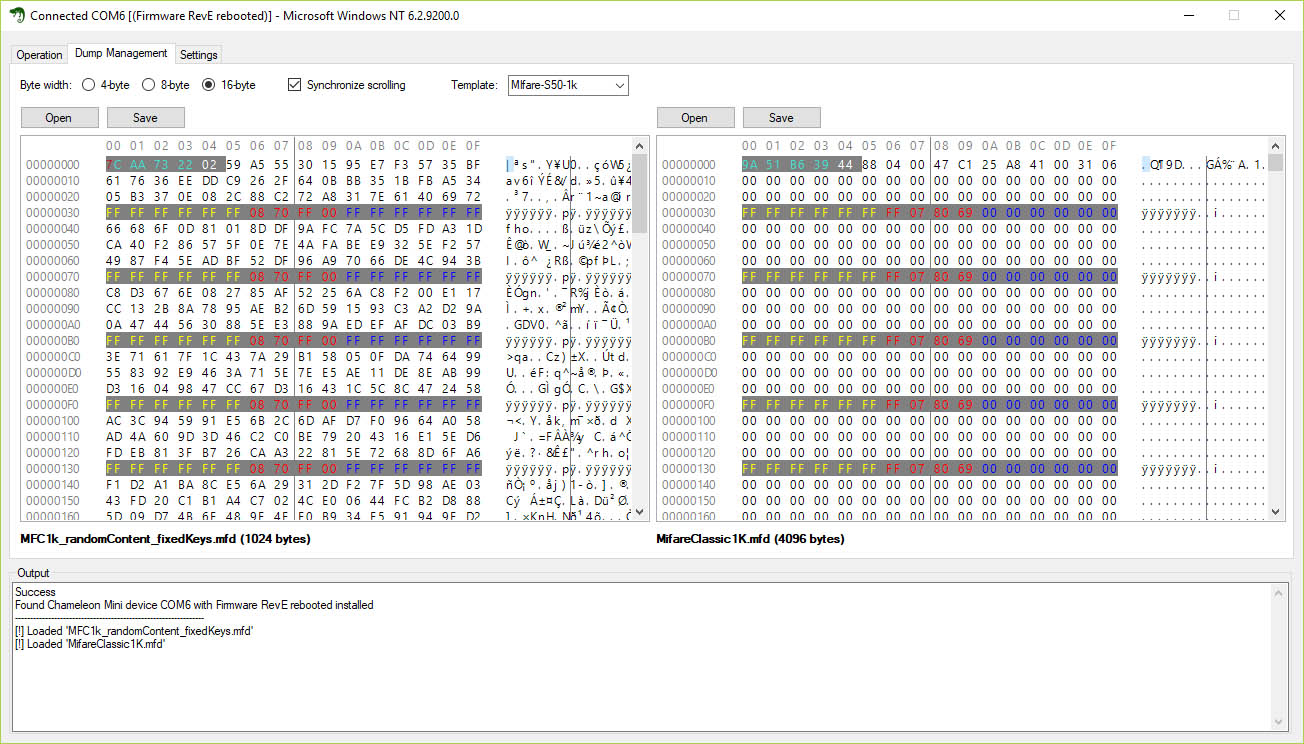
The "Dump Management" GUI tab is useful to open cards dumps and change them if needed. Use a "Template" to highlight cards keys and ACL. If you open a dump here, then you won't be able to upload the same file in a slot while loaded. Save your opened dump in another file, or close and reopen GUI.
If you played too much with firmware flashing tools, end up with a bricked non lighting RevE, that is not even recognized as ATxmega32a4U on Windows devices tree in bootloader mode, and get such a message while flashing following this guide:
old_driver_bootloader
dfu-old-driver: no device present.
Then you may have "soft-bricked" your device. Do not panic and go back to stock brick, doing so:
- go back to Windows
- get the 2 ".hex" files from Firmware / Compiled directory in this repo
- rename:
- "ChameleonMiniRDV2.0_ATxmega32A4U.hex" as "Chameleon-Mini.eep"
- "ITS_A_CARD.hex" as "Chameleon-Mini.hex"
- go in bootloader mode the "black button long press" way
- flash the ".hex" and ".eep" files as described in this page (and NOT another way!), just like if it was a firmware you compiled, with "flash.bat"
If you cannot manage to fire "BOOT_LOADER_EXE.exe" up (errors while launching), get sure to have required Visual C++ Redistributable, reinstall DFU driver if need be, and remove any "libusb0.dll" file from your "BOOT_LOADER_EXE.exe" if any.
Now your RevE should be blinking again (but may not be functioning normally yet). You can proceed to flash it again with a sane functioning firmware like told in this page.