-
Notifications
You must be signed in to change notification settings - Fork 1
/
apis.json
608 lines (608 loc) · 187 KB
/
apis.json
1
2
3
4
5
6
7
8
9
10
11
12
13
14
15
16
17
18
19
20
21
22
23
24
25
26
27
28
29
30
31
32
33
34
35
36
37
38
39
40
41
42
43
44
45
46
47
48
49
50
51
52
53
54
55
56
57
58
59
60
61
62
63
64
65
66
67
68
69
70
71
72
73
74
75
76
77
78
79
80
81
82
83
84
85
86
87
88
89
90
91
92
93
94
95
96
97
98
99
100
101
102
103
104
105
106
107
108
109
110
111
112
113
114
115
116
117
118
119
120
121
122
123
124
125
126
127
128
129
130
131
132
133
134
135
136
137
138
139
140
141
142
143
144
145
146
147
148
149
150
151
152
153
154
155
156
157
158
159
160
161
162
163
164
165
166
167
168
169
170
171
172
173
174
175
176
177
178
179
180
181
182
183
184
185
186
187
188
189
190
191
192
193
194
195
196
197
198
199
200
201
202
203
204
205
206
207
208
209
210
211
212
213
214
215
216
217
218
219
220
221
222
223
224
225
226
227
228
229
230
231
232
233
234
235
236
237
238
239
240
241
242
243
244
245
246
247
248
249
250
251
252
253
254
255
256
257
258
259
260
261
262
263
264
265
266
267
268
269
270
271
272
273
274
275
276
277
278
279
280
281
282
283
284
285
286
287
288
289
290
291
292
293
294
295
296
297
298
299
300
301
302
303
304
305
306
307
308
309
310
311
312
313
314
315
316
317
318
319
320
321
322
323
324
325
326
327
328
329
330
331
332
333
334
335
336
337
338
339
340
341
342
343
344
345
346
347
348
349
350
351
352
353
354
355
356
357
358
359
360
361
362
363
364
365
366
367
368
369
370
371
372
373
374
375
376
377
378
379
380
381
382
383
384
385
386
387
388
389
390
391
392
393
394
395
396
397
398
399
400
401
402
403
404
405
406
407
408
409
410
411
412
413
414
415
416
417
418
419
420
421
422
423
424
425
426
427
428
429
430
431
432
433
434
435
436
437
438
439
440
441
442
443
444
445
446
447
448
449
450
451
452
453
454
455
456
457
458
459
460
461
462
463
464
465
466
467
468
469
470
471
472
473
474
475
476
477
478
479
480
481
482
483
484
485
486
487
488
489
490
491
492
493
494
495
496
497
498
499
500
501
502
503
504
505
506
507
508
509
510
511
512
513
514
515
516
517
518
519
520
521
522
523
524
525
526
527
528
529
530
531
532
533
534
535
536
537
538
539
540
541
542
543
544
545
546
547
548
549
550
551
552
553
554
555
556
557
558
559
560
561
562
563
564
565
566
567
568
569
570
571
572
573
574
575
576
577
578
579
580
581
582
583
584
585
586
587
588
589
590
591
592
593
594
595
596
597
598
599
600
601
602
603
604
605
606
607
608
{
"name": "Apis",
"description": "Apis",
"url": "https://github.com/darrelmiller/openapi-collection",
"created": "2022-12-19T23:59:03.3265190Z",
"modified": "2022-12-19T23:59:03.3265856Z",
"specificationVersion": "0.14",
"apis": [
{
"name": "GUT-VERSORGT-IN REST API",
"description": "REST Api for the admin area and apps of gut-versorgt-in",
"baseUrl": "https://backend.gut-versorgt-in.de/api/v1",
"properties": [
{
"type": "X-openapi",
"url": "https://gut-versorgt-in.de/assets/swagger.json"
}
],
"contact": [
{
"fn": "WAPP GmbH"
}
]
},
{
"name": "WDSS",
"description": "* Order Service (732)\n* User Service (220)",
"baseUrl": "https://api-production.dss-aws.com/",
"properties": [
{
"type": "X-openapi",
"url": "https://api-production.dss-aws.com/v1/openapi.json"
}
]
},
{
"name": "bunq API",
"description": "***UPDATE:*** *We have released a [beta version of the new bunq API documentation.](https://beta.doc.bunq.com)*\n\n***NOTICE:*** *We have updated the sandbox base url to \u0060https://public-api.sandbox.bunq.com/v1/\u0060. Please update your applications accordingly. Check here: \u003Chttps://github.com/bunq/sdk_php/issues/149\u003E for more info.*\n\n***PSD2 NOTICE:*** *The second Payment Services Directive (PSD2) may affect your current or planned usage of our public API, as some of the API services are now subject to a permit. Please be aware that using our public API without the required PSD2 permit is at your own risk and take notice of our updated API Terms and Conditions on \u003Chttps://www.bunq.com\u003E for more information.*\n\n# \u003Cspan id=\u0022topic-introduction\u0022\u003EIntroduction\u003C/span\u003E\n\nWelcome to bunq!\n\n- The bunq API is organised around REST. JSON will be returned in almost all responses from the API, including errors but excluding binary (image) files.\n- Please configure your implementation to send its API requests to \u0060https://public-api.sandbox.bunq.com/v1/\u0060\n- There is a version of the [Android app](https://appstore.bunq.com/api/android/builds/bunq-android-sandbox-master.apk) that connects to the bunq Sandbox environment. To create accounts for the Sandbox app, please follow the steps in the [Android Emulator](#android-emulator) section.\n\n## \u003Cspan id=\u0022topic-introduction-get-started\u0022\u003EGetting started\u003C/span\u003E\n\nBefore you start sending API requests, you need to get an API key and activate it. API activation happens when you install the API key and link your IP address and device to it *(create an API context)*. The steps below will guide you through what you need to do to start sending custom API requests.\n\nHere is an overview of what you can use to get started with the bunq API: \n1. **Create an API key.** You can do it either in our [developer portal](https://developer.bunq.com) or in the bunq app *(Profile \u2192 Security \u0026 Settings \u2192 Developers \u2192 API keys)*. If you want to test our sandbox first, our [bunq Developer ](https://developer.bunq.com)is the best place to start.\n2. **Register a device.** A device can be a phone (private), computer or a server (public). You can register a new device by using the \u0060POST /installation\u0060 and \u0060POST /device-server\u0060 calls. This will activate your API key. You only need to do this once.\n3. **Open a session.** Sessions are temporary and expire after the auto-logout time set for the user account. It can be changed by the account owner in the bunq app.\n4. **Make your first call!**\n\n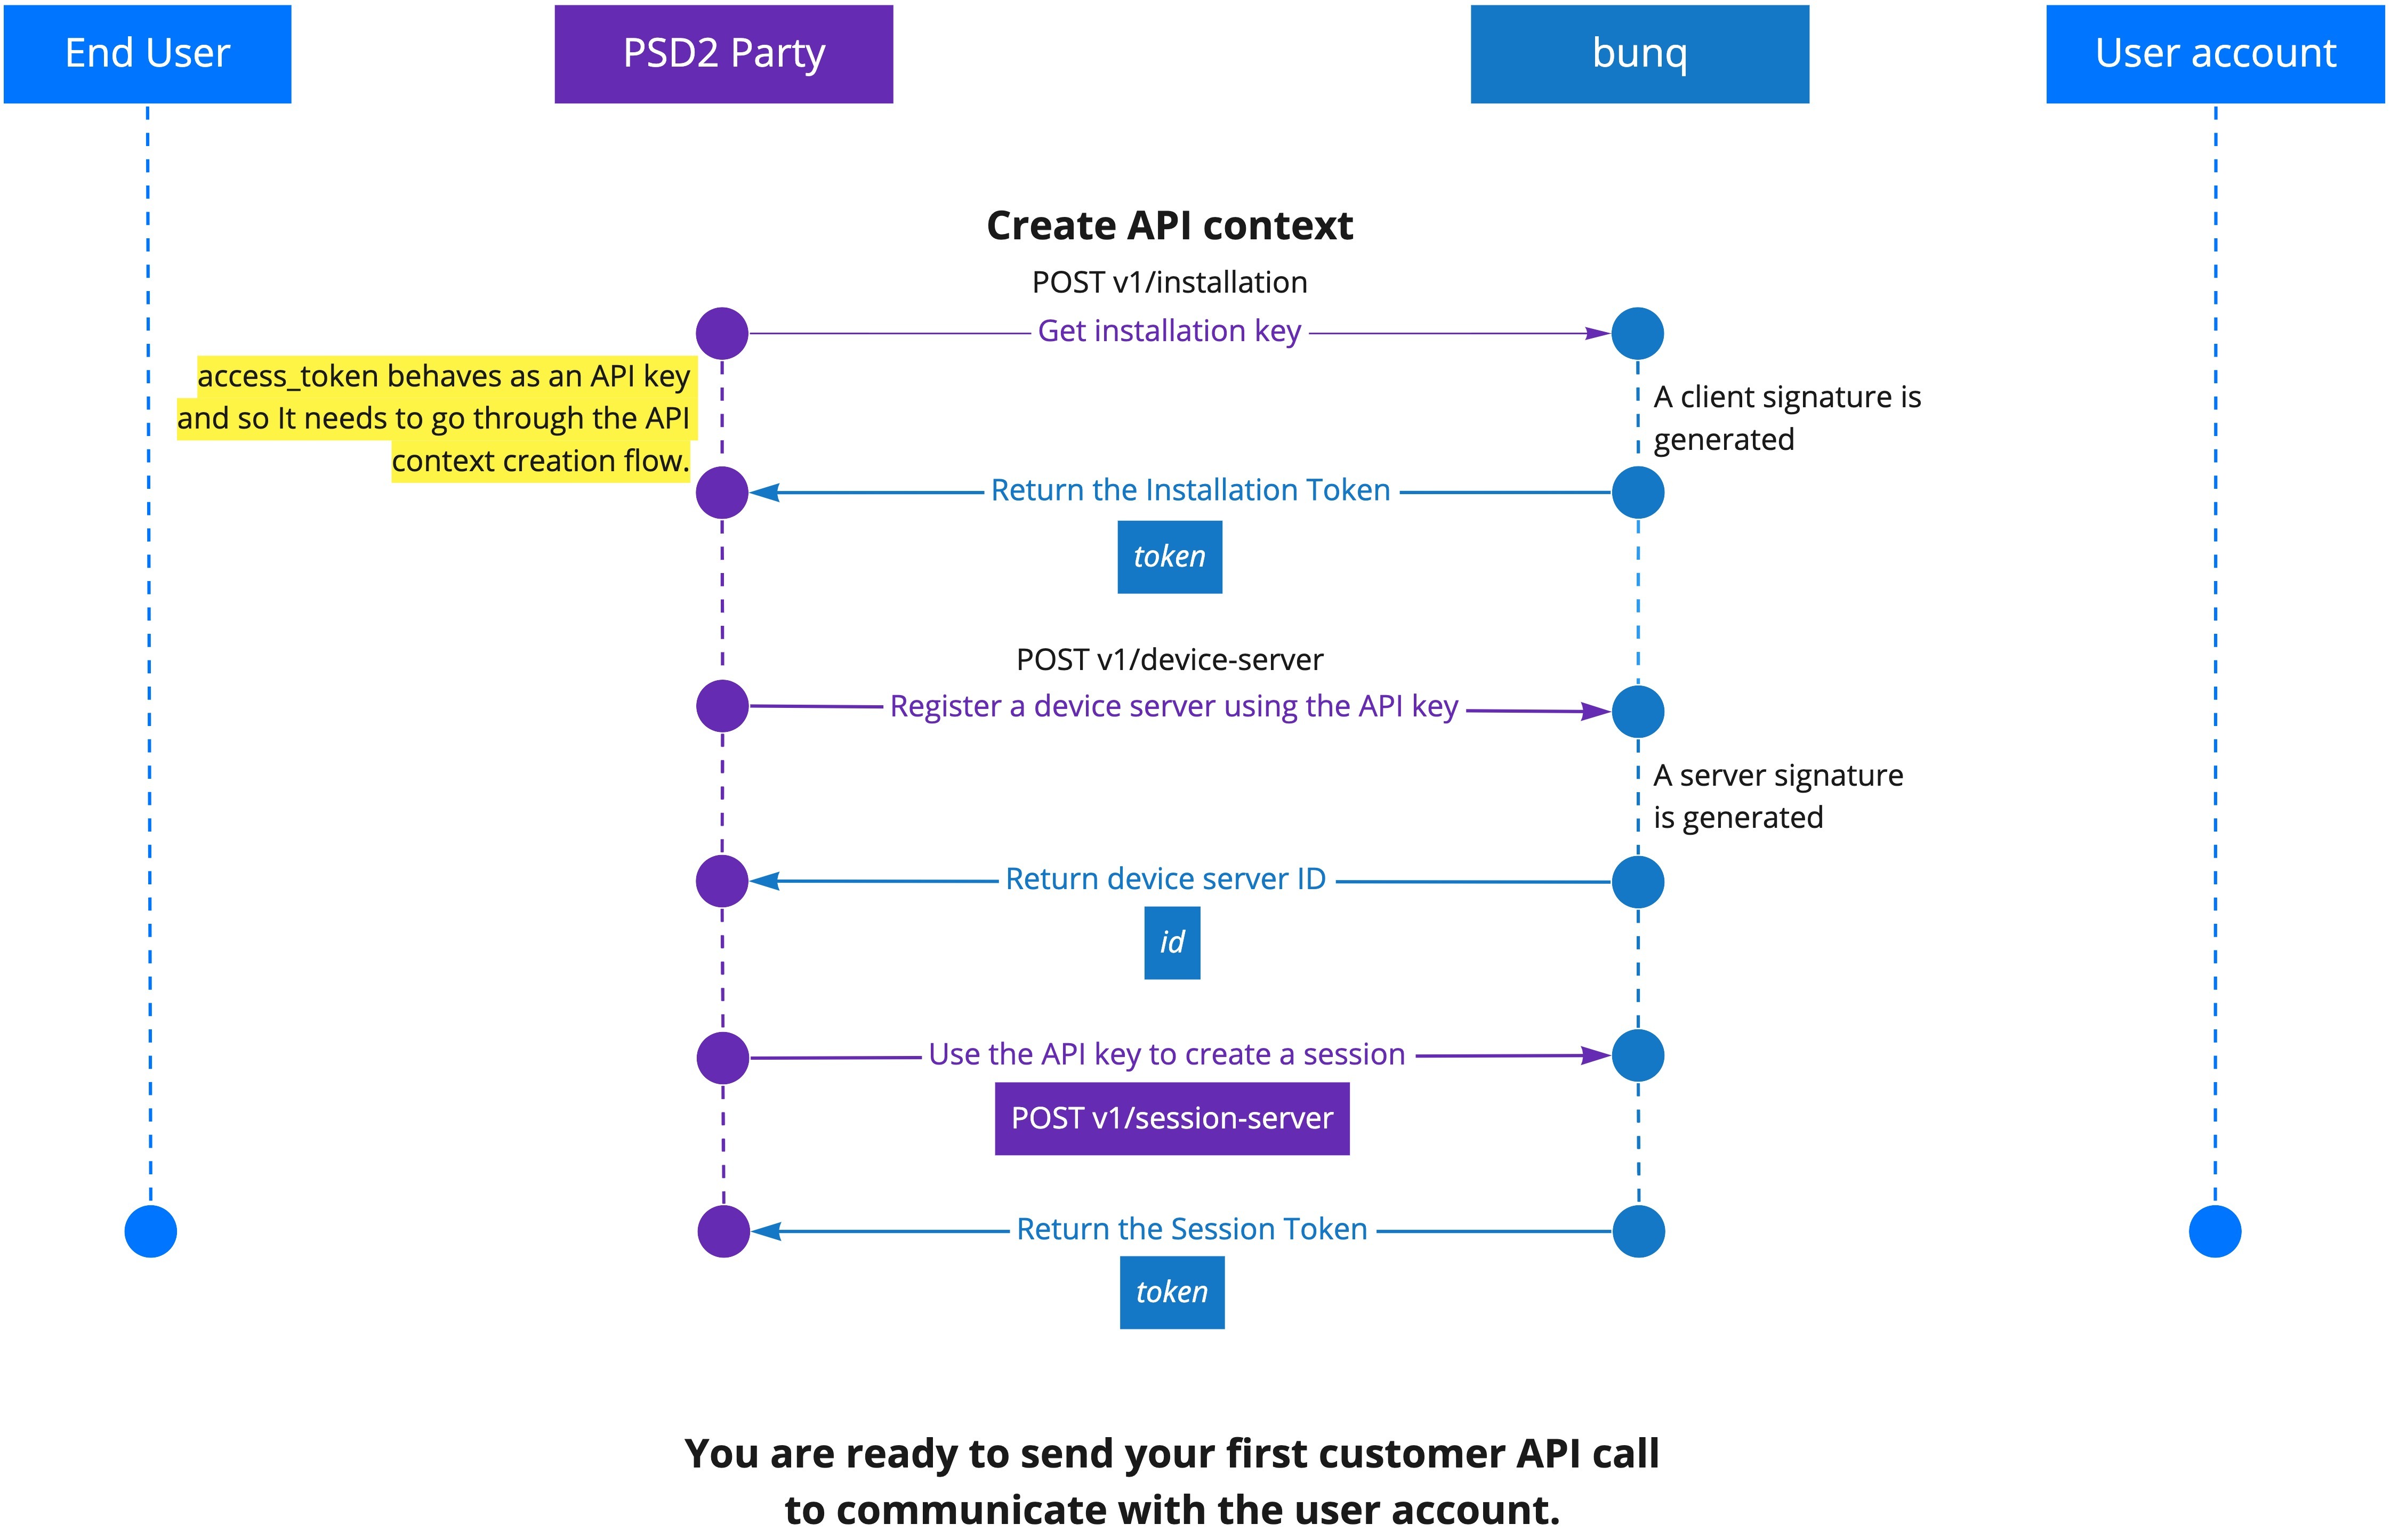\n\n## \u003Cspan id=\u0022topic-introduction-versioning\u0022\u003EVersioning\u003C/span\u003E\n\nDevelopments in the financial sector, changing regulatory regimes and new feature requests require us to be flexible. This means we can iterate quickly to improve the API and related tooling. Therefore, we have chosen not to attach any version numbers to the changes just yet. \n\nWe will inform you in a timely manner of any important changes we make before they are deployed on together.bunq.com. You can also [subscribe to our API newsletter](https://bunq.us8.list-manage.com/subscribe?u=c00d0d6daea4e1cf7c863d52e\u0026id=b08680cdc7) to make sure you don\u0027t miss any important updates. \n\n# \u003Cspan id=\u0022topic-oauth\u0022\u003EOAuth\u003C/span\u003E\n\n## \u003Cspan id=\u0022topic-oauth-what-is-oauth\u0022\u003EWhat is OAuth?\u003C/span\u003E\n\n[OAuth 2.0](https://www.oauth.com/oauth2-servers/getting-ready/) is a protocol that will let your app connect to bunq users in a safe and easy way. Please be aware that if you will gain access to the account information of other bunq users or initiate a payment for them, [you may require a PSD2 permit](https://beta.doc.bunq.com/other/faq#can-we-use-the-bunq-api-to-offer-services-to-third-parties).\n\n## \u003Cspan id=\u0022topic-oauth-get-started-with-oauth-for-bunq\u0022\u003EGet started with OAuth for bunq\u003C/span\u003E\n\nTo initiate authorization into the bunq user accounts, you need to create an OAuth Client and register at least 1 redirect URL for it. \n\nYou can have 1 OAuth Client at a time. Reuse your OAuth credentials for every authorization request. \n\nThe list of steps below will help you to get started:\n\n1. Register an OAuth Client by creating an app in [bunq Developer](https://developer.bunq.com/portal)_._\n2. Add one or more Redirect URLs.\n3. Get your \u0060client_id\u0060 and \u0060secret\u0060 from your app information tab in [bunq Developer](https://developer.bunq.com/portal).\n4. Redirect your users to the [OAuth authorization request URL](#oauth-authorization-request).\n5. If the user accepts the authorization request, they will be redirected to the previously specified \u0060redirect_uri\u0060 with an authorization \u0060code\u0060 parameter.\n6. Use the [token endpoint](#oauth-token-exchange) to exchange the authorization \u0060code\u0060 for an \u0060access_token\u0060.\n7. Use the \u0060access_token\u0060 as a normal API Key. Open a session or use [our SDKs](https://github.com/bunq) to get started.\n\nYou can set up an OAuth Client and add redirect URLs to it using the dedicated endpoints too. Follow the flow below to do it programmatically.\n\n\u2139\uFE0F As a PSD2 user, you cannot log in to the bunq app. You need to follow the flow below to register an OAuth Client for your application.\n\n\n\n## \u003Cspan id=\u0022topic-oauth-what-can-my-apps-do-with-oauth\u0022\u003EWhat can my apps do with OAuth?\u003C/span\u003E\n\nWe decided to launch OAuth with a default permission that allows you to perform the following actions:\n- read and create Monetary Accounts;\n- read Payments \u0026 Transactions;\n- create Payments between Monetary Accounts of the same user;\n- create Draft-Payments (the user will need to approve the payment using the bunq app);\n- assign a Monetary account to a Card;\n- read, create and manage Cards;\n- read and create Request-Inquiries\n- read Request-Responses.\n\nAs a PSD2-licensed developer, you are limited to the permission scopes of your role.\n\n## \u003Cspan id=\u0022topic-oauth-authorization-request\u0022\u003EAuthorization request\u003C/span\u003E\n\nYour web or mobile app should redirect users to the following URL:\n\n\u0060https://oauth.bunq.com/auth\u0060\n\nThe following parameters should be passed:\n\n- \u0060response_type\u0060 - bunq supports the authorization code grant, provide \u0060code\u0060 as parameter (required)\n- \u0060client_id\u0060 - your Client ID, get it from the bunq app (required)\n- \u0060redirect_uri\u0060 - the URL you wish the user to be redirected after the authorization, make sure you register the Redirect URL in the bunq app (required)\n- \u0060state\u0060 - a unique string to be passed back upon completion (optional)\n\nUse \u0060https://oauth.sandbox.bunq.com/auth\u0060 in the sandbox environment.\n\n**Authorization request example:**\n\n\u0060\u0060\u0060\nhttps://oauth.bunq.com/auth?response_type=code\n\u0026client_id=1cc540b6e7a4fa3a862620d0751771500ed453b0bef89cd60e36b7db6260f813\n\u0026redirect_uri=https://www.bunq.com\n\u0026state=594f5548-6dfb-4b02-8620-08e03a9469e6\n\u0060\u0060\u0060\n\n**Authorization request response:**\n\n\u0060\u0060\u0060\nhttps://www.bunq.com/?code=7d272be434a75933f40c13d56aef6c31496005b653074f7d6ac57029d9995d30\n\u0026state=594f5548-6dfb-4b02-8620-08e03a9469e6\n\n\u0060\u0060\u0060\n\n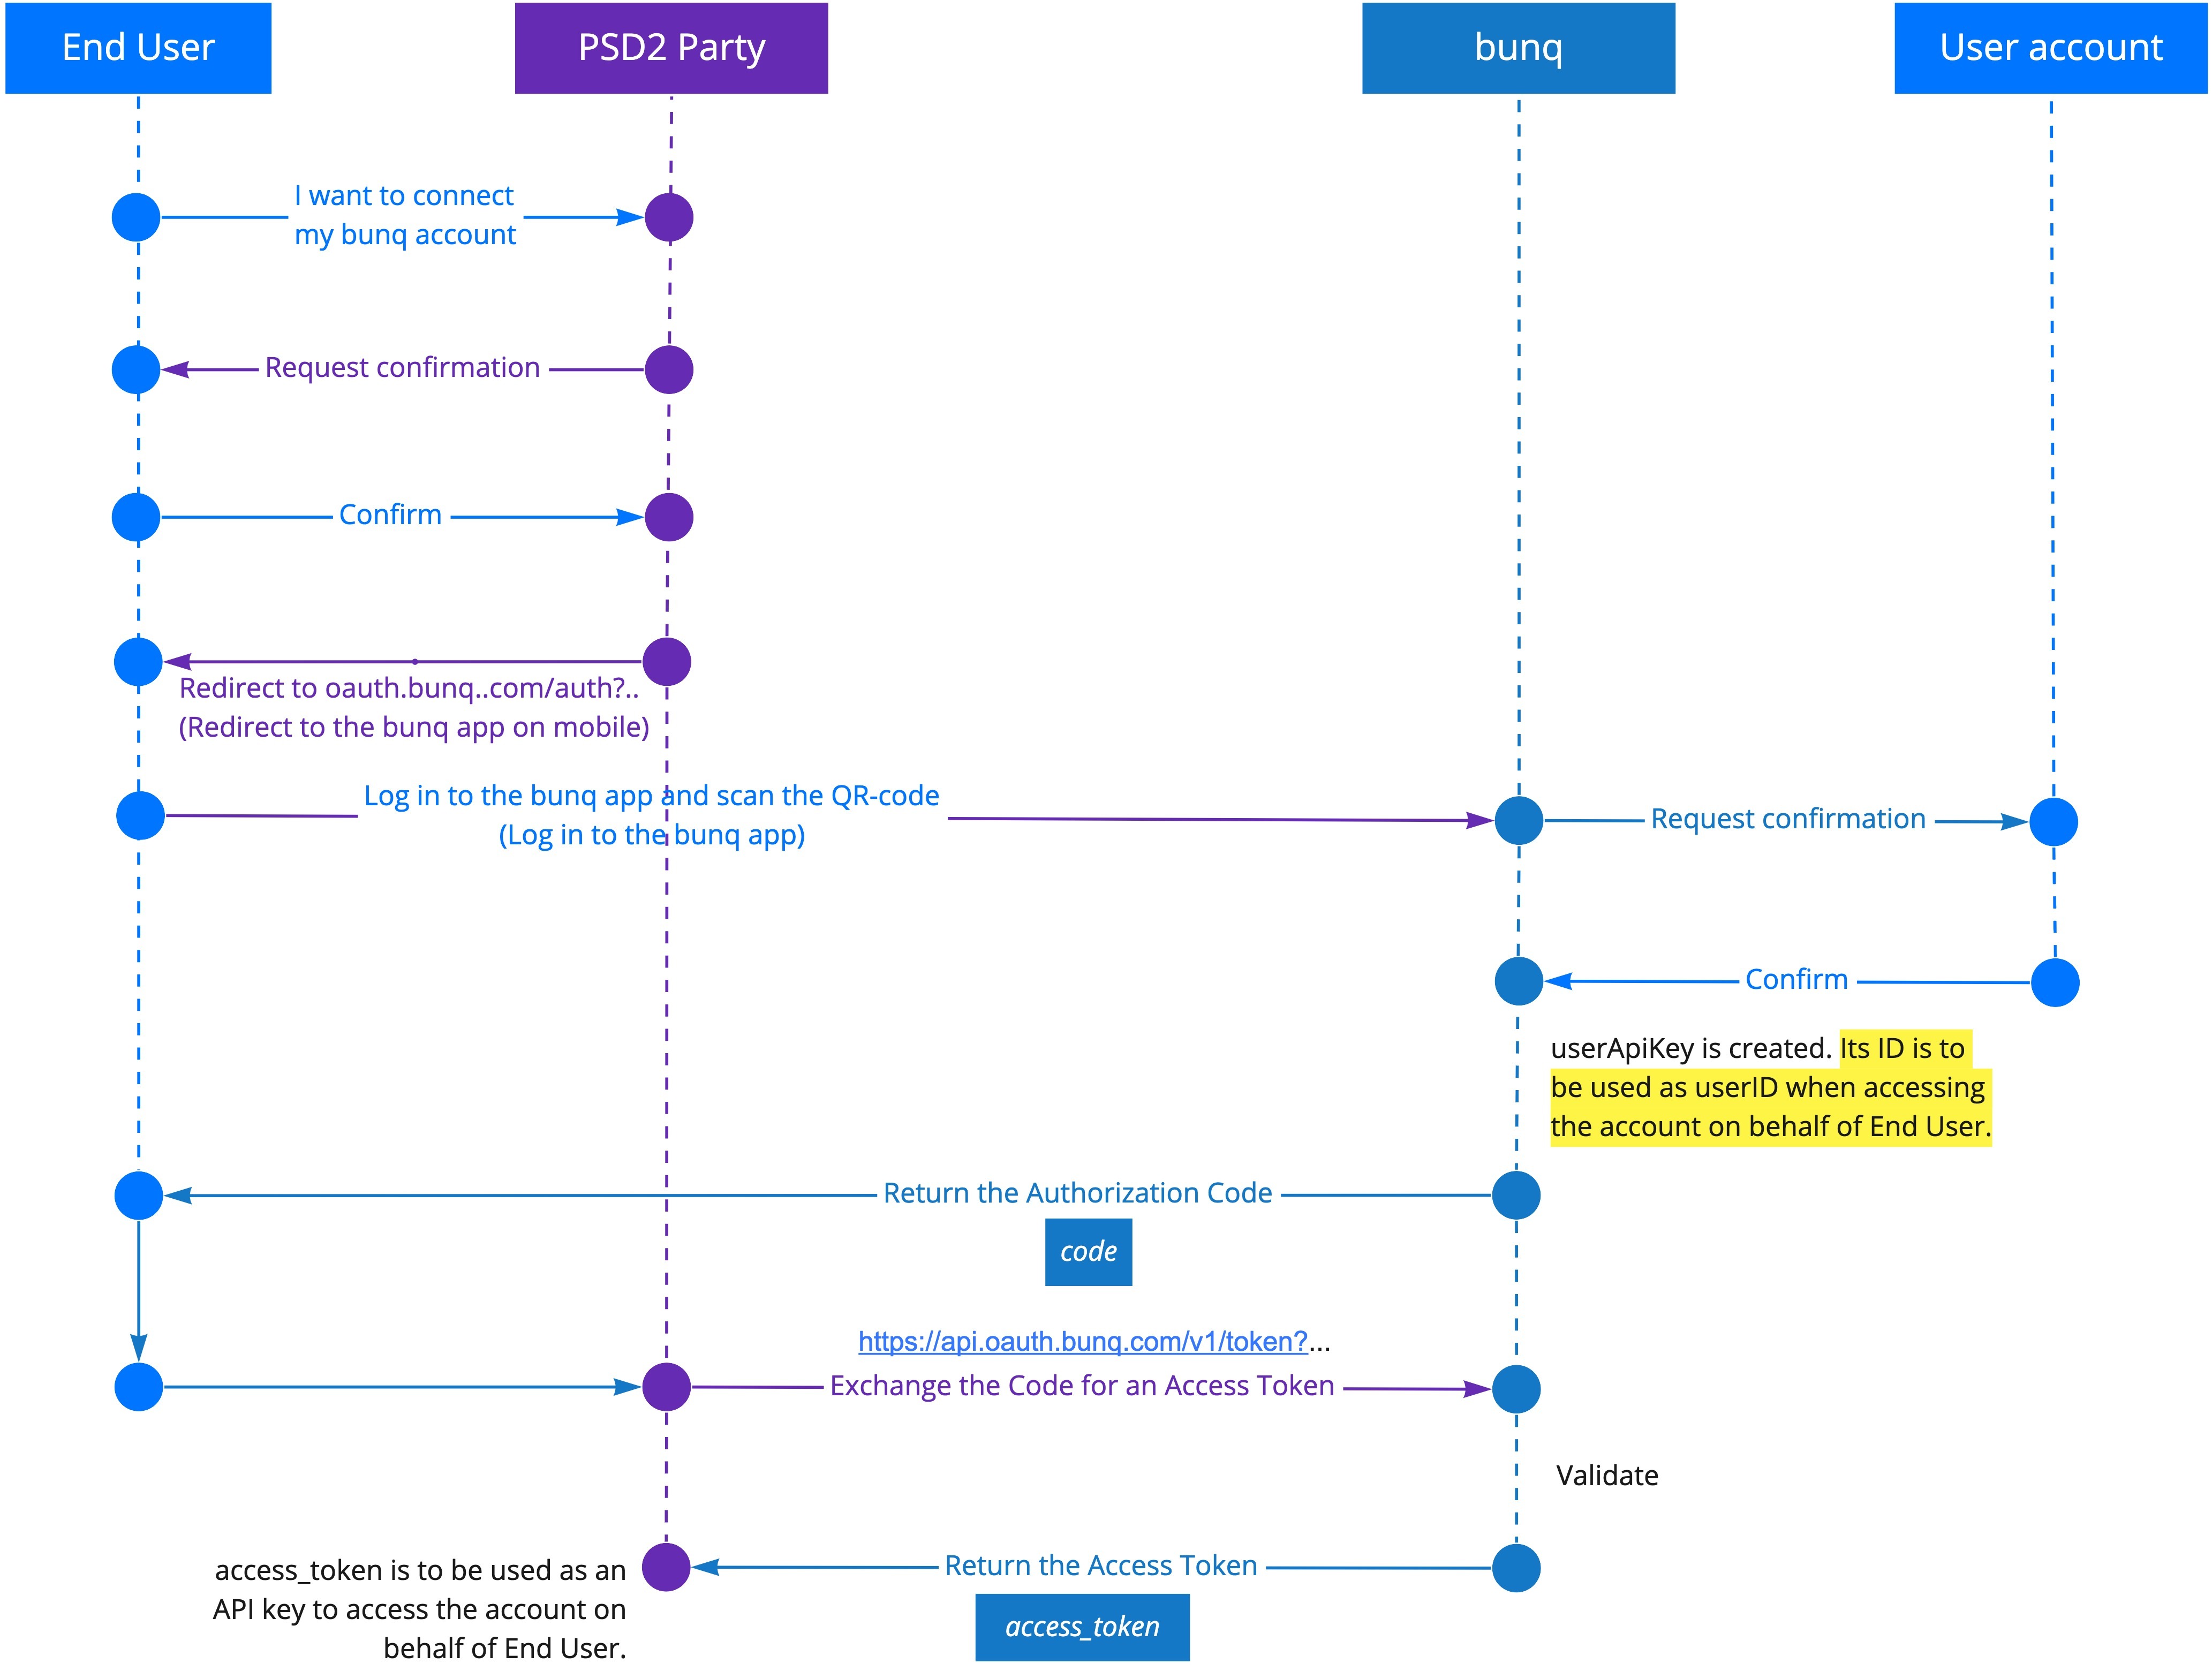\n\n## \u003Cspan id=\u0022topic-oauth-token-exchange\u0022\u003EToken exchange\u003C/span\u003E\n\nIf the authorization request is accepted by the user, you get the authorization \u0060code\u0060_._ Exchange it for an \u0060access_token\u0060.\n\nMake a \u0060POST\u0060 call to \u0060https://api.oauth.bunq.com/v1/token\u0060 . Pass the following parameters as \u0060GET\u0060 variables:\n\n- \u0060grant_type\u0060 - the grant type used, \u0060authorization_code\u0060 for now (required)\n- \u0060code\u0060 - the authorization code received from bunq (required)\n- \u0060redirect_uri\u0060 - the same Redirect URL used in the authorisation request (required)\n- \u0060client_id\u0060 - your Client ID (required)\n- \u0060client_secret\u0060 - your Client Secret (required)\n\nUse \u0060https://api-oauth.sandbox.bunq.com/v1/token\u0060 in the sandbox environment.\n\n**Token request example:**\n\n\u0060\u0060\u0060\nhttps://api.oauth.bunq.com/v1/token?grant_type=authorization_code\n\u0026code=7d272be434a75933f40c13d56aef6c31496005b653074f7d6ac57029d9995d30\n\u0026redirect_uri=https://www.bunq.com/\n\u0026client_id=1cc540b6e7a4fa3a862620d0751771500ed453b0bef89cd60e36b7db6260f813\n\u0026client_secret=184f969765f6f74f53bf563ae3e9f891aec9179157601d25221d57f2f1151fd5\n\u0060\u0060\u0060\n\nNote: The request should only contain URL parameters. No body is expected.\n\n**Example successful response:**\n\n\u0060\u0060\u0060json\n{\n \u0022access_token\u0022: \u00228baec0ac1aafca3345d5b811042feecfe0272514c5d09a69b5fbc84cb1c06029\u0022,\n \u0022token_type\u0022: \u0022bearer\u0022,\n \u0022state\u0022: \u0022594f5548-6dfb-4b02-8620-08e03a9469e6\u0022\n}\n\u0060\u0060\u0060\n\n**Example error response:**\n\n\u0060\u0060\u0060json\n{\n \u0022error\u0022: \u0022invalid_grant\u0022,\n \u0022error_description\u0022: \u0022The authorization code is invalid or expired.\u0022\n}\n\u0060\u0060\u0060\n\n## \u003Cspan id=\u0022topic-oauth-whats-next\u0022\u003EWhat\u0027s next?\u003C/span\u003E\n\nTo start sending calls to the account of the user who has accepted your authorization request, create an API context for the \u0060access_token\u0060 you have received as the result of the token exchange. The \u0060access_token\u0060 can be used as a normal API key. Please continue with [Authentication](#authentication).\n\n**NOTE:** When connecting to a bunq user\u0027s account using OAuth, you create a new user \\(\u0060userApiKey\u0060\\) that has its own \u0060id\u0060 and \u0060access_token\u0060 . When sending a request on behalf of a user connected to your app via OAuth, use the \u0060id\u0060 of \u0060userApiKey\u0060 as \u0060userId\u0060 and the item \u0060id\u0060s of the bunq user \\(\u0060grantedByUser\u0060\\).\n\n**Example of a successful request URL:**\n\n\u0060\u0060\u0060text\nhttps://api.bunq.com/user/{userApiKey\u0027s userId}/monetary-account/{grantedByUser\u0027s monetary-accountId}/payment\n\u0060\u0060\u0060\n\nWhen calling \u0060GET /user/{userID}\u0060, you might expect to get \u0060UserPerson\u0060 or \u0060UserCompany\u0060. Instead, you will get the \u0060UserApiKey\u0060 object, which contains references to both the user that requested access *(you)* and the user that granted access *(the bunq user account that you connected to)*. \n\n.jpg?alt=media\u0026token=d1f212a2-3105-4f0e-a980-34b04a12998a)\n\n## \u003Cspan id=\u0022topic-oauth-using-the-connect-button\u0022\u003EUsing the Connect button\u003C/span\u003E\n\nAll good? Ready to connect to your bunq users? Refer to our style guide and use the following assets when implementing the **Connect to bunq** button.\n\n- [Style guide](https://bunq.com/info/oauth-styleguide)\n- [Connect button assets](https://bunq.com/info/oauth-connect-buttons)\n\nVisit us on together.bunq.com, share your creations, ask question and build your very own bunq app!\n\n# \u003Cspan id=\u0022topic-authentication\u0022\u003EAuthentication\u003C/span\u003E\n\n- All requests must use HTTPS. HTTP calls will fail. \n- You should use SSL Certificate Pinning and Hostname Verification to ensure your connection with bunq is secure.\n- The auto logout time that you set in the app applies to all your sessions including the API ones. If a request is made 30 minutes before a session expires, the session will automatically be extended.\n- We use extra signing on top of HTTPS encryption that you must implement yourself if you are not using the SDKs.\n\n\u2139\uFE0F *We use asymmetric cryptography for signing requests and encryption.*\n- The client (you) and the server (bunq) must have a pair of keys: a private key and a public key. You need to pre-generate your own pair of 2048-bit RSA keys in the PEM format aligned with the PKCS #8 standard.\n- The parties (you and bunq) exchange their public keys in the first step of the API context creation flow. All the following requests must be signed by both your application and the server. Pass your signature in the \u0060X-Bunq-Client-Signature\u0060 header, and the server will return its signature in the \u0060X-Bunq-Server-Signature\u0060 header.\n\n## \u003Cspan id=\u0022topic-authentication-device-registration\u0022\u003EDevice registration\u003C/span\u003E\n\nBefore you can start calling the bunq API, you must activate your API key, which covers the following steps:\n* register your API key, device, and IP address\\(es\\) _\\(only once to activate your API key\\);_\n* create a session via \u0060POST /session-server\u0060. \n\nWe call this sequence of steps \u0022creating an API context.\u0022 \n\nIf you are using OAuth to access a user account, you need to create an API context for the \u0060access_token\u0060 you receive upon [authorization token exchange](https://doc.bunq.com/#/oauth) too. \n\n### \u003Cspan id=\u0022topic-authentication-device-registration-using-our-sdks\u0022\u003EUsing our SDKs\u003C/span\u003E\n\n1. Go to our [GitHub](https://github.com/bunq) page.\n2. Choose the SDK in your language of choice.\n3. Find and use the part dedicated to creating an API context.\n\n[Run Tinker](https://developer.bunq.com/tinker-command-line-banking) to see a sample project using bunq SDKs in action.\n\n\n### \u003Cspan id=\u0022topic-authentication-device-registration-using-our-api\u0022\u003EUsing our API directly\u003C/span\u003E\n\n1. Create an _Installation_ by calling \u0060POST v1/installation\u0060 and passing your pre-generated public key. You will receive an installation _Token._ Use it when making the two following API calls.\n2. Create a _DeviceServer_ via \u0060POST v1/device-server\u0060. Provide a description and a secret \\(API key in this case\\).\n3. Create a _SessionServer_ by executing \u0060POST v1/session-server\u0060. You will receive an authentication _Token._ Use it in the API requests in this active session.\u200B\n\n[Import our Postman collection](https://github.com/bunq/postman) to see our pre-setup API context creation calls. It will automatically generate and pre-fill everything in the API calls that create context so you can inspect the process.\n\n### \u003Cspan id=\u0022topic-authentication-device-registration-ip-addresses\u0022\u003EIP addresses\u003C/span\u003E\n\nWhen using a standard API Key the DeviceServer and Installation that are created in this process are bound to the IP address they are created from. Afterwards it is only possible to add IP addresses via the Permitted IP endpoint.\n\nUsing a Wildcard API Key gives you the freedom to make API calls from any IP address after the POST device-server. You can switch to a Wildcard API Key by tapping on \u201CAllow All IP Addresses\u201D in your API Key menu inside the bunq app. You can also programatically switch to a Wildcard API Key by passing your current ip and a \u0060*\u0060 (asterisk) in the \u0060permitted_ips\u0060 field of the device-server POST call. E.g: \u0060[\u00221.2.3.4\u0022, \u0022*\u0022]\u0060.\n\n# \u003Cspan id=\u0022topic-psd2\u0022\u003EConnect as a PSD2 service provider\u003C/span\u003E\n\nAs a service provider, either an Account Information Service Provider (AISP), Payment Initiation Service Provider (PISP), or Card Based Payment Instrument Issuer (CBPII), you have obtained or are planning to obtain a license from your local supervisor. You will need your unique eIDAS certificate number to start using the PSD2-compliant bunq API on production.\n\nWe accept pseudo certificates in the sandbox environment so you could test the flow. You can generate a test certificate using the command below.\n\n\u26A0\uFE0F Make sure to include AISP and/or PISP in the name to generate a certificate with the roles.\n\n\u0060\u0060\u0060\nopenssl req -x509 -newkey rsa:4096 -keyout key.pem -out cert.pem -days 365 -nodes -subj \u0027/CN=My App PISP AISP/C=NL\u0027\n\u0060\u0060\u0060\n\n## \u003Cspan id=\u0022topic-psd2-register-as-a-service-provider\u0022\u003ERegister as a service provider\u003C/span\u003E\n\nBefore you can read the information on bunq users or initiate payments, you need to register a PSD2 account and receive credentials that will enable you to access the bunq user accounts.\n\n1. Execute \u0060POST v1/installation\u0060 and get your installation *Token* with a unique random key pair.\n1. Use the installation *Token* and your unique PSD2 certificate to call \u0060POST v1/payment-service-provider-credential\u0060. This will register your software. \n1. Receive your API key in return. It will identify you as a PSD2 bunq API user. You will use it to start an OAuth flow. The session will last 90 days. After it closes, start a new session using the same API key.\n1. Register a device by using \u0060POST v1/device-server\u0060 using the API key for the secret and passing the installation *Token* in the \u0060X-Bunq-Client-Authentication\u0060 header. \n1. Create your first session by executing \u0060POST v1/session-server\u0060. Provide the installation *Token* in the \u0060X-Bunq-Client-Authentication\u0060 header. You will receive a session *Token*. Use it in any following request in the \u0060X-Bunq-Client-Authentication\u0060 header.\n\n**NOTE.** The first session will last 1 hour. Start a new session within 60 minutes.\n\n\n\n## \u003Cspan id=\u0022topic-psd2-register-your-applicaton\u0022\u003ERegister your OAuth application\u003C/span\u003E\n\nBefore you can start authenticating on behalf of a bunq user, you need to get *Client ID* and *Client Secret*, which will identify you in authorization requests to the user accounts.\n\n1. Call \u0060POST /v1/user/{userID}/oauth-client\u0060 to create an OAuth Client.\n2. Add a redirect URL to the OAuth Client via \u0060POST /user/{userID}/oauth-client/{oauth-clientID}/callback-url\u0060.\n3. Call \u0060GET /v1/user/{userID}/oauth-client/{oauth-clientID}\u0060. We will return your _Client ID_ and _Client Secret_.\n4. You are ready to [initiate authorization requests](#oauth-authorization-request).\n\nThe flow below will guide you through the full OAuth connection process. Note that you only need to create OAuth credentials once.\n\n\n\n## \u003Cspan id=\u0022topic-psd2-access-user-accounts-as-an-aisp\u0022\u003EAccess user accounts as an AISP\u003C/span\u003E\n\nAs an AISP, you are allowed to authenticate in a user\u2019s account and access \\(read\\) the following account information:\n\n1. legal name\n2. IBAN\n3. nationality\n4. card validity data\n5. transaction history\n6. account balance\n\nTo read the user\u0027s information, you need to establish a connection with their bunq account. You can do it using an [authorization request](#oauth-authorization-request). Once a bunq user has confirmed the authorization request and you have done the [token exchange](#oauth-token-exchange), you can activate the Access Token \\(use it as an API key\\).\n\nToken activation happens when you create an API context \\(install it and link your IP adrress and device to it\\). See the [OAuth](https://beta.doc.bunq.com/basics/oauth) page for the full flow illustration.\n\nAn active Access Token allows you to communicate with the bunq user\u2019s account. You can use it to start a session to interact with the monetary accounts the user allows you to access.\n\n\n\n## \u003Cspan id=\u0022topic-psd2-initiate-payments-as-a-pisp\u0022\u003EMake payments as a PISP\u003C/span\u003E\n\nAs a PISP, you are allowed to authenticate in a user\u2019s account with the following permissions:\nread account information \\(via\u0060GET /user\u0060\\):\n * legal name;\n * IBAN;\n2. initiate payments \\(create draft payments via either \u0060POST /user/{userID}/monetary-account/{monetary-accountID}/draft-payment\u0060 or \u0060POST /user/{userID}/payment-service-provider-draft-payment\u0060\\) and read their statuses;\n3. confirm that the account balance is sufficient for covering the payment \\(via\u0060POST /user/{userID}/confirmation-of-funds\u0060\\).\n\nThe bunq API provides endpoints for different scenarios of the implementation of the payment initiation functionality. In particular, as a PISP user, you can build applications that initiate and authorize one-off or multiple incoming payments. Depending on the use case you are intending to deploy, you might need to initiate the OAuth authorization either before or after the payment initiation. \n\n### \u003Cspan id=\u0022topic-psd2-initiate-multiple-payments-as-a-pisp\u0022\u003EAuthorization of multiple (scheduled) payments\u003C/span\u003E\n\nIt is possible to initiate payments from a bunq user\u0027s account having previously established an OAuth connection between your application and the bunq user\u0027s account. The bunq user will receive push notifications for each initiated payment.\n\nOnce a bunq user has [confirmed they want to make payments via your application](https://beta.doc.bunq.com/psd2/connect-as-a-psd2-service-provider#register-your-application), you can initiate the payment confirmation flow.\n\n1. Create a draft payment via \u0060POST /user/{userID}/monetary-account/{monetary-accountID}/draft-payment\u0060passing the following parameters:\n * \u0060monetary-accountId and userId\u0060 (\u0060userApiKey\u0060\u0027s \u0060id\u0060; see [OAuth](https://beta.doc.bunq.com/basics/oauth#user-id-vs-item-ids) for more information) in the endpoint URL;\n * the customer\u2019s email address, phone number, or IBAN in the \u0060counterparty_alias\u0060 field of the request body.\n2. If the user confirms their intent to make the payment, bunq carries out the transaction.\n3. Check the status of the payment via \u0060GET /user/{userID}/monetary-account/{monetary-accountID}/draft-payment\u0060 using the draft payment \u0060id\u0060 parameter returned in the previous step. \n\n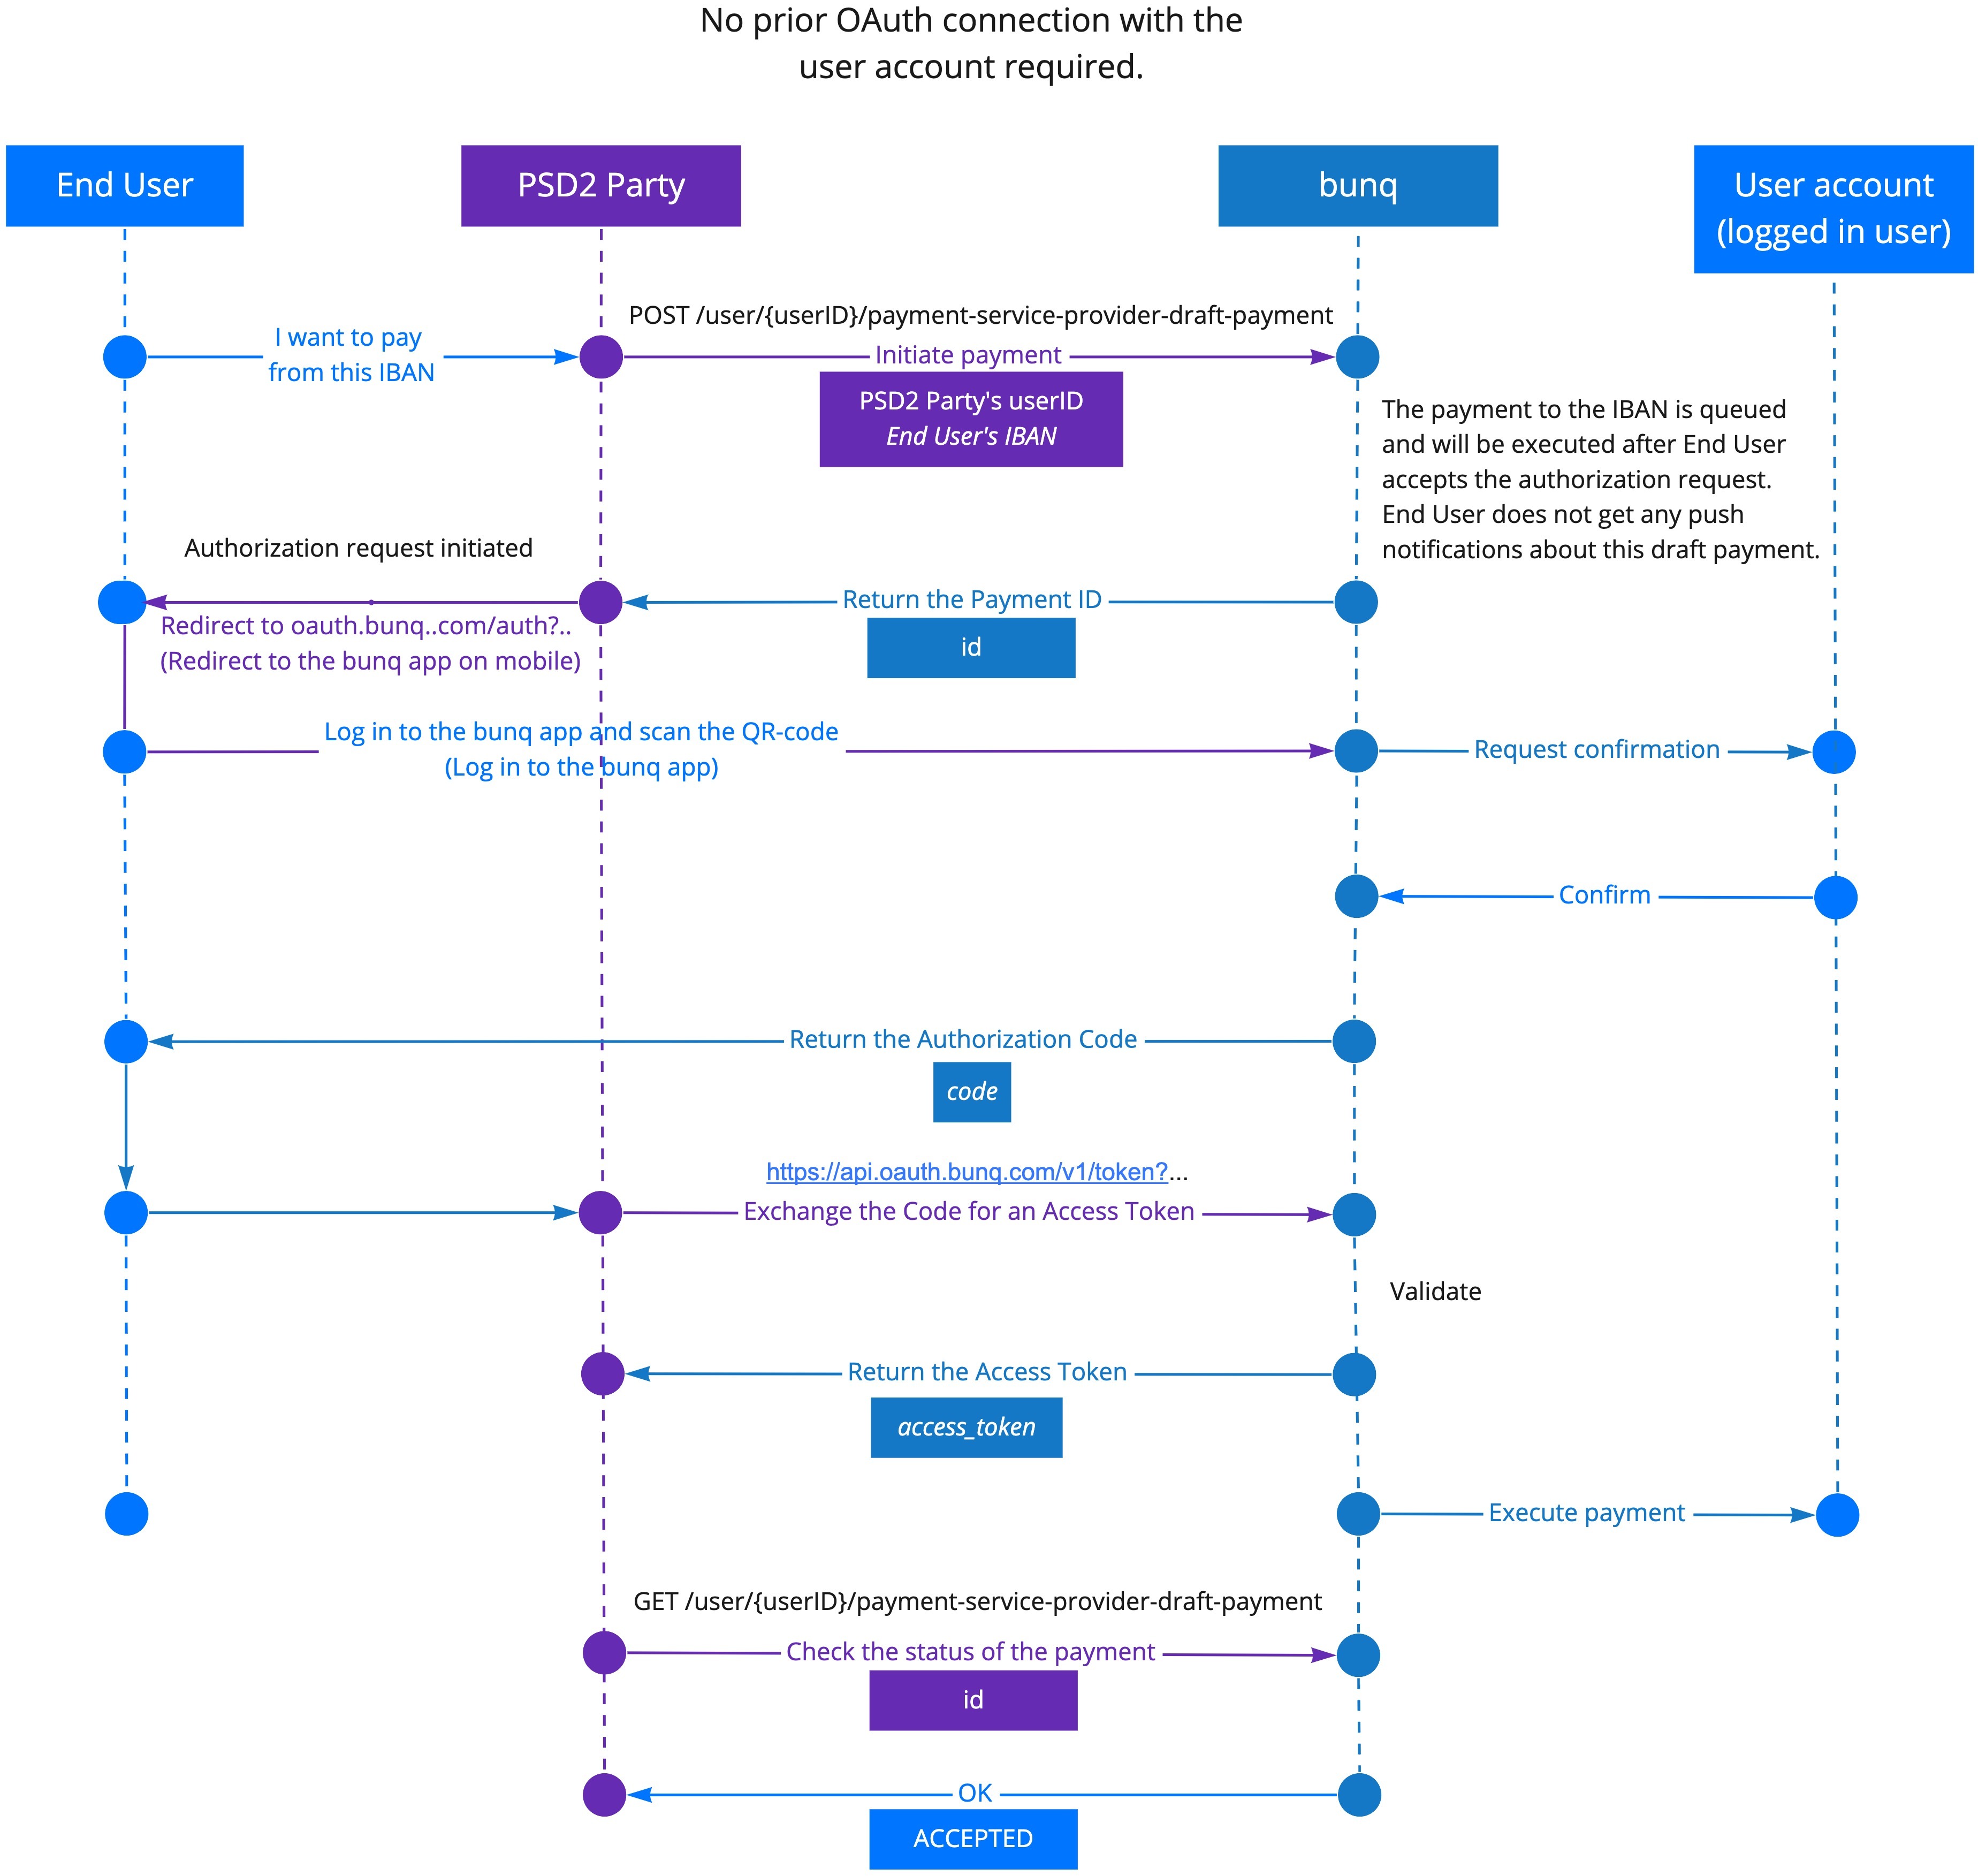\n\n### \u003Cspan id=\u0022topic-psd2-initiate-single-payments-as-a-pisp\u0022\u003ESingle payment authorization\u003C/span\u003E\n\nIt is possible to initiate payments having only the IBAN of the payer using \u0060POST /user/{userID}/payment-service-provider-draft-payment\u0060. In this case, the bunq user will accept the payment along with the authorization request. No additional push notifications are sent to the user. \n\n1. Collect the bunq user\u0027s IBAN (and name) in the UI of your application.\n2. Create a draft payment via \u0060POST /user/{userID}/payment-service-provider-draft-payment\u0060. \n3. Initiate an [authorization request.](https://beta.doc.bunq.com/basics/oauth#authorization-request) Upon the QR-code scan, the bunq user will see and be able to either accept or reject the payment authorization request.\n4. Check the status of the payment.\n\n\n\n## \u003Cspan id=\u0022topic-psd2-confirm-available-funds-as-a-cbpii\u0022\u003EConfirm available funds as a CBPII\u003C/span\u003E\n\nAs a CBPII, you are allowed to authenticate in a user\u2019s account to validate the availability of funds for the payment in question. \n\n1. Collect an alias for the bunq user\u0027s account (their name and IBAN, email address, or phone number).\n2. Check the availability of funds via \u0060POST /user/{userID}/confirmation-of-funds\u0060 passing the following information:\n * your \u0060userId\u0060;\n * the amount of money needed for the payment;\n * the name of the bunq user and the IBAN of the account (email address or phone number pointing at the user are also possible).\n\n# \u003Cspan id=\u0022topic-signing\u0022\u003ESigning\u003C/span\u003E\n\u26A0\uFE0F **NOTE:** We deprecated the signing of the entire API request (the URL, headers and body). You only need to sign the request body. Requests with full request signatures are no longer validated.\n\nWe are legally required to protect our users and their data from malicious attacks and intrusions. That is why we beyond having a secure https connection, we use [asymmetric cryptography](https://en.wikipedia.org/wiki/Public-key_cryptography) for signing requests that create a session or payment. The use of signatures ensures the data is coming from the trusted party and was not modified after sending and before receiving.\n\nRequest body signing is only mandatory for the following operations: \n- open a session;\n- create a payment;\n- create a scheduled payment;\n- any other operation that executes a payment such as the following:\n\t- accept a draft payment;\n\t- accept a scheduled payment;\n\t- accept a draft scheduled payment;\n\t- accept a payment request.\n\nYou will know that the API call must be encrypted if you get the 466 error code. \n\nThe signing mechanism is implemented in our [SDKs](https://github.com/bunq) so if you are using them you don\u0027t have to worry about the details described below.\n\nThe signatures are created using the SHA256 cryptographic hash function and included (encoded in base 64) in the \u0060X-Bunq-Client-Signature\u0060 request header and \u0060X-Bunq-Server-Signature\u0060 response header. The data to sign is the following:\n\n- For requests: the body only.\n- For responses: the body only.\n\nFor signing requests, the client must use the private key corresponding to the public key that was sent to the server in the installation API call. That public key is what the server will use to verify the signature when it receives the request. In that same call the server will respond with a server side public key, which the client must use to verify the server\u0027s signatures. The generated RSA key pair must have key lengths of 2048 bits and adhere to the PKCS #8 standard.\n\n## \u003Cspan id=\u0022topic-signing-request-signing-example\u0022\u003ERequest signing example\u003C/span\u003E\n\nConsider the following request, a \u0060POST\u0060 to \u0060/v1/user/126/monetary-account/222/payment\u0060 (the JSON is formatted with newlines and indentations to make it more readable):\n\n\u003Ctable\u003E\n \u003Cthead\u003E\n \u003Ctr\u003E\n \u003Cth\u003EHeader\u003C/th\u003E\n \u003Cth\u003EValue\u003C/th\u003E\n \u003C/tr\u003E\n \u003C/thead\u003E\n \u003Ctbody\u003E\n \u003Ctr\u003E\n \u003Ctd\u003ECache-Control:\u003C/td\u003E\n \u003Ctd\u003Eno-cache\u003C/td\u003E\n \u003C/tr\u003E\n \u003Ctr\u003E\n \u003Ctd\u003EUser-Agent:\u003C/td\u003E\n \u003Ctd\u003Ebunq-TestServer/1.00 sandbox/0.17b3\u003C/td\u003E\n \u003C/tr\u003E\n \u003Ctr\u003E\n \u003Ctd\u003EX-Bunq-Client-Authentication:\u003C/td\u003E\n\n\u003Ctd\u003Ef15f1bbe1feba25efb00802fa127042b54101c8ec0a524c36464f5bb143d3b8b\u003C/td\u003E\n \u003C/tr\u003E\n \u003C/tbody\u003E\n\u003C/table\u003E\n\n\u0060\u0060\u0060json\n{\n\t\u0022amount\u0022: {\n\t\t\u0022value\u0022: \u002212.50\u0022,\n\t\t\u0022currency\u0022: \u0022EUR\u0022\n\t},\n\t\u0022counterparty_alias\u0022: {\n\t\t\u0022type\u0022: \u0022EMAIL\u0022,\n\t\t\u0022value\u0022: \[email protected]\u0022\n\t},\n\t\u0022description\u0022: \u0022Payment for drinks.\u0022\n}\n\u0060\u0060\u0060\n\nLet\u0027s sign that request. First create a variable \u0060$dataToSign\u0060 containing the body of the request:\n\n\u0060\u0060\u0060json\n{\n \u0022amount\u0022: {\n \u0022value\u0022: \u002212.50\u0022,\n \u0022currency\u0022: \u0022EUR\u0022\n },\n \u0022counterparty_alias\u0022: {\n \u0022type\u0022: \u0022EMAIL\u0022,\n \u0022value\u0022: \[email protected]\u0022\n },\n \u0022description\u0022: \u0022Payment for drinks.\u0022\n}\n\u0060\u0060\u0060\nNext, create the signature of \u0060$dataToSign\u0060 using the SHA256 algorithm and the private key \u0060$privateKey\u0060 of the Installation\u0027s key pair. In PHP, use the following to create a signature. The signature will be passed by reference into \u0060$signature\u0060.\n\n\u0060openssl_sign($dataToSign, $signature, $privateKey, OPENSSL_ALGO_SHA256);\u0060\n\nEncode the resulting \u0060$signature\u0060 using base64, and add the resulting value to the request under the \u0060X-Bunq-Client-Signature\u0060 header. You have just signed your request, and can send it!\n\n## \u003Cspan id=\u0022topic-signing-response-verifying-example\u0022\u003EResponse verifying example\u003C/span\u003E\n\nThe response to the previous request is as follows (the JSON is formatted with newlines and indentations to make it more readable):\n\n\u003Ctable\u003E\n \u003Cthead\u003E\n \u003Ctr\u003E\n \u003Cth\u003EHeader\u003C/th\u003E\n \u003Cth\u003EValue\u003C/th\u003E\n \u003C/tr\u003E\n \u003C/thead\u003E\n \u003Ctbody\u003E\n \u003Ctr\u003E\n \u003Ctd\u003EAccess-Control-Allow-Origin:\u003C/td\u003E\n \u003Ctd\u003E*\u003C/td\u003E\n \u003C/tr\u003E\n \u003Ctr\u003E\n \u003Ctd\u003EContent-Type:\u003C/td\u003E\n \u003Ctd\u003Eapplication/json\u003C/td\u003E\n \u003C/tr\u003E\n \u003Ctr\u003E\n \u003Ctd\u003EDate:\u003C/td\u003E\n \u003Ctd\u003EThu, 07 Apr 2016 08:32:04 GMT\u003C/td\u003E\n \u003C/tr\u003E\n \u003Ctr\u003E\n \u003Ctd\u003EServer:\u003C/td\u003E\n \u003Ctd\u003EAPACHE\u003C/td\u003E\n \u003C/tr\u003E\n \u003Ctr\u003E\n \u003Ctd\u003EStrict-Transport-Security:\u003C/td\u003E\n \u003Ctd\u003Emax-age=31536000\u003C/td\u003E\n \u003C/tr\u003E\n \u003Ctr\u003E\n \u003Ctd\u003ETransfer-Encoding:\u003C/td\u003E\n \u003Ctd\u003Echunked\u003C/td\u003E\n \u003C/tr\u003E\n \u003Ctr\u003E\n \u003Ctd\u003EX-Bunq-Client-Response-Id:\u003C/td\u003E\n \u003Ctd\u003E89dcaa5c-fa55-4068-9822-3f87985d2268\u003C/td\u003E\n \u003C/tr\u003E\n \u003Ctr\u003E\n \u003Ctd\u003EX-Bunq-Client-Request-Id:\u003C/td\u003E\n \u003Ctd\u003E57061b04b67ef\u003C/td\u003E\n \u003C/tr\u003E\n \u003Ctr\u003E\n \u003Ctd\u003EX-Bunq-Server-Signature:\u003C/td\u003E\n \u003Ctd\u003Eee9sDfzEhQ2L6Rquyh2XmJyNWdSBOBo6Z2eUYuM4bAOBCn9N5vjs6k6RROpagxXFXdGI9sT15tYCaLe5FS9aciIuJmrVW/SZCDWq/nOvSThi7\u002BBwD9JFdG7zfR4afC8qfVABmjuMrtjaUFSrthyHS/5wEuDuax9qUZn6sVXcgZEq49hy4yHrV8257I4sSQIHRmgds4BXcGhPp266Z6pxjzAJbfyzt5JgJ8/suxgKvm/nYhnOfsgIIYCgcyh4DRrQltohiSon6x1ZsRIfQnCDlDDghaIxbryLfinT5Y4eU1eiCkFB4D69S4HbFXYyAxlqtX2W6Tvax6rIM2MMPNOh4Q==\u003C/td\u003E\n \u003C/tr\u003E\n \u003Ctr\u003E\n \u003Ctd\u003EX-Frame-Options:\u003C/td\u003E\n \u003Ctd\u003ESAMEORIGIN\u003C/td\u003E\n \u003C/tr\u003E\n \u003C/tbody\u003E\n\u003C/table\u003E\n\n\u0060\u0060\u0060json\n{\n\t\u0022Response\u0022: [\n\t\t{\n\t\t\t\u0022Id\u0022: {\n\t\t\t\t\u0022id\u0022: 1561\n\t\t\t}\n\t\t}\n\t]\n}\n\u0060\u0060\u0060\nWe need to verify that this response was sent by the bunq server and not from a man-in-the-middle:\n- Create a \u0060$dataToSign\u0060 variable containing the body of the request.\n\n**NOTE:** We started to only sign the response body on April 28, 2020. Please make sure you validate our new response signature.\n\nSo for our example above the response to sign will look like this:\n\n\u0060\u0060\u0060\n{\u0022Response\u0022:[{\u0022Id\u0022:{\u0022id\u0022:1561}}]}\n\u0060\u0060\u0060\nNow, verify the signature of \u0060$dataToVerify\u0060 using the SHA256 algorithm and the public key \u0060$publicKey\u0060 of the server. In PHP, use the following to verify the signature.\n\n\u0060openssl_sign($dataToVerify, $signature, $publicKey, OPENSSL_ALGO_SHA256);\u0060\n\n## \u003Cspan id=\u0022topic-signing-troubleshooting\u0022\u003ETroubleshooting\u003C/span\u003E\n\nIf you get an error telling you \u0022The request signature is invalid\u0022, please check the following:\n\n- There are no redundant characters (extra spaces, trailing line breaks, etc.) in the data to sign.\n- Make sure the body is appended to the data to sign exactly as you\u0027re adding it to the request.\n- You have added the full body to the data to sign.\n- You use the data to sign to create a SHA256 hash signature.\n- You have base64 encoded the SHA256 hash signature before adding it to the request under \u0060X-Bunq-Client-Signature\u0060.\n\n# \u003Cspan id=\u0022topic-headers\u0022\u003EHeaders\u003C/span\u003E\n\nHTTP headers allow your client and bunq to pass on additional information along with the request or response.\n\nWhile this is already implemented in our [SDKs](https://github.com/bunq), please follow these instructions to make sure you set appropriate headers for calls if using bunq API directly.\n\n## \u003Cspan id=\u0022topic-headers-request-headers\u0022\u003ERequest headers\u003C/span\u003E\n\n### \u003Cspan id=\u0022topic-headers-request-headers-mandatory-request-headers\u0022\u003EMandatory request headers\u003C/span\u003E\n\n#### Cache-Control\n\n\u0060Cache-Control: no-cache\u0060\n\nThe standard HTTP Cache-Control header is required for all requests.\n\n#### User-Agent\n\n\u0060User-Agent: bunq-TestServer/1.00 sandbox/0.17b3\u0060\n\nThe User-Agent header field should contain information about the user agent originating the request. There are no restrictions on the value of this header.\n\n#### X-Bunq-Client-Signature\n\n**\u26A0\uFE0F UPCOMING CHANGE:** Header and URL signature will stop being validated on April 28, 2020. Please [sign the request body](https://doc.bunq.com/#/signing) only.\n\n\u0060X-Bunq-Client-Signature: XLOwEdyjF1d\u002BtT2w7a7Epv4Yj7w74KncvVfq9mDJVvFRlsUaMLR2q4ISgT\u002B5mkwQsSygRRbooxBqydw7IkqpuJay9g8eOngsFyIxSgf2vXGAQatLm47tLoUFGSQsRiYoKiTKkgBwA\u002B/3dIpbDWd\u002BZ7LEYVbHaHRKkEY9TJ22PpDlVgLLVaf2KGRiZ\u002B9/\u002B0OUsiiF1Fkd9aukv0iWT6N2n1P0qxpjW0aw8mC1nBSJuuk5yKtDCyQpqNyDQSOpQ8V56LNWM4Px5l6SQMzT8r6zk5DvrMAB9DlcRdUDcp/U9cg9kACXIgfquef3s7R8uyOWfKLSNBQpdVIpzljwNKI1Q\u0060\n\n\n#### X-Bunq-Client-Authentication\n\n\u0060X-Bunq-Client-Authentication: 622749ac8b00c81719ad0c7d822d3552e8ff153e3447eabed1a6713993749440\u0060\n\nThe authentication *token* is used to authenticate the source of the API call. It is required by all API calls except for \u0060POST /v1/installation\u0060. \n\nIt is important to note that the device and session calls are using the token from the response of the installation call, while all the other calls use the token from the response of the session-server call:\n- Pass the **installation *Token*** you get in the response to the \u0060POST /installation\u0060 call in the \u0060/device-server\u0060 and \u0060/session-server\u0060 calls.\n- Pass the **session *Token*** you get in the response to the \u0060POST /session-server\u0060 call in all the other calls.\n\n### \u003Cspan id=\u0022topic-headers-request-headers-otpional-request-headers\u0022\u003EOptional request headers\u003C/span\u003E\n\n#### X-Bunq-Language\n\n\u0060X-Bunq-Language: en_US\u0060\n\n\u0060en_US\u0060 is the default language setting for responses and error descriptions.\n\nThe X-Bunq-Language header must contain a preferred language indication. The value of this header is formatted as a ISO 639-1 language code plus a ISO 3166-1 alpha-2 country code, separated by an underscore.\n\nCurrently only the languages en_US and nl_NL are supported. Anything else will default to en_US.\n\n#### X-Bunq-Region\n\n\u0060X-Bunq-Region: en_US\u0060\n\n\u0060en_US\u0060 is the default region for localization formatting.\n\nThe X-Bunq-Region header must contain the region (country) of the client device. The value of this header is formatted as a ISO 639-1 language code plus a ISO 3166-1 alpha-2 country code, separated by an underscore.\n\n#### X-Bunq-Client-Request-Id\n\n\u0060X-Bunq-Client-Request-Id: a4f0de\u0060\n\nThis header has to specify an ID with each request that is unique for the logged in user. There are no restrictions for the format of this ID. However, the server will respond with an error when the same ID is used again on the same DeviceServer.\n\n#### X-Bunq-Geolocation\n\n\u0060X-Bunq-Geolocation: 4.89 53.2 12 100 NL\u0060\n\n\u0060X-Bunq-Geolocation: 0 0 0 0 000\u0060 *(if no geolocation is available or known)*\n\nThis header has to specify the geolocation of the device. It makes it possible for bunq to map the geolocation with the payment.\n\u200C\nThe format of this value is longitude latitude altitude radius country. The country is expected to be formatted of an ISO 3166-1 alpha-2 country code. When no geolocation is available or known the header must still be included but can be zero valued.\n\n### \u003Cspan id=\u0022topic-headers-request-headers-attachment-headers\u0022\u003EAttachment headers\u003C/span\u003E\n\n#### Content-Type\n\n\u0060Content-Type: image/jpeg\u0060\n\nThis header should be used when uploading an attachment to pass its MIME type. Supported types are: image/png, image/jpeg and image/gif.\n\n#### X-Bunq-Attachment-Description\nX-Bunq-Attachment-Description: Check out these cookies.\nThis header should be used when uploading an Attachment\u0027s content to give it a description.\n\n## \u003Cspan id=\u0022topic-response-headers\u0022\u003EResponse headers\u003C/span\u003E\n\n### \u003Cspan id=\u0022topic-response-headers-all-responses\u0022\u003EAll Responses\u003C/span\u003E\n\n#### X-Bunq-Client-Request-Id\n\n\u0060X-Bunq-Client-Request-Id: a4f0de\u0060\n\nThe same ID that was provided in the request\u0027s X-Bunq-Client-Request-Id header. Is included in the response (and request) signature, so can be used to ensure this is the response for the sent request.\n\n#### X-Bunq-Client-Response-Id\n\n\u0060X-Bunq-Client-Response-Id: 76cc7772-4b23-420a-9586-8721dcdde174\u0060\n\nA unique ID for the response formatted as a UUID. Clients can use it to add extra protection against replay attacks.\n\n#### X-Bunq-Server-Signature\n\n\u0060X-Bunq-Server-Signature: XBBwfDaOZJapvcBpAIBT1UOmczKqJXLSpX9ZWHsqXwrf1p\u002BH\u002BeON\u002BTktYksAbmkSkI4gQghw1AUQSJh5i2c4\u002BCTuKdZ4YuFT0suYG4sltiKnmtwODOFtu1IBGuE5XcfGEDDSFC\u002BzqxypMi9gmTqjl1KI3WP2gnySRD6PBJCXfDxJnXwjRkk4kpG8Ng9nyxJiFG9vcHNrtRBj9ZXNdUAjxXZZFmtdhmJGDahGn2bIBWsCEudW3rBefycL1DlpJZw6yRLoDltxeBo7MjgROBpIeElh5qAz9vxUFLqIQC7EDONBGbSBjaXS0wWrq9s2MGuOi9kJxL2LQm/Olj2g==\u0060\n\nThe server\u0027s signature for this response. See the signing page for details on how to verify this signature.\n\n### \u003Cspan id=\u0022topic-response-headers-warning-header\u0022\u003EWarning header\u003C/span\u003E\n\n#### X-Bunq-Warning\n\n\u0060X-Bunq-Warning: \u0022You have a negative balance. Please check the app for more details.\u0022\u0060\n\nUsed to inform you on situations that might impact your bunq account and API access.\n\n# \u003Cspan id=\u0022topic-errors\u0022\u003EErrors\u003C/span\u003E\n\nFamiliar HTTP response codes are used to indicate the success or failure of an API request.\n\nGenerally speaking, codes in the 2xx range indicate success, while codes in the 4xx range indicate an error having to do with provided information (e.g. a required parameter was missing, insufficient funds, etc.).\n\nFinally, codes in the 5xx range indicate an error with bunq servers. If this is the case, please stop by the support chat and report it to us.\n\n## \u003Cspan id=\u0022topic-errors-response-codes\u0022\u003EResponse codes\u003C/span\u003E\n\n\u003Ctable\u003E\n \u003Cthead\u003E\n \u003Ctr\u003E\n \u003Cth\u003ECode\u003C/th\u003E\n \u003Cth\u003EError\u003C/th\u003E\n \u003Cth\u003EDescription\u003C/th\u003E\n \u003C/tr\u003E\n \u003C/thead\u003E\n \u003Ctbody\u003E\n \u003Ctr\u003E\n \u003Ctd\u003E200\u003C/td\u003E\n \u003Ctd\u003EOK\u003C/td\u003E\n \u003Ctd\u003ESuccessful HTTP request\u003C/td\u003E\n \u003C/tr\u003E\n \u003Ctr\u003E\n \u003Ctd\u003E399\u003C/td\u003E\n \u003Ctd\u003ENOT MODIFIED\u003C/td\u003E\n \u003Ctd\u003ESame as a 304, it implies you have a local cached copy of the data\u003C/td\u003E\n \u003C/tr\u003E\n \u003Ctr\u003E\n \u003Ctd\u003E400\u003C/td\u003E\n \u003Ctd\u003EBAD REQUEST\u003C/td\u003E\n \u003Ctd\u003EMost likely a parameter is missing or invalid\u003C/td\u003E\n \u003C/tr\u003E\n \u003Ctr\u003E\n \u003Ctd\u003E401\u003C/td\u003E\n \u003Ctd\u003EUNAUTHORISED\u003C/td\u003E\n \u003Ctd\u003EToken or signature provided is not valid\u003C/td\u003E\n \u003C/tr\u003E\n \u003Ctr\u003E\n \u003Ctd\u003E403\u003C/td\u003E\n \u003Ctd\u003EFORBIDDEN\u003C/td\u003E\n \u003Ctd\u003EYou\u0027re not allowed to make this call\u003C/td\u003E\n \u003C/tr\u003E\n \u003Ctr\u003E\n \u003Ctd\u003E404\u003C/td\u003E\n \u003Ctd\u003ENOT FOUND\u003C/td\u003E\n \u003Ctd\u003EThe object you\u0027re looking for cannot be found\u003C/td\u003E\n \u003C/tr\u003E\n \u003Ctr\u003E\n \u003Ctd\u003E405\u003C/td\u003E\n \u003Ctd\u003EMETHOD NOT ALLOWED\u003C/td\u003E\n \u003Ctd\u003EThe method you are using is not allowed for this endpoint\u003C/td\u003E\n \u003C/tr\u003E\n \u003Ctr\u003E\n \u003Ctd\u003E429\u003C/td\u003E\n \u003Ctd\u003ERATE LIMIT\u003C/td\u003E\n \u003Ctd\u003EToo many API calls have been made in a too short period\u003C/td\u003E\n \u003C/tr\u003E\n \u003Ctr\u003E\n \u003Ctd\u003E466\u003C/td\u003E\n \u003Ctd\u003EREQUEST SIGNATURE REQUIRED\u003C/td\u003E\n \u003Ctd\u003ERequest signature is required for this operation.\u003C/td\u003E\n \u003C/tr\u003E\n \u003Ctr\u003E\n \u003Ctd\u003E490\u003C/td\u003E\n \u003Ctd\u003EUSER ERROR\u003C/td\u003E\n \u003Ctd\u003EMost likely a parameter is missing or invalid\u003C/td\u003E\n \u003C/tr\u003E\n \u003Ctr\u003E\n \u003Ctd\u003E491\u003C/td\u003E\n \u003Ctd\u003EMAINTENANCE ERROR\u003C/td\u003E\n \u003Ctd\u003Ebunq is in maintenance mode\u003C/td\u003E\n \u003C/tr\u003E\n \u003Ctr\u003E\n \u003Ctd\u003E500\u003C/td\u003E\n \u003Ctd\u003EINTERNAL SERVER ERROR\u003C/td\u003E\n \u003Ctd\u003ESomething went wrong on bunq\u0027s end\u003C/td\u003E\n \u003C/tr\u003E\n \u003C/tbody\u003E\n\u003C/table\u003E\n\nAll errors 4xx code errors will include a JSON body explaining what went wrong.\n\n## \u003Cspan id=\u0022topic-errors-rate-limits\u0022\u003ERate limits\u003C/span\u003E\n\nIf you are receiving the error 429, please make sure you are sending requests at rates that are below our rate limits.\n\nOur rate limits per IP address per endpoint:\n\n- GET requests: 3 within any 3 consecutive seconds\n- POST requests: 5 within any 3 consecutive seconds\n- PUT requests: 2 within any 3 consecutive seconds\n- Callbacks: 2 callback URLs per notification category\n\nWe have a lower rate limit for \u0060/session-server\u0060: 1 request within 30 consecutive seconds.\n\n# \u003Cspan id=\u0022topic-api-conventions\u0022\u003EAPI conventions\u003C/span\u003E\n\nMake sure to follow these indications when using the bunq API or get started with our SDKs.\n\n## \u003Cspan id=\u0022topic-api-conventions-responses\u0022\u003EResponses\u003C/span\u003E\n\nAll JSON responses have one top level object. In this object will be a Response field of which the value is always an array, even for responses that only contain one object.\n\nExample response body\n\n\u0060\u0060\u0060json\n{\n\t\u0022Response\u0022: [\n\t\t{\n\t\t\t\u0022DataObject\u0022: {}\n\t\t}\n\t]\n}\n\u0060\u0060\u0060\n\n## \u003Cspan id=\u0022topic-api-conventions-errors\u0022\u003EErrors\u003C/span\u003E\n\n- Error responses also have one top level Error object.\n- The contents of the array will be a JSON object with an error_description and error_description_translated field.\n- The error_description is an English text indicating the error and the error_description_translated field can be shown to end users and is translated into the language from the X-Bunq-Language header, defaulting to en_US.\n- When using bunq SDKs, error responses will be always raised in form of an exception.\n\nExample response body\n\u0060\u0060\u0060json\n{\n\t\u0022Error\u0022: [\n\t\t{\n\t\t\t\u0022error_description\u0022: \u0022Error description\u0022,\n\t\t\t\u0022error_description_translated\u0022: \u0022User facing error description\u0022\n\t\t}\n\t]\n}\n\u0060\u0060\u0060\n\n## \u003Cspan id=\u0022topic-api-conventionsobject-type-indications\u0022\u003EObject Type indications\u003C/span\u003E\n\nWhen the API returns different types of objects for the same field, they will be nested in another JSON object that includes a specific field for each one of them. Within bunq SDKs a BunqResponse object will be returned as the top level object.\n\nIn this example there is a field content, which can have multiple types of objects as value such as \u2014 in this case \u2014 ChatMessageContentText. Be sure to follow this convention or use bunq SDKs instead.\n\n\u0060\u0060\u0060json\n{\n\t\u0022content\u0022: {\n\t\t\u0022ChatMessageContentText\u0022: {\n\t\t\t\u0022text\u0022: \u0022Hi! This is an automated security message. We saw you just logged in on an My Device Description. If you believe someone else logged in with your account, please get in touch with Support.\u0022\n\t\t}\n\t}\n}\n\u0060\u0060\u0060\n\n## \u003Cspan id=\u0022topic-api-conventions-time-formats\u0022\u003ETime formats\u003C/span\u003E\n\nTimes and dates being sent to and from the API are in UTC. The format that should be used is \u0060YYYY-MM-DD hh:mm:ss.ssssss\u0060, where the letters have the meaning as specified in ISO 8601. For example: \u00602017-01-13 13:19:16.215235\u0060.\n\n# \u003Cspan id=\u0022topic-callbacks\u0022\u003ECallbacks\u003C/span\u003E\n\nCallbacks are used to send information about events on your bunq account to a URL of your choice, so that you can receive real-time updates.\n\n## \u003Cspan id=\u0022topic-callbacks-notification-filters\u0022\u003ENotification Filters\u003C/span\u003E\n\nTo receive notifications for certain activities on a bunq account, you have to create notification filters. It is possible to send the notifications to a provided URL and/or the user\u2019s phone as push notifications.\n\nUse the \u0060notification-filter-push\u0060 resource to create and manage push notification filters. Provide the type of events you want to receive notifications about in the \u0060category\u0060 field. \n\n\u0060\u0060\u0060json \n{\n \u0022notification_filters\u0022:[\n {\n \u0022category\u0022:\u0022SCHEDULE_RESULT\u0022\n }\n ]\n}\n\u0060\u0060\u0060\n\nUse the \u0060notification-filter-url\u0060 resource to create and manage URL notification filters. The callback URL you provide in the \u0060notification_target\u0060 field must use HTTPS. \n\n\u0060\u0060\u0060json\n{\n \u0022notification_filters\u0022:[\n {\n \u0022category\u0022:\u0022PAYMENT\u0022,\n \u0022notification_target\u0022:\u0022{YOUR_CALLBACK_URL}\u0022\n }\n ]\n}\n\u0060\u0060\u0060\n\n### \u003Cspan id=\u0022topic-callbacks-notification-filters-callback-categories\u0022\u003ECallback categories\u003C/span\u003E\n\n\u003Ctable\u003E\n \u003Cthead\u003E\n \u003Ctr\u003E\n \u003Cth\u003ECategory\u003C/th\u003E\n \u003Cth\u003EDescription\u003C/th\u003E\n \u003C/tr\u003E\n \u003C/thead\u003E\n \u003Ctbody\u003E\n \u003Ctr\u003E\n \u003Ctd\u003EBILLING\u003C/td\u003E\n \u003Ctd\u003Enotifications for all bunq invoices\u003C/td\u003E\n \u003C/tr\u003E\n \u003Ctr\u003E\n \u003Ctd\u003ECARD_TRANSACTION_SUCCESSFUL\u003C/td\u003E\n \u003Ctd\u003Enotifications for successful card transactions\u003C/td\u003E\n \u003C/tr\u003E\n \u003Ctr\u003E\n \u003Ctd\u003ECARD_TRANSACTION_FAILED\u003C/td\u003E\n \u003Ctd\u003Enotifications for failed card transaction\u003C/td\u003E\n \u003C/tr\u003E\n \u003Ctr\u003E\n \u003Ctd\u003ECHAT\u003C/td\u003E\n \u003Ctd\u003Enotifications for received chat messages\u003C/td\u003E\n \u003C/tr\u003E\n \u003Ctr\u003E\n \u003Ctd\u003EDRAFT_PAYMENT\u003C/td\u003E\n \u003Ctd\u003Enotifications for creation and updates of draft payments\u003C/td\u003E\n \u003C/tr\u003E\n \u003Ctr\u003E\n \u003Ctd\u003EIDEAL\u003C/td\u003E\n \u003Ctd\u003Enotifications for iDEAL-deposits towards a bunq account\u003C/td\u003E\n \u003C/tr\u003E\n \u003Ctr\u003E\n \u003Ctd\u003ESOFORT\u003C/td\u003E\n \u003Ctd\u003Enotifications for SOFORT-deposits towards a bunq account\u003C/td\u003E\n \u003C/tr\u003E\n \u003Ctr\u003E\n \u003Ctd\u003EMUTATION\u003C/td\u003E\n \u003Ctd\u003Enotifications for any action that affects a monetary account\u2019s balance\u003C/td\u003E\n \u003C/tr\u003E\n\t\u003Ctr\u003E\n \u003Ctd\u003EOAUTH\u003C/td\u003E\n \u003Ctd\u003Enotifications for revoked OAuth connections\u003C/td\u003E\n \u003C/tr\u003E\n \u003Ctr\u003E\n \u003Ctd\u003EPAYMENT\u003C/td\u003E\n \u003Ctd\u003Enotifications for payments created from, or received on a bunq account (doesn\u2019t include payments that result out of paying a Request, iDEAL, Sofort or Invoice). Outgoing payments have a negative value while incoming payments have a positive value\u003C/td\u003E\n \u003C/tr\u003E\n \u003Ctr\u003E\n \u003Ctd\u003EREQUEST\u003C/td\u003E\n \u003Ctd\u003Enotifications for incoming requests and updates on outgoing requests\u003C/td\u003E\n \u003C/tr\u003E\n \u003Ctr\u003E\n \u003Ctd\u003ESCHEDULE_RESULT\u003C/td\u003E\n \u003Ctd\u003Enotifications for when a scheduled payment is executed\u003C/td\u003E\n \u003C/tr\u003E\n \u003Ctr\u003E\n \u003Ctd\u003ESCHEDULE_STATUS\u003C/td\u003E\n \u003Ctd\u003Enotifications about the status of a scheduled payment, e.g. when the scheduled payment is updated or cancelled\u003C/td\u003E\n \u003C/tr\u003E\n \u003Ctr\u003E\n \u003Ctd\u003ESHARE\u003C/td\u003E\n \u003Ctd\u003Enotifications for any updates or creation of Connects (ShareInviteBankInquiry)\u003C/td\u003E\n \u003C/tr\u003E\n \u003Ctr\u003E\n \u003Ctd\u003ETAB_RESULT\u003C/td\u003E\n \u003Ctd\u003Enotifications for updates on Tab payments\u003C/td\u003E\n \u003C/tr\u003E\n \u003Ctr\u003E\n \u003Ctd\u003EBUNQME_TAB\u003C/td\u003E\n \u003Ctd\u003Enotifications for updates on bunq.me Tab (open request) payments\u003C/td\u003E\n \u003C/tr\u003E\n \u003Ctr\u003E\n \u003Ctd\u003ESUPPORT\u003C/td\u003E\n \u003Ctd\u003Enotifications for messages received from us through support chat\u003C/td\u003E\n \u003C/tr\u003E\n \u003C/tbody\u003E\n\u003C/table\u003E\n\n### \u003Cspan id=\u0022topic-callbacks-notification-filters-mutation-category\u0022\u003EMutation category\u003C/span\u003E\n\nA Mutation is a change in the balance of a monetary account. So, for each payment-like object, such as a request, iDEAL-payment or a regular payment, a Mutation is created. Therefore, the \u0060MUTATION\u0060 category can be used to keep track of a monetary account\u0027s balance.\n\n### \u003Cspan id=\u0022topic-callbacks-notification-filters-receiving-callbacks\u0022\u003EReceiving callbacks\u003C/span\u003E\n\nCallbacks for the sandbox environment will be made from different IP\u0027s at AWS. \nCallbacks for the production environment will be made from \u0060185.40.108.0/22\u0060.\n\n*The IP addresses might change*. We will notify you in a timely fashion if such a change would take place.\n\n### \u003Cspan id=\u0022topic-callbacks-notification-filters-retry-mechanism\u0022\u003ERetry mechanism\u003C/span\u003E\n\nWhen the execution of a callback fails (e.g. if the callback server is down or the response contains an error) it is tried again for a maximum of 5 times, with an interval of one minute between each try. If your server is not reachable by the callback after the 6th total try, the callback is not sent anymore.\n\n### \u003Cspan id=\u0022topic-callbacks-notification-filters-removing-callbacks\u0022\u003ERemoving callbacks\u003C/span\u003E\n\nTo remove callbacks for an object, send a PUT request to the *user-person*, *user-company*, *monetary-account* or *cash-register* resource with the \u0060notification_filters\u0060 field of the JSON request body unset.\n\u0060\u0060\u0060\n{\n \u0022notification_filters\u0022: []\n}\n\u0060\u0060\u0060\n\n## \u003Cspan id=\u0022topic-callbacks-certificate-pinning\u0022\u003ECertificate pinning\u003C/span\u003E\n\nWe recommend you use certificate pinning as an extra security measure. With certificate pinning, we check the certificate of the server on which you want to receive callbacks against the pinned certificate that has been provided by you and cancel the callback if that check fails.\n\n### \u003Cspan id=\u0022topic-callbacks-certificate-pinning-how-to-set-up-certificate-pinning\u0022\u003EHow to set up certificate pinning\u003C/span\u003E\n\nRetrieve the SSL certificate of your server using the following command:\n\n1. \u0060openssl s_client -servername www.example.com -connect www.example.com:443 \u003C /dev/null | sed -n \u0022/-----BEGIN/,/-----END/p\u0022 \u003E www.example.com.pem\u0060\n2. \u0060POST\u0060 the certificate to the certificate-pinned endpoint.\n\nNow every callback that is made will be checked against the pinned certificate that you provided. Note that if the SSL certificate on your server expires or is changed, our callbacks will fail.\n\n# \u003Cspan id=\u0022topic-pagination\u0022\u003EPagination\u003C/span\u003E\n\nIn order to control the size of the response of a \u0060LIST\u0060 request, items can be paginated. A \u0060LIST\u0060 request is a request for every one of a certain resources, for instance all payments of a certain monetary account \u0060GET /v1/user/1/monetary-account/1/payment\u0060). You can decide on the maximum amount of items of a response by adding a \u0060count\u0060 query parameter with the number of items you want per page to the URL. For instance:\n\n\u0060GET /v1/user/1/monetary-account/1/payment?count=25\u0060\n\nWhen no \u0060count\u0060 is given, the default count is set to 10. The maximum \u0060count\u0060 you can set is 200.\n\nWith every listing, a \u0060Pagination\u0060 object will be added to the response, containing the URLs to be used to get the next or previous set of items. The URLs in the Pagination object can be used to navigate through the listed resources. The Pagination object looks like this given a count of 25:\n\n\u0060\u0060\u0060json\n{\n \u0022Pagination\u0022: {\n \u0022future_url\u0022: null,\n \u0022newer_url\u0022: \u0022/v1/user/1/monetary-account/1/payment?count=25\u0026newer_id=249\u0022,\n \u0022older_url\u0022: \u0022/v1/user/1/monetary-account/1/payment?count=25\u0026older_id=224\u0022\n }\n}\n\u0060\u0060\u0060\n\nThe \u0060newer_url\u0060 value can be used to get the next page. The \u0060newer_id\u0060 is always the ID of the last item in the current page. If \u0060newer_url\u0060 is \u0060null\u0060, there are no more recent items before the current page.\n\nThe \u0060older_url\u0060 value can be used to get the previous page. The \u0060older_id\u0060 is always the ID of the first item in the current page. If \u0060older_url\u0060 is \u0060null\u0060, there are no older items after the current page.\n\nThe \u0060future_url\u0060 can be used to refresh and check for newer items that didn\u0027t exist when the listing was requested. The \u0060newer_id\u0060 will always be the ID of the last item in the current page. \u0060future_url\u0060 will be \u0060null\u0060 if \u0060newer_id\u0060 is not also the ID of the latest item.\n\n# \u003Cspan id=\u0022topic-sandbox\u0022\u003ESandbox\u003C/span\u003E\n*The sandbox base URL is https://public-api.sandbox.bunq.com/v1/*\n\nWe do not use real money and do not allow external transactions in the sandbox environment. \n\n## Sandbox user accounts\nYou need to create a sandbox user to test the bunq API. The easiest way to do it is by using [our developer portal](https://developer.bunq.com/):\n1. Log in using your bunq account or [create a free developer account](https://developer.bunq.com/portal/signup) with sandbox-only access.\n1. Go to Sandbox Users.\n1. Generate up to 5 users.\n1. Use the sandbox API key to create an API context and/or use the user credentials to log in to the [sandbox bunq app](https://doc.bunq.com/#/android-emulator).\n\n### Alternative ways to generate sandbox API keys\nThere are 3 other ways you can generate a bunq sandbox API key:\n* connect to [Tinker](https://lexy.gitbook.io/bunq/quickstart/tinker) *(it will also return login credentials for the sandbox app)*;\n* create it in the [sandbox app](https://doc.bunq.com/#/android-emulator) *(you need to be logged in as a sandbox user)*;\n* call the sandbox user endpoints directly, using [our Postman collection](https://github.com/bunq/postman), or by running a cURL command (change \u0060sandbox-user-person\u0060 to \u0060sandbox-user-company\u0060 to generate a business user):\n\n\u0060\u0060\u0060\ncurl https://public-api.sandbox.bunq.com/v1/sandbox-user-person -X POST --header \u0022Content-Type: application/json\u0022 --header \u0022Cache-Control: none\u0022 --header \u0022User-Agent: curl-request\u0022 --header \u0022X-Bunq-Client-Request-Id: $(date)randomId\u0022 --header \u0022X-Bunq-Language: nl_NL\u0022 --header \u0022X-Bunq-Region: nl_NL\u0022 --header \u0022X-Bunq-Geolocation: 0 0 0 0 000\u0022\n\u0060\u0060\u0060\n\n\u26A0\uFE0F **NOTE:** An API key can only be assigned to an IP within 1 hour after its creation. After the 1 hour, it will become invalid if not assigned. API keys that are created via the sandbox app are wiped with each sandbox reset.\n\nOnce you have a sandbox API key, create more sandbox users to use as test customer accounts, and start playing with the API. \n\nThe sandbox base URL is https://public-api.sandbox.bunq.com/v1/.\n\n## Sandbox money\nWithout money, it\u0027s not always sunny in the sandbox world. Fortunately, getting money on the bunq sandbox is easy. All you need to do is ask Sugar Daddy for it.\n\nSend a \u0060POST v1/request-inquiry\u0060 request passing [email protected] in the counterparty_alias field. Specify the type for the alias and set the \u0060allow_bunqme\u0060 field. Request up to \u20AC500 at a time.\n\u0060\u0060\u0060\n{\n \u0022amount_inquired\u0022: {\n \u0022value\u0022: \u0022100\u0022,\n \u0022currency\u0022: \u0022EUR\u0022\n },\n \u0022counterparty_alias\u0022: {\n \u0022type\u0022: \u0022EMAIL\u0022,\n \u0022value\u0022: \[email protected]\u0022,\n \u0022name\u0022: \u0022Sugar Daddy\u0022\n },\n \u0022description\u0022: \u0022You\u0027re the best!\u0022,\n \u0022allow_bunqme\u0022: false\n}\n\u0060\u0060\u0060\n\n# \u003Cspan id=\u0022topic-android-emulator\u0022\u003EAndroid Emulator\u003C/span\u003E\n\nIn case you do not own an Android device on which you can run our Sandbox app for end-to-end testing, you can set up an emulator to run the bunq Sandbox app for Android.\n\n## Things you will need\n\n- The [bunq Sandbox App APK](https://appstore.bunq.com/api/android/builds/bunq-android-sandbox-master.apk) that\u0027s optimised for emulating;\n- [Android Studio](https://developer.android.com/studio/index.html).\n\n## Starting the Android Virtual Device (AVD) Manager\n\n1. Open Android Studio.\n2. From the top menu, select \u201CTools\u201D \u003E \u0022Android\u0022 \u003E \u0022AVD Manager\u0022.\n\n## Setting up a new virtual device\n\n1. Start the wizard by clicking on \u0022\u002B Create Virtual Device\u0022.\n2. Select a device (recommendation: \u0022Pixel 5.0\u0022 or \u0022Nexus 6\u0022) and press \u0022Next\u0022.\n3. Select an x86 system image (recommendation: Nougat, API Level 25, Android 7.1.1 with Google APIs) and press \u0022Next\u0022. The image needs to have Google Play Services 10.0.1 or higher.\n4. In the bottom left corner, select \u0022Show Advanced Settings\u0022.\n5. Scroll to \u0022Memory and Storage\u0022.\n6. Change \u0022Internal Storage\u0022 to \u00222048 MB\u0022.\n7. Change \u0022SD card\u0022 to \u0022200 MB\u0022.\n8. Press \u0022Finish\u0022.\n\n## Starting the virtual device\n\n1. On the right side under \u0022Actions\u0022, select the green \u0022Play\u0022 button.\n2. Wait for the device to boot, this may take a few minutes.\n\n## Installing the bunq Sandbox App APK\n\n1. Open the command line.\n2. Navigate to your Android SDK platform tools directory (e.g. \u0060cd ~/Library/Android/sdk/platform-tools\u0060 on macOS).\n3. Make sure that the virtual device is started and has fully booted.\n4. Run \u0060./adb install ~/Downloads/bunq-android-sandboxEmulator-public-api.apk\u0060, this may take a few minutes, and should finish with \u0022Success\u0022.\n\n## Creating an account or logging in\n\n1. Create a sandbox account in the [developer portal](https://developer.bunq.com/).\n1. Log in to the sandbox app using the sandbox user credentials.\n\n\u2139\uFE0F *You will be asked to verify your phone number when you open the app for the first time. Sandbox does not send actual SMS messages. Enter any valid phone number and use the default verification code \u0060992266\u0060*. \n\nIf you couldn\u0027t generate a sandbox account in the developer portal, use Tinker:\n1. Install [Tinker](https://beta.doc.bunq.com/quickstart/tinker).\n1. Run \u0060tinker/user-overview\u0060 to create a sandbox account. The output of the command will include the login credentials for the sandbox account.\n\n\u26A0\uFE0F **NOTE:** It is **not** possible to create accounts using the regular signup in the app, bunq is not reviewing Sandbox applications.\n\n# \u003Cspan id=\u0022topic-moving-to-production\u0022\u003EMoving to Production\u003C/span\u003E\n\nHave you tested your bunq integration to the fullest and are you now ready to introduce it to the world? Then the time has come to move it to a production environment!\n\nTo get started you\u0027ll need some fresh API keys for the production environment, which you can create via your bunq app. You can create these under \u0022Profile\u0022 by tapping the \u0022Security\u0022 menu. We do, however, highly recommend using a standard API Key instead of a Wildcard API Key. The former is significantly safer and it protects you from intrusions and possible attacks.\n\nThere\u0027s only a few things to do before your beautiful bunq creation can be moved to production. You\u0027re going to have to change your API Key and redo the sequence of calls to open a session.\n\nThe bunq Public API production environment is hosted at \u0060https://api.bunq.com\u0060.\n\nDo you have any questions or remarks about the process, or do you simply want to show off with your awesome creations? Don\u0027t hesitate to drop us a line on [together.bunq.com](https://together.bunq.com).\n\nPlease be aware that if you will gain access to account information of other bunq users or initiate a payment for them, you maybrequire a PSD2 permit.\n\n# \u003Cspan id=\u0022topic-quickstart-opening-a-session\u0022\u003EQuickstart: Opening a Session\u003C/span\u003E\n\n## \u003Cspan id=\u0022topic-quickstart-opening-a-session-goal\u0022\u003EGoal\u003C/span\u003E\n\nSo, you want to start using the bunq API, awesome! To do this, you have to open a session in which you will be making those calls.\n\n## \u003Cspan id=\u0022topic-quickstart-opening-a-session-getting-an-api-key\u0022\u003EGetting an API key\u003C/span\u003E\n\nTo connect to the API, you have to make sure you have received an API key. \n\n**For production:**\n1. create an app in the [developer portal](http://developer.bunq.com/), or\n1. generate it in the bunq app *(Profile \u2192 Security \u0026 Settings \u2192 Developers \u2192 API keys)*.\n\n**For sandbox**\nYou can use one of the following ways:\n- create a sandbox user in the [developer portal](http://developer.bunq.com/);\n- generate an API key in the [sandbox app](#android-emulator) *(Profile \u2192 Security \u0026 Settings \u2192 Developers \u2192 API keys)*;\n- get an API key from [Tinker](https://beta.doc.bunq.com/quickstart/tinker);\n- run a cURL request: \u0060curl https://public-api.sandbox.bunq.com/v1/sandbox-user-person -X POST --header \u0022Content-Type: application/json\u0022 --header \u0022Cache-Control: none\u0022 --header \u0022User-Agent: curl-request\u0022 --header \u0022X-Bunq-Client-Request-Id: $(date)randomId\u0022 --header \u0022X-Bunq-Language: nl_NL\u0022 --header \u0022X-Bunq-Region: nl_NL\u0022 --header \u0022X-Bunq-Geolocation: 0 0 0 0 000\u0022\u0060. Use \u0060sandbox-user-company\u0060 to generate a business user.\n\nNote that production API key is only usable on production and sandbox key is only usable on sandbox. Sandbox key has a \u0060sandbox_\u0060 prefix while production key does not have any noticeable prefixes.\n\n## \u003Cspan id=\u0022topic-quickstart-opening-a-session-call-sequence\u0022\u003ECall sequence\u003C/span\u003E\n\nThe calls you need to perform to set up a session from scratch are the following:\n\n### \u003Cspan id=\u0022topic-quickstart-opening-a-session-call-sequence-post-installation\u0022\u003E1. POST installation\u003C/span\u003E\n\nEach call needs to be signed with your own private key. An Installation is used to tell the server about the public key of your key pair. The server uses this key to verify your subsequent calls.\n\nStart by generating a 2048-bit RSA key pair. You can find examples by looking at the source code of the sdk\u0027s located at github.\n\n#### Headers\n\nOn the headers page you can find out about the mandatory headers. Take care that if you are in the sandbox environment, you set an \u0060Authorization\u0060 header. Specific to the \u0060POST /installation\u0060 call, you shouldn\u0027t use the \u0060X-Bunq-Client-Authentication\u0060 or the \u0060X-Bunq-Client-Signature\u0060 headers.\n\n#### Body\n\nPost your public key to the Installation endpoint (use \u0060\\n\u0060 for newlines in your public key).\n\n#### Response\n\nSave the Installation token and the bunq API\u0027s public key from the response. This token is used in the \u0060Authentication\u0060 header to register a \u0060DeviceServer\u0060 and to start a \u0060SessionServer\u0060. The bunq API\u0027s public key should be used to verify future responses received from the bunq API.\n\n### \u003Cspan id=\u0022topic-quickstart-opening-a-session-call-sequence-post-device-server\u0022\u003E2. POST device-server\u003C/span\u003E\n\nFurther calls made to the server need to come from a registered device. \u0060POST /device-server\u0060 registers your current device and the IP address(es) it uses to connect to the bunq API.\n\n#### Headers\n\nUse the token you received from \u0060POST /installation\u0060 in the \u0060X-Bunq-Client-Authentication\u0060 header. Make sure you sign your call, passing the call signature in \u0060X-Bunq-Client-Signature\u0060 header.\n\n#### Body\n\nFor the secret, use the API key you received. If you want to create another API key, you can do so in the bunq sandbox app (or production app for the production environment). Login, go to Profile \u003E Security and tap \u0027API keys\u0027. The freshly created API key can be assigned to one or multiple IP addresses using \u0060POST device-server\u0060 within 4 hours before becoming invalid. As soon as you start using your API key, it will remain valid until the next sandbox reset.\u2028\u2028 For the secret, use the API key you received.\n\n### \u003Cspan id=\u0022topic-quickstart-opening-a-session-call-sequence-post-session-server\u0022\u003E3. POST session-server\u003C/span\u003E\n\nTo make any calls besides \u0060installation\u0060 and \u0060device-server\u0060, you need to open a session.\n\n#### Headers\n\nUse the token you received from \u0060POST /installation\u0060 in the \u0060X-Bunq-Client-Authentication\u0060 header. Make sure you sign your call, passing the call signature in \u0060X-Bunq-Client-Signature\u0060 header.\n\n#### Body\n\nFor the secret, use the API key you received.\n\n#### Response\n\nThe token received in the response to \u0060POST /session-server\u0060 should be used to authenticate your calls in this session. Pass this session\u0027s token in the \u0060X-Bunq-Client-Authentication\u0060 header on every call you make in this session.\n\n# \u003Cspan id=\u0022topic-quickstart-payment-request\u0022\u003EQuickstart: Payment Request\u003C/span\u003E\n\n## \u003Cspan id=\u0022topic-quickstart-payment-request-goal\u0022\u003EGoal\u003C/span\u003E\n\nYou want to offer bunq payments on a website or in an application.\n\n## \u003Cspan id=\u0022topic-quickstart-payment-request-scenario\u0022\u003EScenario\u003C/span\u003E\n\nIn this use case the consumer and the merchant both have a bunq account. The consumer wants to pay with bunq and enters their alias in the bunq payment field at checkout. The merchant sends the request for payment to the consumer when the consumer presses enter. The consumer agrees to the request in the bunq mobile app and the merchant has immediate confirmation of the payment. Please be aware that if you will gain access to account information of other bunq users or initiate a payment for them, you require a PSD2 permit.\n\n## \u003Cspan id=\u0022topic-quickstart-payment-request-before-you-start\u0022\u003EBefore you start\u003C/span\u003E\n\nMake sure that you have opened a session and that for any call you make after that, you pass the session\u2019s token in the X-Bunq-Client-Authentication header.\n\n## \u003Cspan id=\u0022topic-quickstart-payment-request-call-sequence\u0022\u003ECall Sequence\u003C/span\u003E\n\nThe consumer is at checkout and selects the bunq payment method. This would be a logical time to open a session on the bunq server.\n\n### \u003Cspan id=\u0022topic-quickstart-payment-request-call-sequence-list-monetary-account\u0022\u003E1. LIST monetary-account\u003C/span\u003E\n\nWhen a request for payment is accepted, the money will be deposited on the bank account the request for payment is connected to. Let\u2019s start by finding all your available bank accounts. Pick one of them to make the request for payment with and save its \u0060id\u0060.\n\n### \u003Cspan id=\u0022topic-quickstart-payment-request-call-sequence-post-monetary-account-attachment\u0022\u003E2. POST monetary-account attachment (optional)\u003C/span\u003E\n\nOptionally, you can attach an image to the request for payment.\n\n#### Headers\nMake sure you set the \u0060Content-Type\u0060 header to match the MIME type of the image. It\u2019s also required you pass a description of the image via the \u0060X-Bunq-Attachment-Description\u0060 header.\n\n#### Body\nThe payload of this request is the binary representation of the image file. Do not use any JSON formatting.\n\n#### Response\nSave the \u0060id\u0060 of the posted attachment. You\u2019ll need it to attach it to the request for payment.\n\n### \u003Cspan id=\u0022topic-quickstart-payment-request-call-sequence-post-request-inquiry\u0022\u003E3. POST request-inquiry\u003C/span\u003E\n\nNext, create a request inquiry. A request inquiry is the request for payment that your customer can respond to by accepting or rejecting it.\n\n#### Body\n\nPass the customer\u2019s email address, phone number or IBAN in the \u0060counterparty_alias\u0060. Make sure you set the correct \u0060type\u0060 for the alias, depending on what you pass. When providing an IBAN, a name of the \u0060counterparty_alias\u0060 is required. You can provide the \u0060id\u0060 of the created attachment.\n\n#### Response\n\nYou will receive the \u0060id\u0060 of the created request inquiry in the response. Save this \u0060id\u0060. You will need it to check if the customer has responded to the request yet.\n\n### \u003Cspan id=\u0022topic-quickstart-payment-request-call-sequence-get-request-inquiry\u0022\u003E4. GET request-inquiry\u003C/span\u003E\n\nAfter you\u2019ve sent the request for payment, its status can be checked.\n\n#### Response\n\nWhen the \u0060status\u0060 is \u0060ACCEPTED\u0060, the customer has accepted and paid the request, and you will have received the money on the connected monetary account. If the \u0060status\u0060 is \u0060REJECTED\u0060, the customer did not accept the request.\n\n# \u003Cspan id=\u0022topic-quickstart-create-a-tab-payment\u0022\u003EQuickstart: Create a Tab payment\u003C/span\u003E\n\n## \u003Cspan id=\u0022topic-quickstart-create-a-tab-payment-goal\u0022\u003EGoal\u003C/span\u003E\n\nYou will create a tab that can be paid once by a single user, a so called TagUsageSingle, and explore three different ways to make the Tab visible to your customers:\n\n- QR code from the CashRegister\n- QR code from the Tab.\n\n## \u003Cspan id=\u0022topic-quickstart-create-a-tab-payment-before-you-start\u0022\u003EBefore you start\u003C/span\u003E\n\nMake sure that you have opened a session and that for any call you make after that, you pass the session\u2019s token in the \u0060X-Bunq-Client-Authentication\u0060 header.\n\n## \u003Cspan id=\u0022topic-quickstart-create-a-tab-payment-call-sequence\u0022\u003ECall sequence\u003C/span\u003E\n\n### \u003Cspan id=\u0022topic-quickstart-create-a-tab-payment-call-sequence-post-attachment-public\u0022\u003E1. POST attachment-public\u003C/span\u003E\n\nStart by creating an attachment that will be used for the avatar for the cash register.\n\n#### Header\n\nMake sure you set the \u0060Content-Type\u0060 header to match the MIME type of the image. It is also required you pass a description of the image via the \u0060X-Bunq-Attachment-Description\u0060 header.\n\n#### Body\n\nThe payload of this request is the binary representation of the image file. Do not use any JSON formatting.\n\n#### Response\n\nSave the \u0060uuid\u0060 of the posted attachment. You\u0027ll need it to create the avatar in the next step.\n\n### \u003Cspan id=\u0022topic-quickstart-create-a-tab-payment-call-sequence-post-avatar\u0022\u003E2. POST avatar\u003C/span\u003E\n\nMake an avatar using the public attachment you\u0027ve just created.\n\n#### Body\n\nThe payload of this request is the \u0060uuid\u0060 of the attachment public.\n\n#### Response\n\nIn response, you\u2019ll receive the UUID of the avatar created using the attachment. Save this UUID. You\u2019ll use it as the avatar for the cash register you\u0027re about to create.\n\n### \u003Cspan id=\u0022topic-quickstart-create-a-tab-payment-call-sequence-list-monetary-account\u0022\u003E3. LIST monetary-account\u003C/span\u003E\n\nGet a listing of all available monetary accounts. Choose one, and save the id of the monetary account you want your cash register to be connected to. Each paid tab for the cash register will transfer the money to this account.\n\n### \u003Cspan id=\u0022topic-quickstart-create-a-tab-payment-call-sequence-post-cash-register\u0022\u003E4a. POST cash-register\u003C/span\u003E\n\nCreate a cash register. Use the \u0060id\u0060 of the monetary account you want to connect the cash register to in the URL of the request.\n\n#### Body\n\nIn the body provide the \u0060uuid\u0060 of the avatar you created for this cash register. Also make sure to provide a unique name for your cash register. Set the status to \u0060PENDING_APPROVAL\u0060.\n\n#### Response\n\nThe response contains the \u0060id\u0060 of the cash register you created. Save this \u0060id\u0060. You will need it to create subsequent tabs and tab items.\n\n### \u003Cspan id=\u0022topic-quickstart-create-a-tab-payment-call-sequence-wait-for-approval\u0022\u003E4b. Wait for approval\u003C/span\u003E\n\nOn the production environment, a bunq admin will review and approve your cash register. In the sandbox environment, your cash register will be automatically approved.\n\n### \u003Cspan id=\u0022topic-quickstart-create-a-tab-payment-call-sequence-post-tab-usage-single\u0022\u003E5. POST tab-usage-single\u003C/span\u003E\n\nCreate a new tab that is connected to your cash register. Use the id of the cash register you want to connect this tab to in the URL of your request.\n\n#### Body\n\nGive the tab a name in \u0060merchant_reference\u0060. Create the tab with status \u0060OPEN\u0060, and give the tab a starting amount. You can update this amount later.\n\n#### Response\n\nThe response contains the uuid of the tab you created.\n\n### \u003Cspan id=\u0022topic-quickstart-create-a-tab-payment-call-sequence-post-tab-item\u0022\u003E6. POST tab-item (optional)\u003C/span\u003E\n\nYou can add items to a tab. For instance, if a customer will be paying for multiple products via this tab, you can decide to add an item for each of these. Adding items to a tab is optional, and adding them will not change the total amount of the tab itself. However, if you\u0027ve added any tab items the sum of the amounts of these items must be equal to the \u0060total_amount\u0060 of the tab when you change its status to \u0060WAITING_FOR_PAYMENT\u0060.\n\n### \u003Cspan id=\u0022topic-quickstart-create-a-tab-payment-call-sequence-put-tab-usage-single\u0022\u003E7. PUT tab-usage-single\u003C/span\u003E\n\nUpdate the status of the tab to \u0060WAITING_FOR_PAYMENT\u0060 if you want the costumer to pay the tab, and you\u0027re done adding any tab items. You can use this request to make the tab visible for your costumers.\n\n#### Visibility\n\nTo decide how you are going to make your tab visible, pass a visibility object in the payload.\n\nSetting \u0060cash_register_qr_code\u0060 to true will connect this tab to the QR code from the cash register. If this cash register does not have a QR code yet, one will be created. Only one Tab can be connected to the cash register\u2019s QR code at any given time.\n\nSetting \u0060tab_qr_code\u0060 to true will create a QR code specifically for this tab. This QR code can not be linked to anything else.\n\n# \u003Cspan id=\u0022topic-quickstart-transwerwise-payment\u0022\u003EQuickstart: Create a TransferWise payment\u003C/span\u003E\n\n## Goal\n\nYou want to send a payment in currency other than euro outside the SEPA zone.\n\n## Before you start\n\nMake sure that you have opened a session and that for any call you make after that, you pass the session\u2019s token in the \u0060X-Bunq-Client-Authentication\u0060 header.\n\n\u2139\uFE0F *bunq relies on TransferWise for international, so you need to create a TransferWise account linked to a bunq account to be able to create international transfers. You can do it either from the bunq app or using our API as described below.*\n\n## Get the up-to-date exchange rate (optional)\n\nYou might want to check the latest currency exchange rate before making a transfer. Here\u2019s how you can do it using the bunq API:\n1. Check the list of supported currencies via \u0060GET /user/{userID}/transferwise-currency\u0060. Copy the needed currency code.\n2. Create a temporary quote for the currency of your choice via \u0060POST /user/{userID}/transferwise-quote-temporary\u0060.\n\n\u2139\uFE0F *A quote is the exchange rate at the exact timestamp. Temporary quotes carry solely informative value and cannot be used for creating a transfer.*\n\n3. Read the temporary quote via \u0060GET /user/{userID}/transferwise-quote-temporary/{transferwise-quote-temporaryID}\u0060.\n\n## Create a TransferWise account\n\nYou need a TransferWise account linked to your bunq account to make TransferWise payments via the bunq API. Create one via \u0060POST /user/{userID}/transferwise-user\u0060, and save its ID. \n\n\u2139\uFE0F *You cannot use an existing TransferWise account.*\n\n## Create a quote\n\n1. Create a quote via POST /user/{userID}/transferwise-quote and save its ID. \n\n\u2139\uFE0F *Use amount_target to indicate the sum the recipient must get. Amount_source, on the other hand, will indicate the sum you want to send, but it will not necessarily be the final sum the recipient gets.*\n\n\u2139\uFE0F *Quotes are valid for 30 minutes so if you do not manage to create a transfer within this time, you will need to create another quote.*\n\n2. Get the exchange rate by reading the quote via GET /user/{userID}/transferwise-quote/(transferwise-quoteID).\n\n## Create a recipient\n\nIf you have sent money via the TransferWise account linked to your bunq account, you can reuse the recipients. You can list their IDs via \u0060GET /user/{userID}/transferwise-quote/{transferwise-quoteID}/transferwise-recipient\u0060.\n\nTo create a new, previously unused recipient, follow these steps:\n1. Retrieve the fields required for creating the recipient as the requirements vary for the type of recipient in each country. Iterate sending the following request pair till there are no more required fields:\n- \u0060GET /user/{userID}/transferwise-quote/{transferwise-quoteID}/transferwise-recipient-requirement\u0060\n- \u0060POST /user/{userID}/transferwise-quote/{transferwise-quoteID}/transferwise-recipient-requirement\u0060\n2. Create a recipient account using the final request body from the previous step with \u0060POST /user/{userID}/transferwise-quote/{transferwise-quoteID}/transferwise-recipient-requirement\u0060\n\n## Create a transfer\n\nFinally, having both the quote ID and the recipient ID, you can create a transfer. \uD83C\uDF89\n\n1. Check if there are any additional transfer requirements via \u0060POST /user/{userID}/transferwise-quote/{transferwise-quoteID}/transferwise-transfer-requirement\u0060.\n2. Create a transfer via \u0060POST /user/{userID}/transferwise-quote/{transferwise-quoteID}/transferwise-transfer\u0060. You need to specify the ID of the monetary account from which you want the payment to be made.\n\n# \u003Cspan id=\u0022topic-quickstart-attachments\u0022\u003EQuickstart: Downloading attachments\u003C/span\u003E\n\n## Goal\nExport receipts and invoices attached to payments to your application.\n\n## The scenario you want to achieve\n0. The bunq user has accepted the authorization request and your application can read the bunq user\u2019s account information.\n1. Your application imports all the transactions and attachments.\n2. The bunq user sees the transactions matched with the receipts and invoices in your application.\n\n## Before you start\n* Make sure that you have opened a session\n* Make sure you pass the session Token in the X-Bunq-Client-Authentication header in all the following requests of the session.\n\n## Call sequence\n1. List the payments of the user via GET /user/{userID}/monetary-account/{monetary-accountID}/payment.\n2. Check if the payments have attachments via GET /user/{userID}/monetary-account/{monetary-accountID}/payment/{paymentID}/note-attachment. Save the attachment IDs.\n3. Export the raw content of the attachments via GET /user/{userID}/attachment/{attachmentID}/content.\n\n***HINT:** You can use [callbacks](https://doc.bunq.com/#/callbacks) to make sure you don\u2019t miss anything happening on the bunq account.*\n",
"baseUrl": "https://public-api.sandbox.bunq.com/%7BbasePath%7D",
"properties": [
{
"type": "X-openapi",
"url": "https://raw.githubusercontent.com/bunq/doc/master/swagger.json"
}
],
"contact": [
{
"fn": "bunq Developer Support"
}
]
},
{
"name": "SPI Location saisonni\u00E8re - \u00C9os",
"description": "",
"baseUrl": "https://api.heliosconnect.fr/",
"properties": [
{
"type": "X-openapi",
"url": "https://api.heliosconnect.fr/v0/swagger.json"
}
]
},
{
"name": "FGO game data API",
"description": "Provide raw and nicely bundled FGO game data.\n\n### Static export files\n\n#### Full data export files\n\nPre-generated full nice data that can be served instantly:\n- NA data:\n - [NA Servant](/export/NA/nice_servant.json)\n - [NA Servant with lore](/export/NA/nice_servant_lore.json)\n - [NA Craft Essence](/export/NA/nice_equip.json)\n - [NA Craft Essence with lore](/export/NA/nice_equip_lore.json)\n - [NA War](/export/NA/nice_war.json)\n - [NA Event](/export/NA/nice_event.json)\n - [NA Command Code](/export/NA/nice_command_code.json)\n - [NA Material](/export/NA/nice_item.json)\n - [NA Mystic Code](/export/NA/nice_mystic_code.json)\n - [NA Item](/export/NA/nice_item.json)\n - [NA Master Mission](/export/NA/nice_master_mission.json)\n - [NA Illustrator](/export/NA/nice_illustrator.json)\n - [NA Voice Actor](/export/NA/nice_cv.json)\n - [NA BGM](/export/NA/nice_bgm.json)\n - [NA Asset Storage](/export/NA/asset_storage.json)\n- JP data:\n - [JP Servant](/export/JP/nice_servant.json),\n [JP Servant with English names](/export/JP/nice_servant_lang_en.json)\n - [JP Servant with lore](/export/JP/nice_servant_lore.json),\n [JP Servant with English names and lore](/export/JP/nice_servant_lore_lang_en.json)\n - [JP Craft Essence](/export/JP/nice_equip.json),\n [JP Craft Essence with English names](/export/JP/nice_equip_lang_en.json)\n - [JP Craft Essence with lore](/export/JP/nice_equip_lore.json),\n [JP Craft Essence with lore and English names](/export/JP/nice_equip_lore_lang_en.json)\n - [JP War](/export/JP/nice_war.json),\n [JP War with English names](/export/JP/nice_war_lang_en.json)\n - [JP Event](/export/JP/nice_event.json),\n [JP Event with English names](/export/JP/nice_event_lang_en.json)\n - [JP Command Code](/export/JP/nice_command_code.json),\n [JP Command Code with English names](/export/JP/nice_command_code_lang_en.json)\n - [JP Mystic Code](/export/JP/nice_mystic_code.json),\n [JP Mystic Code with English names](/export/JP/nice_mystic_code_lang_en.json)\n - [JP Material](/export/JP/nice_item.json),\n [JP Material with English names](/export/JP/nice_item_lang_en.json)\n - [JP Master Mission](/export/JP/nice_master_mission.json)\n - [JP Illustrator](/export/JP/nice_illustrator.json)\n [JP Illustrator with English names](/export/JP/nice_illustrator_lang_en.json)\n - [JP Voice Actor](/export/JP/nice_cv.json)\n [JP Voice Actor with English names](/export/JP/nice_cv_lang_en.json)\n - [JP BGM](/export/JP/nice_bgm.json),\n [JP BGM](/export/JP/nice_bgm_lang_en.json)\n - [JP Asset Storage](/export/JP/asset_storage.json)\n- Both regions (The data is the same for both NA and JP endpoints):\n - [All enums](/export/JP/nice_enums.json)\n - [Trait mapping](/export/JP/nice_trait.json)\n\n#### Trimmed-down data export files\n\nPre-generated, trimmed-down, lightweight basic data that can be used for indexing purposes:\n- NA data:\n - [NA servant](/export/NA/basic_servant.json)\n - [NA CE](/export/NA/basic_equip.json)\n - [NA svt](/export/NA/basic_svt.json)\n - [NA Command Code](/export/NA/basic_command_code.json)\n - [NA Mystic Code](/export/NA/basic_mystic_code.json)\n - [NA War](/export/NA/basic_war.json)\n - [NA Event](/export/NA/basic_event.json)\n- JP data:\n - [JP servant](/export/JP/basic_servant.json),\n [JP servant with English names](/export/JP/basic_servant_lang_en.json)\n - [JP CE](/export/JP/basic_equip.json),\n [JP CE with English names](/export/JP/basic_equip_lang_en.json)\n - [JP svt](/export/JP/basic_svt.json),\n [JP svt with English names](/export/JP/basic_svt_lang_en.json)\n - [JP Command Code](/export/JP/basic_command_code.json),\n [JP Command Code with English names](/export/JP/basic_command_code_lang_en.json)\n - [JP Mystic Code](/export/JP/basic_mystic_code.json),\n [JP Mystic Code with English names](/export/JP/basic_mystic_code_lang_en.json)\n - [JP War](/export/JP/basic_war.json),\n [JP War with English names](/export/JP/basic_war_lang_en.json)\n - [JP Event](/export/JP/basic_event.json),\n [JP Event with English name](/export/JP/basic_event_lang_en.json)\n\n\n### API Usage\n\nIt\u0027s recommended to use the static export files or search with the \u0060/basic\u0060 endpoints\nand fetch nice or raw data as needed.\nA big search with nice or raw data will take a while to respond.\n\nThere are many export files in the \u0022Export files\u0022 section above.\nMake sure you check them out before querying the API.\nChances are what you need is already there.\nFeel free to contact me if you would like to see an export file that is not currently available.\n\n### Miscellaneous info\n\nThe current data version can be found [here](/info).\n\nAPI\u0027s changelog can be found [here](https://github.com/atlasacademy/fgo-game-data-api/blob/master/CHANGELOG.md).\n\nTo discuss more about the API, you can go to the [Atlas Academy Discord](https://discord.gg/TKJmuCR).\nBug reports and feature requests are welcome.\nSource code of the API is available on [GitHub](https://github.com/atlasacademy/fgo-game-data-api).\n\nAvailable documentation styles: [RapiDoc](/rapidoc), [Swagger UI](/docs), [Redoc](/redoc).\n\n### Static Constants\n\nHere are the static files that can be used for damage calculation.\nChange \u0060JP\u0060 to \u0060NA\u0060 in the URL if you are looking for NA constants.\nMapping of the damage formula to the API can be found\n[here](https://github.com/atlasacademy/fgo-game-data-docs/tree/master/battle):\n- [Attribute Affinity](/export/JP/NiceAttributeRelation.json)\n- [Class Attack Rate](/export/JP/NiceClassAttackRate.json)\n- [Class Affinity](/export/JP/NiceClassRelation.json)\n- [Card Details](/export/JP/NiceCard.json)\n- [Constants](/export/JP/NiceConstant.json)\n- [Buff Action info](/export/JP/NiceBuffList.ActionList.json)\n- [Master Level info](/export/JP/NiceUserLevel.json)\n- [Palingenesis QP cost](/export/JP/NiceSvtGrailCost.json)\n",
"baseUrl": "https://api.atlasacademy.io/",
"properties": [
{
"type": "X-openapi",
"url": "https://api.atlasacademy.io/openapi.json"
}
]
},
{
"name": "Para\u015F\u00FCt - API V4",
"description": "# G\u0130R\u0130\u015E\n\n## API Hakk\u0131nda\n\nPara\u015F\u00FCt API\u0027yi kullanmak veya g\u00F6r\u00FC\u015Flerinizi bizimle payla\u015Fmak isterseniz l\u00FCtfen bizimle [email protected] adresi \u00FCzerinden ileti\u015Fime ge\u00E7iniz.\n\nAPI\u0027yi kullanarak Para\u015F\u00FCt verilerine ula\u015Fabilir ve kendi yazd\u0131\u011F\u0131n\u0131z uygulamalar ile entegre edebilirsiniz. API vas\u0131tas\u0131yla Para\u015F\u00FCt Web aray\u00FCz\u00FC ile yap\u0131lan hemen her i\u015Flemi ger\u00E7ekle\u015Ftirebilirsiniz.\n\n\n- API geli\u015Ftirmesinde \u00E7o\u011Funlukla JSONAPI (http://jsonapi.org/) standartlar\u0131na uymaya \u00E7al\u0131\u015Ft\u0131k.\n\n- D\u00F6k\u00FCmantasyon olu\u015Fturulmas\u0131nda ise OpenAPI-Swagger 2.0 kulland\u0131k.\n\n- API hizmetimizin \u0060BASE_URL\u0060i \u0060https://api.parasut.com\u0060 \u015Feklindedir.\n\n- V4 endpointlerine ula\u015Fmak i\u00E7in \u0060https://api.parasut.com/v4\u0060 \u015Feklinde kullanabilirsiniz.\n\n## Genel Bilgiler\n\n- API metodlar\u0131na eri\u015Fmek i\u00E7in baz URL olarak \u0060https://api.parasut.com/v4/firma_no\u0060 adresi kullan\u0131l\u0131r.\n - Bu yap\u0131da kullan\u0131lan \u0060firma_no\u0060 parametresi bilgisine eri\u015Filmek istenin firman\u0131n Para\u015F\u00FCt veritaban\u0131ndaki kay\u0131t numaras\u0131d\u0131r.\n - \u00D6rne\u011Fin 115 numaral\u0131 firman\u0131n m\u00FC\u015Fteri/tedarik\u00E7i listesine eri\u015Fmek i\u00E7in \u0060https://api.parasut.com/v4/115/contacts\u0060 adresi kullan\u0131l\u0131r.\n- \u0130stekleri g\u00F6nderirken \u0060Content-Type\u0060 header\u0027\u0131 olarak \u0060application/json\u0060 veya \u0060application/vnd.api\u002Bjson\u0060 g\u00F6ndermelisiniz.\n- Yeni bir kay\u0131t olu\u015Ftururken **ilgili** kayd\u0131n \u0060ID\u0060 parametresini bo\u015F g\u00F6ndermeli veya hi\u00E7 g\u00F6ndermemelisiniz.\n - \u00D6rnek: Sat\u0131\u015F faturas\u0131 olu\u015Ftururken \u0060data-\u003Eid\u0060 bo\u015F olmal\u0131, ama \u0060relationships-\u003Econtact-\u003Edata-\u003Eid\u0060 dolu olmal\u0131, \u00E7\u00FCnk\u00FC g\u00F6nderdi\u011Finiz m\u00FC\u015Fterinizin ID\u0027si daha \u00F6nceden elinizde bulunmal\u0131d\u0131r. Ayn\u0131 \u015Fekilde \u0060relationships-\u003Edetails-\u003Edata\u0060 i\u00E7erisinde tan\u0131mlad\u0131\u011F\u0131n\u0131z ID\u0027ler de bo\u015F olmal\u0131, \u00E7\u00FCnk\u00FC hen\u00FCz fatura kalemi yaratmad\u0131n\u0131z.\n- API endpointlerine ula\u015Fmak i\u00E7in, ald\u0131\u011F\u0131n\u0131z \u0060access_token\u0060\u0027\u0131 sorgulara \u0060Authorization\u0060 header\u0027\u0131 olarak \u0060Bearer access_token\u0060 \u015Feklinde g\u00F6ndermelisiniz.\n- Dakikada 60 adet istek g\u00F6nderebilirsiniz.\n\n# Authentication\n\n\u003C!-- ReDoc-Inject: \u003Csecurity-definitions\u003E --\u003E\n\nPara\u015F\u00FCt API kimlik do\u011Frulama i\u00E7in oAuth2 kullanmaktad\u0131r. Bu protokol\u00FC destekleyen istemci k\u00FCt\u00FCphanelerini kullanarak oturum a\u00E7abilir ve API\u0027yi kullanabilirsiniz.\n\nGerekli CLIENT_ID, CLIENT_SECRET ve REDIRECT_URL bilgilerini almak i\u00E7in [email protected] adresine mail atabilirsiniz.\n\nKimlik do\u011Frulama i\u015Fleminin ba\u015Far\u0131l\u0131 olmas\u0131 durumunda bir adet kimlik jetonu (authentication token) ve bir adet de yenileme jetonu (refresh token) g\u00F6nderilecektir. Kimlik jetonu 2 saat s\u00FCreyle ge\u00E7erlidir ve her istekte http ba\u015Fl\u0131k bilgilerinin i\u00E7erisinde g\u00F6nderilmelidir. Bu s\u00FCrenin sonunda kimlik jetonu ge\u00E7erlili\u011Fini yitirecektir ve yenileme jetonu kullan\u0131larak tekrar \u00FCretilmesi gerekmektedir.\n\n## access_token almak:\n\naccess_token alman\u0131z i\u00E7in iki farkl\u0131 se\u00E7enek bulunmaktad\u0131r.\n\nKullan\u0131m \u015Feklinize ba\u011Fl\u0131 olarak iki y\u00F6ntemden birini tercih etmelisiniz.\n\n### 1. grant_type=authorization_code\n\nBu y\u00F6ntemi kullanabilmek i\u00E7in \u00F6ncelikle a\u015Fa\u011F\u0131da belirtildi\u011Fi gibi kullan\u0131c\u0131y\u0131 ba\u015Far\u0131l\u0131 authentication i\u015Fleminin ard\u0131ndan y\u00F6nlendirmek istedi\u011Finiz \u0060REDIRECT_URL\u0060\u0027i bize ula\u015Farak kay\u0131t ettirmeniz gerekmektedir. \u0060REDIRECT_URL\u0060 varsay\u0131lan olarak \u0060urn:ietf:wg:oauth:2.0:oob\u0060 gelmektedir.\n\nSize \u00F6zel bir REDIRECT_URL tan\u0131mlamak isterseniz [email protected] adresine mail atabilirsiniz.\n\n1. Kullan\u0131c\u0131y\u0131 \u015Fu adrese y\u00F6nlendirin:\n\n \u0060\u0060\u0060\n BASE_URL/oauth/authorize?client_id=CLIENT_ID\u0026redirect_uri=REDIRECT_URL\u0026response_type=code\n \u0060\u0060\u0060\n\n2. Oturum a\u00E7m\u0131\u015Fsa ve uygulamay\u0131 kabul ederse, kullan\u0131c\u0131 sizin tan\u0131mlad\u0131\u011F\u0131n\u0131z REDIRECT_URL\u0027e \u015Fu \u015Fekilde gelmesi gerekiyor:\n \u0060REDIRECT_URL?code=xxxxxxx\u0060\n\n3. Burada size gelen \u0022code\u0022 parametresi ile access token almal\u0131s\u0131n\u0131z.\n\n\u0060\u0060\u0060bash\ncurl -F grant_type=authorization_code \\\n-F client_id=CLIENT_ID \\\n-F client_secret=CLIENT_SECRET \\\n-F code=RETURNED_CODE \\\n-F redirect_uri=REDIRECT_URL \\\n-X POST BASE_URL/oauth/token\n\u0060\u0060\u0060\n\n### 2. grant_type=password\n\nE-posta ve \u015Fifre ile access_token alman\u0131z i\u00E7in a\u015Fa\u011F\u0131daki istekte size \u00F6zel alanlar\u0131 doldurarak POST iste\u011Fi atman\u0131z gerekmektedir.\n\n\u0060\u0060\u0060bash\ncurl -F grant_type=password \\\n-F client_id=CLIENT_ID \\\n-F client_secret=CLIENT_SECRET \\\n-F username=YOUREMAIL \\\n-F password=YOURPASSWORD \\\n-F redirect_uri=urn:ietf:wg:oauth:2.0:oob \\\n-X POST BASE_URL/oauth/token\n\u0060\u0060\u0060\n\n### Sonu\u00E7\n\nHer iki y\u00F6ntem sonucunda size a\u015Fa\u011F\u0131daki gibi bir sonu\u00E7 d\u00F6necektir:\n\n\u0060\u0060\u0060json\n{\n \u0022access_token\u0022: \u0022XYZXYZXYZ\u0022,\n \u0022token_type\u0022: \u0022bearer\u0022,\n \u0022expires_in\u0022: 7200,\n \u0022refresh_token\u0022: \u0022ABCABCABC\u0022\n}\n\u0060\u0060\u0060\n\nBurada d\u00F6nen \u0060access_token\u0060\u0027\u0131 API endpointlerine ula\u015Fmak i\u00E7in g\u00F6nderdi\u011Finiz sorgulara \u0060Authorization\u0060 header\u0027\u0131 olarak \u0060Bearer XYZXYZXYZ\u0060 \u015Feklinde eklemeniz gerekiyor.\n\n\n#### Refresh token ile yeni access_token alma \u00F6rne\u011Fi:\n\n\u0060access_token\u0060 ge\u00E7erlili\u011Fini 2 saat i\u00E7erisinde yitirdi\u011Fi i\u00E7in \u0060refresh_token\u0060 ile yeni token alabilirsiniz.\n\n\u0060\u0060\u0060bash\ncurl -F grant_type=refresh_token \\\n-F client_id=CLIENT_ID \\\n-F client_secret=CLIENT_SECRET \\\n-F refresh_token=REFRESH_TOKEN \\\n-X POST BASE_URL/oauth/token\n\u0060\u0060\u0060\n\n\u0060refresh_token\u0060 ile yeni bir \u0060access_token\u0060 al\u0131rken ayn\u0131 zamanda yeni bir \u0060refresh_token\u0060 da almaktas\u0131n\u0131z. Dolay\u0131s\u0131yla, daha sonra yeniden bir \u0060access_token\u0060 alma iste\u011Finizde size d\u00F6nen yeni \u0060refresh_token\u0060\u0131 kullanmal\u0131s\u0131n\u0131z.\n\n# SIK KULLANILAN \u0130\u015ELEMLER\n\n## Kullan\u0131c\u0131 Bilgisi\n\n\u0060access_token\u0060 ald\u0131\u011F\u0131n\u0131z kullan\u0131c\u0131n\u0131n genel bilgilerini g\u00F6rmek i\u00E7in [/me](/#operation/showMe) adresini kullanabilirsiniz.\n\n## Sat\u0131\u015F Faturas\u0131 Olu\u015Fturma\n\nSat\u0131\u015F faturas\u0131 olu\u015Fturmak i\u00E7in bir m\u00FC\u015Fteri (\u0060contact\u0060) \u0060id\u0060\u0027si ve bir veya birden fazla \u00FCr\u00FCn (\u0060product\u0060) \u0060id\u0060\u0027sine ihtiyac\u0131n\u0131z vard\u0131r.\n\n### M\u00FC\u015Fteri\n\n##### Yeni bir m\u00FC\u015Fteri ile\n\nE\u011Fer ihtiya\u00E7 duydu\u011Funuz m\u00FC\u015Fteri bilgisi hen\u00FCz yoksa, \u00F6ncelikle m\u00FC\u015Fteri olu\u015Fturman\u0131z gereklidir. Bunun i\u00E7in [M\u00FC\u015Fteri olu\u015Fturma](/#operation/createContact) endpoint\u0027ini kullanmal\u0131s\u0131n\u0131z. Ba\u015Far\u0131l\u0131 bir \u015Fekilde m\u00FC\u015Fteri olu\u015Fturulursa size d\u00F6necek olan yan\u0131t ihtiya\u00E7 duyaca\u011F\u0131n\u0131z m\u00FC\u015Fteri \u0060id\u0060\u0027sini i\u00E7erir.\n\n##### Mevcut bir m\u00FC\u015Fteri ile\n\nE\u011Fer daha \u00F6nceden zaten olu\u015Fturdu\u011Funuz bir m\u00FC\u015Fteri ile ili\u015Fkili bir sat\u0131\u015F faturas\u0131 olu\u015Fturacaksan\u0131z \u00F6ncelikle o m\u00FC\u015Fterinin \u0060id\u0060\u0027sini \u00F6\u011Frenmeniz gerekir. Bunun i\u00E7in [M\u00FC\u015Fteri listesi](/#operation/listContacts) endpoint\u0027ini kullanabilirsiniz. M\u00FC\u015Fteri listesi endpoint\u0027i isim, e-posta, vergi numaras\u0131 gibi \u00E7e\u015Fitli filtreleri destekler. Bunlar\u0131 kullanarak arad\u0131\u011F\u0131n\u0131z m\u00FC\u015Fteriyi bulabilirsiniz.\n\n### \u00DCr\u00FCn\n\n##### Yeni bir \u00FCr\u00FCn ile\n\nE\u011Fer ihtiya\u00E7 duydu\u011Funuz \u00FCr\u00FCn bilgisi hen\u00FCz yoksa, \u00F6ncelikle \u00FCr\u00FCn olu\u015Fturman\u0131z gereklidir. Bunun i\u00E7in [\u00DCr\u00FCn olu\u015Fturma](/#operation/createProduct) endpoint\u0027ini kullanmal\u0131s\u0131n\u0131z. Ba\u015Far\u0131l\u0131 bir \u015Fekilde \u00FCr\u00FCn olu\u015Fturulursa size d\u00F6necek olan yan\u0131t ihtiya\u00E7 duyaca\u011F\u0131n\u0131z \u00FCr\u00FCn \u0060id\u0060\u0027sini i\u00E7erir.\n\n##### Mevcut bir \u00FCr\u00FCn ile\n\nE\u011Fer daha \u00F6nceden olu\u015Fturdu\u011Funuz bir \u00FCr\u00FCn\u00FC kullanarak bir sat\u0131\u015F faturas\u0131 olu\u015Fturacaksan\u0131z \u00F6ncelikle o \u00FCr\u00FCn\u00FCn \u0060id\u0060\u0027sini \u00F6\u011Frenmeniz gerekir. Bunun i\u00E7in [\u00DCr\u00FCn listesi](/#operation/listProducts) endpoint\u0027ini kullanabilirsiniz. \u00DCr\u00FCn listesi endpoint\u0027i isim, kod gibi \u00E7e\u015Fitli filtreleri destekler. Bunlar\u0131 kullanarak arad\u0131\u011F\u0131n\u0131z \u00FCr\u00FCn\u00FC bulabilirsiniz.\n\n---\n\n\u0130htiya\u00E7 duydu\u011Funuz m\u00FC\u015Fteri ve \u00FCr\u00FCn \u0060id\u0060\u0027lerini ald\u0131ktan sonra [Sat\u0131\u015F Faturas\u0131 Olu\u015Fturma](/#operation/createSalesInvoice) endpoint\u0027i ile sat\u0131\u015F faturas\u0131 olu\u015Fturabilirsiniz. Endpoint\u0027in tan\u0131m\u0131nda sa\u011F tarafta bekledi\u011Fimiz veri \u015Fekli bulunmaktad\u0131r, a\u015Fa\u011F\u0131daki bilgileri verinin \u015Fekli ile k\u0131yaslamak daha a\u00E7\u0131klay\u0131c\u0131 olabilir.\n\nDikkat edilecek noktalar:\n* \u0060relationships\u0060 alt\u0131ndaki \u0060contact\u0060\u0027te bulunan \u0060id\u0060 alan\u0131na m\u00FC\u015Fteri \u0060id\u0060\u0027sini girmeniz gereklidir.\n* \u0060relationships\u0060 alt\u0131ndaki \u0060details\u0060 k\u0131sm\u0131 bir listedir (\u0060array\u0060) ve fatura kalemlerini temsil eder. Bu listenin her eleman\u0131n\u0131n ili\u015Fkili oldu\u011Fu bir \u00FCr\u00FCn vard\u0131r. Yani \u0060details\u0060 alt\u0131ndaki her eleman\u0131n kendine ait bir \u0060relationships\u0060 k\u0131sm\u0131 mevcuttur. Buradaki \u0060product\u0060 \u0060id\u0060 alan\u0131 \u00FCstteki \u00FCr\u00FCn ad\u0131mlar\u0131nda elde etti\u011Finiz \u0060id\u0060\u0027yi koyman\u0131z gereken yerdir.\n\n## Sat\u0131\u015F Faturas\u0131na Tahsilat Ekleme\n\n[Tahsilat ekleme](/#operation/paySalesInvoice) k\u0131sm\u0131ndaki ilgili alanlar\u0131 doldurarak sat\u0131\u015F faturas\u0131na tahsilat ekleyebilirsiniz.\n\n## Sat\u0131\u015F Faturas\u0131n\u0131n Tahsilat\u0131n\u0131 Silme\n\nBir sat\u0131\u015F faturas\u0131n\u0131n tahsilat\u0131n\u0131 silmek asl\u0131nda o tahsilat\u0131 olu\u015Fturan para ak\u0131\u015F i\u015Flemini silmek demektir. Bir i\u015Flemi silmeden \u00F6nce o i\u015Flemin \u0060id\u0060\u0027sine ihtiyac\u0131n\u0131z vard\u0131r.\n\nBir sat\u0131\u015F faturas\u0131na ait tahsilatlar\u0131 almak i\u00E7in [Sat\u0131\u015F faturas\u0131 bilgilerini alma (show)](/#operation/showSalesInvoice) endpoint\u0027ine istek atarken \u0060?include=payments\u0060 parametresini de eklemelisiniz. Bu size sat\u0131\u015F faturas\u0131 bilgilerine ilave olarak tahsilatlar\u0131 da verir.\n\nTahsilatlar ile birlikte o tahsilatlar\u0131 olu\u015Fturan i\u015Flemleri de almak i\u00E7in yine ayn\u0131 endpoint\u0027e \u0060?include=payments.transaction\u0060 parametresini ekleyerek istek yapman\u0131z gerekir. Bu size hem sat\u0131\u015F faturas\u0131 bilgilerini, hem tahsilat bilgilerini hem de tahsilat\u0131 olu\u015Fturan i\u015Flemlerin bilgilerini verir.\n\n\u0060?include=payments.transaction\u0060 parametresini kullanarak yapt\u0131\u011F\u0131n\u0131z istek ile i\u015Flem (\u0060transaction\u0060) \u0060id\u0060\u0027sini ald\u0131ktan sonra [i\u015Flem silme](/#operation/deleteTransaction) endpoint\u0027inde bu \u0060id\u0060\u0027yi kullanarak silme i\u015Flemini yapabilirsiniz.\n\n## Sat\u0131\u015F Faturas\u0131 Resmile\u015Ftirme\n\nOlu\u015Fturdu\u011Funuz bir sat\u0131\u015F faturas\u0131 varsa onu e-Ar\u015Fiv veya e-Fatura olarak resmile\u015Ftirmek i\u00E7in a\u015Fa\u011F\u0131dakileri yapman\u0131z gereklidir.\n\n1. \u00D6ncelikle m\u00FC\u015Fterinizin e-Fatura kullan\u0131c\u0131s\u0131 olup olmad\u0131\u011F\u0131n\u0131 \u00F6\u011Frenmelisiniz. Bunun i\u00E7in m\u00FC\u015Fterinizin e-Fatura gelen kutusu olup olmad\u0131\u011F\u0131na bakmak gereklidir. [e-Fatura gelen kutusu](/#operation/listEInvoiceInboxes) endpoint\u0027ine m\u00FC\u015Fterinin vkn\u0027sini kullanarak bir istek yapt\u0131\u011F\u0131n\u0131zda e\u011Fer bir gelen kutusu oldu\u011Funa dair yan\u0131t al\u0131yorsan\u0131z m\u00FC\u015Fteri e-Fatura kullan\u0131c\u0131s\u0131d\u0131r. M\u00FC\u015Fteri e-Fatura kullan\u0131c\u0131s\u0131 ise resmile\u015Ftirme i\u00E7in e-Fatura olu\u015Fturmak, e-Fatura kullan\u0131c\u0131s\u0131 de\u011Filse e-Ar\u015Fiv olu\u015Fturmak gereklidir. \u0130hracat Faturalar\u0131 her zaman e-Fatura olarak resmile\u015Ftirilmelidir.\n\nOlu\u015Fturdu\u011Funuz e-Fatura, e-Ar\u015Fiv ve e-Smm\u2019nin d\u00FCzenleme tarihi e-Fatura/e-Smm\u2019ye ge\u00E7i\u015F sa\u011Flad\u0131\u011F\u0131n\u0131z aktivasyon tarihinden sonra olmal\u0131d\u0131r. Ayn\u0131 zamanda olu\u015Fturdu\u011Funuz e-Fatura\u2019n\u0131n d\u00FCzenleme tarihi al\u0131c\u0131n\u0131n etiketi kullanmaya ba\u015Flad\u0131\u011F\u0131 tarihten de \u00F6nce olamaz. Al\u0131c\u0131n\u0131n etiketi kullanmaya ba\u015Flad\u0131\u011F\u0131 tarihi e-Fatura gelen kutusunu \u00E7ekerek g\u00F6r\u00FCnt\u00FCleyebilirsiniz.\n\n2. e-Fatura / e-Ar\u015Fiv / e-Smm olu\u015Fturma:\n * \u00D6nceki ad\u0131mda m\u00FC\u015Fterinin e-Fatura kullan\u0131c\u0131s\u0131 oldu\u011Fu \u00F6\u011Frenildiyse, [e-Fatura olu\u015Fturma endpoint\u0027i](/#operation/createEInvoice) kullan\u0131larak e-Fatura olu\u015Fturmak gereklidir.\n * \u00D6nceki ad\u0131mda m\u00FC\u015Fterinin e-Ar\u015Fiv kullan\u0131c\u0131s\u0131 oldu\u011Fu \u00F6\u011Frenildiyse, [e-Ar\u015Fiv olu\u015Fturma endpoint\u0027i](/#operation/createEArchive) kullan\u0131larak e-Ar\u015Fiv olu\u015Fturmak gereklidir.\n * E\u011Fer makbuz kullan\u0131c\u0131s\u0131 iseniz, [e-Smm olu\u015Fturma endpoint\u0027ini](/#operation/createESmm) kullanarak e-Smm olu\u015Fturman\u0131z gereklidir.\n\n e-Fatura / e-Ar\u015Fiv / e-Smm olu\u015Fturma i\u015Flemi synchronous de\u011Fildir. Yani istek arka planda yerine getirilir. Bu y\u00FCzden e-Fatura / e-Ar\u015Fiv / e-Smm olu\u015Fturma endpoint\u0027leri cevap olarak olu\u015Fturma i\u015Fleminin durumunu takip edebilece\u011Finiz bir i\u015Flem \u0060id\u0060\u0027si d\u00F6ner. Bu i\u015Flem \u0060id\u0060\u0027sini [sorgulama](/#tag/TrackableJobs) endpoint\u0027inde belirli aral\u0131klarla(\u0060id\u0060\u0027nin kullan\u0131m s\u00FCresi olu\u015Fturulduktan sonra 15 dakikad\u0131r) kullan\u0131p olu\u015Fturma i\u015Fleminin durumunu takip etmeniz gerekmektedir. \u0130\u015Flem durumu ile ilgili a\u015Fa\u011F\u0131daki yan\u0131tlar\u0131 alabilirsiniz:\n * \u0060status: \u0022pending\u0022\u0060 i\u015Flemin s\u0131rada oldu\u011Funu, hen\u00FCz ba\u015Flamad\u0131\u011F\u0131n\u0131 g\u00F6sterir.\n * \u0060status: \u0022running\u0022\u0060 i\u015Flemin yap\u0131lmakta oldu\u011Funu ancak hen\u00FCz sonu\u00E7lanmad\u0131\u011F\u0131n\u0131 g\u00F6sterir.\n * \u0060status: \u0022error\u0022\u0060 i\u015Flemde bir hata oldu\u011Fu anlam\u0131na gelir. D\u00F6nen yan\u0131tta hata mesaj\u0131n\u0131 inceleyebilirsiniz.\n * \u0060status: \u0022done\u0022\u0060 i\u015Flemin ba\u015Far\u0131l\u0131 bir \u015Fekilde sonu\u00E7land\u0131\u011F\u0131n\u0131 g\u00F6sterir.\n3. e-Fatura / e-Ar\u015Fiv / e-Smm i\u015Fleminin ba\u015Far\u0131l\u0131 bir \u015Fekilde sonu\u00E7land\u0131\u011F\u0131n\u0131 g\u00F6rd\u00FCkten sonra e-Fatura / e-Ar\u015Fiv / e-Smm bilgilerini almak i\u00E7in [Sat\u0131\u015F faturas\u0131 bilgilerini alma (show)](/#operation/showSalesInvoice) endpoint\u0027ine \u0060?include=active_e_document\u0060 parametresi ile istek yapman\u0131z gerekmektedir. Buradan s\u0131radaki ad\u0131mda ihtiya\u00E7 duyaca\u011F\u0131n\u0131z e-Fatura / e-Ar\u015Fiv / e-Smm \u0060id\u0060\u0027lerini ve ba\u015Fka bilgileri de alabilirsiniz.\n4. e-Fatura / e-Ar\u015Fiv / e-Smm ba\u015Far\u0131yla resmile\u015Ftirildikten sonra m\u00FC\u015Fterilerinize PDF olarak g\u00F6ndermek isteyebilirsiniz. Bunun i\u00E7in:\n * e-Ar\u015Fiv i\u00E7in, 4. ad\u0131mda elde edece\u011Finiz e-Ar\u015Fiv \u0060id\u0060\u0027sini kullanarak [e-Ar\u015Fiv PDF](/#operation/showEArchivePdf) endpoint\u0027ine istek atabilirsiniz. Bu endpoint PDF hen\u00FCz yoksa bo\u015F bir yan\u0131t ile birlikte 204 d\u00F6ner. Yani 204 almayana kadar belirli aral\u0131klarla bu endpoint\u0027e istek yapman\u0131z gerekmektedir. Ge\u00E7erli yan\u0131t ald\u0131\u011F\u0131n\u0131zda size d\u00F6necek olan PDF URL 1 saat i\u00E7in ge\u00E7erlidir. Bu y\u00FCzden bu linki direk olarak m\u00FC\u015Fterinizle **payla\u015Fmamal\u0131s\u0131n\u0131z**. \u0130ndirip m\u00FC\u015Fterinize kendiniz g\u00F6ndermelisiniz.\n * e-Ar\u015Fiv i\u00E7in anlat\u0131lan senaryonun ayn\u0131s\u0131 e-Fatura i\u00E7in de ge\u00E7erlidir. Tek farkl\u0131 k\u0131s\u0131m iste\u011Fi yapaca\u011F\u0131n\u0131z endpoint\u0027tir: [e-Fatura PDF](/#operation/showEInvoicePdf)\n * e-Ar\u015Fiv i\u00E7in anlat\u0131lan senaryonun ayn\u0131s\u0131 e-Smm i\u00E7in de ge\u00E7erlidir. Tek farkl\u0131 k\u0131s\u0131m iste\u011Fi yapaca\u011F\u0131n\u0131z endpoint\u0027tir: [e-Smm PDF](/#operation/showESmmPdf)\n\n## Belirli Firmalar \u0130\u00E7in \u00D6zel Gereksinimler\n\nE\u011Fer \u00F6zel gereksinim duyan bir firmaya e-fatura kesiyorsan\u0131z, bu k\u0131sm\u0131 detayl\u0131 bir \u015Fekilde g\u00F6zden ge\u00E7iriniz. A\u015Fa\u011F\u0131da destekledi\u011Fimiz \u00F6zel firmalar\u0131n kendi ihtiya\u00E7lar\u0131na g\u00F6re olu\u015Fturdu\u011Fumuz alanlar\u0131 g\u00F6rebilirsiniz.\n\n### SGK i\u00E7in gerekli \u00F6zel alanlar\n\nSGK\u0027ya fatura kesebilmek i\u00E7in a\u015Fa\u011F\u0131daki json\u0027u inceleyebilirsiniz. \n\n\u0060\u0060\u0060 json\ncustom_requirement_params: {\n integration: { \n data: { \n additional_invoice_type: \u0027SAGLIK_ECZ\u0027,\n tax_payer_code: \u0027xx\u0027,\n tax_payer_name: \u0027xx\u0027,\n file_number: \u0027xx\u0027,\n term_start_date: \u00272021-01-02\u0027,\n term_end_date: \u00272021-01-04\u0027\n }\n }\n}\n\u0060\u0060\u0060\n\nBuradaki data\u0027n\u0131n i\u00E7indeki alanlar\u0131n anlamlar\u0131:\n\n- \u0060additional_invoice_type\u0060: ilave fatura tipi\n- \u0060tax_payer_code\u0060: m\u00FCkellef kodu\n- \u0060tax_payer_name\u0060: m\u00FCkellef ad\u0131\n- \u0060file_number\u0060: dosya numaras\u0131\n- \u0060term_start_date\u0060: d\u00F6nem ba\u015Flang\u0131\u00E7\n- \u0060term_end_date\u0060: d\u00F6nem biti\u015F\n\nEk olarak \u0060additional_invoice_type\u0060 a\u015Fa\u011F\u0131daki de\u011Ferlerden biri olmal\u0131d\u0131r.\n\nAvailable: *SAGLIK_ECZ, SAGLIK_HAS, SAGLIK_OPT, SAGLIK_MED, ABONELIK, MAL_HIZMET, DIGER*\n\n## \u0130rsaliye Olu\u015Fturma\n\n\u0130rsaliye olu\u015Fturmak i\u00E7in bir m\u00FC\u015Fteri/tedarik\u00E7i (\u0060contact\u0060) \u0060id\u0060\u0027si ve bir veya birden fazla \u00FCr\u00FCn (\u0060product\u0060) \u0060id\u0060\u0027sine ihtiyac\u0131n\u0131z vard\u0131r.\n\n### M\u00FC\u015Fteri/Tedarik\u00E7i\n\n##### Yeni bir m\u00FC\u015Fteri/tedarik\u00E7i ile\n\nE\u011Fer ihtiya\u00E7 duydu\u011Funuz m\u00FC\u015Fteri/tedarik\u00E7i bilgisi hen\u00FCz yoksa, \u00F6ncelikle m\u00FC\u015Fteri/tedarik\u00E7i olu\u015Fturman\u0131z gereklidir. Bunun i\u00E7in [M\u00FC\u015Fteri/Tedarik\u00E7i olu\u015Fturma](/#operation/createContact) endpoint\u0027ini kullanmal\u0131s\u0131n\u0131z. Ba\u015Far\u0131l\u0131 bir \u015Fekilde m\u00FC\u015Fteri/tedarik\u00E7i olu\u015Fturulursa size d\u00F6necek olan yan\u0131t ihtiya\u00E7 duyaca\u011F\u0131n\u0131z m\u00FC\u015Fteri/tedarik\u00E7i \u0060id\u0060\u0027sini i\u00E7erir.\n\n##### Mevcut bir m\u00FC\u015Fteri/tedarik\u00E7i ile\n\nE\u011Fer daha \u00F6nceden zaten olu\u015Fturdu\u011Funuz bir m\u00FC\u015Fteri/tedarik\u00E7i ile ili\u015Fkili bir irsaliye olu\u015Fturacaksan\u0131z \u00F6ncelikle o m\u00FC\u015Fteri/tedarik\u00E7inin \u0060id\u0060\u0027sini \u00F6\u011Frenmeniz gerekir. Bunun i\u00E7in [M\u00FC\u015Fteri/tedarik\u00E7i listesi](/#operation/listContacts) endpoint\u0027ini kullanabilirsiniz. M\u00FC\u015Fteri/tedarik\u00E7i listesi endpoint\u0027i isim, e-posta, vergi numaras\u0131 gibi \u00E7e\u015Fitli filtreleri destekler. Bunlar\u0131 kullanarak arad\u0131\u011F\u0131n\u0131z m\u00FC\u015Fteri/tedarik\u00E7iyi bulabilirsiniz.\n\n### \u00DCr\u00FCn\n\n##### Yeni bir \u00FCr\u00FCn ile\n\nE\u011Fer ihtiya\u00E7 duydu\u011Funuz \u00FCr\u00FCn bilgisi hen\u00FCz yoksa, \u00F6ncelikle \u00FCr\u00FCn olu\u015Fturman\u0131z gereklidir. Bunun i\u00E7in [\u00DCr\u00FCn olu\u015Fturma](/#operation/createProduct) endpoint\u0027ini kullanmal\u0131s\u0131n\u0131z. Ba\u015Far\u0131l\u0131 bir \u015Fekilde \u00FCr\u00FCn olu\u015Fturulursa size d\u00F6necek olan yan\u0131t ihtiya\u00E7 duyaca\u011F\u0131n\u0131z \u00FCr\u00FCn \u0060id\u0060\u0027sini i\u00E7erir.\n\n##### Mevcut bir \u00FCr\u00FCn ile\n\nE\u011Fer daha \u00F6nceden olu\u015Fturdu\u011Funuz bir \u00FCr\u00FCn\u00FC kullanarak bir irsaliye olu\u015Fturacaksan\u0131z \u00F6ncelikle o \u00FCr\u00FCn\u00FCn \u0060id\u0060\u0027sini \u00F6\u011Frenmeniz gerekir. Bunun i\u00E7in [\u00DCr\u00FCn listesi](/#operation/listProducts) endpoint\u0027ini kullanabilirsiniz. \u00DCr\u00FCn listesi endpoint\u0027i isim, kod gibi \u00E7e\u015Fitli filtreleri destekler. Bunlar\u0131 kullanarak arad\u0131\u011F\u0131n\u0131z \u00FCr\u00FCn\u00FC bulabilirsiniz.\n\n---\n\n\u0130htiya\u00E7 duydu\u011Funuz m\u00FC\u015Fteri/tedarik\u00E7i ve \u00FCr\u00FCn \u0060id\u0060\u0027lerini ald\u0131ktan sonra [\u0130rsaliye Olu\u015Fturma](/#operation/createShipmentDocument) endpoint\u0027i ile irsaliye olu\u015Fturabilirsiniz. Endpoint\u0027in tan\u0131m\u0131nda sa\u011F tarafta bekledi\u011Fimiz veri \u015Fekli bulunmaktad\u0131r, a\u015Fa\u011F\u0131daki bilgileri verinin \u015Fekli ile k\u0131yaslamak daha a\u00E7\u0131klay\u0131c\u0131 olabilir.\n\nDikkat edilecek noktalar:\n* \u0060relationships\u0060 alt\u0131ndaki \u0060contact\u0060\u0027te bulunan \u0060id\u0060 alan\u0131na m\u00FC\u015Fteri/tedarik\u00E7i \u0060id\u0060\u0027sini girmeniz gereklidir.\n* \u0060relationships\u0060 alt\u0131ndaki \u0060stock_movements\u0060 k\u0131sm\u0131 bir listedir (\u0060array\u0060) ve irsaliye kalemlerini temsil eder. Bu listenin her eleman\u0131n\u0131n ili\u015Fkili oldu\u011Fu bir \u00FCr\u00FCn vard\u0131r. Yani \u0060stock_movements\u0060 alt\u0131ndaki her eleman\u0131n kendine ait bir \u0060relationships\u0060 k\u0131sm\u0131 mevcuttur. Buradaki \u0060product\u0060 \u0060id\u0060 alan\u0131 \u00FCstteki \u00FCr\u00FCn ad\u0131mlar\u0131nda elde etti\u011Finiz \u0060id\u0060\u0027yi koyman\u0131z gereken yerdir.\n",
"baseUrl": "https://api.parasut.com/v4",
"properties": [
{
"type": "X-openapi",
"url": "https://apidocs.parasut.com/swagger.json"
}
]
},
{
"name": "\u81FA\u7063\u8B49\u5238\u4EA4\u6613\u6240 OpenAPI",
"description": "\u672C\u5E73\u81FA\u63D0\u4F9B\u81FA\u7063\u8B49\u5238\u4EA4\u6613\u6240\u670D\u52D9API\uFF0C\u6B61\u8FCE\u5404\u4F4D\u4ECB\u63A5\u4F7F\u7528\u3002\u003Cbr\u003E\u003Cbr\u003E[\u4F7F\u7528\u689D\u6B3E](https://www.twse.com.tw/zh/page/terms/use.html)",
"baseUrl": "https://openapi.twse.com.tw/v1",
"properties": [
{
"type": "X-openapi",
"url": "https://openapi.twse.com.tw/v1/swagger.json"
}
]
},
{
"name": "ARTiTEX API",
"description": "The ARTiTEX API that is used for both the ARTiTEX Apps and the Web Management Application",
"baseUrl": "https://api.artitex.de/",
"properties": [
{
"type": "X-openapi",
"url": "https://artitex.de/assets/swagger.json"
}
],
"contact": [
{
"fn": "WAPP GmbH"
}
]
},
{
"name": "Consumer API Documentation",
"description": "Omny Studio\u2019s consumer APIs allows third-parties to integrate metadata about published content in custom players and content directories on a website or in a mobile app.\r\nOnly publicly-published content will be available in the consumer API. Hidden programs, private clips or private playlists will not be accessible.\r\nNote: the \u201Cconsumer API\u201D is a read-only API. To create, edit or delete content, the \u201C[management API](https://help.omnystudio.com/advanced-features-and-tips-and-tricks/developer-documentation/omny-studio-management-api)\u201D allows private administrative access to the organization.\r\n\r\n### Testing\r\nTo test the API, you can import the OpenAPI specification into API clients like [Postman](https://www.postman.com/downloads/) or [Insomia](https://insomnia.rest).\r\n\r\n### Analytics\r\nIf you\u0027d like to track the number of plays/downloads that are occurring from your custom players, you can [define and track custom sources](https://help.omnystudio.com/en/articles/4209306-tracking-downloads-from-custom-sources).\r\nIf you\u0027d like to track consumption data for plays on custom players, you can [send player events using the Omny Studio\u0027s consumption analytics API](https://help.omnystudio.com/en/articles/2435830-consumption-analytics-api-for-third-party-players-beta).\r\n\r\n### Caching\r\nResponses are cached up to 10 minutes. Updates to clip metadata may not be reflected until the cache is refreshed.\r\n\r\n### CORS\r\nFor optimal API performance, we recommend making \u0022simple requests\u0022 (i.e. do not specify any custom HTTP headers) to avoid triggering a CORS OPTIONS preflight request.\r\n\r\n### Rate limits\r\nThere are no practical rate limits to this API. However,\r\nour web application firewall Cloudflare may block traffic it deems to be malicious or harmful.\r\n\r\n### Disable preloading\r\nWe recommend third-party publishers who build custom players to disable preloading and auto-playing from their players to ensure only user-initiated playback will trigger a download.\r\n\r\n### Backwards compatible routes\r\nFor backwards compatibility, all consumer API endpoints also work with the prefix \u0060/api/\u0060, but we recommend using the newer documented routes that elide this now unnecessary prefix.",
"baseUrl": "https://api.omny.fm/",
"properties": [
{
"type": "X-openapi",
"url": "https://api.omny.fm/docs/consumer-api/swagger.json"
}
]
},
{
"name": "CheckLeaked.cc Api",
"description": "",
"baseUrl": "https://api.checkleaked.cc/api",
"properties": [
{
"type": "X-openapi",
"url": "https://checkleaked.cc/swagger/swagger.json?__WB_REVISION__=ddf74b0a067b63aa5129c580f79ee109"
}
]
},
{
"name": "GraphHopper Directions API",
"description": "\nWith the [GraphHopper Directions API](https://www.graphhopper.com/products/) you can integrate A-to-B route planning, turn-by-turn navigation,\nroute optimization, isochrone calculations and other tools in your application.\n\nThe GraphHopper Directions API consists of the following RESTful web services:\n\n * [Routing API](#tag/Routing-API),\n * [Route Optimization API](#tag/Route-Optimization-API),\n * [Isochrone API](#tag/Isochrone-API),\n * [Map Matching API](#tag/Map-Matching-API),\n * [Matrix API](#tag/Matrix-API),\n * [Geocoding API](#tag/Geocoding-API) and\n * [Cluster API](#tag/Cluster-API).\n\n# Explore our APIs\n\n## Get started\n\n1. [Sign up for GraphHopper](https://support.graphhopper.com/a/solutions/articles/44001976025)\n2. [Create an API key](https://support.graphhopper.com/a/solutions/articles/44001976027)\n\nEach API part has its own documentation. Jump to the desired API part and learn about the API through the given examples and tutorials.\n\nIn addition, for each API there are specific sample requests that you can send via Insomnia or Postman to see what the requests and responses look like.\n\n## Postman\n\nTo explore our APIs with [Postman](https://www.getpostman.com/), follow these steps:\n\n1. Import our [request collections](https://gist.githubusercontent.com/oblonski/4b6ad76ba473eba049ae13f6230ea06a/raw/9a0bdf6f36a19f094f2a72eb22a03abb65851c07/graphhopper_directions_api.postman_collection.json) as well as our [environment file](https://gist.githubusercontent.com/oblonski/809b91874c4c5d1fd8a7ff68efb5b351/raw/261f427cb9b9702508670b73b06dd5350d30f373/graphhopper_directions_api.postman_environment.json).\n2. Specify [your API key](https://graphhopper.com/dashboard/#/register) in your environment: \u0060\u0022api_key\u0022: your API key\u0060\n3. Start exploring\n\n\n\n## API Client Libraries\n\nTo speed up development and make coding easier, we offer the following client libraries:\n\n * [JavaScript client](https://github.com/graphhopper/directions-api-js-client) - try the [live examples](https://graphhopper.com/api/1/examples/)\n * [Others](https://github.com/graphhopper/directions-api-clients) like C#, Ruby, PHP, Python, ... automatically created for the Route Optimization API\n\n### Bandwidth reduction\n\nIf you create your own client, make sure it supports http/2 and gzipped responses for best speed.\n\nIf you use the Matrix, the Route Optimization API or the Cluster API and want to solve large problems, we recommend you to reduce bandwidth\nby [compressing your POST request](https://gist.github.com/karussell/82851e303ea7b3459b2dea01f18949f4)\nand specifying the header as follows: \u0060Content-Encoding: gzip\u0060. This will also avoid the HTTP 413 error \u0022Request Entity Too Large\u0022.\n\n## Contact Us\n\nIf you have problems or questions, please read the following information:\n\n- [FAQ](https://graphhopper.com/api/1/docs/FAQ/)\n- [Public forum](https://discuss.graphhopper.com/c/directions-api)\n- [Contact us](https://www.graphhopper.com/contact-form/)\n- [GraphHopper Status Page](https://status.graphhopper.com/)\n\nTo stay informed about the latest developments, you can\n\n- follow us on [twitter](https://twitter.com/graphhopper/),\n- read [our blog](https://graphhopper.com/blog/),\n- sign up for our newsletter or\n- [our forum](https://discuss.graphhopper.com/c/directions-api).\n\nSelect the channel you like the most.\n\n\n# Map Data and Routing Profiles\n\nCurrently, our main data source is [OpenStreetMap](https://www.openstreetmap.org). We also integrated other network data providers.\nThis chapter gives an overview about the options you have.\n\n## OpenStreetMap\n\n#### Geographical Coverage\n\n[OpenStreetMap](https://www.openstreetmap.org) covers the whole world. If you want to see for yourself if we can provide data suitable for your region,\nplease visit [GraphHopper Maps](https://graphhopper.com/maps/).\nYou can edit and modify OpenStreetMap data if you find that important information is missing, e.g. a weight limit for a bridge.\n[Here](https://wiki.openstreetmap.org/wiki/Beginners%27_guide) is a beginner\u0027s guide that shows how to add data. If you have edited data, we usually consider your data after 1 week at the latest.\n\n#### Supported Routing Profiles\n\nThe Routing, Matrix and Route Optimization APIs support the following profiles:\n\nName | Description | Restrictions | Icon\n-----------------|:----------------------|:------------------------------------|:---------------------------------------------------------\ncar | Car mode | car access, weight=2500kg, width=2m, height=2m | \ncar_delivery | Car mode | car access including delivery and private roads. Use only in case your drivers are allowed to access these roads. | \ncar_avoid_ferry | Car mode | car that heavily penalizes ferries | \ncar_avoid_motorway | Car mode | car that heavily penalizes motorways | \ncar_avoid_toll | Car mode | car that heavily penalizes tolls | \nsmall_truck | Small truck like a Mercedes Sprinter, Ford Transit or Iveco Daily | height=2.7m, width=2\u002B0.34m, length=5.5m, weight=2080\u002B1400 kg | \nsmall_truck_delivery | Small truck | Like small_truck but including delivery and private roads. Use only in case your drivers are allowed to access these roads. | \ntruck | Truck like a MAN or Mercedes-Benz Actros | height=3.7m, width=2.6\u002B0.34m, length=12m, weight=13000\u002B13000 kg, hgv=yes, 3 Axes | \nscooter | Moped mode | Fast inner city, often used for food delivery, is able to ignore certain bollards, maximum speed of roughly 50km/h. weight=300kg, width=1m, height=2m | \nscooter_delivery | Moped mode | Like scooter but including delivery and private roads. Use only in case your drivers are allowed to access these roads. |  \nfoot | Pedestrian or walking without dangerous [SAC-scales](https://wiki.openstreetmap.org/wiki/Key:sac_scale) | foot access | \nhike | Pedestrian or walking with priority for more beautiful hiking tours and potentially a bit longer than \u0060foot\u0060. Walking duration is influenced by elevation differences. | foot access | \nbike | Trekking bike avoiding hills | bike access | \nmtb | Mountainbike | bike access | \nracingbike | Bike preferring roads | bike access | \n\nPlease note:\n\n * the free package supports only the routing profiles \u0060car\u0060, \u0060bike\u0060 or \u0060foot\u0060\n * up to 2 different routing profiles can be used in a single request towards the Route Optimization API. The number of vehicles is unaffected and depends on your subscription.\n * we offer custom routing profiles with different properties, different speed profiles or different access options. To find out more about custom profiles, please [contact us](https://www.graphhopper.com/contact-form/).\n * a sophisticated \u0060motorcycle\u0060 profile is available up on request. It is powered by the [Kurviger](https://kurviger.de/en) Routing API and favors curves and slopes while avoiding cities and highways.\n \n## TomTom\n\nIf you want to include traffic, you can purchase the TomTom Add-on.\nThis Add-on only uses TomTom\u0027s road network and historical traffic information.\nLive traffic is not yet considered. If you are interested to learn how we consider traffic information, we recommend that you read [this article](https://www.graphhopper.com/blog/2017/11/06/time-dependent-optimization/).\n\nPlease note the following:\n\n * Currently we only offer this for our [Route Optimization API](#tag/Route-Optimization-API). [Contact us](https://www.graphhopper.com/contact-form/) if you would like to use it for the Matrix or Routing API.\n * In addition to our terms, you need to accept TomTom\u0027s [End User License Aggreement](https://www.graphhopper.com/tomtom-end-user-license-agreement/).\n * We do *not* use TomTom\u0027s web services. We only use their data with our software.\n \n[Contact us](https://www.graphhopper.com/contact-form/) if you want to buy this TomTom add-on.\n\n#### Geographical Coverage\n\nWe offer\n\n- Europe including Russia\n- North, Central and South America\n- Saudi Arabia and United Arab Emirates\n- South Africa\n- Southeast Asia\n- Australia\n\n#### Supported Vehicle Profiles\n\nName | Description | Restrictions | Icon\n-----------|:----------------------|:--------------------------|:---------------------------------------------------------\ncar | Car mode | car access | \nsmall_truck| Small truck like a Mercedes Sprinter, Ford Transit or Iveco Daily | height=2.7m, width=2\u002B0.4m, length=5.5m, weight=2080\u002B1400 kg | \n\n \n# Custom Model\n\nA custom model allows you to modify the default routing behavior of a vehicle profile by specifying a set of rules in JSON language.\nThere are three JSON properties to change a profile: \u0060priority\u0060, \u0060speed\u0060 and \u0060distance_influence\u0060 that are described in great detail in the next sections and you can get a quick overview in this [example-driven blog post](https://www.graphhopper.com/blog/2020/05/31/examples-for-customizable-routing/).\n\nBut first we will give an introductory example for each of these JSON properties. Let\u0027s start with \u0060speed\u0060:\n\n\u0060\u0060\u0060json\n{\n \u0022speed\u0022: [{\n \u0022if\u0022: \u0022road_class == MOTORWAY\u0022,\n \u0022limit_to\u0022: \u002290\u0022\n }]\n}\n\u0060\u0060\u0060\n\nAs you might have already guessed this limits the speed on motorways to 90km/h.\nChanging the speed will of course change the travel time, but at the same time this makes other road classes more likely as well, so you can use this model to avoid motorways.\n\nYou can immediately try this out in the Browser [on GraphHopper Maps](https://graphhopper.com/maps/?point=50.856527%2C12.876127\u0026point=51.02952%2C13.295603\u0026profile=car\u0026custom_model=%7B%22speed%22%3A%5B%7B%22if%22%3A%22road_class\u002B=%3D\u002BMOTORWAY%22%2C%22limit_to%22%3A%2290%22%7D%5D%7D).\nGraphHopper Maps offers an interactive text editor to comfortably enter custom models.\nYou can open it by pressing the \u0022custom\u0022 button. It will check the syntax of your custom model and mark errors in red. You can press\nCtrl\u002BSpace or Alt\u002BEnter to retrieve auto-complete suggestions. Pressing Ctrl\u002BEnter will send a routing request for the\ncustom model you entered. To disable the custom model you click the \u0022custom\u0022 button again.\n\n\nIn the second example we show how to avoid certain road classes without changing the travel time:\n\n\u0060\u0060\u0060json\n{\n \u0022priority\u0022: [{\n \u0022if\u0022: \u0022road_class == LIVING_STREET || road_class == RESIDENTIAL || road_class == UNCLASSIFIED\u0022,\n \u0022multiply_by\u0022: \u00220.1\u0022\n }]\n}\n\u0060\u0060\u0060\n\nThis example avoids certain smaller streets. [View it in GraphHopper Maps](https://graphhopper.com/maps/?point=51.125708%2C13.067915\u0026point=51.125964%2C13.082271\u0026profile=car\u0026custom_model=%7B%22priority%22%3A%5B%7B%22if%22%3A%22road_class\u002B=%3D\u002BLIVING_STREET\u002B%7C%7C\u002Broad_class\u002B%3D%3D\u002BRESIDENTIAL\u002B%7C%7C\u002Broad_class\u002B%3D%3D\u002BUNCLASSIFIED%22%2C%22multiply_by%22%3A%220.1%22%7D%5D%7D).\n\nThe third example shows how to prefer shortest paths:\n\n\u0060\u0060\u0060json\n{\n \u0022distance_influence\u0022: 200\n}\n\u0060\u0060\u0060\n\n[View this example in GraphHopper Maps](https://graphhopper.com/maps/?point=51.04188%2C13.057766\u0026point=51.057527%2C13.068237\u0026profile=car\u0026custom_model=%7B%22distance_influence%22%3A200%7D).\n\nThere is a fourth JSON property \u0060areas\u0060 that allows you to define areas that can then be used in the \u0060if\u0060 or \u0060else_if\u0060 conditions for \u0060speed\u0060 and \u0060priority\u0060.\nPlease read more about this and the other properties below and try some examples in\n[GraphHopper Maps](https://graphhopper.com/maps/) with the help of\n[this blog post](https://www.graphhopper.com/blog/2020/05/31/examples-for-customizable-routing/).\n\n\n## Customizing speed\n\nWhen using custom models you do not need to define rules that specify a speed for every road segment, but rather GraphHopper\nassumes a default speed. All you need to do is adjust this default speed to your use-case as you will always use the custom \nmodel in conjunction with a routing profile which is used to determine the default speed.\n\nThe custom model is a JSON object and the first property we will learn about here is the \u0060speed\u0060 property. The \u0060speed\u0060\nproperty\u0027s value is a list of conditional statements that modify the default speed. Every such statement consists of a\ncondition and an operation. The different statements are applied to the default speed from top to bottom, i.e.\nstatements that come later in the list are applied to the resulting value of previous operations. Each statement is only\nexecuted if the corresponding condition applies for the current road segment. This will become more clear in the following\nexamples.\n\nCurrently the custom model language supports two operators:\n\n- \u0060multiply_by\u0060 multiplies the speed value with a given number\n- \u0060limit_to\u0060 limits the speed value to a given number\n\n#### \u0060if\u0060 statements and the \u0060multiply_by\u0060 operation\n\nLet\u0027s start with a simple example using \u0060multiply_by\u0060:\n\n\u0060\u0060\u0060json\n{\n \u0022speed\u0022: [\n {\n \u0022if\u0022: \u0022road_class == MOTORWAY\u0022,\n \u0022multiply_by\u0022: \u00220.5\u0022\n }\n ]\n}\n\u0060\u0060\u0060\n\nThis custom model reduces the speed of every road segment for which the \u0060road_class\u0060 attribute is \u0060MOTORWAY\u0060 to\nfifty percent of the default speed (the default speed is multiplied by \u00600.5\u0060). Again, the default speed is the speed\nthat GraphHopper would normally use for the profile\u0027s vehicle. Note the \u0060if\u0060 clause which means that the operation\n(\u0060multiply_by\u0060) is only applied *if* the condition \u0060road_class == MOTORWAY\u0060 is fulfilled for the road segment under\nconsideration. The \u0060==\u0060 indicates equality, i.e. the condition reads \u0022the road_class equals MOTORWAY\u0022. If you\u0027re a bit\nfamiliar with programming note that the condition (the value of the \u0060if\u0060 key) is just a boolean condition in Java\nlanguage (other programming languages like C or JavaScript are very similar in this regard). A more complex condition\ncould look like this: \u0060road_class == PRIMARY || road_class == TERTIARY\u0060 which uses the **or**\n(\u0060||\u0060) operator and literally means \u0022road_class equals PRIMARY or road_class equals TERTIARY\u0022.\n\nThere can be multiple such \u0027if statements\u0027 in the speed section, and they are evaluated from top to bottom:\n\n\u0060\u0060\u0060json\n{\n \u0022speed\u0022: [\n {\n \u0022if\u0022: \u0022road_class == MOTORWAY\u0022,\n \u0022multiply_by\u0022: \u00220.5\u0022\n },\n {\n \u0022if\u0022: \u0022road_class == PRIMARY || road_environment == TUNNEL\u0022,\n \u0022multiply_by\u0022: \u00220.7\u0022\n }\n ]\n}\n\u0060\u0060\u0060\n\nIn this example the default speed of road segments with \u0060road_class == MOTORWAY\u0060 will be multiplied by \u00600.5\u0060, the default speed\nof road segments with \u0060road_class == PRIMARY\u0060 will be multiplied by \u00600.7\u0060 and for road segments with both \u0060road_class == MOTORWAY\u0060 and\n\u0060road_environment == TUNNEL\u0060 the default speed will be multiplied first by \u00600.5\u0060 and then by \u00600.7\u0060. So overall the\ndefault speed will be multiplied by \u00600.35\u0060. For road segments with \u0060road_class == PRIMARY\u0060 and \u0060road_environment == TUNNEL\u0060 we\nonly multiply by \u00600.7\u0060, even though both parts of the second condition apply. It only matters whether the road segment matches\nthe condition or not.\n\n\u0060road_class\u0060 and \u0060road_environment\u0060 are road attributes of \u0027enum\u0027 type, i.e. their value can only be one of a fixed set of\nvalues, like \u0060MOTORWAY\u0060 for \u0060road_class\u0060.\n\nOther road attributes like \u0060get_off_bike\u0060 are of \u0060boolean\u0060 type. They can be used as conditions directly, for example:\n\n\u0060\u0060\u0060json\n{\n \u0022speed\u0022: [\n {\n \u0022if\u0022: \u0022get_off_bike\u0022,\n \u0022multiply_by\u0022: \u00220.6\u0022\n }\n ]\n}\n\u0060\u0060\u0060\n\nwhich means that for road segments with \u0060get_off_bike==true\u0060 the speed factor will be \u00600.6\u0060.\n\nFor attributes with numeric values, like \u0060max_width\u0060 you should not use the \u0060==\u0060 (equality) or \u0060!=\u0060 (\ninequality) operators, but the numerical comparison operators \u0022bigger\u0022 \u0060\u003E\u0060, \u0022bigger or equals\u0022 \u0060\u003E=\u0060, \u0022smaller\u0022 \u0060\u003C\u0060, or\n\u0022smaller or equals\u0022 \u0060\u003C=\u0060, e.g.:\n\n\u0060\u0060\u0060json\n{\n \u0022speed\u0022: [\n {\n \u0022if\u0022: \u0022max_width \u003C 2.5\u0022,\n \u0022multiply_by\u0022: \u00220.8\u0022\n }\n ]\n}\n\u0060\u0060\u0060 \n\nwhich means that for all road segments with \u0060max_width\u0060 smaller than \u00602.5m\u0060 the speed is multiplied by \u00600.8\u0060.\n\n\n### The \u0060limit_to\u0060 operation\n\nBesides the \u0060multiply_by\u0060 operator there is also the \u0060limit_to\u0060 operator. As the name suggests \u0060limit_to\u0060 limits the\ncurrent value to the given value. Take this example:\n\n\u0060\u0060\u0060json\n{\n \u0022speed\u0022: [\n {\n \u0022if\u0022: \u0022road_class == MOTORWAY\u0022,\n \u0022multiply_by\u0022: \u00220.8\u0022\n },\n {\n \u0022if\u0022: \u0022surface == GRAVEL\u0022,\n \u0022limit_to\u0022: \u002260\u0022\n }\n ]\n}\n\u0060\u0060\u0060\n\nThis implies that on all road segments with the \u0060GRAVEL\u0060 value for \u0060surface\u0060 the speed will be at most \u006060km/h\u0060,\nregardless of the default speed and the previous rules. So for a road segment with \u0060road_class == MOTORWAY\u0060,\n\u0060surface == GRAVEL\u0060 and default speed \u0060100\u0060 the first statement reduces the speed from \u0060100\u0060 to \u006080\u0060 and the second\nstatement further reduces the speed from \u006080\u0060 to \u006060\u0060. If the \u0060road_class\u0060 was \u0060PRIMARY\u0060 and the default speed was \u006050\u0060\nthe first rule would not apply and the second rule would do nothing, because limiting \u006050\u0060 to \u006060\u0060 still yields \u006050\u0060.\n\nA common use-case for the \u0060limit_to\u0060 operation is the following pattern:\n\n\u0060\u0060\u0060json\n{\n \u0022speed\u0022: [\n {\n \u0022if\u0022: \u0022true\u0022,\n \u0022limit_to\u0022: \u002290\u0022\n }\n ]\n}\n\u0060\u0060\u0060\n\nwhich means that the speed is limited to \u006090km/h\u0060 for all road segments regardless of its properties. The condition\n\u0022\u0060true\u0060\u0022 is always fulfilled.\n\n### \u0060else\u0060 and \u0060else_if\u0060 statements\n\nThe \u0060else\u0060 statement allows you to define that some operations should be applied if an road segment does **not** match a\ncondition. So this example:\n\n\u0060\u0060\u0060json\n{\n \u0022speed\u0022: [\n {\n \u0022if\u0022: \u0022road_class == MOTORWAY\u0022,\n \u0022multiply_by\u0022: \u00220.5\u0022\n },\n {\n \u0022else\u0022: \u0022\u0022,\n \u0022limit_to\u0022: \u002250\u0022\n }\n ]\n}\n\u0060\u0060\u0060\n\nmeans that for all road segments with \u0060road_class == MOTORWAY\u0060 we multiply the default speed by \u00600.5\u0060 and for all others we\nlimit the default speed to \u006050\u0060 (but never both).\n\nIn case you want to distinguish more than two cases (road segments that match or match not a condition) you can use \u0060else_if\u0060\nstatements which are only evaluated in case the previous \u0060if\u0060 or \u0060else_if\u0060 statement did **not** match:\n\n\u0060\u0060\u0060json\n{\n \u0022speed\u0022: [\n {\n \u0022if\u0022: \u0022road_class == MOTORWAY\u0022,\n \u0022multiply_by\u0022: \u00220.5\u0022\n },\n {\n \u0022else_if\u0022: \u0022road_environment == TUNNEL\u0022,\n \u0022limit_to\u0022: \u002270\u0022\n },\n {\n \u0022else\u0022: \u0022\u0022,\n \u0022multiply_by\u0022: \u00220.9\u0022\n }\n ]\n}\n\u0060\u0060\u0060\n\nSo if the first condition matches (\u0060road_class == MOTORWAY\u0060) the default speed is multiplied by \u00600.5\u0060, but the other two\nstatements are ignored. Only if the first statement does not match (e.g. \u0060road_class == PRIMARY\u0060) the second statement\nis even considered and only if it matches (\u0060road_environment == TUNNEL\u0060) the default speed is limited to 70. The last\noperation (\u0060multiply_by: \u00220.9\u0022\u0060) is only applied if both previous conditions did not match.\n\n\u0060else\u0060 and \u0060else_if\u0060 statements always require a preceding \u0060if\u0060 or \u0060else_if\u0060 statement. However, there can be multiple\n\u0027blocks\u0027 of subsequent \u0060if/else_if/else\u0060 statements in the list of rules for \u0060speed\u0060.\n\n\u0060else_if\u0060 is useful for example in case you have multiple \u0060multiply_by\u0060 operations, but you do not want that the speed\ngets reduced by all of them. For the following model\n\n\u0060\u0060\u0060json\n{\n \u0022speed\u0022: [\n {\n \u0022if\u0022: \u0022road_class == MOTORWAY\u0022,\n \u0022multiply_by\u0022: \u00220.5\u0022\n },\n {\n \u0022else_if\u0022: \u0022road_environment == TUNNEL\u0022,\n \u0022multiply_by\u0022: \u00220.8\u0022\n }\n ]\n}\n\u0060\u0060\u0060\n\nonly the first factor (\u00600.5\u0060) will be applied even for road segments that fulfill both conditions.\n\n## Limit rules to certain areas\n\nYou can not only modify the speed of road segments based on properties, like we saw in the previous examples, but you\ncan also modify the speed of road segments based on their location. To do this you need to first create and add some\nareas to the \u0060areas\u0060 section of the custom model. You can then use the name of these areas in the conditions of your\n\u0060if/else/else_if\u0060 statements.\n\nIn the following example we multiply the speed of all road segments in an area called \u0060custom1\u0060 with \u00600.7\u0060 and also limit it\nto \u006050km/h\u0060. Note that each area\u0027s name needs to be prefixed with \u0060in_\u0060:\n\n\u0060\u0060\u0060json\n{\n \u0022speed\u0022: [\n {\n \u0022if\u0022: \u0022in_custom1\u0022,\n \u0022multiply_by\u0022: \u00220.7\u0022\n },\n {\n \u0022if\u0022: \u0022in_custom1\u0022,\n \u0022limit_to\u0022: \u002250\u0022\n }\n ],\n \u0022areas\u0022: {\n \u0022custom1\u0022: {\n \u0022type\u0022: \u0022Feature\u0022,\n \u0022id\u0022: \u0022something\u0022,\n \u0022properties\u0022: {},\n \u0022geometry\u0022: {\n \u0022type\u0022: \u0022Polygon\u0022,\n \u0022coordinates\u0022: [\n [\n [\n 1.525,\n 42.511\n ],\n [\n 1.510,\n 42.503\n ],\n [\n 1.531,\n 42.495\n ],\n [\n 1.542,\n 42.505\n ],\n [\n 1.525,\n 42.511\n ]\n ]\n ]\n }\n }\n }\n}\n\u0060\u0060\u0060\n\nAreas are given in GeoJson format, but currently only the exact format in the above example is supported, i.e. one\nobject with type \u0060Feature\u0060, a geometry with type \u0060Polygon\u0060 and optional (but ignored) \u0060id\u0060 and \u0060properties\u0060 fields. Note\nthat the coordinates array of \u0060Polygon\u0060 is an array of arrays that each must describe a closed ring, i.e. the first\npoint must be equal to the last. Each point is given as an array [longitude, latitude], so the coordinates array has\nthree dimensions total.\n\nUsing the \u0060areas\u0060 feature you can also block entire areas i.e. by multiplying the speed with \u00600\u0060, but for this you\nshould rather use the \u0060priority\u0060 section that we will explain next.\n\n## Customizing priority\n\nMake sure you read the introductory section of this document to learn what the \u0060priority\u0060 factor means. In short it\nallows similar modifications as \u0060speed\u0060, but instead of modifying the road segment weights *and* travel times it will only\naffect the weights. By default, the priority is \u00601\u0060 for every road segment, so it does not affect the weight. However,\nchanging the priority of a road can yield a relative weight difference in comparison to other roads.\n\nCustomizing the \u0060priority\u0060 works very much like changing the \u0060speed\u0060, so in case you did not read the section about\n\u0060speed\u0060 you should go back there and read it now. The only real difference is that there is no \u0060limit_to\u0060 operator for\n\u0060priority\u0060. As a quick reminder here is an example for priority:\n\n\u0060\u0060\u0060json\n{\n \u0022priority\u0022: [\n {\n \u0022if\u0022: \u0022road_class == MOTORWAY\u0022,\n \u0022multiply_by\u0022: \u00220.5\u0022\n },\n {\n \u0022else_if\u0022: \u0022road_class == SECONDARY\u0022,\n \u0022multiply_by\u0022: \u00220.9\u0022\n },\n {\n \u0022if\u0022: \u0022road_environment == TUNNEL\u0022,\n \u0022multiply_by\u0022: \u00220.1\u0022\n }\n ]\n}\n\u0060\u0060\u0060\n\nmeans that road segments with \u0060road_class==MOTORWAY\u0060 and \u0060road_environment==TUNNEL\u0060 get priority \u00600.5*0.1=0.05\u0060 and\nthose with \u0060road_class==SECONDARY\u0060 and no TUNNEL, get priority \u00600.9\u0060 and so on.\n\nEdges with lower priority values will be less likely part of the optimal route calculated by GraphHopper, higher values\nmean that these road segments shall be preferred. If you do not want to state which road segments shall be avoided, but\nrather which ones shall be preferred, you need to **decrease** the priority of others:\n\n\u0060\u0060\u0060json\n{\n \u0022priority\u0022: [\n {\n \u0022if\u0022: \u0022road_class != CYCLEWAY\u0022,\n \u0022multiply_by\u0022: \u00220.8\u0022\n }\n ]\n}\n\u0060\u0060\u0060\n\nmeans decreasing the priority for all road_classes *except* cycleways.\n\nJust like we saw for \u0060speed\u0060 you can also adjust the priority for road segments in a certain area. It works exactly the\nsame way:\n\n\u0060\u0060\u0060json\n{\n \u0022priority\u0022: [\n {\n \u0022if\u0022: \u0022in_custom1\u0022,\n \u0022multiply_by\u0022: \u00220.7\u0022\n }\n ]\n}\n\u0060\u0060\u0060\n\nTo block an entire area set the priority value to \u00600\u0060. You can even set the priority only for certain roads in an area\nlike this:\n\n\u0060\u0060\u0060json\n{\n \u0022priority\u0022: [\n {\n \u0022if\u0022: \u0022road_class == MOTORWAY \u0026\u0026 in_custom1\u0022,\n \u0022multiply_by\u0022: \u00220.1\u0022\n }\n ]\n}\n\u0060\u0060\u0060\n\nSome other useful attributes to restrict access to certain roads depending on your vehicle dimensions are the\nfollowing:\n\n\u0060\u0060\u0060json\n{\n \u0022priority\u0022: [\n {\n \u0022if\u0022: \u0022max_width \u003C 2.5\u0022,\n \u0022multiply_by\u0022: \u00220\u0022\n },\n {\n \u0022if\u0022: \u0022max_length \u003C 10\u0022,\n \u0022multiply_by\u0022: \u00220\u0022\n },\n {\n \u0022if\u0022: \u0022max_weight \u003C 3.5\u0022,\n \u0022multiply_by\u0022: \u00220\u0022\n }\n ]\n}\n\u0060\u0060\u0060\n\nwhich means that the priority for all road segments that allow a maximum vehicle width of \u00602.5m\u0060, a maximum vehicle\nlength of \u006010m\u0060 or a maximum vehicle weight of \u00603.5tons\u0060, or less, is zero, i.e. these \u0022narrow\u0022 road segments are\nblocked.\n\n## Customizing distance_influence\n\nThe \u0060distance_influence\u0060 property allows you to control the trade-off between a fast route (minimum time) and a short route\n(minimum distance). The larger \u0060distance_influence\u0060 is the more GraphHopper will prioritize routes with a small\ntotal distance. More precisely, the \u0060distance_influence\u0060 is the time you need to save on a detour (a longer distance\nroute option) such that you prefer taking the detour compared to a shorter route. Please note that this value is a number, not a string.\n\nA value of \u0060100\u0060 means that one extra kilometer of detour must save you \u0060100s\u0060 of travelling time or else you are not \nwilling to take the detour. Or to put it another way, if a reference route takes \u0060600s\u0060 and is \u006010km\u0060 long, \n\u0060distance_influence=100\u0060 means that you are willing to take an alternative route that is \u006011km\u0060 long only if \nit takes no longer than \u0060500s\u0060 (saves \u0060100s\u0060). Things get a bit more complicated when \u0060priority\u0060 is not \u00601\u0060, but the \neffect stays the same: The larger \u0060distance_influence\u0060 is, the more GraphHopper will focus on finding short routes.\n\n\n## Road attributes\n\nGraphHopper stores different attributes for every road segment. Some frequently used are the following (some of their possible values are given in brackets):\n\n- road_class: (OTHER, MOTORWAY, TRUNK, PRIMARY, SECONDARY, TRACK, STEPS, CYCLEWAY, FOOTWAY, ...)\n- road_environment: (ROAD, FERRY, BRIDGE, TUNNEL, ...)\n- road_access: (DESTINATION, DELIVERY, PRIVATE, NO, ...)\n- surface: (PAVED, DIRT, SAND, GRAVEL, ...)\n- smoothness: (EXCELLENT, GOOD, INTERMEDIATE, ...)\n- toll: (MISSING, NO, HGV, ALL)\n- bike_network, foot_network: (MISSING, INTERNATIONAL, NATIONAL, REGIONAL, LOCAL, OTHER)\n- country: (\u0060MISSING\u0060 or the country as a \u0060ISO3166-1:alpha3\u0060 code e.g. \u0060DEU\u0060)\n- hazmat: (YES, NO), hazmat_tunnel: (A, B, .., E), hazmat_water: (YES, PERMISSIVE, NO)\n- hgv: (MISSING, YES, DESIGNATED, ...)\n- track_type: (MISSING, GRADE1, GRADE2, ..., GRADE5)\n- urban_density: (RURAL, RESIDENTIAL, CITY)\n\n\nTo learn about all available encoded values you can query the \u0060/info\u0060 endpoint\n\nBesides this kind of categories, which can take multiple different string values, there are also some that represent a\nboolean value (they are either true or false for a given road segment), like:\n\n- get_off_bike\n- road_class_link\n- roundabout\n\nThere are also some that take on a numeric value, like:\n\n- average_slope: a number for 100 * \u0022elevation change\u0022 / edge_distance for a road segment; it changes the sign in reverse direction; see also max_slope\n- curvature: \u0022beeline distance\u0022 / edge_distance (0..1) e.g. a curvy road is smaller than 1\n- hike_rating, horse_rating, mtb_rating: a number from 0 to 6 for the \u0060sac_scale\u0060 in OSM, e.g. 0 means \u0022missing\u0022, 1 means \u0022hiking\u0022, 2 means \u0022mountain_hiking\u0022 and so on\n- lanes: number of lanes\n- max_slope: an unsigned decimal for the maximum slope (100 * \u0022elevation change / distance_i\u0022) of an edge with \u0060sum(distance_i)=edge_distance\u0060. Important for longer road segments where ups (or downs) can be much bigger than the average_slope.\n- max_speed: the speed limit from a sign (km/h)\n- max_height (meter), max_width (meter), max_length (meter)\n- max_weight (ton), max_axle_load (in tons)\n\n\n## Limitations\n\nCustom models are currently:\n\n1. only available for the [POST Route Endpoint](#operation/postRoute).\nIf you are interested in using this for the Matrix or Route Optimization API please [contact us](https://www.graphhopper.com/contact-form/) to get access to an early alpha version.\nFor the Isochrone API it is also planned.\n2. only available for the following parent profiles: \u0060foot\u0060, \u0060bike\u0060, \u0060scooter\u0060, \u0060car\u0060 and \u0060small_truck\u0060.\n3. only available for OpenStreetMap.\n\nThis feature will strongly benefit from feedback, so do not hesitate to share your experience, your favorite custom\nmodel or some of the problems you ran into when you tried building your own with custom model.\n\n## Troubleshooting\n\n### Recommendations\n\nFor debugging you can use the custom model editor in [GraphHopper Maps](https://graphhopper.com/maps/) (click the \u0027custom\u0027 button).\n\nWhen debugging problems with custom models you should first try if your request goes through without an error using an empty custom model.\n\nFor production you should avoid to include road_access and toll in the profile as we will change their values in the next weeks which could cause unexpected problems.\n\n### Route calculation is slower\n\nThe route calculation with custom_models will be slower as a different algorithm has to be used. The more the result deviates from the optimum the slower the response can get.\nStill for certain use cases you can make the calculation if you tune the custom_model and e.g. exclude certain ways via \u0060{ \u0022if\u0022: \u0022road_class == TRACK || road_class == RESIDENTIAL\u0022, \u0022multiply_by\u0022: \u00220\u0022 }\u0060.\n\n### All routes for my custom model fail\n\nThis could mean that either your custom model made some of the roads near the start and destination inaccessible, \nthen usually we return a PointNotFoundException with the point_index with the \u0022location snap\u0022 problem.\n\nOr, the custom model made all roads between your start and destination inaccessible, then we return a ConnectionNotFoundException. This happens e.g. when you exclude tunnels, \nferries or motorways but all routes between start and destination have these road attributes satisfied, i.e. we cannot find a route.\n\n**Solution**: relax your custom model and e.g. instead of excluding certain road attributes via \u0060\u0022multiply_by\u0022: \u00220\u0022\u0060 you should try to use \u0060\u00220.01\u0022\u0060.\n",
"baseUrl": "https://graphhopper.com/api/1",
"properties": [
{
"type": "X-openapi",
"url": "https://docs.graphhopper.com/openapi.json"
}
],
"contact": [
{
"fn": "API Support"
}
]
},
{
"name": "Deutscher Wetterdienst: API",
"description": "API des Deutschen Wetterdienstes (DWD) aus der DWD App. \u003Cbr\u003E\u003Cbr\u003E Neben unterschiedlichen Wetterwarnungen (s.u.) lassen sich unter [/dwd.api.proxy.bund.dev/v30/stationOverviewExtended](/dwd.api.proxy.bund.dev/v30/stationOverviewExtended) nach Angabe des Parameters *stationIDs* (z.B. \u0027G005\u0027) auch die Wetterdaten ausgew\u00E4hlter Wetterstationen anfordern (wobei die sog. \u0027Stationskennung\u0027 des DWD anzugeben ist). \u003Cbr\u003E\u003Cbr\u003E Unter [https://opendata.dwd.de/](https://opendata.dwd.de/) bietet der DWD dar\u00FCber hinaus auch aktuelle und historische Daten zu diversen Wetter- und Klimaph\u00E4nomenen zum Download an (vgl. hierzu die offizielle Dokumentation [hier](https://opendata.dwd.de/climate_environment/CDC/Readme_intro_CDC_ftp.pdf)). In diesem Zusammenhang erw\u00E4hnenswert ist auch eine weitere offizielle Liste aller Wetterstationen (ohne Stationskennung aber mit sog. \u0027Stations_id\u0027) [hier](https://opendata.dwd.de/climate_environment/CDC/observations_germany/climate/daily/kl/recent/KL_Tageswerte_Beschreibung_Stationen.txt).",
"baseUrl": "https://app-prod-ws.warnwetter.de/v30",
"properties": [
{
"type": "X-openapi",
"url": "https://dwd.api.bund.dev/openapi.yaml"
}
]
},
{
"name": "Swagger Generator",
"description": "This is an online swagger codegen server. You can find out more at https://github.com/swagger-api/swagger-codegen or on [irc.freenode.net, #swagger](http://swagger.io/irc/).",
"baseUrl": "https://generator.swagger.io/api",
"properties": [
{
"type": "X-openapi",
"url": "https://generator.swagger.io/api/swagger.json"
}
],
"contact": [
{
"fn": "[email protected]"
}
]
},
{
"name": "CDN",
"description": "Welcome to CDN API documentation.\n\nThe API documentation provides requests to manage CDN service and get statistics.\n\n# Introduction\n\nOur API has predictable, resource-oriented URLs and uses HTTP response codes to indicate API errors.\nWe use built-in HTTP features, such as HTTP authentication and HTTP terminology, which can be understood by HTTP clients.\nJSON will be returned in all responses from the API, including errors.\n\n### Responses\n\nThe API uses HTTP response codes to show success or failure of an API request. \nIn general, 2xx codes indicate success, 4xx codes indicate an error that resulted from the provided information \n(e.g. a required parameter is missing or invalid, etc.), and codes in the 5xx range indicate an error connected \nwith our servers.\n\n### Maximum Body Request\n\nMaximum API body request size is 1MB.\n\n### Methods\n\nUse the PATCH method instead of PUT if you need to change one parameter.\n\n### Domain names\n\nIf you are using internationalized domain names (IDNs), they must be\nrepresented in Punycode, which puts the IDN into the character set A-Z and 0-9, to connect with the DNS.\n\n### Deprecated API\n\nAPI evolution causes some endpoints to become deprecated. If you want to monitor deprecated API parts and be\nurgently notified once some API parts become deprecated, you should add deprecation header support in your client application.\nWe [follow this][1] document but use \u0027X-\u0027 prefix for all headers instead, e.g. X-Deprecation, X-Sunset, X-Link etc.\n\n [1]: https://tools.ietf.org/html/draft-dalal-deprecation-header-02\n\n### HTTP Status Code Summary\n\nCode | Description\n------------- | -------------\n2xx | OK \u2014 Request has been completed successfully.\n400 | Bad Request \u2014 Required parameter is missing.\n401 | Unauthorized \u2014 Provided credentials are invalid or your API token has expired.\n403 | Forbidden \u2014 Access denied. You do not have enough rights.\n404 | Not Found \u2014 Requested item doesn\u0027t exist.\n429 | Too Many Requests \u2014 You have exceeded the number of allowed requests for your resources.\n503 | Service Unavailable \u2014 You have made a mistake in request parameters or the service is currently unavailable.\n500 502 504 | Server errors \u2014 Something went wrong on our end.\n\n# Rate limits\n\nThere is a general limit of 4 requests per second. If you go over the rate limit, you will receive a message.\n\n### Prefetch Calls Limiting\n\nYou can make 1 prefetch request for a resource per minute. One prefetch request is limited to 100 patterns.\nIf you go over the rate limit, you will receive a message.\n\n### Purge Calls Limiting\n\nYou can make 1 purge request for a resource per minute. One purge request is limited to 10 patterns.\nIf you go over the rate limit, you will receive a message.\n",
"baseUrl": "https://api.___serverhost___/",
"properties": [
{
"type": "X-openapi",
"url": "https://api.gcorelabs.com/cdn/docs/openapi.yaml"
}
]
},
{
"name": "Anketa.WebApi",
"description": "",
"baseUrl": "https://localhost:25790/",
"properties": [
{
"type": "X-openapi",
"url": "https://aitah.maxima.ee/js/swagger.json"
}
]
},
{
"name": "PCI Vault API",
"description": "[PCIVault.io](https://pcivault.io) is a vendor neutral PCI DSS compliant environment provided by [SnapBill, Inc](https://www.snapbill.com). \u003Cbr /\u003E\n\n It is a SaaS solution offering Tokenization as a Service (TaaS) combined with its own Entropy as a Service (EaaS) engine for lightning quick enterprise grade encryption. Leveraging the Standard Unix Password Manager and PGP, this PCI vault is open for use by anyone requiring a secure PCI compliant environment to store sensitive payment data in any format. \u003Cbr /\u003E\n\n [Sign up for an account \u0026rarr;](https://pcivault.io/register) \u003Cbr /\u003E\n\n View our PCI DSS [Attestation of Compliance (AOC)](https://pci-certificates.s3.eu-west-1.amazonaws.com/PCI-DSS-v3_2_1-AOC-ServiceProviders-PCIVault.pdf) and [Executive Scan Summary (ESS)](https://pci-certificates.s3.eu-west-1.amazonaws.com/PCI-ASV-ExecutiveReport-PCIVault.pdf).\n\n ### Instructions:\n\n - \u003Cstrong\u003EStep 1:\u003C/strong\u003E [Add a new key](/#/Keys) (you need at least one key)\n\n - \u003Cstrong\u003EStep 2:\u003C/strong\u003E [Encrypt, tokenize and store data securely](#/Vault) (with your key)",
"baseUrl": "https://api.pcivault.io/v1",
"properties": [
{
"type": "X-openapi",
"url": "https://api.pcivault.io/openapi.json"
}
]
},
{
"name": "Swagger Petstore",
"description": "This is a sample server Petstore server. You can find out more about Swagger at [http://swagger.io](http://swagger.io) or on [irc.freenode.net, #swagger](http://swagger.io/irc/). For this sample, you can use the api key \u0060special-key\u0060 to test the authorization filters.",
"baseUrl": "https://petstore.swagger.io/v2",
"properties": [
{
"type": "X-openapi",
"url": "https://petstore.swagger.io/v2/swagger.json"
}
]
},
{
"name": "Anketa.WebApi",
"description": "",
"baseUrl": "https://localhost:25789/",
"properties": [
{
"type": "X-openapi",
"url": "https://paldies.maxima.lv/js/swagger.json"
}
]
},
{
"name": "Swagger Converter",
"description": "Converts a 1.x or 2.x Swagger definition to the OpenAPI 3.0.1 format",
"baseUrl": "https://converter.swagger.io/api/",
"properties": [
{
"type": "X-openapi",
"url": "https://converter.swagger.io/api/openapi.json"
}
]
},
{
"name": "Image-Charts",
"description": "Charts, simple as a URL. A safe and fast replacement for Google Image Charts",
"baseUrl": "https://image-charts.com/",
"properties": [
{
"type": "X-openapi",
"url": "https://image-charts.com/swagger.json"
}
]
},
{
"name": "WarframeStat.us API",
"description": "Simple API for data from the game Warframe.\n[Parser Docs](https://wfcd.github.io/warframe-worldstate-parser/)\n[Items Types](https://github.com/WFCD/warframe-items/blob/master/index.d.ts)\n",
"baseUrl": "https://api.warframestat.us/",
"properties": [
{
"type": "X-openapi",
"url": "https://docs.warframestat.us/openapi.json"
}
]
},
{
"name": "Jokes One API",
"description": " Jokes One API offers a complete feature rich REST API access to its jokes platform. This is the documentation for the world famous [jokes API](https://jokes.one/api/joke/). If you are a subscriber and you are trying this from a console add \u0027X-JokesOne-Api-Secret\u0027 header and add your api key as the header value. You can test and play with the API right here on this web page. For using the private end points, code samples and subscribing to the API please visit https://jokes.one/api/joke/.",
"baseUrl": "https://api.jokes.one/",
"properties": [
{
"type": "X-openapi",
"url": "https://api.jokes.one/yaml/jokes.one.openapi.yaml?v9"
}
],
"contact": [
{
"fn": "Jokes One"
}
]
},
{
"name": "Swagger Validator Badge",
"description": "Parses and validates a Swagger/OpenAPI 2.0 or an OpenAPI 3.x definition",
"baseUrl": "https://validator.swagger.io/validator/",
"properties": [
{
"type": "X-openapi",
"url": "https://validator.swagger.io/validator/openapi.json"
}
]
},
{
"name": "Zenvia APIs",
"description": "API Support: https://atendimento.zenvia.com/\u003Cspan class=\u0022link-content\u0022\u003E[OpenAPI specification source](https://github.com/zenvia/zenvia-openapi-spec)\u003C/span\u003E\n\n\n# Overview\n\nThis is the reference documentation for the Zenvia *REST-like* API. The API itself is based on resources that are represented by JSON format and are manipulated using the HTTP protocol.\n\n## Features\n\nYou can send messages through the [Zenvia-supported channels](#section/Supported-Channels).\n\nYou can also subscribe to events and receive them on a webhook of your choosing. The available events for each and every channel are:\n\n* Messages: Receive messages events for outgoing and/or incoming messages.\n* Messages status: Receive status updates for outgoing messages.\n\n## Pre-requisites\n\nBefore using this API you need the following:\n\n* **Zenvia Account**: create an account on [Zenvia platform\u0027s site](https://app.zenvia.com/)\n* **Integrations**: configure desired channels to send and/or receive messages on the [integrations page](https://app.zenvia.com/home/credentials)\n* **API Token**: create an API token on the [API console](https://app.zenvia.com/home/api)\n* **Webhook**: subscribe to events using [subscriptions API resources](#tag/Subscriptions)\n * _Status Webhook_ **(important)**: Since our messaging API is asynchronous, it is necessary to register a webhook in order to know whether the message sending was successful or not.\n * _Message Webhook_ (optional): receive message responses by subscribing to message events.\n\nYou can use the [Sandbox](#section/Getting-started-with-Sandbox) to start using and testing this API immediately.\n\n## View your Usage Report\nYou can also access Zenvia platform to view your [Usage Report](https://app.zenvia.com/notifications/dashboard/api)\n\n# Getting started with Sandbox\n\nThe fastest way to begin utilizing this API is with our [Sandbox (available on the Zenvia platform)](https://app.zenvia.com/home/sandbox).\n\nAs you create your new Sandbox, you\u0027ll be guided step-by-step in order to start sending and receiving messages using your desired channel.\n\n[Click here and start sending and receiving messages using RCS, WhatsApp or SMS using this API.](https://app.zenvia.com/home/sandbox)\n\nYou are allowed to send test messages to phone numbers you\u0027ve connected during a 24-hour period. Following that, you must reconnect your number by sending the keyword once again to continue using the Sandbox\u0027s features.\n\n# API versions\n\nAll notable changes to Zenvia APIs will be documented here.\n\n\u003C!-- The format is based on Keep a Changelog: http://keepachangelog.com/en/1.0.0/ --\u003E\n\u003C!-- and this project adheres to Semantic Versioning: http://semver.org/spec/v2.0.0.html --\u003E\n\nCurrently, the Zenvia APIs is on version v2.\n\n## v2 (current)\n\n### 2021-05-24\n\n* Added\n * Added the referral section that indicates an advertisement was clicked by the user to the [message event](#section/MESSAGE) received by the webhook\n\n### 2020-10-27\n\n* Added\n * Added RCS Channels sections.\n\n### 2020-09-24\n\n* Added\n * Added message-batches: API to send messages in batch.\n\n### 2020-09-01\n\n* Breaking Changes\n * Visitor not sent as a JSON within contents block. Instead, it\u0027s sent directly under the message object.\n * Location is no longer used as JSON.\n * Removed deprecated \u0060channels\u0060 attribute from the template resource.\n\n## v1 (deprecated)\n\nYou can still check v1 version clicking \u003Ca target=\u0022_blank\u0022 href=\u0022https://zenvia.github.io/zenvia-openapi-spec/v1/\u0022\u003Ehere\u003C/a\u003E.\n\n\n### 2020-02-01\n\n* Added\n * Added templates.\n * Added reporting API.\n\n### 2020-01-01\n\n* Added\n * Added Subscription section.\n * Added WhatsApp, SMS, and Facebook Channels sections.\n\n# SDKs\n\nMake it simpler to use our API by integrating our SDK into your software.\n\nThese helper libraries are available on [Node](https://github.com/zenvia/zenvia-sdk-node) and [Java](https://github.com/zenvia/zenvia-sdk-java) programming languages and located on our [GitHub](https://github.com/zenvia) page.\n\n# HTTP Methods\n\nHTTP methods are used to manipulate resources. Though, as not all resources allow all HTTP operations, observeOK the reference of each resource below.\n\nMethods used with collection endpoints:\n\n| HTTP Method | Operation | Success HTTP status |\n|:-----------------|:-------------------------|:--------------------|\n| GET | List collection items | 200 - OK |\n| POST | Create a new item | 200 - OK |\n\nMethods used with item endpoints:\n\n| HTTP Method | Operation | Success HTTP status |\n|:-----------------|:-----------------------------|:--------------------|\n| GET | Retrieve one resource item | 200 - OK |\n| DELETE | Delete one resource item | 204 - No content |\n| PATCH | Update one resource item | 200 - OK |\n\nWhen an operation is executed successfully, the API will respond with a 2xx status code.\n\n# Error Handling\n\nWhen one error occurs, the API will return a 4xx or 5xx HTTP status code and the payload with an Error Object.\n\nThe error object obeys the follwing schema:\n\n\u003CSchemaDefinition schemaRef=\u0022#/components/schemas/error.base\u0022 /\u003E\n\nResponses error codes are detailed below.\n\n| Http Status Code | Code | Message | Retry request |\n|:-----------------|:---------------------|:---------------------------------|:--------------|\n| 400 | VALIDATION_ERROR | Validation error | No |\n| 401 | AUTHENTICATION_ERROR | No authorization token was found | No |\n| 404 | NOT_FOUND | Not found | No |\n| 409 | DUPLICATED | Entity already exists | No |\n| 500 | INTERNAL_ERROR | Internal error | Yes |\n\n# Authentication\n\n## Token\nTo use this API you need to send the API token in every request.\n\nThe token needs to be sent in the HTTP header \u0027X-API-TOKEN\u0027.\n\nExample:\n\u0060\u0060\u0060X-API-TOKEN: hKp94crjv9OF3UGrCpSXUJw1-UYHhRvLKNLt\u0060\u0060\u0060\n\nGenerate your token on the [API console](https://app.zenvia.com/home/api) on Zenvia platform.\n\n## JWT\n\nThe JWT token is primarily used by front-end applications for user interactions.\n\nFor server-to-server integrations use the [token authentication](#section/Authentication/Token) approach.\n",
"baseUrl": "https://api.zenvia.com/v2",
"properties": [
{
"type": "X-openapi",
"url": "https://zenvia.github.io/zenvia-openapi-spec/v2/openapi.json"
}
],
"contact": [
{
"fn": "API Support"
}
]
},
{
"name": "Doctorisy - Identity HTTP API",
"description": "The Identity Microservice HTTP API. This is a Data-Driven/CRUD microservice",
"baseUrl": "http://registries.doctorisy.com:443/identity",
"properties": [
{
"type": "X-openapi",
"url": "https://registries.doctorisy.com/identity/swagger/v1/swagger.json"
}
],
"contact": [
{
"fn": "Doctorisy"
}
]
},
{
"name": "My API",
"description": "",
"baseUrl": "https://hanlintest.ehanlin.com.tw/hanlintest-api",
"properties": [
{
"type": "X-openapi",
"url": "https://hanlintest.ehanlin.com.tw/hanlintest-api/swagger/v1/swagger.json"
}
]
},
{
"name": "Autobahn App API",
"description": "Was passiert auf Deutschlands Bundesstra\u00DFen? API f\u00FCr aktuelle Verwaltungsdaten zu Baustellen, Staus und Ladestationen. Au\u00DFerdem Zugang zu Verkehrs\u00FCberwachungskameras und vielen weiteren Datens\u00E4tzen.\n",
"baseUrl": "https://verkehr.autobahn.de/o/autobahn",
"properties": [
{
"type": "X-openapi",
"url": "https://autobahn.api.bund.dev/openapi.yaml"
}
]
},
{
"name": "Swagger Petstore - OpenAPI 3.0",
"description": "This is a sample Pet Store Server based on the OpenAPI 3.0 specification. You can find out more about\nSwagger at [http://swagger.io](http://swagger.io). In the third iteration of the pet store, we\u0027ve switched to the design first approach!\nYou can now help us improve the API whether it\u0027s by making changes to the definition itself or to the code.\nThat way, with time, we can improve the API in general, and expose some of the new features in OAS3.\n\nSome useful links:\n- [The Pet Store repository](https://github.com/swagger-api/swagger-petstore)\n- [The source API definition for the Pet Store](https://github.com/swagger-api/swagger-petstore/blob/master/src/main/resources/openapi.yaml)",
"baseUrl": "https://petstore3.swagger.io/api/v3",
"properties": [
{
"type": "X-openapi",
"url": "https://petstore3.swagger.io/api/v3/openapi.json"
}
]
},
{
"name": "Swagger Generator",
"description": "This is an online swagger codegen server. You can find out more at https://github.com/swagger-api/swagger-codegen or on [irc.freenode.net, #swagger](http://swagger.io/irc/).",
"baseUrl": "https://generator3.swagger.io/api",
"properties": [
{
"type": "X-openapi",
"url": "https://generator3.swagger.io/openapi.json"
}
]
},
{
"name": "My TestGo API",
"description": "",
"baseUrl": "https://testgo.teams.com.tw/testgo-api",
"properties": [
{
"type": "X-openapi",
"url": "https://testgo.teams.com.tw/testgo-api/swagger/v1/swagger.json"
}
]
},
{
"name": "My API",
"description": "",
"baseUrl": "https://mest.meikoschool.com.tw/meiko-teams-api",
"properties": [
{
"type": "X-openapi",
"url": "https://mest.meikoschool.com.tw/meiko-teams-api/meiko-teams-api/swagger/v1/swagger.json"
}
]
},
{
"name": "Anketa.WebApi",
"description": "",
"baseUrl": "https://localhost:25789/",
"properties": [
{
"type": "X-openapi",
"url": "https://aciu.maxima.lt/js/swagger.json?v=1.1.57-13"
}
]
},
{
"name": "TibiaData API",
"description": "This is the API documentation for the TibiaData API.\nThe documentation contains version 3 and above.",
"baseUrl": "https://api.tibiadata.com/",
"properties": [
{
"type": "X-openapi",
"url": "https://docs.tibiadata.com/swagger.json"
}
],
"contact": [
{
"fn": "TibiaData"
}
]
},
{
"name": "Calvert API",
"description": "",
"baseUrl": "https://api.calvertlearning.com/prod/v2",
"properties": [
{
"type": "X-openapi",
"url": "https://api.calvertlearning.com/prod/v2/swagger.json"
}
]
},
{
"name": "They Said So Quotes API",
"description": " They Said So Quotes API offers a complete feature rich REST API access to its quotes platform. This is the documentation for the world famous [quotes API](https://theysaidso.com/api). If you are a subscriber and you are trying this from a console add \u0027X-TheySaidSo-Api-Secret\u0027 header and add your api key as the header value. You can test and play with the API right here on this web page. For using the private end points and subscribing to the API please visit https://theysaidso.com/api.",
"baseUrl": "https://quotes.rest/",
"properties": [
{
"type": "X-openapi",
"url": "https://quotes.rest/yaml/theysaidso.quotes.openapi.yaml?v1.1"
}
],
"contact": [
{
"fn": "They Said So"
}
]
},
{
"name": "DVS Debitoren Web API",
"description": "",
"baseUrl": "https://meine-stbvs.com/v1",
"properties": [
{
"type": "X-openapi",
"url": "https://meine-stbvs.com/v1/openapi.json"
}
]
},
{
"name": "Rarify API",
"description": "The most accurate API to search, analyze, and integrate NFT data",
"baseUrl": "https://api.rarify.tech/",
"properties": [
{
"type": "X-openapi",
"url": "https://api.redocly.com/registry/bundle/rarify/Rarify%20API/v1/openapi.json?branch=default"
}
]
},
{
"name": "API",
"description": "REST API to manage Reepay resources",
"baseUrl": "https://api.reepay.com/",
"properties": [
{
"type": "X-openapi",
"url": "https://api.reepay.com/swagger.json"
}
],
"contact": [
{
"fn": "[email protected]"
}
]
},
{
"name": "srprs.me API",
"description": "",
"baseUrl": "https://api.srprs.me/",
"properties": [
{
"type": "X-openapi",
"url": "https://api.srprs.me/swagger.json"
}
]
},
{
"name": "Myworkout API",
"description": "Documentation for Myworkout API 2.\n\nBasic concepts are explained in this section.\n\n# Localization\nThe API supports localization for error messages like validation errors.\nThe preferred way to request language is to set proper \u0060Accept-Language\u0060 header, but this can be overriden by adding a \u0060lang\u0060 query parameter to the request.\n\n- _Example 1_: \u0060Accept-Language: no\u0060 - _Example 2_: \u0060en-GB,en-US;q=0.9,en;q=0.8\u0060\n",
"baseUrl": "https://api.myworkout.com/",
"properties": [
{
"type": "X-openapi",
"url": "https://api.myworkout.com/doc/api/swagger.json"
}
]
},
{
"name": "TzKT API",
"description": "# Introduction\n\nTzKT Explorer provides free REST API and WebSocket API for accessing detailed Tezos blockchain data and helps developers build more services and applications on top of Tezos.\nTzKT is an open-source project, so you can easily clone and build it and use it as a self-hosted service to avoid any risks of depending on third-party services.\n\nTzKT API is available for the following Tezos networks with the following base URLs:\n\n- Mainnet: \u0060https://api.tzkt.io/\u0060 or \u0060https://api.mainnet.tzkt.io/\u0060 ([view docs](https://api.tzkt.io)) \n- Ghostnet: \u0060https://api.ghostnet.tzkt.io/\u0060 ([view docs](https://api.ghostnet.tzkt.io))\n- Kathmandunet: \u0060https://api.kathmandunet.tzkt.io/\u0060 ([view docs](https://api.kathmandunet.tzkt.io))\n- Limanet: \u0060https://api.limanet.tzkt.io/\u0060 ([view docs](https://api.limanet.tzkt.io))\n\nWe also provide a staging environment for testing newest features and pre-updating client applications before deploying to production:\n\n- Mainnet staging: \u0060https://staging.api.tzkt.io/\u0060 or \u0060https://staging.api.mainnet.tzkt.io/\u0060 ([view docs](https://staging.api.tzkt.io))\n\nFeel free to contact us if you have any questions or feature requests.\nYour feedback really helps us make TzKT better!\n\n- Discord: https://discord.gg/aG8XKuwsQd\n- Telegram: https://t.me/baking_bad_chat\n- Slack: https://tezos-dev.slack.com/archives/CV5NX7F2L\n- Twitter: https://twitter.com/TezosBakingBad\n- Email: [email protected]\n\nAnd don\u0027t forget to star TzKT project [on GitHub](https://github.com/baking-bad/tzkt) ;)\n\n# Terms of Use\n\nTzKT API is free for everyone and for both commercial and non-commercial usage.\n\nIf your application or service uses the TzKT API in any forms: directly on frontend or indirectly on backend,\nyou must mention that fact on your website or application by placing the label\n**\u0022Powered by TzKT API\u0022** or **\u0022Built with TzKT API\u0022** with a direct link to [tzkt.io](https://tzkt.io).\n\n\n# Rate Limits\n\nThere will be no rate limits as long as our servers can handle the load without additional infrastructure costs.\nHowever, any apparent abuse will be prevented by setting targeted rate limits.\n\nCheck out [Tezos Explorer API Best Practices](https://baking-bad.org/blog/tag/TzKT/)\nand in particular [how to optimize requests count](https://baking-bad.org/blog/2020/07/29/tezos-explorer-api-tzkt-how-often-to-make-requests/).\n\n---\n",
"baseUrl": "https://staging.api.tzkt.io/",
"properties": [
{
"type": "X-openapi",
"url": "https://api.tzkt.io/v1/swagger.json"
}
],
"contact": [
{
"fn": "Baking Bad Team"
}
]
},
{
"name": "NextGen CarMap management API",
"description": "An api carmap",
"baseUrl": "https://carmap.next-gen.ro/swagger.json",
"properties": [
{
"type": "X-openapi",
"url": "https://carmap.next-gen.ro/swagger.json"
}
]
},
{
"name": "BitOasis Public API",
"description": "BitOasis Technologies is the Middle East \u0026 North Africa\u2019s (MENA) largest online digital currency platform. Established in 2015, BitOasis operates from the United Arab Emirates (UAE) and currently aims its services at retail clients from the Gulf Cooperation Council (GCC) region, with plans to expand to the rest of the MENA market in the future. The services currently offered by BitOasis are as follows:\n\n\u002B A Bitcoin (BTC) wallet with multi-signature technology for long term storage of Bitcoin (BTC).\n\n\u002B A platform for basic buying/selling of digital currencies (referred to as the \u201CBitOasis Core\u201D).\n\n\u002B A platform for trading in digital currencies (referred to as the \u201CBitOasis Pro\u201D).\n\u002B A platform that facilitates sending and receiving digital currencies.\n\n\u002B A platform that facilitates online and offline storage of clients\u2019 digital assets.\n\n\nThe only services available for the public API are:\n\n\u002B Trading in digital currencies (referred to as the \u201CBitOasis Pro\u201D).\n\n\u002B Sending and receiving digital currencies.\n\n\nAnd we are planning to provide a public API for the rest of the services in the near future.\n",
"baseUrl": "https://api.bitoasis.net/v1/",
"properties": [
{
"type": "X-openapi",
"url": "https://api.bitoasis.net/doc/swagger.json"
}
]
},
{
"name": "Ubiquity REST API",
"description": "Ubiquity provides a RESTful and uniform way to access blockchain resources,\nwith a rich and reusable model across multiple cryptocurrencies.\n\n[Documentation](https://app.blockdaemon.com/docs/ubiquity)\n\n### Protocols\n#### Mainnet\nThe following protocols are currently supported:\n* algorand\n* bitcoin\n* bitcoincash\n* dogecoin\n* ethereum\n* litecoin\n* near\n* oasis\n* polkadot\n* solana\n* stellar\n* tezos\n* xrp\n\n#### Testnet\n* bitcoin/testnet\n* bitcoincash/testnet\n* dogecoin/testnet\n* ethereum/goerli\n* litecoin/testnet\n\n#### Native\nUbiquity provides native access to all Blockchain nodes it supports.\n* bitcoin/(mainnet | testnet) - [RPC Documentation](https://developer.bitcoin.org/reference/rpc/)\n* ethereum/(mainnet | goerli) - [RPC Documentation](https://ethereum.org/en/developers/docs/apis/json-rpc/)\n* polkadot/mainnet - [Sidecar API Documentation](https://paritytech.github.io/substrate-api-sidecar/dist/)\n* polkadot/mainnet/http-rpc - [Polkadot RPC Documentation](https://polkadot.js.org/docs/substrate/rpc/)\n* algorand/mainnet - [Algod API Documentation](https://developer.algorand.org/docs/reference/rest-apis/algod/)\n* stellar/mainnet - [Stellar Horizon API Documentation](https://developers.stellar.org/api)\n* dogecoin/(mainnet | testnet) - [Dogecoin API Documentaion](https://developer.bitcoin.org/reference/rpc/)\n* oasis/mainnet - [Oasis Rosetta Gateway Documentation](https://www.rosetta-api.org/docs/api_identifiers.html#network-identifier)\n* near/mainnet - [NEAR RPC Documentation](https://docs.near.org/docs/api/rpc)\n* litecoin/mainnet - [Litecoin RPC Documentation](https://litecoin.info/index.php/Litecoin_API)\n* bitcoincash/mainnet - [Bitcoin Cash RPC Documentation](https://docs.bitcoincashnode.org/doc/json-rpc/)\n* tezos/mainnet - [Tezos RPC Documentation](https://tezos.gitlab.io/developer/rpc.html)\n\n\nA full URL example: https://svc.blockdaemon.com/universal/v1/bitcoin/mainnet\n\n##### Pagination\nCertain resources contain a lot of data, more than what\u0027s practical\nto return for a single request.\nWith the help of pagination, the data is split across multiple responses.\nEach response returns a subset of the items requested, and a continuation token.\n\nTo get the next batch of items, copy the returned continuation token\nto the continuation query parameter and repeat the request with the new URL.\nIn case no continuation token is returned, there is no more data available.\n",
"baseUrl": "https://svc.blockdaemon.com/universal/%7Bversion%7D",
"properties": [
{
"type": "X-openapi",
"url": "https://ubiquity.docs.blockdaemon.com/openapi.json"
}
],
"contact": [
{
"fn": "Blockdaemon"
}
]
},
{
"name": "Unstoppable Partner API",
"description": "The Partner API requires you to be authorized to access them. To access the Partner API and integrate it into your application, check our [Set up Partner API Access](https://docs.unstoppabledomains.com/partner/) guide.",
"baseUrl": "https://unstoppabledomains.com/api/v2/resellers/%7BresellerId%7D",
"properties": [
{
"type": "X-openapi",
"url": "https://raw.githubusercontent.com/unstoppabledomains/website-api-docs-v2/master/openapi.yaml"
}
]
},
{
"name": "EKM Partner API",
"description": "Our new API allows partners to build significantly better integrations with the EKM platform.\r\n\r\nTo try out the below endpoints, or for full up to date representations of the request / response models, please see the [swagger page](https://api.ekm.net/swagger/index.html). (We display examples here, but the swagger page is guaranteed to show the complete model.)\r\n\r\nTo keep up to date with the latest updates, please see our [RSS feed](https://partners.ekm.net/ChangeLog/Feed) or the [partner dashboard](https://partners.ekm.net/).",
"baseUrl": "https://api.ekm.net/",
"properties": [
{
"type": "X-openapi",
"url": "https://api.ekm.net/swagger/v0/swagger.json"
}
],
"contact": [
{
"fn": "EKM"
}
]
},
{
"name": "Open Data Lab API - Netherlands Institute for Sound and Vision",
"description": "Get RDF for open datasets and for resources in the NISV catalogue.",
"baseUrl": "https://data.beeldengeluid.nl/swagger.json",
"properties": [
{
"type": "X-openapi",
"url": "https://data.beeldengeluid.nl/swagger.json"
}
]
},
{
"name": "\u81FA\u7063\u8B49\u5238\u4EA4\u6613\u6240 OpenAPI",
"description": "\u672C\u5E73\u81FA\u63D0\u4F9B\u81FA\u7063\u8B49\u5238\u4EA4\u6613\u6240\u670D\u52D9API\uFF0C\u6B61\u8FCE\u5404\u4F4D\u4ECB\u63A5\u4F7F\u7528\u3002\u003Cbr\u003E\u003Cbr\u003E[\u4F7F\u7528\u689D\u6B3E](https://www.twse.com.tw/zh/page/terms/use.html)",
"baseUrl": "https://openapi.twse.com.tw/v1",
"properties": [
{
"type": "X-openapi",
"url": "https://openapi.twse.com.tw/swagger.json"
}
]
}
]
}