Vitality GOES supports theming to give the web app a completely different look and feel. To set a theme globally, configure the siteTheme option in your config.ini to match the desired theme ID.
Your users can also select an available theme from the "Local Settings" screen in the Web App to customize it on their local device.
The following themes are included with Vitality GOES:
| Name | ID (Folder Name) | Description |
|---|---|---|
| Built-in | default/unset | The default theme for Vitality GOES if another valid theme is not selected |
| Dark Red | red | Red variant of the built-in theme |
| GOES Assistant | light | Light theme inspiried by Home Assistant |
| Purple | purple | My very supportive wife wanted to make her own theme and I said OK |
| RobCo Industries UOS | uos | Vitality GOES for RobCo's Unified Operating System (UOS). Pip-Boy not included. |
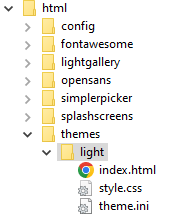
A theme is simply a folder containing theme.ini and one or more CSS stylesheets/associated resources. To install a theme, copy the theme folder into the /themes/ folder of your Vitality GOES installation. Afterwards, you can use its folder name in siteTheme of your config.ini file.
The theme will also be selectable in the "Local Settings" screen.
Making themes requires knowledge of CSS. To make a theme, follow the steps below. You can also copy an existing theme from this repository and modify it as necessary.
-
Create an empty folder in the
themesfolder of your Vitality GOES Installation. The name you give it will be used to select it with thesiteThemeoption. -
Create a blank file named
index.htmlin the theme folder for security purposes -
Create a file named
theme.iniin the theme folder. Configure the following options in it:name: Human-readable name of the theme as shown in the web interface. OptionalthemeColor: Background color used for the theme. Used by the web app's manifest for coloring the user's web browser. Optionalstylesheets[]: Array of CSS stylesheets to be loaded into the web app. Can be speficied multiple times. Specify either a path relative to the theme folder, or a full URL for an external stylesheet. At least one stylesheet is required
Finally, add custom styles into the stylesheet specified in theme.ini. Any styles specified will override those set in the built-in theme, making for a highly configurable user experience.


